Budget Friendly Control Panel - 2 PID, 2 Element

Homebrew Talk - Beer, Wine, Mead, & Cider Brewing Discussion Forum

Help Support Homebrew Talk - Beer, Wine, Mead, & Cider Brewing Discussion Forum:

This site may earn a commission from merchant affiliate links, including eBay, Amazon, and others.

emribecky

Well-Known Member
Joined
Apr 26, 2006
Messages
53
Reaction score
13
Location
Brewtown, WI
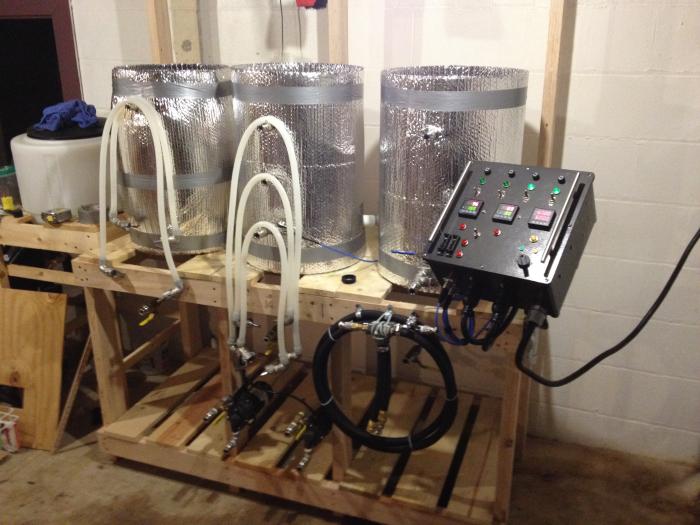
Just wanted to throw my build out there in case there is anyone who is wanting to go electric, but cant quite swing the cost.

My story begins with a very successful 2011 Fantasy Football Season, where I won about $750 total. Top on my list of things to blow hard earned money on was a new Brew Rig. Living in WI meant a top priority was being able to brew year round, and having an open area in the basement meant i was going Electric. Where does everyone go to check out Electric Brewing? Why, theelectricbrewery.com of course.

Kal has crafted a fantastic brew rig, let alone a fantastic site with great info. But the pricetag.... wow. Don't get me wrong, the rig is worth every penny and is built to the highest standards... but I just couldn't afford spending all of my cash on only half of a control panel.

So what's a guy to do? Beg, Borrow, and Steal. Not to mention a close analysis of what were the most important CTQs (Critical To Quality, for you non Six Sigma folks) and how could I make them all work for half the cost.

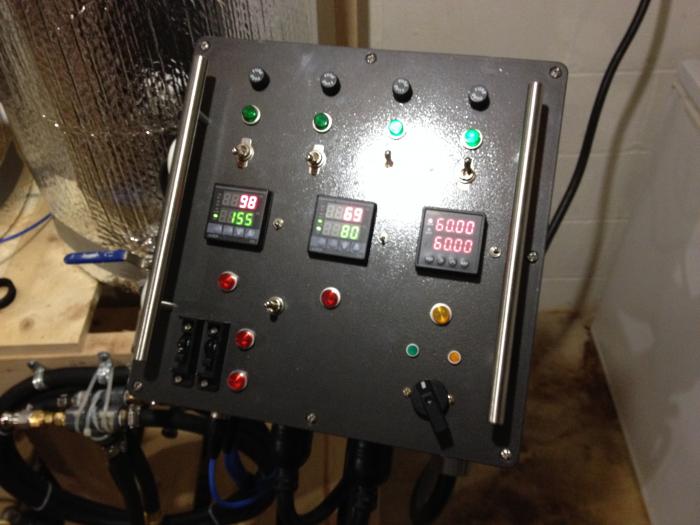
Below is what I came up with. 12x12x6 PVC Junction Box for the enclosure. Scrounged and re-purposed as many parts as possible, (understanding this isn't always possible for everyone, I still included their value as part of the overall cost). Only used 2 PIDs to cut costs. Used cheaper "Box Mount" receptacles instead of the fancier "Flange Mount". I designed every aspect of the build with cost as a major driver, (i.e. a $15 illuminated switch is cool, but a separate $2 pilot light and $4 switch will work fine), etc etc.

I have sourcing lists and links for those interested in the nitty gritty. Again, I am wholly impressed with what others have done, especially the genesis of all of these rigs, Kal's. I just couldn't afford the level of build that he was able to pull off.

More pics to come when the entire brewery is up and running.

2012-02-28 20.12.31.jpg

2012-03-03 11.25.50.jpg

2012-03-03 12.26.19.jpg

2012-03-04 20.31.04.jpg

2012-03-31 17.17.46.jpg
 
Very cool man! I've been wanting to go electric, but found myself in the same situation as yourself. Considering your winnings were $750, would that be the total build cost? I'm interested in parts lists and more pictures.
 
The control panel got up to about $650, which includes the assumed value of all parts I scrounged and re-purposed.

There are plenty of other expenses that are somewhat specific to an individuals setup. How many vessels you are looking to build, how many you already have, if you need an exhaust system, etc. The above number includes the Camco 5500W heating elements and lock nuts plus $10 or so for mounting. The rest of your own expenditures will again depend on what you want and what you already have. PM me your email and I'll send my sourcing sheet.
 
Nice work! Do you have a wiring diagram? Can you post a photo of the inside? I would like to see how you mounted your components. I am using the same box in my current rig. I am in the process of adding a second PID for my HLT, but it is really tight in there with three contactors.
 
Thanks!

No wiring diagrams, just kind-of eyeballed it and scribbled out a few of the sub-assemblies on paper and wired it up in stages. The closest I have is just a mock up of the control panel, as seen below. I'll see about taking pictures of the inside, don't have any handy right now. I just screwed everything through the walls of the enclosure, which isn't a problem on the back cause the standoffs molded into the enclosure give enough clearance. A dab of silicone while mounting the parts and it should be tight enough.

Sparky Panel.jpg
 
Excellent pictures and post!
What has been the biggest expense so far to get the total up to $650?
Thanks
 
The PIDs ($45 each) and the Temperature Probes ($35 each) were easily the big ticket items. The rest is just a bunch of small parts. Mouser.com is the best for researching whats out there for electrical components, and they have great prices. SSRs were $11 (amazon for those actually), Relays $8, Indicator Lamps were $2, Switches $5, etc etc. The 10/3 SJOW cable isn't cheap... $2 a foot or so...
 
It's a dark gray rustoleum hammered finish, but specifically for plastic. Didnt even prime, and it adhered great. Very durable.
 
I have been drooling over kal's system for awhile now, but don't have anywhere near the funds yet. Very interested in this build. Particularly I am interested in the brewing vessels. Building just the hlt in kal's system is almost up to the $750 you started with. Curious to see your innovations here.

Micah
 
For fear that people think that I have not read Kal's write-up, and also to add a little extra weight to my own panel, I was wondering where you found the drawer handles. I live in your neck of the woods, but have not seen them available at any local hardware stores (not in that length). Were they an internet find? Thanks

542032_289230761146489_109802049089362_621636_1135422017_n.jpg
 
Very nice. I have greater ambitions for my eHERMS brewery, but it's going to take me a fairly long time to afford it all. So I'd like to at least make a basic (inexpensive) control panel so that I can actually keep brewing in the meantime! Then, when I have the cash to go totally automated, I can either salvage a bunch of the parts or just sell it to another brewer looking for a cheap panel.
 
I like your setup, looks great! Mine is not nearly as pretty, but darn cheap, 1 PID and 1 30 amp plug, then I plug in whichever kettle I need to heat at the time.
 
Not to hijack this thread, but we are forming a group to discuss the different PID's, PIC's and components to build simple, intermediate and advanced dontrol boards and integrated systems. We are a tiny group now but looking for tinkerers who would like to build or help others to do the same. Sorry for the "jack. Back on topic now.
Wheelchair Bob

Where's the group?
 
I like your setup, looks great! Mine is not nearly as pretty, but darn cheap, 1 PID and 1 30 amp plug, then I plug in whichever kettle I need to heat at the time.

I am looking to do something just like this to get started. Do you have any posts with pics and details.

Thanks
 
First off, I love the setup.

Maybe a dumb question, what are the aux switches for (actually, what are all of the top 4 for?)? That baby looks amazing and I am going to start my electric build soon and it will be eerily similar to this. Thanks for more inspiration!
 
Also a question. Do I need to have an SSR for each element if I have a switch that picks which element is heating? As mentioned above my current setup is one SSR, but I am thinking about building something a bit more like what is posted above (simply because I have extra kettles and parts I'd like to put into a system to sell)
 
When I was designing my system, I opted for a discrete PID, SSR, Probe, and Element for each heated vessel for
1) simplicity
2) ruggedness (Three Way Switches that allow the "sharing" of components will likely be the #1 point of failure) and
3) Expandability (I can upgrade the feeder circuit and move up to 50A (both elements firing at once) for back to back brewing in the future if I desire.

Is it ideal? I dunno. It's how I wanted to roll with this build, "Cheap but Correct". The extra SSR was $10, and a 240V 30A DPDT was around $20 if I remember correctly...

The top row of switches are all on the same 120V Buss. The switch all the way to the right energizes the buss, which are the other 120V switches (AUX1, AUX2, and Control). AUX1 and AUX2 are 120V outlets on the left side of the control panel for anything, Pumps, Ventilation, Stirrer, etc. "Control" is the power circuit for the PIDs and the Timer. Why a master Buss Switch? Cause four switches looked better than three on the top of the panel :D Purely cosmetic!
 
Not a whole lot of progress on the actual build. I've been Silver Soldering fittings into my keggles and ordering all of the plumbing parts... But the next couple of weekends should help to get things moving...
 
I like the idea of a PID/SSR/probe for each pot, and I think I would do that if i had the money. Do you use the DPDT switch to make sure you can only have one of those sets on at a time for now?

Also, good source for a project(Junction) box like yours? My current one is in an old ammo can :)
 
I use a single pid and ssr wired up to a single 220 outlet, then I just plug in whatever pot I want to heat at the time. Little more work but cheaper than buying another outlet and a heavy duty switch!
 
No heavy duty switch... the cheapest I could find was about $30 and I figured switching that much juice would burn out the switch pretty quickly so I would be replacing that part too often.
Instead I use a $3 10A dpdt (on-off-on) switch to activate two DP Mechanical Relays (Contactors) that both legs of each 220V runs through, one at a time. Yes it requires two relays after the switch, opposed to one relay before the switch, but relays are built for switching on +23A repeatedly so they shouldnt need to be replaced anytime soon.

That project box is a $35 12x12x6" PVC Junction Box available at your local hardware depot. Super easy to machine and takes rustoleum paint very well. Also, if you screw up badly or decide to change/improve your layout, it's a cheap replacement. They are also pretty strong. I had a relay blow up on me (i mis-sourced the first set of relays, 12V != 120V) and the box, though well sealed, held together just fine.
 
ON and STBY lights were scavanged from a Rack Mount UPS I scored from work. They are 110V and required about a 1/4" Mounting hole. Unfortunately I wasn't able to find them on Mouser. (was looking for future replacement parts) But there are a ton of small 110V LED lights on Mouser.
 
Just thought I would mention that I am using a 30A water heater switch from HD for my HLT. Looks like a wall switch, am using it to manually heat my HLT 4500 element.

Ed
 
Nice job!

If I can offer a suggestion: Throw some panel tags on the control panel so that everyone else can see what those pretty lights and switches are for. They're pretty cheap in the grand scheme of things and will also make the panel safer to use even for yourself. Most of us don't brew every day and it's easy to forget sometimes which switch is for what. You can also use a label maker if you have one available for even less expensive tags (but I find they tend to peel after years of use).

Good luck with the brews!

Kal
 
Yeah, tags are definitely on the to-do list... thanks for the props and for a lot of inspiration!
 
Looks good. I like the mount from a digital sat system.

Close!! It's actually a mounting kit for a Cisco Aironet Wireless Access Point. I'm a computer engineer, so I get some awesome leftovers when building development Datacenters and such!
 
Nice job. Are you using cast iron pipe to bottom drain your keggles?
 
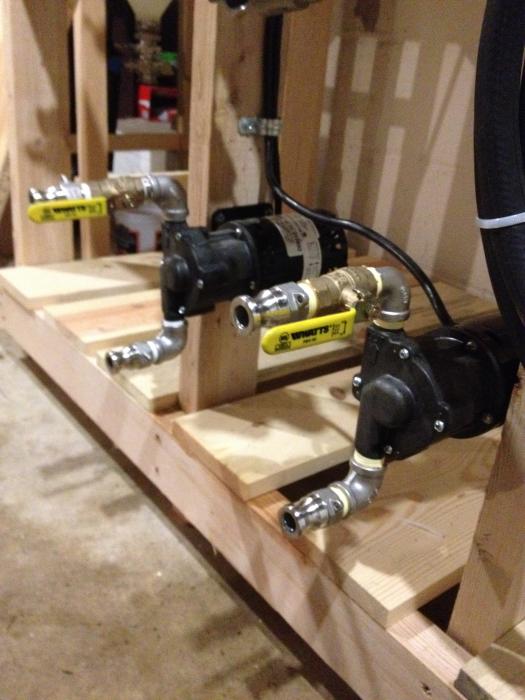
It doesnt look like it, but that is 1/2" 316 SS pipe on the bottom drains. I think the were 6" drop, Elbow, then 8" run before the ball valves.
 
Back
Top