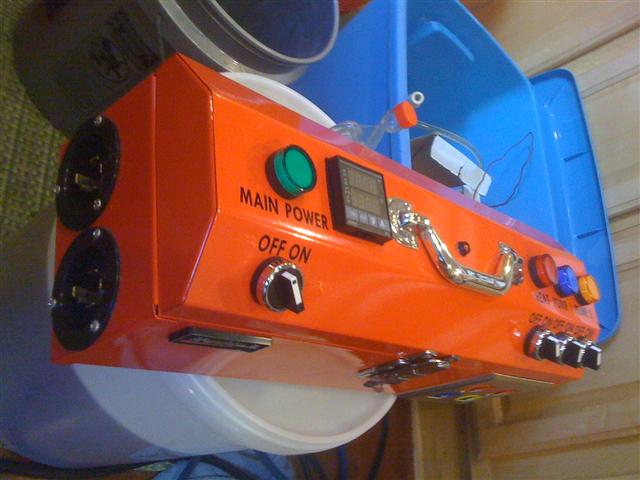
My E-Kettle and Toolbox Control Panel

Homebrew Talk - Beer, Wine, Mead, & Cider Brewing Discussion Forum

Help Support Homebrew Talk - Beer, Wine, Mead, & Cider Brewing Discussion Forum:

This site may earn a commission from merchant affiliate links, including eBay, Amazon, and others.

dflipse

Active Member
Joined
Jun 30, 2009
Messages
42
Reaction score
1
Location
Pittsburgh
I can't thank many of the other members here enough for their informative posts, creative ideas, and careful documentation of their electric brewing projects. I've recently completed a 3000W e-kettle and toolbox control panel with portability in mind. That goal led to me using two 1500W elements, and feeding the whole thing with two separate household circuits. I don't think I've broken any real ground here, but if anyone has questions of any kind, I'd be happy to answer them.

Kal, especially, will see that many of the best elements of my project were stolen directly from him. When it came time to choose lights and switches, I had some others picked out, but I felt like I owed him the honor of copying "the look."

Apologies in advance for the iPhone pics. Didn't have the digital camera handy when I thought of taking the pictures.
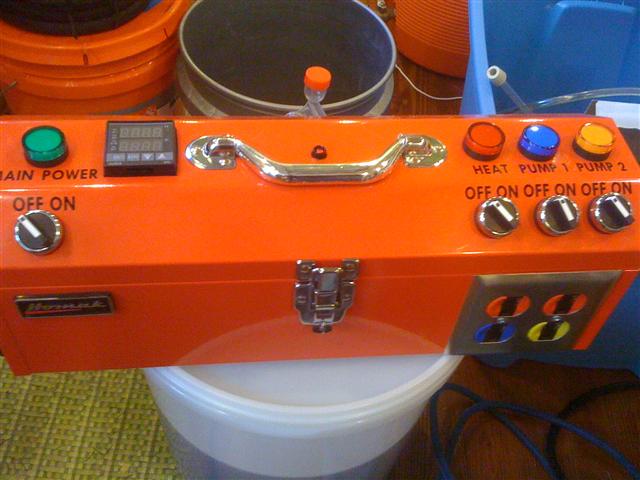
IMG_0638%20(Small).JPG

Toolbox control panel.

IMG_0639%20%28Small%29.JPG

Power in side. Used those way oversized plugs, with recessed male locking outlets both due to availability and because they look kinda badass.
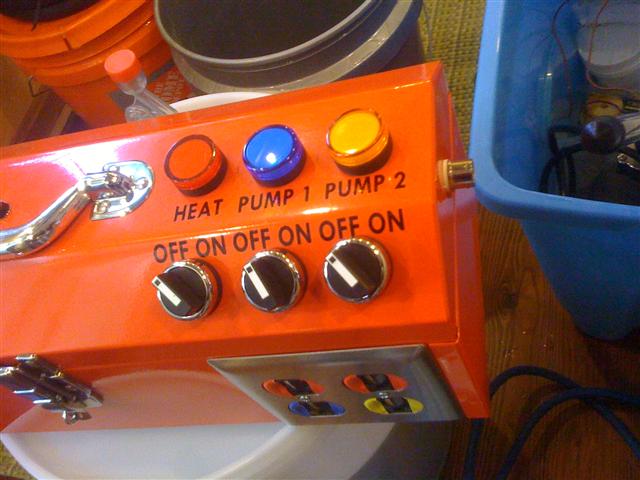
IMG_0640%20%28Small%29.JPG

Power out side. The switches do line up, normally. I think I'd just been showing my brewing partner how they install, and I'd loosened that middle one. The outlets are color-coded with electrical tape, which felt like a temporary solution but now I kind of like.
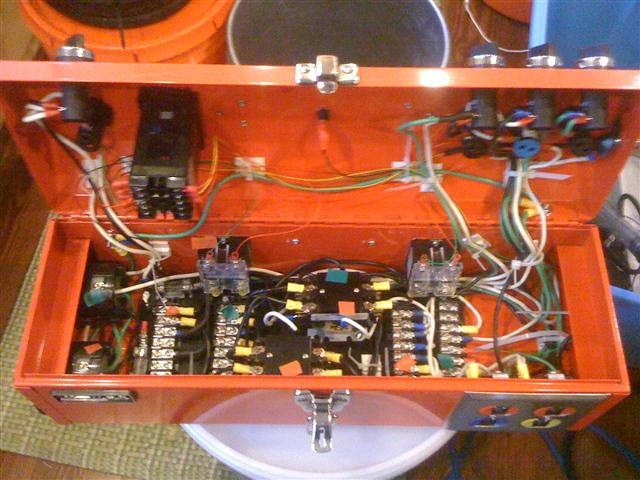
IMG_0641%20%28Small%29.JPG

The guts. You can see little orange and green tags of electrical tape. Those were to help me keep the A and B circuits straight and separate as I wired the thing up.

Power comes in on the left, goes through one of the relays (controlled by the Main Power switch) in the middle, to the Hot bars on the left, then to the various bits. The second relay is controlled by the Heat switch, and allows power to the red outlets. Solid state relays are also in play, mounted on the back panel, and controlled by the PID.

The blue and yellow outlets are simply controlled through the corresponding switches. On the right, there is a Neutral bar for each circuit.

It's not the neatest wiring in the world, but it's good enough for government work. I also recognize that it's not as idiot proof as some of the best designs here, but I've been very pleased with the functionality and ease of use up to this point.

There is of course Ground Fault protection available. If not wherever I plug it in, I've got the portable (GFCI adapters.
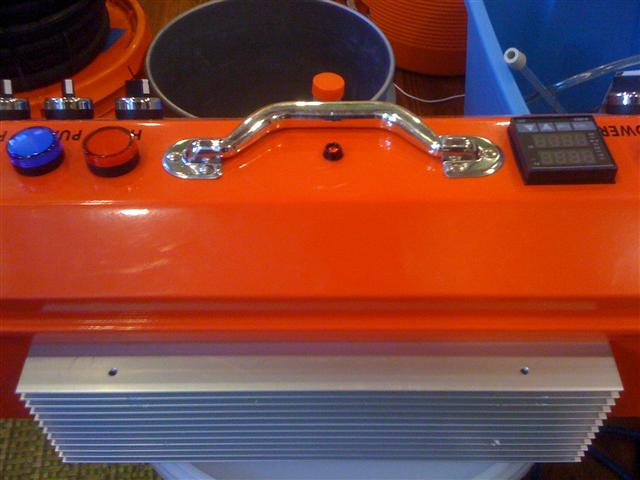
IMG_0642%20(Small).JPG

Oversized heat sink. Again, a combination of aesthetics and what was available to me.
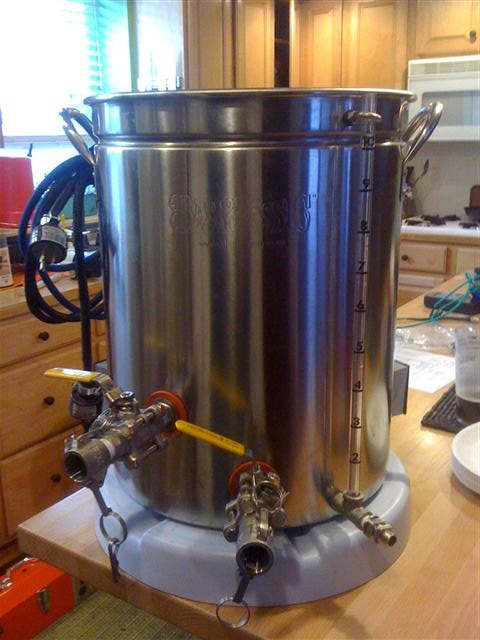
IMG_0645%20(Small).JPG

The kettle itself. A whole other project. Used the Bayou Classic 44qt from Amazon, and couldn't be happier with that choice, except that the fairly small diameter made getting good seals with the weldless fittings somewhat tedious. We're completely drip-free now through several brews, knock on wood. That's a Bobby M sight tee, Auber RTD, most other bits from Bargain Fittings.
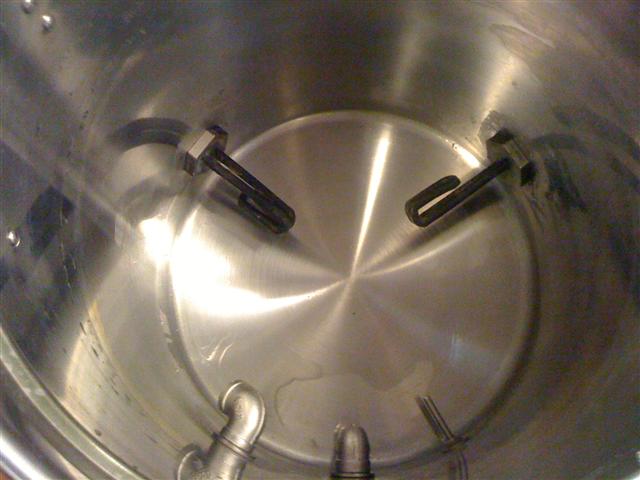
IMG_0647%20%28Small%29.JPG

Post-cleanup. I just used a street elbow for my pickup tube and have been very happy with that. The return port is just a plain elbow. Those are two 1500W ELD elements from Plumbing Supply.
 
Last edited by a moderator:
Looks great! I'm working on something very similar. How do you cool?

Also, why did you choose to put the return/whirlpool port so low? Not criticizing - it all looks fantastic! - just wondering.
 
Great design.

I'm looking at doing basically the same thing in the future and I was wondering if you had the wiring diagram available, if you could post it?
 
Looks great! I'm working on something very similar. How do you cool?

Also, why did you choose to put the return/whirlpool port so low? Not criticizing - it all looks fantastic! - just wondering.

We cool with a Bobby M Counterflow Chiller. Several configurations are currently possible with our current setup, but I essentially built this to make a Countertop Brutus capable of full five gallon batches. Post-boil, we can recirc with the CFC if needed to get down to our temps, as well as optionally using the fountain pump to chill with ice water.

No particular logic for the return port placement. Wanted it above the drain (which I'd like to be 1/4" or so lower) but definitely below the level of the liquid.

The only wiring diagrams I had were scrawled on scraps of paper. The two parallel circuits did take some thinking to make sure I got it right the first time. I may be able to come up with something legible in a little while.
 
Very, very nice! I'm doing one that's very similar....in fact, my hands are all cut up from doing the wiring in the box! Boerderij Kabouter, Kal, and Gabrew (who simplified things) have heavily influenced my control box.

I really dig that color choice, as well as the color coded receptacles. Looking back, I wish I used the real estate on the lid...it makes wiring way easier....but I was adamant about having nothing on top so I could stack things on the box.

Congrats, that thing is beautiful! :mug:
 
I have to admit I love the toolbox control panels. Now you really have me debating on a NEMA watertight enclsoure or a more portable toolbox. Habor Freight has a "stainless" box for under $20. Haven't seen it in person to confrim it's actually stainless.
 
Homak makes some decent stuff. I got a Kobalt toolbox at Lowe's. Just remember to go as big as possible....it fills up quick!
 
VERY nice. Few questions..

1. Why ELD elements? Advantage over LD or HD? At only 1500 watt each scorching can't be an issue right?

2. Where did you get the lights and toggle switches?

3. What did you label with?

I am planning a 2 1500w heatstick build with a toolbox control, but much much simpler. Will move the heatsticks from HLT to Kettle.

I plan on having 2 gfci outlets, 2 on/off switches and 2 indicator lights. No temp control as I will just use the kettle thermometers to tell me when to flick switches on and off. I do not mind watching my temps.

Mainly this is because I barely know enough to play with 110 =)

If you are interested in a little side cash, I'd love someone to help diagram a simple layout for this. I could sketch up my ideas..

Again, great build!
 
Got any more pics/details of your element mounting and connections outside the kettle. I'm adding the same and I'm wondering how you mounted it all. What are the big nuts you used? Can you just add a nut and grommet to seal. inside?
Looks great! Nice job.
 
Thanks for all the nice comments.

VERY nice. Few questions..

1. Why ELD elements? Advantage over LD or HD? At only 1500 watt each scorching can't be an issue right?

2. Where did you get the lights and toggle switches?

3. What did you label with?

I am planning a 2 1500w heatstick build with a toolbox control, but much much simpler. Will move the heatsticks from HLT to Kettle.

I plan on having 2 gfci outlets, 2 on/off switches and 2 indicator lights. No temp control as I will just use the kettle thermometers to tell me when to flick switches on and off. I do not mind watching my temps.

Mainly this is because I barely know enough to play with 110 =)

If you are interested in a little side cash, I'd love someone to help diagram a simple layout for this. I could sketch up my ideas..

Again, great build!

1. I had no particular desire to find an ELD element versus LD, HD, etc. What I did like was the Incoly material, which is supposedly somewhat resistant to dry firing and won't rust. Just a few batches in, but works well so far.

2. Like on so many things, I followed The Electric Brewery when it came to the lights and switches. They came from eBay, specifically the seller electrical_parts.

3. The labels are also from Bobby M. He doesn't appear to be currently selling them.

As far as a wiring diagram, you don't need much. Wire the plug to the switch, then the element and light in parallel, then the neutral from both back to the plug. Ground items as appropriate.

I like the idea of making two nice heatsicks and moving them as needed. Will really give you a lot of flexibility and eliminate any issues with punching holes in kettles, sealing them up, etc.

Got any more pics/details of your element mounting and connections outside the kettle. I'm adding the same and I'm wondering how you mounted it all. What are the big nuts you used? Can you just add a nut and grommet to seal. inside?
Looks great! Nice job.

There are lots of ways to get this done. Again, I copied the technique from The Electric Brewery's Heating Elements page. I picked up the Stainless locknut and o-ring from Bargain Fittings, and added the appropriately sized washer from the local hardware store. I did change it up by using single gang boxes, which was tight but workable.

The relatively small diameter of the kettle made it tough to get a good seal. The threads on the element are relatively short, and it's tough to get the locknut threaded. I tried it a few times, added the silicone sealant, and it's been water-tight.
 
Thanks for all the nice comments.


1. I had no particular desire to find an ELD element versus LD, HD, etc. What I did like was the Incoly material, which is supposedly somewhat resistant to dry firing and won't rust. Just a few batches in, but works well so far.

2. Like on so many things, I followed The Electric Brewery when it came to the lights and switches. They came from eBay, specifically the seller electrical_parts.

3. The labels are also from Bobby M. He doesn't appear to be currently selling them.

As far as a wiring diagram, you don't need much. Wire the plug to the switch, then the element and light in parallel, then the neutral from both back to the plug. Ground items as appropriate.

I like the idea of making two nice heatsicks and moving them as needed. Will really give you a lot of flexibility and eliminate any issues with punching holes in kettles, sealing them up, etc.

1. Material, that sounds like a good enough reason to me.

2. I love his site, read through most of it, but only browsed the control panel because I thought it was so far beyond what I had planned. Will re-read.

3. Thanks, I'll watch Bobby's site. I just got a Sightglass and some ball valves from him Friday, AWESOME stuff.

I was thinking having the heatsticks would be the most flexible solution for me. Can travel with them, can use them in the house even to help the lady get her pasta water up to boil, etc. I'm also trying to keep my gear easy to clean as that part isn't too fun.

Appreciate the info on wiring, that does make it sound much easier.
Best of luck on your controlled brews =)
 
I really like the colors and look of your tool box. Nice work! I know functionally it's sweet, but as is nearly important for taking pride in DIY, it's aesthetically awesome too. Kudos.
 
Can I ask what you used a backplate, in order to mount your component to bottom of the toolbox?
 
Can I ask what you used a backplate, in order to mount your component to bottom of the toolbox?

The toolbox came with a metal tray. It was the full length of the box, and sits on the "shelf" at either end, with sides and a handle. I cut it down to about half the length, cut the handle off, and cut the sides down to just about 1 cm. Angle grinders are fun.

So that left me a nice flat piece of metal, that when turned upside down, stood off the bottom enough to provide clearance for screws, bolts etc and let me do most of my wiring outside the box.
 
That's a great idea....I never even considered doing that. I just used a piece of scrap aluminum for mine; really anything will work, just make sure it clears the switches, receptacles, etc. because you WILL be taking it in/out to tweak things.
 
That's a great idea....I never even considered doing that. I just used a piece of scrap aluminum for mine; really anything will work, just make sure it clears the switches, receptacles, etc. because you WILL be taking it in/out to tweak things.

I wasn't smart enough to design it like that. The SSRs in the back prevent the plate from moving in and out.

It was a real hassle, especially when I put it all together and one of the mechanical relays didn't work. I'd tested one of them... I had to pull the SSRs, disconnect things, pull the whole backplate out. I found that the wire between the contact and the coil was broken. Was able to fix it with a drop of solder, then put the whole beast back together.
 
How much did it run in total? I want it.

Good question. My accounting is spotty because I made several purchases that were in part for this, and in part for other projects. Here's the major pieces-

$90 - Kettle - Amazon
$23 - Toolbox - Amazon
$50 - Auber PID -Auber
$40 - 4" RDT temp probe - Auber
$42 - Two 1500W elements - PlumbingSupply
$45 - Two SSRs and heat sink - eBay
$110 - Switches, indicators, recessed power outlets - eBay
$50 - Guess for the power cords
$120 - Large order from McMaster Carr, of which 80% was probably for this
$80 - Guess for various stainless fittings, mostly Bargain Fittings
$30 - Sight glass/tee - Brewhardware

Sorry my records aren't better. That doesn't include the pump, tubing, MLT and other major pieces that were carried over from earlier versions of the brewery.

Speaking of other versions, I'm already scheming to continue this basic setup (Countertop Brutus), but take the CFC out of it entirely and move to no-chill fermentation in Corny Kegs. Hopefully by the end of the summer.
 
Well, all the components...hey, look over there!

("No" is the answer to the question.)
I know its not UL listed
I know...I know...I'm being a buzzkill
It's just there's gonna be a group of ppl carrying around a whole lot of electricity like it was their lunch.
Just sayin...
 
Ah, yes, an absolutely fair point.

In brief, all components should be securely grounded and I never run this on circuits without GFCI protection. I also never move it around when hooked up to power.

This kind of thing should NOT be your first ever electronic project.

The Electric Brewery is absolutely mandatory reading for anyone considering building any kind of control panel and/or electric kettle.
 
First, the Harbor Freight one referenced earlier appears to have a plastic top with various structural ridges and grooves that would make it challenging for mounting controls. The entire box may be lined with plastic also.

I have been reading various control panel threads, and I posted this in Kal's. My apologies for the cross-post, but this probably belongs here anyway.

A metal tool box that looks pretty promising is the Homak 20" Flat Top. It's the same manufacturer as the hip-roofed one dflipse used, but it is a bit bigger and flat-topped.

I would lay out the controls something like this:

Control_Panel_20x8_5.jpg


This would be to support a single-vessel BIAB with recirculation, using one PID and one pump. L means light, S/L means illuminated switch, A means illuminated alarm buzzer, S means switch, and R is the reset button for the timer. Any words of wisdom, other than making sure that whatever I use for a back panel is removable post-installation, lol?

And finally, any ideas on the back plate for someone who does not own an angle grinder?
 
Last edited by a moderator:
Stop at Harbor Freight and pick up a $20.00 angle grinder with a coupon. :D

Probably a good idea. It will not be the first time I go for an inexpensive HF tool to support my brewing habit. BTW, I love how the user reviews average 4 of 5, with every 4 peple saying it's great and the 5th saying it died after 2 hours.
 
Probably a good idea. It will not be the first time I go for an inexpensive HF tool to support my brewing habit. BTW, I love how the user reviews average 4 of 5, with every 4 peple saying it's great and the 5th saying it died after 2 hours.

The good news is that you'll get this job done in way less than two hours.
 
I'm thinking that I may go with two of these plastic ones, one for the control panel and a second for the pump. I will want to see them in person first, though, to just make sure there is nothing funky to get in the way of the build.

Waterloo 22" Plastic Tool Box


It looks like they brand one as Westward for Grainger.

They come in a 22" and a 19 3/4" width. I suspect either would work, and I could probably stack the control panel box on top of the pump box.
 
Last edited by a moderator:
Back
Top