ebay aquarium temp controller build

Homebrew Talk - Beer, Wine, Mead, & Cider Brewing Discussion Forum

Help Support Homebrew Talk - Beer, Wine, Mead, & Cider Brewing Discussion Forum:

This site may earn a commission from merchant affiliate links, including eBay, Amazon, and others.
It just occurred to me that since my fridge has a defrost timer I could wire the heating circuit to one side of the controller and the cooling side to the other and just wire the internal fan to run 100% of the time. Heating might not work reliably without jumping out the defrost thermostat though...

Hmmm........
 
Wanting to do this build. Just want to make sure I order the right controller since most of the links are dead.

http://cgi.ebay.com/All-purpose-Tem...849?pt=LH_DefaultDomain_0&hash=item3363a7d649

Is this the correct unit? The dual stage to heat and cool?

It says it's 250vac. Is it safe to use in 110v?

If not, PLEASE post link to the appropriate controller. Thanks!

http://cgi.ebay.com/Mini-Temperature-Controller-Thermostat-Aquarium-120-C-/280607864035?pt=LH_DefaultDomain_0&hash=item41558834e3
This is the one you want, I have purchased 3 from this seller.
 
Just bought one from the same guy and finished the build over the weekend, whole process went very smooth except I couldn't get the 8" project box from the Radio Shack stores I had to order it online which added to the cost...
 
I am using my temp controller in a 15cft chest freezer and as getto as it sounds, all I need to maintain the temperature is a $10 walmart hairdryer on the low setting. The freezer was holding 67 degrees in the garage which is around 40 degrees with no problems. Best part of it is that it has a built in GFCI on it.
 
Bought the Project box, outlet, wire's today! Just ordered the controller from Ebay. Hope it doesn't take FOREVER to get here. Probably will. =(
 
yeah mine arrived much quicker than I remember when I ordered direct from Hong Kong in the past.

-=Jason=-
 
Mine took forever to arrive, but I built my Keezer with this and mounted it on the front like you see with the more expensive controllers. I don't use the heat yet but it made sense to get it just in case I end up needing it.
 
I wrote mixtea via ebay before I ended up ordering from quality_link2000. I asked if they had any in 110v, this is how they replied,
"We only have 220V in stock. 110V much order .
Best regards.
Bicky"

Not quite sure how to take that, so I just went with the other seller who ships 110v unit to US.

I'm thinking about mounting magnets on the back of the box, so I cant just slap it on the side of my fridge. Anybody done this?
 
i added a note to seller that I needed 110 when I paid for it, but I doubt they saw that. Only 22.99, I have wasted more on stupid purchases.
 
i added a note to seller that I needed 110 when I paid for it, but I doubt they saw that. Only 22.99, I have wasted more on stupid purchases.

Well, not all is lost. Only the control side (display) runs on 220V. The relays are just switches. You can still use it but DO NOT follow any of the wiring diagrams posted here.
 
I wrote mixtea via ebay before I ended up ordering from quality_link2000. I asked if they had any in 110v, this is how they replied,
"We only have 220V in stock. 110V much order .
Best regards.
Bicky"

Not quite sure how to take that, so I just went with the other seller who ships 110v unit to US.

I'm thinking about mounting magnets on the back of the box, so I cant just slap it on the side of my fridge. Anybody done this?

I got the same message from Bicky. Infact, I contacts 2 or 3 of the sellers and they all only had the 110v. Ended up going with this guy (http://cgi.ebay.com/Mini-Digital-Te...461?pt=LH_DefaultDomain_0&hash=item3f02ce0f7d), as he had the 110v. Looking forward to another brewery project!
 
Well, not all is lost. Only the control side (display) runs on 220V. The relays are just switches. You can still use it but DO NOT follow any of the wiring diagrams posted here.

I don't follow what you are suggesting for him to do with his 220V controller.
 
But is it worth it to run a 220 circuit for a $20 controller? I rather just order a new one. What if I tried it with 110? will it just not work?

Update: Got a note from the seller, he has not shipped yet! He said he is getting 110 in two weeks and will send one once he gets them.

HBT just saved for 23.99. I did not even think to look at the volts until I read this thread again.

Thanks for all the responses.
 
…
I’m thinking about mounting magnets on the back of the box, so I cant just slap it on the side of my fridge. Anybody done this?
Be careful of how close the magnets are to any electronic chips. You could ruin the controller. You might consider using Velcro instead.
 
I've seen where people are talking about mounting to their keezers and fridges. Is the humid environment of a refrigerator going to damage the electronics of the controller? Could some of you post pics of how you mounted your units? Thanks
 
I mounted a Love controller in my upright freezer, been about 6 months, no issue yet. I also wired up 3 oulets in there, one always on, one on with the heater, one on with the compressor. Think I want to add a forth one for a fan that attached to a relay so it is on with the heater or compressor.

P1030928_2.jpg

P1030929_2.jpg
 
I just read through the entire thread and I think I'm ready to pull the trigger on the controller. I've had a Wanted add in the classified section here for a couple weeks looking for a temp. controller with no bites. So, I guess it's time to build one. :)

With all the dead links and some confusion on which controller is correct can someone confirm that this is the one that I need?

http://cgi.ebay.com/Mini-Digital-Temperature-Controller-Thermostat-50-99-C-/270677673019?pt=LH_DefaultDomain_0&hash=item3f05a5843b

Thanks!
 
When you get it, think you could type up a quick instruction on how to change the set points or something? I seem to have lost my instruction booklet :)
 
I think I have a defective unit mine is only a single stage meaning i can either have it heat, or cool but can't have a heat source and cooling source wired up at once.


from the directions if I understand it correctly when in settings menu "CA= temperature" well my Ca only goes from -7 to 7 what kind of crap is that?

I am going to be using this unit for my keezer so I need the cooling part to function and right now its now.

its to bad we don't have a clear set of instruction for an american to use in this thread some where.

-=jason=-

Are you sure that you are not changing the sensor calibration offset?
 
Which one did you buy?

looked like the one in the OP, but it will only control one thing, either cooling or heating.


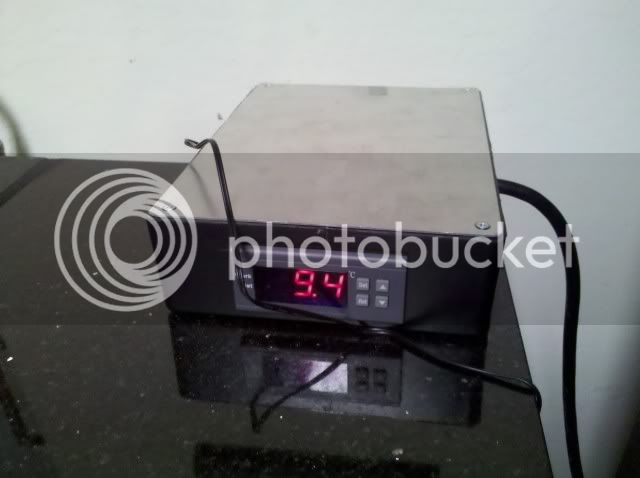
I think I got screwed on this unit to be honest.

I shall type out the instructions in case anyone has any ideas.

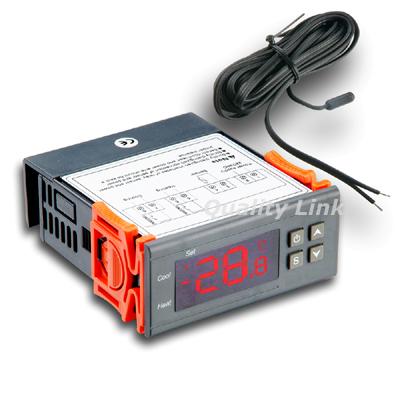
From my instructions these do the following

HC = heating / cooling I select either "H" or "C" factory setting is C
D= Hysteresis set / 1~15 factory setting is 5
LS = Lowest setting / -50~110 factory setting is -50
HS = highest setting / -50~110 factory setting is 110
CA= adjust the temperature / -5 ~+5 factory setting is 0
PT= Delay time / 0~10 factory setting is 1 minutes

Function:
Press RST key to open the thermostat, running status, press the button for 3 seconds, turn off the thermostat
* cooling, heating function

Cooling Mode: When the measured temperature is higher than or equal to the value set+ hysteresis value, then the relay will start the output; when measuring the temperature below the set value, the relay does not open and close the output.

Heating Mode: When the measured temperature is higher than or equal to the set value, the relay off, turn off the output; when measured temperature below the set value - hysteresis, the relay starts output

Setting an Example: If set to heating mode, set the temperature to 25 degrees, hysteresis is set to 5, then when measured temperature is higher than or equal 25 degrees off the relay, closing the output. When the temperature is below 20 degrees relay will be turned on, start output.

Setting an Example: If set to cooling mode, set the temperature to 25 degrees, hysteresis is set to 5, then when measuring the temperature below 25 degrees off the relay, closing the output. When the temperature is higher than or equal to 30 degrees the relay will be connected , start output.

*Cooling, heating mode:
Press "SET" button and hold more then 3 seconds, display the menu.
screen appears "HC" code,
press the "SET" button and press the "^" or "v" button to adjust, C said cooling mode; H said heating mode.

*Hysteresis Function:
Hysteresis is setting limited to the between the start and stop maximum intervals, start and stop thermostat for the minimum interval between 1 °C, the maximum is 15 °C.

*Hysteresis settings:
Press "SET" button and hold more than 3 seconds, press the "^" or "v" button transferred to the screen appears "D",
press "SET" key to display the hysteresis set value,
press "^" or "v" to adjust parameters.

*temperature correction:
When measuring the temperature and the standard deviation of temperature, the temperature correction function can be used to make measurements to the thermostat temperature is consistent with the standard value, the corrected temperature = temperature before correction and the correction value (correction value can be positive, negative , and 0)

*temperature correction settings:
press "SET" button and hold more than 3 seconds, press "^" or "v" key to adjust to the screen "CA" Code,
press the "SET" key to display the temperature correction settings
press "^" or "v" key to adjust parameters

For Example: When we detect the temperature of 25 degrees, CA is set to 0 the display 25 degrees, CA is set to 1, the Display 26 degrees, CA is set to 1, the display 24 degrees.
This feature is generally used for measurement of body touch probe can not be directly used. such as the probe in a cup outside, but to measure the temperature of a glass of water, because heat loss of the cup parameters we need to adjust the CA so that shows the temperature of temperature of matter sorted out the same cup.

*delay protection function:
in the cooling mode, the first power, when the measured value is higher than the Set value + hysteresis value , the machine will not stat immediately Cooling. Set the delay time required to run the machine to start cooling: adjacent twice cooling start interval is greater than delay time, Machines need to run the remaining delay time to start cooling. Delay time from the moment of downtime starts. Heating mode as the delay with cooling mode. From the moment they start to stop the operation of the remaining time. Heating mode as the delay with the cooling mode.
NOTE: it is recommended to use the equipment only with the compressor delay start function do not delay start function Please set the parameters to 0.

*Delay protection settings:
Press the "SET" button and hole more than 3 seconds.
Press the "^" or "v" button to transferred to the screen appears "PT"code
press the "SET" key to display time and delay setting value
press the "^" or "v" key to adjust the parameters

*upper and lower functions:
HS and LS set limits to control the temperature range
for example: HS is set to +15and ls is set to -10
Temperature control can only be adjusted between -10 and +15
when the control temperature to -10 when press "v" the display will remain at -10 and not down: when the control temperature set to +15

*upper and lower functions:
HS and LS set limits to control the temperature range
for example: HS is set to +15and ls is set to -10
Temperature control can only be adjusted between -10 and +15
when the control temperature to -10 when press "v" the display will remain at -10 and not down: when the control temperature set to +15 press "^" button, the display will remain as the +15 will not rise.
if the set point to outside this range, you must change the HS and LS values

*upper and lower limit settings:
Press the "SET" button and hold more than 3 seconds
press the "^" or "v" button transferred to the screen appears "HS or "LS"code
press the "SET" button to display the upper or lower limit, and the the "^" or "v" key to adjust the parameters.
HS representative ceiling. LS behalf of lower limit

for example: the upper and lower limits are used to limit the range of temperature control can be set, such as: LS was 10, HS 20 then press the set button adjust temperature control on what can only be varied between 10 and 20.


-=Jason=-
 
I have this controller:

325922166_o.jpg


Here is how mine works

I press and hold the "S" button for 3 seconds and the indicator changes to F1, release the "S" and use the arrow keys to toggle through F1, F2, F3 and F4

F1 = Temperature set value in Celsius

F2 = Difference set value (this is the amount the temp needs to change before the unit activates the heating/cooling circuit)

F3 = Compressor Delay Time (I set mine to 10 minutes)

F4 = Temperature calibration value (I left this at zero)

once you get to the F value you need to change, press and hold the "S" button while simultaneously hitting the up and down arrows, when you get the value you want, release the "S" button. You can then hit the up and down arrows to select another F value and adjust the same way. When everything is the way you want it, press the power button (the one directly above the "S") to save the settings
 
I think I have a defective unit mine is only a single stage meaning i can either have it heat, or cool but can't have a heat source and cooling source wired up at once.


from the directions if I understand it correctly when in settings menu "CA= temperature" well my Ca only goes from -7 to 7 what kind of crap is that?

I am going to be using this unit for my keezer so I need the cooling part to function and right now its now.

its to bad we don't have a clear set of instruction for an american to use in this thread some where.

-=jason=-

CA looks like temperature correction, just leave that at zero
 
holy crap yeah so I was making things way more complicated then they needed to be.

I set my CA back to 0

from the main menu where it shows the actually temperature I pressed "SET" the the up and down arrows and guess what it worked like it should, in the Cool setting I set it to 10 then grabbed the probe and when it got warmer than 10 it kicked on my shop light I had plugged in.

IMG_20110105_193706.jpg


-=Jason=-
 
Back
Top