E-BIAB - Background Research

Homebrew Talk - Beer, Wine, Mead, & Cider Brewing Discussion Forum

Help Support Homebrew Talk - Beer, Wine, Mead, & Cider Brewing Discussion Forum:

This site may earn a commission from merchant affiliate links, including eBay, Amazon, and others.

sicklesr

Well-Known Member
Joined
Oct 16, 2012
Messages
138
Reaction score
3
Location
Albany
Hey all, Long time lurker, new member here!

I've used this site since I started brewing for recipes, and now it's time I got involved.

At first glance, I thought this would be a simple plug-n-play system. Boy was I wrong!

I'm going to be building a basic 1 kettle (80q aluminum) e-BIAB system using an existing 220v 30A dryer outlet. I've attached a very basic representation of the system. I'll use a PID to monitor mash temps, and a march pump for recirculation and counterflow chilling.

Please take a look and make any suggestions! I don't want the full automation, but I can't seem to find any way around the PID either. I'll need advice on what PID to use, and what thermoprobe works with it.

I'll be checking back on this all the time, so please leave any questions or comments. I'll need a wiring diagram in the future, but please don't make anything for me as of now. I want to make sure this is the right setup before any of you go out of your way for me *cough* PJ *cough*. :cross:

You guys have done awesome work, and I'm really looking forward to this build.


Thanks in advance, and happy brewing!

`Sickles
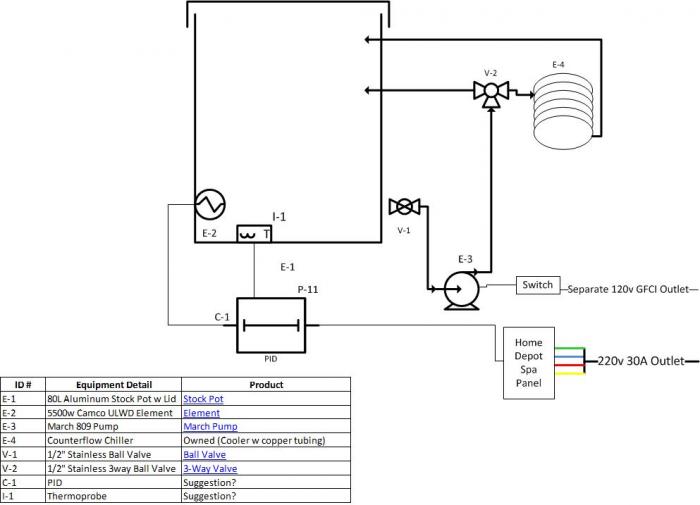
E-BIAB_10.16.2012.jpg
 
I strongly recommend that you choose the Auber Instruments PID SYL-2352 along with their RTD Sensor with Weldless Fitting & Deluxe Cable option.

There are a lot of other products that you can get from them that will make your life a lot easier in your planning and your build.
Project box, SSR, SSR heat sink, switches, contactors and lots more.

You got me for the diagram. I just need your plan.

By the way... Welcome Aboard. I sincerely hope that you enjoy participating here.

P-J
 
Fantastic. I'll add those to my project product list.

One quick question. I would be safe if I replaced the current breaker with a identically rated GFCI breaker, right? Assuming it is .5ms response time....

I just want to know in case I find one that would fit my panel. Me thinks it would be easier than installing the spabox.

Short answer - yes.

Just keep in mind that you don't want to have a very long walk somewhere to reset it. Reason? You would really hesitate tripping it when things "seem" to be going wrong. If it is close - no problem...

P-J
 
PJ-
Thanks for the reasoning.
I have a 4 pronged dryer outlet. Could I just get another 4 pronged male cord, and run that directly into the spa box? My goal is to be able to flip the breaker, unplug the dryer, plug in the brewery, and reset the breaker.

Jeff-
Good insight. I like that design a lot! I'll modify my drawing to incorporate it. What diameter sight glass is normally used? I see that the probe has 1/2" NPT threading, so I'd have to go with a fitting like this, right?
 
What do you guys think of a bulkhead/valve like this one? Do you think something like this would work with a 4 gauge (~.2") aluminum pot?

Is it worth it to get a total unit like this, or buy each piece individually?
 
Last edited by a moderator:
Bargain fittings has some great inventory. The kits the sell are perfect for what I want to do.

If i was using these weldless bulkheads, what diameter hole would I need? I plan on getting a 4 gauge (~.2") Aluminum stock pot. Would I need a knockout punch, or since it is aluminum, could I drill it with a step bit, oil, and patience?

**Edited for my awesome spelling skillz**
 
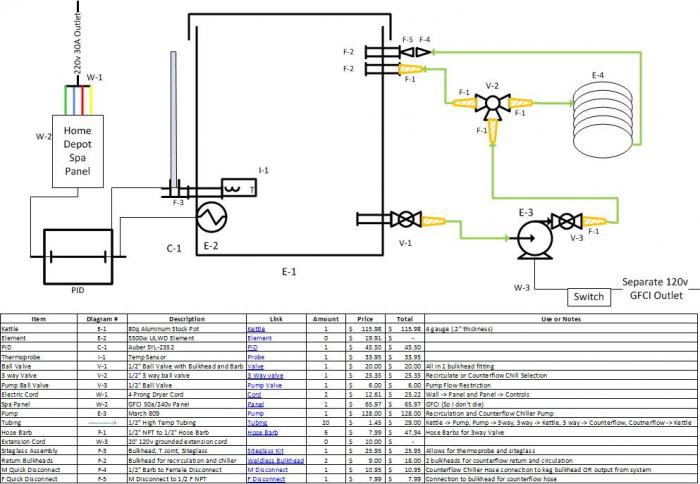
Here's an updated drawing, and an updated parts list.

PJ, what do you think about the setup? If it looks OK, I'd like a wiring drawing for the following two circuts.

  1. I will go from existing 240v/30a dryer plug, to the Spa Panel. Then from the Spa Panel through an "On/Off" switch, to the control box housing the PID. The PID will control a single element, with a thermoprobe.
  2. A pump will be powered from a 120v GFCI outlet on a seperate breaker. I would like an "On/Off" switch for the pump as well.

My day would look like this:
  1. Turn off Dryer Breaker
  2. Fill kettle from existing HW Outlet for Washer
  3. Unplug Dryer Cord, Plug in Spa Panel Cord
  4. Turn on Dryer Breaker
  5. Open Valve V-1 to gravity prime March 809 Pump
  6. Set 3-Way Valve V-2 for recirculation
  7. Turn on Pump Switch for recirculation start
  8. Set PID at strike temprature
  9. Once strike temp is reached, dough in
  10. Hold at mash temp for recipe timeline
  11. Hoist grain, and drain grain bag
  12. Set PID for Boil
  13. Hold boil for recipe timeline
  14. Turn off PID
  15. Turn off Pump Switch for March 809 Pump
  16. Set 3-Way Valve V-2 for Counterflow Chiller
  17. Ensure Quick Connect fittings are connected at F-4 and F-5
  18. Turn on Pump Switch for March 809 Pump
  19. Chill to Pitch Temp
  20. Turn off Pump Switch for March 809 Pump
  21. Disconnect Quick Connects at F-4 and F-5
  22. Place Quick Disconnect in Fermentation Chamber
  23. Turn on Pump Switch for March 809 Pump to fill Fermentation Chamber
  24. Once system is empty, Turn off Pump Switch
  25. Reconnect Quick Connects at F-4 and F-5
  26. Cycle Hot Water and PBW thro all lines
  27. Empty into waste bucket


Comments welcome! If anyone wants the links to my material list, just specify what peices you need, and I'll reply with them/

Thanks everyone, this really has my blood going... Just have to scratch up the 600$ or so :confused:

brew kettle1.jpg
 
Aluminum is easy to drill even with a cheap, Harbor Freight, step bit. If you buy fittings from either of those vendors, they should come with instructions, but you just want the minimum opening that will allow the fitting through.
 
Just know those are conduit punches so they make a whole larger than they sat. A half inch conduit punch makes a 7/8" hole.
 
jeffmeh said:
For aluminum, I hear they work fine. Not meant for stainless....

Worked fine for me on my bayou classic steal BK, using the bargain fittings weldless bulkhead for my elements. In fact have have two no leak elements in my bk.
 
seatbelt123 said:
Worked fine for me on my bayou classic steal BK, using the bargain fittings weldless bulkhead for my elements. In fact have have two no leak elements in my bk.

Oh, and if you're nervous about it juts practice on a piece of cheap steal from Home Depot. It's not hard, I just used a 1/2" socket wrench.
 
Thanks for all the feedback on the drills. If the Harbor Freight knockout punches are only 20$, I may just use them instead of the step bit. Whats an extra few dollars now??

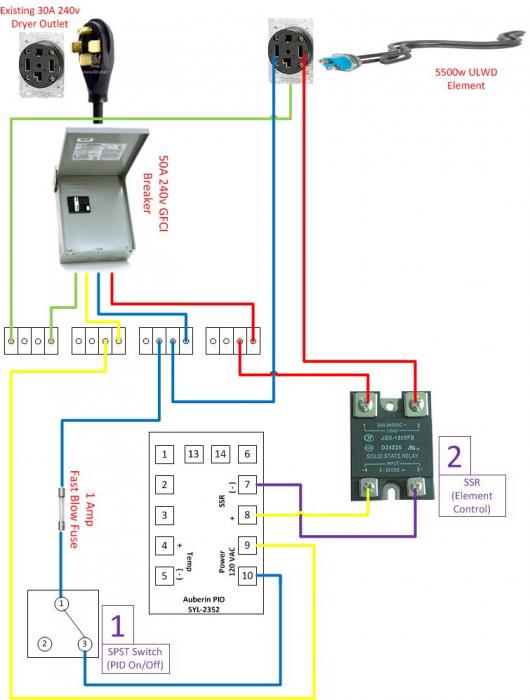
I've hybridized my own PJ drawing with a lot of copying and guessing. I made two, because I wasn't sure what the DPST Switch (#3) was for after the SSR. Drawing #1 (NO DPST Switch) is attached below. Drawing #2 (With DPST Switch) will be on the next post.

PJ and others, could you take a look at these?

electrical1.jpg
 
I very strongly suggest that you plan on using diagram 2. Without the element switch, there will be power available at your boil kettle unless you shut the breaker off or unplug your rig. The switch disconnects both lines of the 240V power and thus isolates the kettle. I believe that you do not really want to play "You Bet Your Life". Please play it safe.

The switch that you could use for that task is this one from Grainger:
http://www.grainger.com/Grainger/NKK-Toggle-Switch-2TPF6

P-J
 
I didn't even need the strong suggestion, a mild one would have convinced me straight away :)

Thanks for the switch link. As for the other switch (PID Power), I need to look for something that is 30A 120v SPST, right?

And for the terminals, what do you suggest? I assume (Awlayd dangerous) that they all need to be rated to 30A 240v. Is that correct?


Thank you so much for all you do here!
 
Christmas is coming early!

I am off from work starting tomorrow, through New Years! I want to get started on my build. I have my 80qt Aluminum Pot on hand and fittings/hoses/pump/valves in my "cart" ready to be ordered. My PID is on order as well as the thermoprobe! :ban:

I just need some help sourcing my electrical components...

Wiring:
From looking online here, I believe that 10 gauge wire will suffice for my current draw inside my control box (30 amp @ phases of 120v), and that 12 gauge would be fine for the ground. Could you recommend a wire type? Even better if it's available at a local hardware store (Home Depot, Ace, Lowes).

I'm also using a standard 30amp drier cord to feed my control box from an existing 30amp drier outlet.

Switches:
As for switch #1, SPST, will this work? I couldn't find anything at 25A like the DPST switch.
http://www.grainger.com/Grainger/POWER-FIRST-Toggle-Switch-2VLN5?Pid=search
As for switch #2, DPST, this is what I'll order. (As recommended by P-J)
http://www.grainger.com/Grainger/NKK-Toggle-Switch-2TPF6

Solid State Relay:
Where do you guys recommend for a SSR? This is what I found with a quick google search, and it comes with the Heat Sink. If there is a local supplier (US) I'd rather use them for patriotism (and faster shipping) ((And Quality)).
http://www.ebay.com/itm/DC-3-32V-AC...CI%2BUA%2BFICS&otn=21&pmod=160923681301&ps=54

Spa Panel:
I picked up the Midwest Electric 50A Spa Panel from Home Depot.

Terminals:
I'm totally lost here. Do I even need a terminal strip for any of my connections besides Blue (Neutral)? It seems like I can just go from Spa Panel directly to the PID (Yellow, Hot#1) or directly to the SSR (Red, Hot #2). If my assumption is correct (which is no sure thing) could I just get a terminal strip for Neutral (Blue) like this:
http://www.gandermountain.com/modpe..._kwcid=goobase_goobase_filler&cID=GSHOP_82366


Thank you guys so much. I'll make sure to collate all this into a single post when I'm done for others future reference!


`Ryan
 
I can vouch for the harbor freight knock-out, but there is a caveat. The harbor freight kit comes with 4 punches, and two bolts - a large one and a small one. The larger three knockouts work with the large bolt, and the smallest knockout works with the small bolt.

I used the larger bolt, and the largest punch (or 2nd largest punch - can't remember which) to punch a hole in the side of my keggle for the same size element you are going to purchase (Camco 5500W). It made the hole pretty easily, and the hole is perfectly round, and very neat. It just required a tiny bit of sanding.

However, I used the smallest bolt and the smallest punch to put a hole for a temp probe / sight glass, and just as the punch was about to pull through, it broke the threads on the bolt and fell off. It actually punched two of the teeth through, and then crapped out. I brought the kit back to harbor freight, and they replaced the whole kit no questions asked. I started again on the same spot, and the punch came through no problem.

So for whatever reason, the smaller bolt sucks, which surprised me, as I figured the smaller hole would be easier, as there is less surface area and less friction.

So you should be fine on an aluminum pot, as they were able to get through my heavy duty keg relatively easily.
 
Thanks man.

Did you incorporate any switches? Do you have any idea if mine will work?
 
Switch #1 has a 1amp fuse so you only need a 120v/1amp (or greater) switch.

I used the harbor freight knockouts on an AL kettle and plastic control panel and they work great for these materials. Their lifespan is limited on SS.
 
Thanks everyone. Build Complete.

I'll take pictures and make sure they get into a build thread ASAP. And by ASAP, I mean, As Soon As I Brew A Batch And Get To Enjoy Electronically Controlled And Heated Brew In A Bag Brewing.

So ASAIBABAGTEECAHBIAB.
 
Looking forward to the photos. Interested in your build.
 
For all that were sub'd to this thread. Here is the final product build thread.


Thanks for everyone's help!
 
Back
Top