Yet another cooler Mash Tun DIY, more ideas

Homebrew Talk - Beer, Wine, Mead, & Cider Brewing Discussion Forum

Help Support Homebrew Talk - Beer, Wine, Mead, & Cider Brewing Discussion Forum:

This site may earn a commission from merchant affiliate links, including eBay, Amazon, and others.

bendavanza

Well-Known Member
Joined
Aug 30, 2008
Messages
2,184
Reaction score
23
Location
Oak CLiff, TX
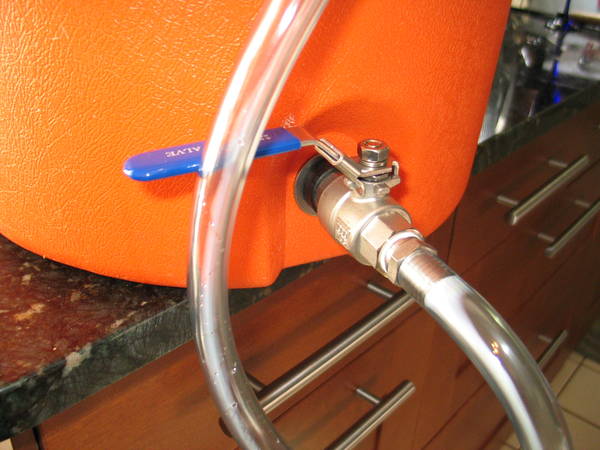
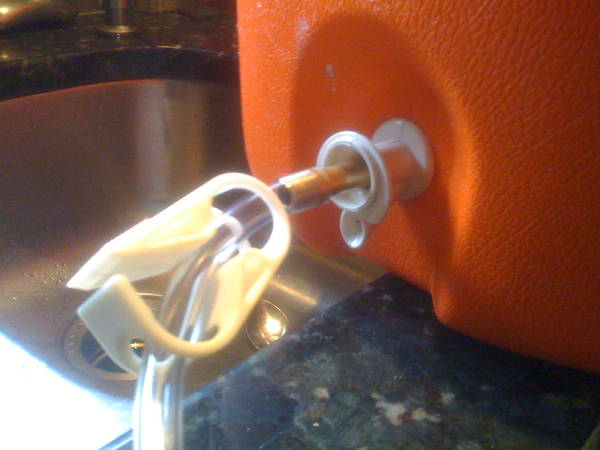
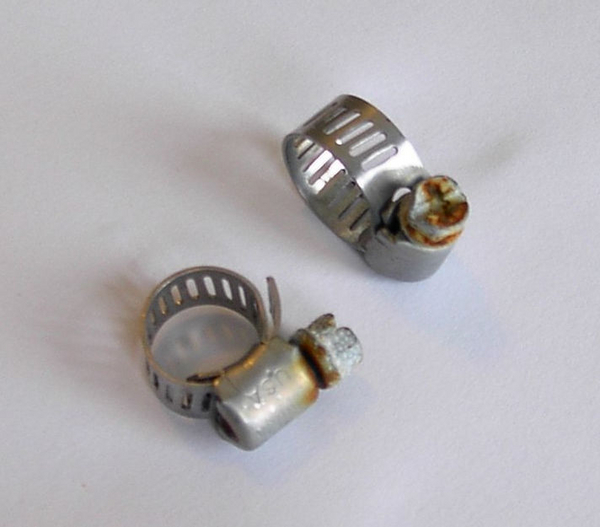
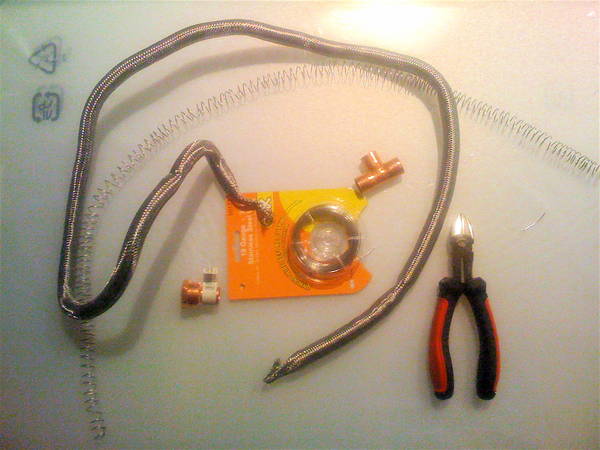
I did my first AG batch using the gott 10g cooler and a SS braid. I used a long one, thinking it might help with flow, prevent stuck sparge, etc. What I found was the thing was so long it would lift up during stirring. I did some reading and in a book called "How To Brew" by John Palmer, there is a braided line that loops into a tee. This made a lot of sense to me. I also read here somewhere about the braid collapsing from the weight of the grain. This got me to thinking, and I decided to make a spring out of stainless wire, and pack it into the braid. This supports the braid immensely, and helps it keep it's shape. I got a 1/2 ss ball valve kit from Bargain Brew Fitting Home Page and was trying to figure out how I could best adapt a tee and tube into this. Wandering around Elliots Hardware, I came across some copper threaded to 1/2 tube adapters, a 45˚ elbow, some all stainless clamps, and a 1/2" tee. To make a nice fit I had to sand some of the 45˚ fitting to size. I coiled the stainless wire around a extra fine point sharpie, and then stretched it to size. It was difficult to feed the coil into the braid, but with some additional hands on the job, compressing the braid, I was able to stuff 1/2 the spring in from each side. If I were using a new braid that hadn't gotten dented from my first couple AG batches, it would have fed in much easier. Make sure to bend in the tip of your wire so it does not catch. The braid is bound to puncture your fingers so beware. It also makes a hell of a chinese fingercuff so keep your digits out of them. On my first attempt the coil was way too long and I had to cut it down.
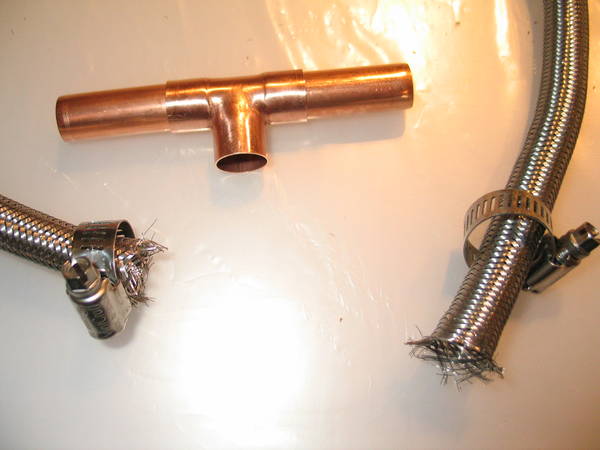
Here are some pics, the valve and fittings work really well, leaving very little water in the cooler.
IMG_0499.JPG

IMG_3208.JPG

IMG_3200.JPG

IMG_3210.JPG
 
old valve, which was the OEM valve drilled out and a brass tube pressed in. it worked ok but the snap clamp was annoying to use and the tubing kept getting deformed.
IMG_0484.JPG

old braid, way too long and moved around too much. What was I thinking?
IMG_04831.JPG
 
Isn't it amazing how every time you brew you find something to improve in your system? I started out with the braid as well in a round cooler. I eventually moved to a square cooler with a PVC manifold. Your spring idea will really help with drainage but any suction you might have on the wort is broken as soon as some area on the braid draws air. I'm not sure how much wort is then left behind. Probably not enough to worry.

Linc
 
Revvy: The clamps were tagged as all stainless, the band, screw, and body. I saw Flyguy's post, but thanks for the warning. You can find good SS clamps if you look.
Missing Link: On my tests with water alone, it sucked all but the last 1/4" of water out. Time to test it out for real. Right now I'm prepping my kegs for some welding with valves, sight glass and thermometers. I have all the parts with the exception of the thermometers.
-Ben
 
Isn't it amazing how every time you brew you find something to improve in your system? I started out with the braid as well in a round cooler. I eventually moved to a square cooler with a PVC manifold. Your spring idea will really help with drainage but any suction you might have on the wort is broken as soon as some area on the braid draws air. I'm not sure how much wort is then left behind. Probably not enough to worry.

Linc

Good point. I have already started mine in copper tubing, but had considered braiding. Now I can see that the siphon effect will be broken as soon as the wort touches the top of the braid, while in a copper tubing setup, the siphon will continue until it reaches the bottom of the tubing (if you put the holes on the bottom) and therefore you will get more wort.
 
Now I can see that the siphon effect will be broken as soon as the wort touches the top of the braid, while in a copper tubing setup, the siphon will continue until it reaches the bottom of the tubing (if you put the holes on the bottom) and therefore you will get more wort.
Actually, the siphon effect is generally only an issue for manifolds or false bottoms, because they require a 'pickup tube' to connect the manifold with the bulkhead/valve. Most who use a braid attach it directly to the bulkhead, meaning that they can simply tip their cooler to drain the last bit of wort out. This means LESS wort loss than in a MLT with a manifold or false bottom outfitted with a pickup tube.
 
This looks a lot like mine, but I used a compression fitting "T". It's out of the appendix in "How To Brew". Came together sweet.

IMG_3210.JPG
 
The suction from my siphon effect keeps pulling fluid down to 1/4" of the 1/2" tubing, leaving a very small amount behind, in fact the pic was taken after draining a few gallons out without tipping. My tee is a tight fit against the floor.
Capt Kirk- Your pic is where I took the idea for the loop, I just found the copper tee easier for me.
cheers
 
bdavanza: where on earth did you get SS wire from?!?! Everything here is galvanized and such. could copper wire work? I'm looking at 16 gauge, what did you use?
 
I found mine at the hardware store in the picture hanging area. It was an Ace hardware store. It's in the orange cardstock package in my first pic.
 
I have only made two batches of beer, one extract, one partial mash and I was thinking I would never go all grain so fast, but this just looks like such an awesome design and such a fun project that I can't resist.
 
go for it Maui.
There is a very satisfying thing about AG. Just plan for lower efficiency your first few times going through it. I think I was at 60-65% the first batch. I normally get near 70% now, with the exception of a very high gravity beer. I hope to improve it further.
 
bdavanza: where on earth did you get SS wire from?!?! Everything here is galvanized and such. could copper wire work? I'm looking at 16 gauge, what did you use?

Have you a buddy that works on aircraft?? Practically everything on aircraft is safety-wired (SS). Just another source.
 
Well, after way too much time in Lowes and Home Depot I finally have an AG setup! Oh ya! Unfortunatly, it's not the cool one on this thread I had hoped to end up with at the end of the day, but that's how shopping on an island goes. I couldn't get the parts to do the loop into a tee. They were lacking in copper pieces and there was no 1/2" SS braid. I couldn't find a way to connect the smaller SS braid to an available copper tee. But I set it up with one end tied off, and I found some copper wire (no SS wire) and I have that inside the braid for support. So it should work, but I'll try ACE tomorrow, I'd like to do the loop into a tee.
 
I did some reading and in a book called "How To Brew" by John Palmer, there is a braided line that loops into a tee. This made a lot of sense to me. I also read here somewhere about the braid collapsing from the weight of the grain. This got me to thinking, and I decided to make a spring out of stainless wire, and pack it into the braid.

You could have saved yourself some time and/or money, since Palmer covers the SS-braid-collapsing issue right in the book. No need for a spring, just use larger braid.

Palmer's book says specifically to use 1" braid (from a water heater connector, I found mine at Home Depot). It won't collapse like 1/2" braid might. He even gave a parts list.

There's a discussion of it from Palmer himself when he was revising the book back in '05 here:

Steel Braid Lauter Design - BrewBoard

Note the taper in the photo where it goes into the 1/2" tee:

htb_braid3.JPG
 
Edit: I made the braid loop a bit shorter and I'm using a paddle that's not sharp, my old one was more like a big stainless butterknife. No braid float and predictable results.
I also covered my copper fitting connections with short pieces of silicone tube which has improved the suction issue and keeps my braid from coming loose.
-Ben


My braid still floats and I'm having trouble getting past 65% efficiency, I wonder if that could be part of the problem? I know the tee is flush with the bottom. With 1/2" ball valves and 1/2" silicone hose, my gravity fed setup loses prime on the siphon easily unless the valve is wide open near the end.
 
Back
Top