Scuba's Rig Build 2: Judgment Day

Homebrew Talk - Beer, Wine, Mead, & Cider Brewing Discussion Forum

Help Support Homebrew Talk - Beer, Wine, Mead, & Cider Brewing Discussion Forum:

This site may earn a commission from merchant affiliate links, including eBay, Amazon, and others.

ScubaSteve

Well-Known Member
Joined
May 21, 2007
Messages
3,673
Reaction score
91
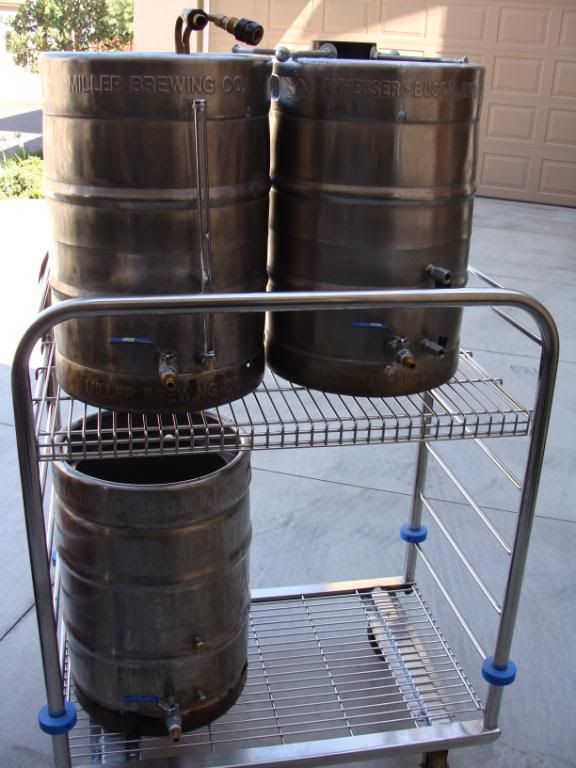
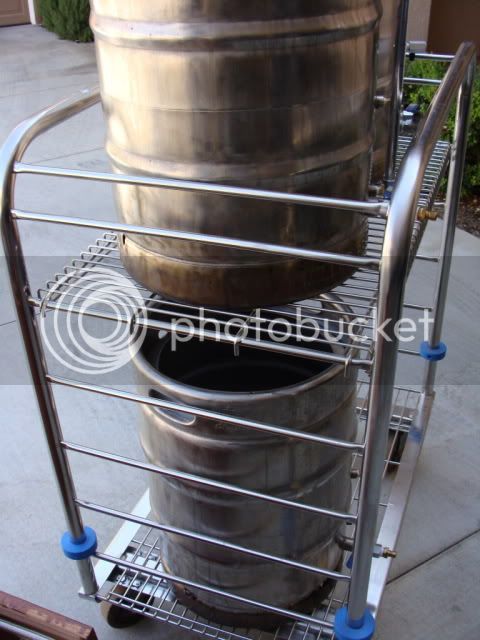
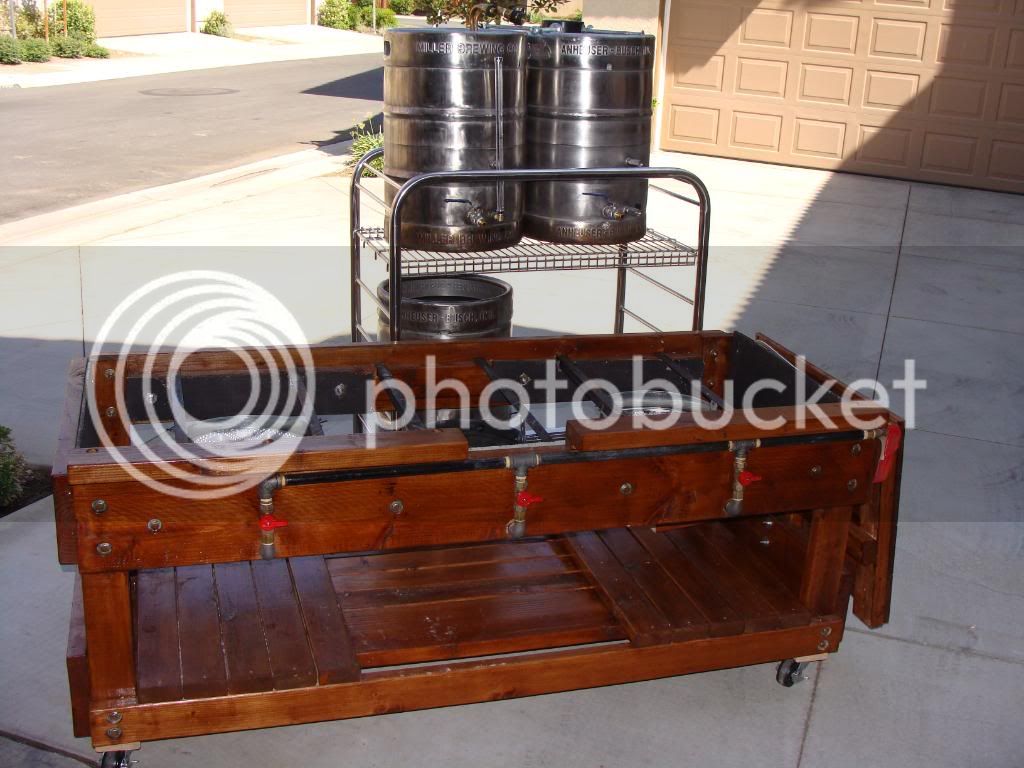
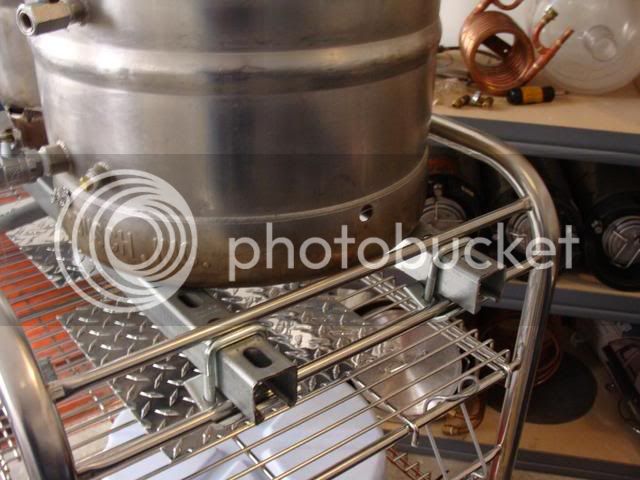
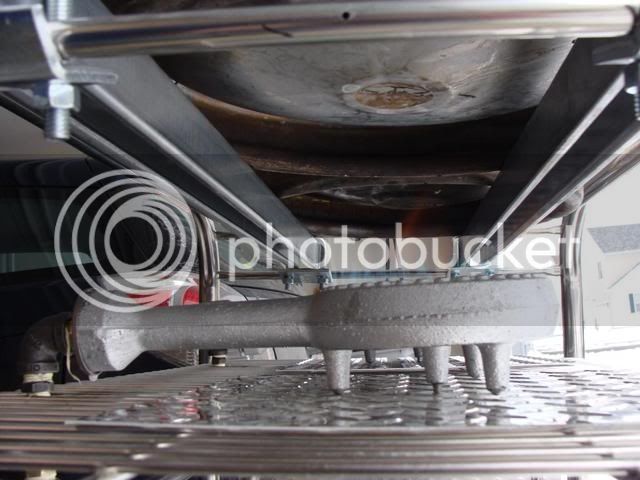
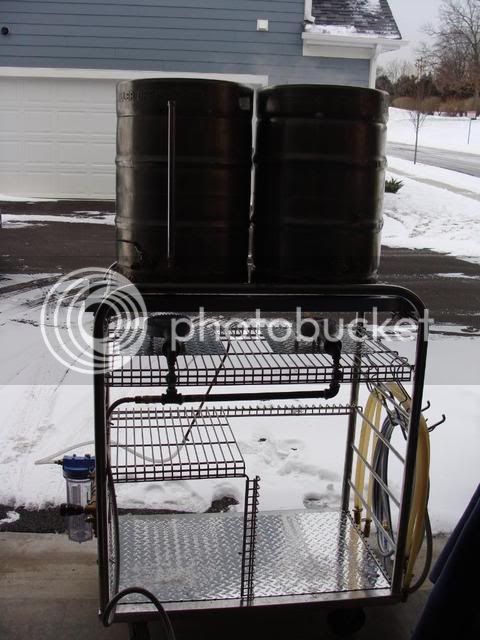
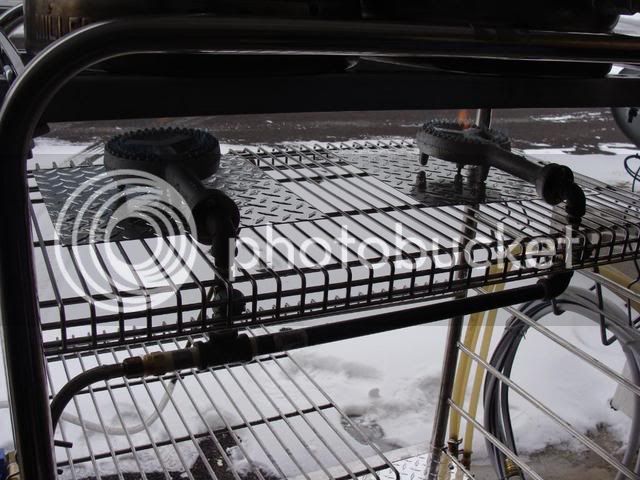
So I started building a new rig. I used to have a wood rig that was more than enough for my purposes, but I was moving, and in the spirit of shedding unnecessary items and conserving space in the new home, I sold it.:eek:

You can see my build of the wooden rig here:https://www.homebrewtalk.com/f11/scubas-herms-build-36267/

Wood is a really underrated medium in homebrewing. If you put some thought into your design, it will serve you for years!

Back to business! :ban::ban:
 
I "acquired" a really well built SS cart. I just knew it had potential for brewing purposes. I put all my vessels on it in all sorts of configurations, but I was never satisfied....I would stare at it trying to figure out how to make it work. Finally, I just put all my toolboxes on it and used it as a rolling cart for projects.

After I moved (and no longer had a rig), I looked at it again. It's just wide enough to fit 2 sankes on top:

DSC01818.jpg


More Pics:

DSC01822-1.jpg


Beefy shopping cart wheels (spider webs included):

DSC02421.jpg


So, what I think I'll do is have the HLT on the top left, the BK on the top right, and the MT on the bottom. I'll leave room for either my 10 gallon Coleman or Sanke MLT. Truth be told, I like the cooler better, but it's not as uniform as the SS keg MLT.


.
 
I guess you can call this a 2-tier rig....but that's okay with me.

My philosophy changed after having a 1-tier:

-Using more height (gravity) to flood the hell out of the march pump. If I want to prime my tubing, it'll be a snap.

-Using gravity to drain the bk through a CFC. I can also use my pump for this, but I don't have to. I used to use a B3 50' 1/2 " IC.
(that's a different discussion, which I can comment on outside of this thread)

-Not worrying about having my HLT higher in the air. It's really well supported by side rails, it's heated in place, and I have a sight gauge to tell me how full it is. I mean, come on....we all know what hot water looks like! It's not that high anyway, but it saves MEGA space being stacked....

-Here's the big one! Not worrying about having my BK in the air! I know some folks may wonder about this....I started using fermcap-s, and now I don't worry about boilovers! I realize I don't need to look into the BK anymore worrying about foam, so now I just toss my hops in and stir. I can still see in the keggle on my toes, so it's not a problem. At flameout, I whirlpool and drain to the CFC. I plan on integrating a hopback that goes on/off with QD's for easy removal.

The advantages? I have a rig that takes up a hell of a lot less space than my single-tier:

DSC01820.jpg


I know it's not as pretty, but it does the same thing in a compact, shiny package! I still have my pumps, but I can also use gravity, because it's free!
 
I realized (luckily) that this thing was built out of SS tubing. If I were to integrate burners and heat the thing up, the tubing might explode. See this thread for more info! : The Northern Brewer Homebrew Forum :: View topic - EXPLOSION! On National Homebrew Day - Converted Keg

So, I drilled out the SS with a Dewalt titanium split-tip bit. The black moly bit I used barely scratched the 316 SS. Man, SS is a hard metal! Note the small hole...

DSC02419.jpg


Here's another pic, showing the orientation of the SQ14 burners I plan to use:

DSC02420.jpg


And another:

DSC02422.jpg
 
When you say whirlpool at flameout, forgive my ignorance, but just what the hell does that mean?
 
Sorry, I notice I use quite a few acronyms, etc. When you're done boiling your wort, you turn off the burner and get ready to cool the wort. That's flameout. Before you do that, you can take a sanitized spoon and create a strong whirlpool, and that will cause all the particulate hop debris to concentrate and settle in the middle of the kettle. If you drain the kettle with a dip tube placed near the inner wall of the of the kettle, you will avoid that pile of debris, and it won't make it into your beer....and that generally equals clearer beer.
 
You can always tell the quality of a hobby/obsession by whether or not the uninitiated can tell what you are talking about. The obtuse the nomenclature, to more involved and interesting the hobby.

In one of your earlier posts on this thread, you refer to a cooler MLT as being not as uniform as the SS keg MLT - is that a temperature thing or a matter of aesthetic?
 
I think the SS MLT is going to be more aesthetic in this rig. But, experience shows that the cooler will hold temp within 1 degree well over an hour on a cold day.....so I'll make sure I leave room for either MLT, and maybe allow for an upgrade to a rectangular cooler in the future. I'm a batch sparger.
 
Sure...that's probably the biggest engineering problem I'm facing. We'll see what happens...it's 316SS and frickin solid. It may be wire style shelving, but the wires are 1/4" each....and there's a lot of them. Experience with my last rig showed me that 2 pieces of 1/8" angle iron were more than strong enough to support a full keg getting blasted by a banjo burner. Plan B is to slide a few pieces of angle under the top shelf, if necessary.
 
That will probably work too...but I'd be careful putting heat on something like that. This cart I'm using is really well built, SS through and through, no coatings/platings etc. I had a hell of a time drilling through the bars....you can really tell the difference between brass, mild steel, etc. and SS. It's a pretty hard metal. I imagine a cart like this would be well out of my price range if bought new.
 
Nice Steve. I'm still stealing your single tier wooden rig setup idea for my own electric setup. ;)

Kal
 
You'll have a lot easier time with it if it's electric (assuming you know how to wire everything). A lot of my headscratching came from mounting burners and putting in heatshields.
 
Ed, it's pretty sweet. I'm happy I got it....I was worried about the cold break, but I just turned out one of my best IPA's ever; leaving the pellets free in the kettle (no bags) and crash cooling it all later. I just clogged the hell out of it with whole hops, but I just blasted those out and it's good as new. That'd never happen on a plate chiller. It cools fast, looks great, kinda pricey, but I think it's worth it if you're looking at a long-term piece of gear to put in a stand, etc.
 
While the SS wire may stand up to the heat and weight strain, it's stealing probably close to 40% or more of your burner's heat. I think you'll see a dramatic increase in propane use unfortunately.
 
So you do not strain out the pellet hops? How long does it take to chill 10 gallons?

2 brews ago I did an APA and used 3 oz. of pellets. I just tossed them right in. I did a good whirlpool at the end, let them settle, and drained to the chiller. That was a 5 gal batch, and it dropped to 75-80 as fast as I could drain the kettle. It chills the wort immediately, you're just limited by how long it takes to fill the fermenter. It gives a hellaciously strong cold break, about 6 inches off the bottom, and that settled into a solid cake with the trub. I did use a highly flocculating yeast though. The beer had the best hop flavor I've had in my beers...I never realized how much my hop utilization suffered with paint strainers.

Now that I've actually clogged the chiller, I can see it has limits. I'd put some sort of coarse strainer in, but wouldn't worry about particulates.

Now, back to the rig :p!

I DID in fact have some big trouble with the shelving...more to come on that;) This build has gone in a slightly different direction...more pics to come :mug:
 
It gives a hellaciously strong cold break, about 6 inches off the bottom, and that settled into a solid cake with the trub.

I was stunned by the amount of cold break since switching from an IC to a plate chiller! Even after settling awhile, it goes about a third of the way up the carboy. But like you say, it eventually settles down almost completely.

Must be the speed...instead of chilling the whole kettle volume slowly, you're bringing a small quantity of wort (that within the chiller at any given moment) down to cold temps very quickly.
 
You'll have a lot easier time with it if it's electric (assuming you know how to wire everything). A lot of my headscratching came from mounting burners and putting in heatshields.

Yup - I followed your other thread pretty closely. For what it's worth, I thought you were pretty crazy making a propane/NG brew stand out of wood, but hey - we brewers aren't always the sanest bunch. ;)

Kal
 
Yup - I followed your other thread pretty closely. For what it's worth, I thought you were pretty crazy making a propane/NG brew stand out of wood, but hey - we brewers aren't always the sanest bunch. ;)

Kal

Ha! I'll take that as a compliment:D:mug:
 
Not to take this off-topic but my understanding is that there's no issues with having the cold break in the primaries (6 gallon carboys) correct? I swear I read that somewhere here. If yes, and the cold break compresses nicely over time, why do some people try and keep the cold break out of the fermenters?

Kal
 
So, I've done quite a bit to the rig in the last few months......I added lots of awesome diamond plate! It's actually aluminum, 1/16" thick. I would have liked to have SS, but am pretty satisfied with it so far and it's really machineable which was a HUGE plus. You ever try to drill SS?

DSC02531.jpg


DSC02540.jpg


DSC02541.jpg
 
I used this configuration of SS parts (minus the fender washer) to secure the diamond plate to the bottom:

DSC02548.jpg


And it looks like this all tightened down:

DSC02551.jpg


And here's the bottom left side where I left a space for all my fancy plumbing to go to the pumps, etc. :

DSC02546.jpg
 
On the outside of this panel, I fastened my plumbing:

DSC02552.jpg


I chose to make it low so I could put my electronics high and avoid any dripping. I plan to run braided hoses from the barb fittings to my chiller, as well as a multi-purpose hose for quickly connecting to and blowing out clogs/flushing/cleaning the chiller, BK, and HLT.

Here's the quick connect I set up for my hose:

DSC02554.jpg


I plan to tweak this idea, because in actual practice the QD leaks like hell. Maybe I just need to buy a different model.

Here's a close up of the filter canister. I filter my water with a coarse filter, and use a shepherds hook to fill the HLT. I might consider hard plumbing this in the future:

DSC02555.jpg
 
I worked out all kinds of configurations for my chiller, pumps, etc....I settled on something like this:

DSC02543.jpg


My MLT is on the right. The HLT will be on the upper tier to the left, and the BK will be on the right. I can use gravity, 1 pump, 2 pumps, or all three in unison if necessary. The profile is quite small compared to the standard 1-tier and 3-tier designs...I think it combines the best of both styles.

I've found gravity to be especially useful in priming the pumps...as well as adding sparge water. I really don't need 2 pumps, but I believe in redundancy and awesomeness equally. :D
 
I think at this point in the build, I need to talk about the SS wire shelving and how it holds up to heat. I fastened my burners, placed the kegs in their normal positions, and fired up the burners just to see what might happen.

I'm SO glad I did.....and I'm SO glad for the constructive criticism of this forum :mug:

About 30 secs into the burn the wire shelving turned cherry red and turned into SPAGHETTI! I'm sorry I don't have pics, but at the time I was more worried about the red hot molten metal falling onto the burner. It really was a sight to behold, and I'm so glad I checked this before game day.

WORD TO THE WISE: CHECK AND RECHECK YOUR HANDIWORK BEFORE YOU USE IT! BREW DAY IS TOO LATE!

:mug:
 
So after the colossal failure of the wire shelving, I had to figure out how to support the full kegs under heat. This is one of the most important things in the build...this could result in disaster if done incorrectly.

I chose some beefy uni-strut....HD was actually helpful for once and actually cut it for me!

DSC02561.jpg


I secured it with the fancy uni-strut hardware...which was eerily perfect for my application:

DSC02562.jpg


Here's how it all fits together:

DSC02563.jpg


And here's the undercarriage:

DSC02570.jpg
 
So, in my best attempt to use the materials at hand, I used the warped and destroyed shelving to my advantage. I made a mid level shelf with a support beam by cutting and bending the original material.

DSC02571.jpg


Whatever metal that stuff was, it was putty compared to the angle grinder :D It's definitely different from the actual support tubing, which required special bits, cutting oil, and elbow grease to drill. The new shelf still allows room for the MLT....I made sure it could fit either the keg or cooler.
 
And here's a closer look at the propane manifold. It's hard to see with all the blinding snow, it's a basic manifold with some needle valves I had in my stock.

DSC02566.jpg


This is KEY. You NEED needle valves....gas rated ball valves are great for emergency shutoff, but they don't provide fine control nor are they designed to be left half open.
 
So then I found this cool-guy rack to hang my hoses from:

DSC02557.jpg


I bent it to hook on nicely:

DSC02558.jpg


And here it is in use:

DSC02559.jpg
 
Back
Top