LOVE TSS2 Programming : Neutral Area Mode

Homebrew Talk - Beer, Wine, Mead, & Cider Brewing Discussion Forum

Help Support Homebrew Talk - Beer, Wine, Mead, & Cider Brewing Discussion Forum:

This site may earn a commission from merchant affiliate links, including eBay, Amazon, and others.

SankePankey

Well-Known Member
Joined
Dec 20, 2009
Messages
904
Reaction score
21
Location
Hudson Valley, New York
He folks-

Just wanted to pass on the info I learned from speaking to Dwyer about the dual stage controller powering my ferm chambers. I have the TSS2 in 2 chest freezers with the heat source being a light bulb (which works 'awesome') and my thermowell puts the probe in the center of 15 gallons.

I know a lot of people fiddle with the program settings and I hadn't heard of this mode from the forum before calling. It is clearly described on the manual and even has a graph to show for it (pictured below).

In the R8 parameter, your choices are On1,On2,nEU.

nEU - Neutral Area Mode - For a one probe setup, neutral area mode offers a selectable (via the R3 setting) margin in between when relay 1 and relay 2 are on. This helps to accommodate for overshoot, especially in a system like mine with the probe in the beer not on the side of the fermenter, so the cooling and heating systems don't fight eachother in a continuous tug of war due to the thermal mass of the beer.

nEU:
Relay 1-
Temp of probe >= SP1+R3 .....relay 1 on.
Temp of probe <= SP1 ...........relay 1 off.

Relay 2-
Temp of probe <= SP1-R3........relay 2 on.
Temp of probe >= SP1............relay 2 off.

Right now, I have my SP1 temperature set to 82 (saison) and my R3 set to 1.2. I am not seeing any handoff in between the cooling and heating cycle, which is of course the whole point. I'm sure I can drop the R3 margin even lower. My temps are not swinging more than 1.2 degrees total. Pretty good. I will start to decrease the R3 until I get to where there is hand-off with the cooling and heating and back it off by 2 tenths of a degree or something.

This way I don't have to fiddle with any settings other than the set point. Even if I cold crash, all I do is set the SP1 where I want to and don't worry about the compressor fighting the bulb yet have near perfect control of my temps with no fussing with SP2 and such.

Did I explain that correctly? My brain doesn't work in the A.M.:confused:

Here is the graph in the manual I took a pic of. The manual for the TSS2 Dwyer has online isn't updated and doesn't show nEU mode in the way it does in my recently purchased one's manual. Dunno why they don't update it on their website..? Perhaps they tweaked what nEU actually does which is why I haven't heard anyone speak of it.... Also I think they misprinted the info for Relay 1 in my opinion, but I could be wrong too.
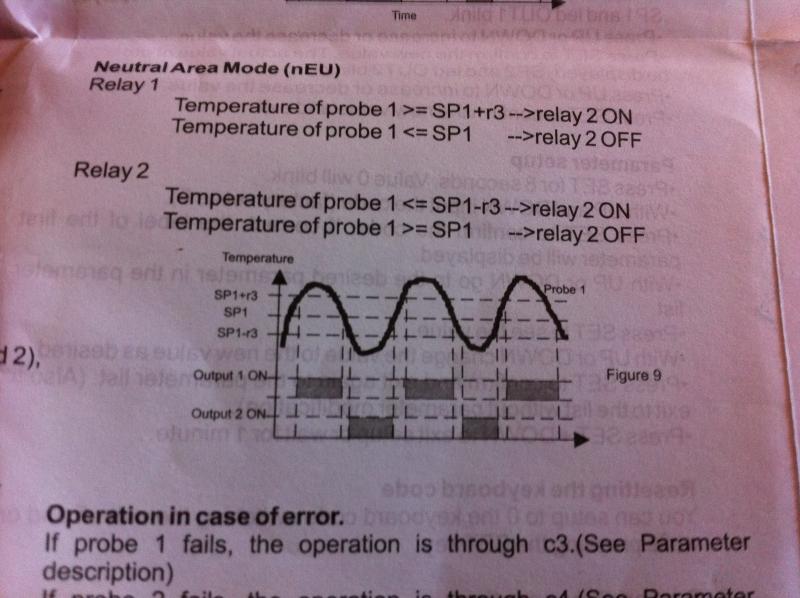
IMG_0718.jpg
 
This way I don't have to fiddle with any settings other than the set point. Even if I cold crash, all I do is set the SP1 where I want to and don't worry about the compressor fighting the bulb yet have near perfect control of my temps with no fussing with SP2 and such.

SankePankey you can do the same without using the Neutral Mode.

The neutral mode did not work for my set-up, created unnecessary cooling cycles because of the way R3 is used and the way my heater works.

For my set-up I can use R1 and R2 with different values and get better control.

Cheers,
ClaudiusB
 
Maybe they really did change what nEU does. If you look in your manual (and the one they have online) the graph doesn't look the same.

How does your heater work different than mine? I am getting none of the unnecessary cycles you mention and am turning R3 down to close the margin gap. I have temp swings of less than 1 degree total. Interesting.

But your way, you have to change more than one setting to change the temp. That's what I wanted to avoid. I just change SP1, but you have to change SP1 and SP2 every time you change the temp. Am I wrong about that?
 
But your way, you have to change more than one setting to change the temp. That's what I wanted to avoid. I just change SP1, but you have to change SP1 and SP2 every time you change the temp. Am I wrong about that?
I only have to change one setting, SP1 same as you.

My cooling turns on at 0.1° F above SP1 and heating turns on 1.4° F below SP1 by using r1 & r2.
In the neutral mode using r3 I could not do it.

How does your heater work different than mine?
Not different just in a different environment.
I am using a ceramic IR heater in a small incubator which keeps on heating after turned off.
Knowing the characteristic of the heater allows me to turn the heater off way before the set point is reached without overshooting SP1 and slowly approaches the set-point.
Heating is only used if the temp falls 1.4° F below the set-point which rarely happens.
After the compressor turns off the evaporator plate keeps on dropping the temp by 1-1.2° F.

Cheers,
ClaudiusB
 
I tried this today because I like the idea of not having to deal with two different set points. However, I'm finding that my chest freezer overshoots sp1 significantly. So, if I set sp1=32, r3=1 (cold crashing) when my freezer kicks on it drops to 32 and shuts off but then continues to coast down to 31 where my heater then kicks on and again overshoots to about 32.2 before stabilizing. Ideally in this scenario I'd like the fridge to turn off around 0.5 degrees above sp1 which would keep the heater from ever kicking on. Do you happen to know if that's possible? I know using a larger r3 param would keep the two from fighting, but then I end up with a larger neutral area than I want. I may just have to go back to two different set points for better control.
 
here something to try i think understand what the negative numbers are for instead of r3 at 1 try -1 worth a shot? maybe it will shut it off when it within 1 degree then it will coast to it maybe? or maybe u need to bump that 1 to a 1.5 thats what im running and it has been holding steady... im only .4 over my target...
 
I tried this today because I like the idea of not having to deal with two different set points. However, I'm finding that my chest freezer overshoots sp1 significantly. So, if I set sp1=32, r3=1 (cold crashing) when my freezer kicks on it drops to 32 and shuts off but then continues to coast down to 31 where my heater then kicks on and again overshoots to about 32.2 before stabilizing. Ideally in this scenario I'd like the fridge to turn off around 0.5 degrees above sp1 which would keep the heater from ever kicking on. Do you happen to know if that's possible? I know using a larger r3 param would keep the two from fighting, but then I end up with a larger neutral area than I want. I may just have to go back to two different set points for better control.

That's what thermal mass is. Your beer is overshooting the target (due to internal convection of the liquid) not your freezer. It turned off.

If you don't want your heater to kick on to combat thermal mass of your beer at 31, you'll have to start your cold crash at 36ish and then push it down to 32 from there- you're thermal mass will not carry it as far past as it would going from room temp to 32. That's what I do. You could even raise R3 at crashing, but that's not convenient.

Your SP1 is what the freezer will turn off at. That's the function. If you want to 'think' about it in a different way, like "I'll set SP1 to .5 above what I want to hit" , that's what you have to do. Neutral Area is just that - No heating or cooling within the Neutral Area of the R3 value.

Have no idea what negative numbers do so, interested.

I wasn't starting from room temp though. That's starting from just high enough to trigger the freezer to come on. 33 degrees in this case. So I'm only trying to drop one degree but it overshoots by another 1+ degrees. If I could get it to turn on at 33 and off at 32.5 it would coast to 31.5 which would be perfect.
 
OK, I see what your saying. Maybe I can explain it a little better.

The SP1 value is in the middle of where heating or cooling take place. R3 is how far away in either direction (from SP1) heating or cooling isn't taking place. Check out the graph above.

You could lessen the R3 value upon crashing. You'd set SP1 to 32.5 and set R3 to .5, then you will get compressor on at 33 and off at 32.5, you'll get heating on at 32 and off at 32.5. You'll also get a lot of hand-off between cooling and heating.

If I were you, I would put R3 to how ever far the temp goes past where your cooling turns off and then set SP1 to that amount above 31.5 and call it a day.
 
Tried changing my TSS2 to this method so I can only adjust SP1, it did not work for me. Could you provide the relevant settings as I assume I must have one wrong somewhere.
I have some filled in, left out the important bits.

SP1 35
SP2
RO dep
R1
R2
R3
R8 Neu
CO 5
C1
C2

anything I am missing?

Thanks if you can do this!
 
Tried changing my TSS2 to this method so I can only adjust SP1, it did not work for me.
Will work with the other programming methods too.
Keep in mind R3 will effect both heating and cooling in the same way, symmetrical window.

mcomb & samc should you need more control with different parameters using R1 & R2 may work out better for you, non symmetrical window.

In a freezer the evaporator coils and walls temps are in the teens, turning off the compressor will not stop cooling instantly, also how you mount the sensor will play a role, etc..
The same applies to my ceramic heater in my small incubator, the mass keeps on suppling heat after turned off and I use R1 & R2 to control the different effects.

Cheers,
ClaudiusB
 
mcomb & samc should you need more control with different parameters using R1 & R2 may work out better for you, non symmetrical window.

Yeah, that's what I ended up doing. It's a bit more difficult to program initially, but now I've got a temperature window that makes more sense intuitively to me than neutral area mode did. So, for me, now SP1 + 0.1 is the highest value the fermentor is ever allowed to be, the lowest temp is about two tenths below the temp it coasts to after the freezer shuts off. Gives me about a 1.6 degree window in my setup without handoff between the cooling and heating. The smallest window I could have gotten without handoff using neutral area would have been about 3 degrees.
 
Yeah, that's what I ended up doing. It's a bit more difficult to program initially, but now I've got a temperature window that makes more sense intuitively to me than neutral area mode did. So, for me, now SP1 + 0.1 is the highest value the fermentor is ever allowed to be, the lowest temp is about two tenths below the temp it coasts to after the freezer shuts off. Gives me about a 1.6 degree window in my setup without handoff between the cooling and heating. The smallest window I could have gotten without handoff using neutral area would have been about 3 degrees.

So how about posting your settings? Help a brewer out?
If I needed to do math to complete my tax returns I'm golden, when I see these kinds of numbers I'm lost.
 
So how about posting your settings? Help a brewer out?
If I needed to do math to complete my tax returns I'm golden, when I see these kinds of numbers I'm lost.

lol, sure. Here are my current settings and explanations for some:

sp1: 31.5
sp2: -0.8
r0: dep
r1: 0.2
r2: 0.6
r8: on1
c0: 10
c1: dir
c2: inv

So, my freezer comes on at sp1 + r1 which is 31.7. It cools until it reaches sp1 which is 31.5 and then turns off (in my case temperature then continues to drop to about 30.4 but this will probably depend on your cooling device).

If the temperature goes below sp1 + sp2 - r2 which in this case is 30.1 then the heater will come on. At sp1 + sp2 which in this case is 30.7 the heater will turn off (with my heater, a brewbelt, it will then coast to about 30.9).

I know it's a bit confusing wrapping your head around the interaction with sp2, r1, and r2. I didn't really get it until I started plugging in real numbers to those equations to see what the trigger points ended up being. And then you may have to do some trial and error to figure out what works best with your actual heating and cooling systems.

Hope that helps.
 
That helps, a very easy non tech way to look at it. Some of the other posters know this stuff inside out and can be really helpful, but since they are so fluent the explanations can leave me with a massive headache. I've been using mine for awhile now with great results but I just changed my fermenter and probe set up and what used to work became less effective. Thanks again off to test.
 
I know it's a bit confusing wrapping your head around the interaction with sp2, r1, and r2. I didn't really get it until I started plugging in real numbers to those equations to see what the trigger points ended up being.
You did a great job.

Cheers,
ClaudiusB
 
OK, I sort of get why you do it that way Claudius.

But would I not get the same exact performance as mcomb by setting SP1 to 31.3 and r3 to .5? Cooling would turn on at 31.8 and turn off at 31.4. Heating would turn on at 30.8 and turn off at 31.3.

Isn't this samzies or am I wrong? Or is this ever so close that it doesn't really make a difference? I mean, small temp fluctuating doesn't matter for crashing, just that you get down as far as you want to go. Or is it that you're compensating for the actual chamber having thermal mass for cooling whereas the heating element doesn't have any. That kind of makes sense I guess.

Do you then change your r1 and r2 values when you are not crashing, when your at ferm temps or leave it the same?
 
But would I not get the same exact performance as mcomb by setting SP1 to 31.3 and r3 to .5? Cooling would turn on at 31.8 and turn off at 31.4. Heating would turn on at 30.8 and turn off at 31.3.

If I tried that I'd have constant handoff between cooling and heating. Every time my freezer ran my heater would also kick on due to the overshoot when cooling. The range I have above is somewhat wider, but more importantly it's biased to the low side of the setpoint to allow that cooling overshoot without kicking the heater on. As far as I can tell, with nEU it's not possible to bias towards one side of the setpoint, you have to increase r3 which widens the neutral area on both sides of the setpoint whereas the method above effectively widens it on one side of the setpoint only.
 
He folks-
... It is clearly described on the manual and even has a graph to show for it (pictured below).
...

Clear as mud. Reading and understanding the "manual" that comes with it, is like trying to read and understand physical chemistry (by far the hardest subject I have studied).

http://www.scribd.com/doc/33080983/...nstallation-and-Operating-Instructions-Manual

The only thing I can figure out how to do is shut the temp alarm off when you only have one probe and the only reason I figured that out was because on another beer forum someone had written how to shut it off. When I figure out how to use this thing I will re-write the instructions (at least exactly how to program it simply to heat and cool because it's all greek to me right now).
 
lol, sure. Here are my current settings and explanations for some:

sp1: 31.5
sp2: -0.8
r0: dep
r1: 0.2
r2: 0.6
r8: on1
c0: 10
c1: dir
c2: inv

So, my freezer comes on at sp1 + r1 which is 31.7. It cools until it reaches sp1 which is 31.5 and then turns off (in my case temperature then continues to drop to about 30.4 but this will probably depend on your cooling device).

If the temperature goes below sp1 + sp2 - r2 which in this case is 30.1 then the heater will come on. At sp1 + sp2 which in this case is 30.7 the heater will turn off (with my heater, a brewbelt, it will then coast to about 30.9).

I know it's a bit confusing wrapping your head around the interaction with sp2, r1, and r2. I didn't really get it until I started plugging in real numbers to those equations to see what the trigger points ended up being. And then you may have to do some trial and error to figure out what works best with your actual heating and cooling systems.

Hope that helps.

I know that this is a bit of a necro but this is the best info that I've been able to find. I'll be trying this out tonight on a keezer and a ferm chamber. Thanks for the help mcomb @ ClaudiusB!
 
Back
Top