Alright guys, I'm getting going on my second keezer (RIP first keezer). My first had a tower but this one will have a collar. I built a top and platform for the first one and had a pretty hard time with the mitres. There were a bunch of spots I was way off and needed filler pieces and putty to make right. I'd like to not do that with my collar. I picked up a piece of Red Oak that cost 40 bucks so I would really like to not screw up this piece of wood. Any tips on cutting my mitres? I have a Mitre saw and a circular saw with an angling fence. I also have a table saw but I don't think it's big enough for my boards.
You are using an out of date browser. It may not display this or other websites correctly.
You should upgrade or use an alternative browser.
You should upgrade or use an alternative browser.
Cutting Mitres for a keezer collar
- Thread starter EKennett
- Start date

Help Support Homebrew Talk - Beer, Wine, Mead, & Cider Brewing Discussion Forum:
This site may earn a commission from merchant affiliate
links, including eBay, Amazon, and others.
Chello
Well-Known Member
Set the miter saw to cut at a 45 degree angle. Should produce accurate 90 degree corners.
If your miter saw can't handle the size of the board, set your circular saw angle to 45 degrees, and draw a straight line to follow across the board.
If your miter saw can't handle the size of the board, set your circular saw angle to 45 degrees, and draw a straight line to follow across the board.
Jota21
Well-Known Member
if you have a 10" table saw and it tilts to 45, it should be able to miter a two-by...
How thick is the red oak?
How thick is the red oak?
EKennett
Well-Known Member
Sorry, I actually got 1x8 oak.
I'm wondering if I should be making my measurements on the inside of the mitred edge or the outside. I'm thinking that if I want the collar to be flush with the lip of the keezer I should measure the outside of the mitred edge.
I'm wondering if I should be making my measurements on the inside of the mitred edge or the outside. I'm thinking that if I want the collar to be flush with the lip of the keezer I should measure the outside of the mitred edge.
the top of you keezer SHOULD have a lip at the edge where the lid meets. you want your longest cuts to be to those measurements.
say your freezer has dimentions of 2' x 3' yet that lip is lets just say its 1/4" thick. it would mean you are going to build your collar to
1foot 11-1/2" x 2 foot 11-1/2"
if you are unsure on how to use your saw buy some cheap 2x4' or even cheaper wood and make a practice collar
-=Jason=-
say your freezer has dimentions of 2' x 3' yet that lip is lets just say its 1/4" thick. it would mean you are going to build your collar to
1foot 11-1/2" x 2 foot 11-1/2"
if you are unsure on how to use your saw buy some cheap 2x4' or even cheaper wood and make a practice collar
-=Jason=-
Like Catt22, I would also suggest verifying the angle - the gauges on tools are not particularly accurate, and stops are not a guarantee. Set the blade where you think 45 is, cut a test piece into two pieces. Flip one of the two pieces to make a 90 joint, and check with a square.
electrichead
Well-Known Member
- Joined
- Dec 11, 2010
- Messages
- 143
- Reaction score
- 5
If your miter saw can handle an 8" plank, than that is the way to go. I know some smaller models can only do up to 6". If this is the case you would get a cleaner cut with the circular. Which ever one you choose, do like jester said, verify the angles on some scrap. If you are worried about you circular saw cuts being straight, over shoot your line by a 1/16" and sand to perfect.
I don't recommend the table saw as any height variation in the end opposite the blade will effect you angle.
I don't recommend the table saw as any height variation in the end opposite the blade will effect you angle.
EKennett said:Alright guys, I'm getting going on my second keezer (RIP first keezer). My first had a tower but this one will have a collar. I built a top and platform for the first one and had a pretty hard time with the mitres. There were a bunch of spots I was way off and needed filler pieces and putty to make right. I'd like to not do that with my collar. I picked up a piece of Red Oak that cost 40 bucks so I would really like to not screw up this piece of wood. Any tips on cutting my mitres? I have a Mitre saw and a circular saw with an angling fence. I also have a table saw but I don't think it's big enough for my boards.
Cut four short pieces at 45's same length cuts on both ends. Rough assemble and you should have a perfect square.
This technique multiplies error, so you will see the slightest of misalignments. Good luck
ebeer
Well-Known Member
I made my collar at 45's with a miter saw. I'm no workworker, and it never ceases to amaze me how easy it can be to mess up a simple 45 degree cut. Like how can I cut two 45 degree angles, but they don't line up perfectly?? I totally respect those who know what they're doing with wood.
At any rate, mine turned out just fine. I rounded off the outside edges with a sander to fit the rounded lip of the freezer. I'm really happy with the result...but often wonder if a simple but joint would have saved a lot of trouble for someone like me who is not skilled in woodworking.
Oh yeah, if you don't want use screws and will rely on wood glue or liquid nails to hold the joints, I found a belt clamp with ratchet really handy to keep everything in place while drying.
Jota21
Well-Known Member
If your miter saw can handle an 8" plank, than that is the way to go. I know some smaller models can only do up to 6". If this is the case you would get a cleaner cut with the circular. Which ever one you choose, do like jester said, verify the angles on some scrap. If you are worried about you circular saw cuts being straight, over shoot your line by a 1/16" and sand to perfect.
I don't recommend the table saw as any height variation in the end opposite the blade will effect you angle.
Or use a speed square to guide the boot of your cirular saw. But really, on a 1x8, the best thing to do is to find someone with a miter saw that will work (I'm not sure if a 12" can do it or not, but I'd start looking for a friend with a slider)
From your list, in order of what I'd use:
Miter saw, if it will cut 1x8 in one cut.
Circ saw with a new blade, and a square/guide clamped to the oak.
Table saw set at 45* with a long crosscut guide.
Get some cheap MDF and make sure your cuts are exact enough for you. Then go for the oak.
B
Miter saw, if it will cut 1x8 in one cut.
Circ saw with a new blade, and a square/guide clamped to the oak.
Table saw set at 45* with a long crosscut guide.
Get some cheap MDF and make sure your cuts are exact enough for you. Then go for the oak.
B
Like Catt22, I would also suggest verifying the angle - the gauges on tools are not particularly accurate, and stops are not a guarantee. Set the blade where you think 45 is, cut a test piece into two pieces. Flip one of the two pieces to make a 90 joint, and check with a square.
Couldn't agree more. Used a brand new Dewalt miter saw for mine and set it at 45. Two 45s did not make a 90. Had to adjust til I got it perfect (and to be honest, it still wasn't). I would definitely suggest setting it up with some cheaper wood.
When using a circular saw the good cut will be on the bottom of the board and the cut on the top of the board will tend to splinter as the teeth of the blade are coming out of the wood. This can be prevented by placing a quality masking tape on the wood centered over your cutting line.
Always adjust the blade depth to the thickness of the material plus 1/4" or so. Setting the blade depth any deeper usually makes it more difficult for the blade guard to function properly, affecting the quality of your cut.
As far as mitre cuts go, I've always found I made better cuts when I took the blade guard out of play (raised it up and held it up with my left thumb). The blade guard just seems to add torque to straight line effort until the guard is on top of the wood - the greater the angle, the greater the torque.
Now, draw you a line on that board and split it right down the middle! Always do a test cut first.
JuanMoore
Getting the banned back together
Cutting accurate miters is harder than it seems, and the longer the joint the more difficult.
Make sure the boards you are trying to join are perfectly flat. Any cupping or twisting will be amplified by the joint. If you're buying the wood from a big box store, sight down the length and choose the most flat pieces. If you're buying from a real wood shop, have them joint the faces for you.
It's usually easier and more accurate to stand the boards up against the fence and set the miter to an angle than laying the board flat and using a bevel angle. As mentioned, care needs to be taken to ensure that the angle is set accurately. Don't trust the factory stops or the numbers on the dial, instead use a speed square or angle finder.
Accurate cuts are only half the battle. Use whatever clamps, jigs, etc. you can to hold things in place, and make minor adjustments until everything lines up well. Masking tape works well to hold things in place while still allowing for adjustments. A little patience will go a long way when it comes to assembly.
Some cheap scraps are good for practicing both the cutting and the assembly. Practice until you feel confident that you can get an acceptable result, and then go for it. Good luck!
For a joint like that I usually work to find a design that doesn't require a miter at all. I don't like the way a miter can open up later and it isn't particularly strong.
I would probably have made that by cutting a rabbet groove in each end of the back side of the face piece. The sides would fit into those grooves.
At the back end of each side piece I would rabbet another groove for the back piece to set into.
This is how many kitchen cabinets are put together. Pull a drawer out of a cabinet and you will often find the box of the drawer is put together the way I described above.
BrewBeemer
Well-Known Member
Layer or stack 1/2" to 3/4" light and dark woods, maple with black walnut plus joined with dovetailed ends woukl show as strong contrasting ends dovetailed ends plus strength.
I haven't seen a miter saw yet manufactured be it compounds or slides that didn't require time spent with a tuneup and squaring made accurate before use. If your planning on 45 degree mitered joints I would add biscuts for added strength.
The wife happened to run across one craigslist item of intrest for me as she has my tool want list.
Look for older DeWalt's the heavy cast iron framed radial saws they are rather accurate after tightening up plus cheap, I paid $35 for a 12" one, too heavy for PO plus needed a new cord.
Model 1000, http://www.skylinepictures.com/New_Frame_Moulding_Cutting_Joining_Equipment_nfe7_full.htm
was my great freebie find.
It is fully loaded with the optional 48" long arms and stops plus a new carbide blade. A great find vs $3,400 they go for loaded this from a mega buck art studio that ordered three new tax writeoff saws. I was first to call and pick it up have truck will travel 6 miles away.
Granted a one purpose tool for dead nuts perfect 22.5 and 45 degree miter cuts but oh what a dream to use including house baseboards.
There are basically two kinds of carpenters in the world. The kind that frame up houses and the kind that make violins. A skilled carpenter knows how to compensate for the imperfections of both the tools and the materials. Sure, the more advanced jointing technique would be the best way to go, but only a very few of us have the skill and the equipment they require. I still think that a clean and tight butt joint is the best option for the average weekend warrior when building something like this. I built mine using doweled butt joints. Well sanded and painted they look about the same anyway. Natural or stained finishes don't cover defects as well as paint does. I would never attempt a precision miter cut using a hand held circular saw with or without a guide. You can make a Ryobi perform as well as a DeWalt if you know the right tricks.
Granted a one purpose tool for dead nuts perfect 22.5 and 45 degree miter cuts but oh what a dream to use including house baseboards.
I don't think my house has a single wall that was a perfect 90 degrees
 I had to tweak the angle on every single outside corner baseboard!
- Joined
- Nov 6, 2007
- Messages
- 62,016
- Reaction score
- 6,922
I don't think my house has a single wall that was a perfect 90 degrees
agreed. All these tools for perfect angles are a great idea in theory, not the guy building the house didn't use them so it's moot point
And lets face it, we're not building ,museum pieces. 43-44.5° is good enough.BrewBeemer
Well-Known Member
I don't think my house has a single wall that was a perfect 90 degrees
Erik, I hear ya about walls not being square I recall this in newer construction houses back in 77 when I did residential electrical.
I have baseboards with picture frame mouldings near the ceiling as well at top levels of window frames on acouple houses.
The 1905, 1913, 1931 and 1936 house all have square walls with only slight settling problems I releveled years ago. Real carpenters built houses with pride back in the early 1900's.
There are a lot of a880's era homes on this island plus contractor friends restoring them, i've had the privilege to be hired installing missing or broken trim, this FrameSquare has been a money maker for me considering it's a freebie. I made aluminum wedges allowing for not so 90* miters for newer construction homes.
Real carpenters built houses with pride back in the early 1900's.
Just one more reason why I hope to build my next home - I can be as exacting as I want! I'll have to borrow your rig for the trim then, since it will all be done right!

Just one more reason why I hope to build my next home - I can be as exacting as I want! I'll have to borrow your rig for the trim then, since it will all be done right!
I hope you have a lot of free time, I have been working on a 1500 sq ft addition for a year and a half.

BrewBeemer
Well-Known Member
I hope you have a lot of free time, I have been working on a 1500 sq ft addition for a year and a half.
A year and a half, that's all?
I've surpassed 8 years on the 1,200' 1905 house, shower sliding glass just installed, carpets, linoleum and window coverings next. I'm 96% restored, basement laundry room / work area sheetrocked 17' 6" x 14' 8" a toasty quiet room.
I releveled, central heat, full copper plumbing, I did a 200 amp service change, double windows with "E" ratings, new roof, fully insulated. Silent inside holds temps be it summer or winter. Car finish on doors and door frames (removed 17 layers paint). Cut out then added wood where doors and frames had damaged wood missing. Tig welded cast door latches latch cams from wear, I went over the top spray painting all framework not that airless crap. Back injury delays, hired help are overpriced total hacks no thanks. Sory a bit OT ya think?
lotbfan
Well-Known Member
be a man and dovetail those joints!
I gave up on miters and went with a butt joint, next time when I build a collar, I am going to just pay the guy at the cabinet shop down the road 10 bucks to make the cuts for me... maybe that is an option for you.
I gave up on miters and went with a butt joint, next time when I build a collar, I am going to just pay the guy at the cabinet shop down the road 10 bucks to make the cuts for me... maybe that is an option for you.
- Joined
- Nov 18, 2008
- Messages
- 2,058
- Reaction score
- 25
I don't think my house has a single wall that was a perfect 90 degrees
If you have drywall, your corners will never be square. Even if the framer does a perfect job, mudding the corners (inside and out) will cause them to be <> 90.
BrewBeemer
Well-Known Member
Lath & plaster all houses with wainscoting in the 1905 house, pantry cabinet shelves made of one piece pine 26 1/2" wide, goofy hand made fired fireplace bricks, kitchen had a chimney sticking into kitchen. Wavey glass with bubbles plus coal box in the fireplace, gas lamp lighting fixtures found in the attic.
When building cabinets, I make sure the carcass, is small enough to fit, doesn't need to be tight. The faceframe, the part you really see, can then be made to fit perfect.
Working with wood, is all about practice, tricks, and jigs. The tools mean very little if you know some tricks. Although the blades should be sharp.
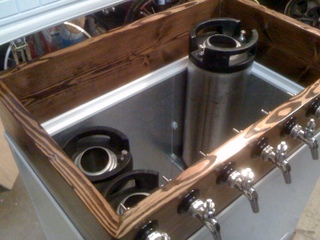
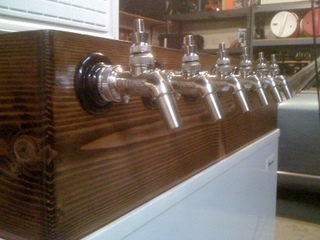
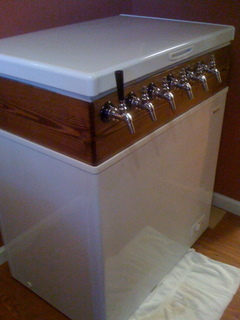
Your cuts look great, considering you are showing grain, butt joints would have looked silly.
Butt Joint guy, you can do them with hard wood and stain, end grain usually soaks more stain, so heres a trick sand end grain with paper 2x as fine as other areas. This should help match the soak.
Working with wood, is all about practice, tricks, and jigs. The tools mean very little if you know some tricks. Although the blades should be sharp.
Your cuts look great, considering you are showing grain, butt joints would have looked silly.
Butt Joint guy, you can do them with hard wood and stain, end grain usually soaks more stain, so heres a trick sand end grain with paper 2x as fine as other areas. This should help match the soak.
BrewBeemer
Well-Known Member
Try this joint, strong, easy to make plus no exposed end grains and accurate as hell for gapless joints. http://www.wonderhowto.com/how-to-make-lock-miter-joint-258950/
Try this joint, strong, easy to make plus no exposed end grains and accurate as hell for gapless joints. http://www.wonderhowto.com/how-to-make-lock-miter-joint-258950/
holy **** I need that right MEOW..
-=Jason=-
BrewBeemer
Well-Known Member
Make all your 45* miter cuts plus add spline slots, then make splines that fit snug within the kerfs all can be done with a table or radial arm saw.
Similar threads
- Replies
- 1
- Views
- 916
- Replies
- 11
- Views
- 1K