Turkey fryer burner timer/interlock mod

Homebrew Talk - Beer, Wine, Mead, & Cider Brewing Discussion Forum

Help Support Homebrew Talk - Beer, Wine, Mead, & Cider Brewing Discussion Forum:

This site may earn a commission from merchant affiliate links, including eBay, Amazon, and others.
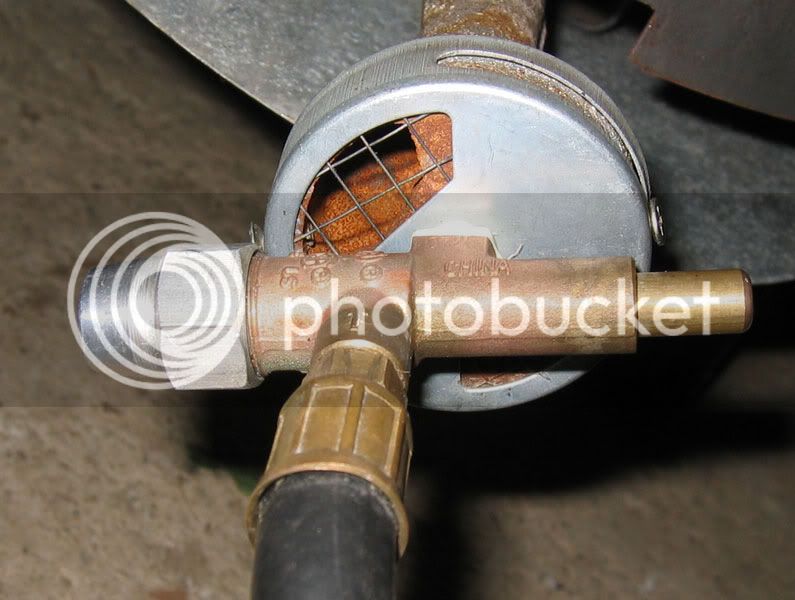
I just removed the whole timer box.
Only thing left is the safety valve the turns off the gas when the timer runs out..
Not sure if it is the same as others but there are two options.
The first is what I did.
1- take a short 6 inch or so piece if wire and wrap it around to hold the valve open.

2- I did a quick test and this valve is controlled by an electro magnetic switch of some basic kind.
I assume that the timer puts out a small electrical current to this switch / or as some say the heat builds up and keeps it open and when the timer runs out it releases the valve.
I attached a 1.5v battery to it and this held the valve open.
It has two wires so trial and error to figure out positive and negative. if it matters.

But for me the wire holding the valve open seems ti work.

Wish I would have tried turning it to far if that is all I needed to do.
also wish i would have found this thread before i started messing with it but the way i did it works so far.


I really liked the turkey fryer during my fist batch.. But we will see how well it holds a boil during a north Canadian winter.

Ps typing on my cell phone so many grammar mistakes I apologise for..

You should just be able to take the entire electro mag switch out of the valve all together and successfully have an open valve. Just be sure to re-install that aluminum housing the valve nested into so you have a closed-up gas line in the end.
 
During my last brew day I was rudely interrupted by my father showing off his shiny new motorcycle and he forced me to take it for a ride. He stood watch over my boiling wort and I instructed him how to prevent a boilover but failed to mention the timer. When I returned I saw that the wort wasn't boiling any longer. Needless to say the timer is ridiculous and adds a level of frustration to my brew day everytime. Well I just did this mod and everything seems to be working flawlessly. Thanks for the info!
 
I took the cap off the end of mine but found no gasket, nothing that looks like any of the pics. Whats the deal? Its one of the banjo cookers from walmart
 
I just pulled the knob off the timer and turned the pin with a pair of pliers till the timer stopped ticking, the burner still has the thermocouple protection but the stupid timer no longer moves as its jammed fully on.
Not sure how long it will last but for now its doing the trick.
 
haha i'm gonna definitely try that, if it breaks, walmart has a pretty loose return policy :p
 
My burner has a knob on it that goes off every 15 minutes. Instead of messing with it, I just duct taped the knob all the way open. Way easier.
 
My burner has a knob on it that goes off every 15 minutes. Instead of messing with it, I just duct taped the knob all the way open. Way easier.

I did almost the same...except I drilled a hole through the handle and used a zip tie to hold it from moving...tossed that burner and bought a sp10..love it
 
Bought a Bass Proshops turkey fryer to start doing full boil. Got it about 5:00pm. Annoyed with timer by 5:01. Found this thread by 6:00. Had it disabled by 6:30 using the method described here. You guys rock. Seriously, thank you.

I did cut my thumb on the sheet metal timer cover. Be careful, it is very sharp.
 
This worked like a million bucks. Modded it today and I had an old school turkey fryer in about ten minutes.
 
Yup, just used a zip tie on the knob to hold it down, works like a champ now! Thanks to all, and brew on, CHEERS!

PS: No need for batteries in the timer, just ignore it's even there.
 
DISCLAIMER: Propane is dangerous. I am not a certified anything. Be careful and use your head, dammit.

I have one of those turkey fryer setups with the timer that shuts the gas off every 20 minutes. That got tiresome, so I removed the timer.

It also has a safety interlock for the gas - you have to push a button to get the gas started, then hold it until a sensor heats up. This will shut the gas off if the flame goes out.

Then when I used my new 15 gallon pot, it was too wide and reflected too much heat back onto the control box, causing erratic behavior. The interlock would shut the gas off randomly for no good reason.

I decided to see if I could bypass all that by directly threading the regulator hose into the burner body. No such luck - the body is 1/8" NPT and the regulator hose is straight thread sealed with a copper washer. So I decided before buying a new burner, I'd see if I could defeat the interlock.

When I pulled the black box apart, I saw the fitting in the following picture.

burnermod.jpg


The aluminum cap on the left side of the photo was straight up and the button was straight down. It's skewed in the picture because I tightened up the threads in the body of the burner and this is where it ended up.

There was a brass tube and fitting going into the top of the aluminum cap. I removed that, then removed the aluminum cap. Inside is a cartridge with a spring and rubber washer at the bottom. It's this rubber washer that seals the gas off. I popped the rubber washer off and the spring and metal washer behind it came with it.

Then I just put the cartridge back in and threaded the aluminum cap back on. There's no need to put the brass fitting back in the top of the aluminum cap because the cap seals on the cartridge inside.

Now the burner works like a normal burner. Turn on the regulator, you get gas at the burner. Yay!

-Joe

Was it difficult to remove the aluminum cap? The one on my burner seems very very tight.
 
msa8967 said:
Was it difficult to remove the aluminum cap? The one on my burner seems very very tight.
It was not that hard to takeoff. It should unscrew with a little strength. Counterclockwise.
 
I just held it down with some ducktape and used a little bit of JB Weld once it dried it was great.
 
I just used a zip tie and held the button down. I tried to open it up as described, but everything was so tight I was worried I would strip threads, or snap something off. I used the zip tie and it works great! Bypasses the valve and no need to use batteries anymore. Path of least resistance worked wonders in this instance.
 
Bump!

I can vouch for the twist the timer til it stops ticking technique. I couldn't get the cap off to save my life, I've had the burner for a year and it's kept outside. The cap was all but fused on, I'd have to cut it off. So I just twisted the timer til it broke and now it works like a charm. Just did a 60 minute boil to confirm. This particular batch had one 60 minute hop addition so not having to tend to it every 10 minutes was a real treat!
 
The easier and safer option is to simply remove the timer knob and cover for the timer box, and connect the two wires going into the timer to each other. The burner will run without the timer turned on, and you still retain the auto gas shutoff just in case the flame blows out.


Drinking = Lucky Red ale, Blonde Hag ale
Primary = Tomahawk Amber ale
 
Snagged this burner and accompanying 30qt aluminum pot for $10 via Craigslist. I actually found a YouTube video that directed me to search HBT for this thread.

I modded mine by removing the timer, wire-nutting the two timer wires together and pulling the safety shutoff valve out. Basically used the brass nut the wires go into as a plug. It worked great, but now I'm debating putting the valve back in. Originally, I just bypassed the timer and tried to light the burner, but as soon as it lit I let off the flow switch...probably just didn't let the thermo get hot enough to keep the connection open.
 
I have a very similar set up, but just ordered a 40qt stainless steel tall boy kettle from northern Brewers last night to replace to 30qt aluminum boil pot. what I did to the burner was just put duct tape around the little button on the top that you hold down to light. It's worked great ever since, haha.
 
Went ahead and followed Irish's instructions to finish mine out, however the ex-valve assembly is horizontal with the button on the right hand side, to get the tapered threads tight. I have to admit, while it works and I'm proud of my $10 bargain I'm a little hesitant to do a long burn with this setup. Would definitely rather hit the plumbing aisle and get the proper adapter fitting to go from the hose to the burner and use some gas tape/dope. Or maybe even just cough up the coin for a nice new one...ten bucks got me rusty back-porch special that presumable has been out since last Turkey Day (it was still full of peanut oil...that was fun to clean out and re-oxidize the aluminum pot....)

Here's that copper piece that screws in the end of the aluminum cap. This is where the wires led back to the timer in the original setup. The rounded end fits in snug with the rubber/plastic washer:

IMG_8128.jpg


IMG_8129.jpg


Re-assembled, no signs of leaks:

IMG_8130.jpg


IMG_8133.jpg


Thanks again for the original tutorial, this is a huge help.
 
Back
Top