Single Vessel, All Electric, NS, NC Brewery

Homebrew Talk - Beer, Wine, Mead, & Cider Brewing Discussion Forum

Help Support Homebrew Talk - Beer, Wine, Mead, & Cider Brewing Discussion Forum:

This site may earn a commission from merchant affiliate links, including eBay, Amazon, and others.
Just wanted to make sure you weren't thinking of using it during the boil for hops, I can No Chill in a bucket but it gets really soft and warps when I drain the wort in to it.

+1 on the Happy Wife/Happy Brewer, I'd also like to have a small space solution in the basement. Brewing while being able to play with my little one inside is my end goal.

And yes, HEX is just an acronym for Heat EXchanger.
 
Okay....so I scored some 304 SS screen. I really SHOULD have got a sample pack on Mcmaster-Carr and done some experimentation, but my impulsive side took over.

I got 3'X4' of 6x6 Mesh:
ItemDetailStandard92405t23-6x6.gif


And 3'X4' of 30x30 Mesh:
ItemDetailStandardMedium92405t25-30x30.gif


I would cut these in half lengthwise and line the steamer basket....affixing it with either rivets, solder, or JB Weld. I'm not sure which size mesh I'll ultimately go with......

I have experience with the 30x30....it's pretty fine and surprisingly strong. It works well in a hopstopper for pellets. I got great filtration, but the all stuck particles required some good cleaning. I'm not SO concerned with using an ultra fine screen, I use a CFC and plan to have a large bottom drain. I also primarily use whole hops. The price was just right.

The 6x6 may be too coarse, but it looked pretty burly, and I figure it might provide that really durable "wire basket" feel to the steamer basket. I may still go with the large mesh bags for ease of cleanup...this would just serve as a filter for whole hop cones. The large mesh should really allow good circulation through the pot, the "DIY Hopstopper" thread chronicles the horrors of a scorched 10 gallon batch from too fine of mesh. If it is TOO big, I'm sure I could make my money back on it in a heartbeat.

With all of this talk of SS screen, I wonder....what size mesh are the bags we use? How fine COULD you go before you had efficiency/flow problems? Swiss voile looks pretty fine.....so does the nylon mesh.....
 
Nice, I'm still torn between SS Mesh and making a frame for a Swill Voile bag. You'll have to let us know how you think these work. I would think the 6x6 might be too big for the grain, but that 30x30 might just be the ticket!
 
Random thought. I've heard of people adding water to their grain prior to milling it. I was wondering if this wet grain would be less likely to fall through a mesh or steamer that had 'large' holes.
 
Random thought. I've heard of people adding water to their grain prior to milling it. I was wondering if this wet grain would be less likely to fall through a mesh or steamer that had 'large' holes.

The holes in my steamer are like 3/8" of an inch. Un-milled grain would pour through it. I condition my malt about 75% of the time, but I think the husks would stay in the mesh, but everything else would not. Maybe that's okay??
 
What a great thread!

I am currently building out 950sq. ft. of my basement. The bar area is aprox. 10x12 inside the cabinets and fridge/sink area.( brew area)

I have 2 sanke's and a vision, but this changes everything. I was planning a 3 tier gravity system with a winch on my BK for a gravity feed to my fermentors.

I am a firm believer in simplicity and love the single vessel idea but would like to use what I already have.

I would also like to eliminate the rims and just mash and sparge as I do now. I am getting 82% eff.

Problem is going to be able to raise the mash temp without increasing the liquid in the mash and stirring alot.

I'm thinking I could fabricate a copper basket (bottom holes only) for the sanke and slowly lift this out during the sparge.

I also like the bottom drain and would use a removeable riser with screen. This would let me drain completely, leaving all break materials and hops behind. I would then remove the riser for easy cleaning.

Sorry for rambling.

Bull
 
Random thought. I've heard of people adding water to their grain prior to milling it. I was wondering if this wet grain would be less likely to fall through a mesh or steamer that had 'large' holes.

No way in hell am I adding wet or even moist grain to my barleycrusher....I'd rather just get the right size mesh ;)
 
What a great thread!

I am currently building out 950sq. ft. of my basement. The bar area is aprox. 10x12 inside the cabinets and fridge/sink area.( brew area).......

I would also like to eliminate the rims and just mash and sparge as I do now. I am getting 82% eff. ......

Problem is going to be able to raise the mash temp without increasing the liquid in the mash and stirring alot......

I'm thinking I could fabricate a copper basket (bottom holes only) for the sanke and slowly lift this out during the sparge.......

I also like the bottom drain and would use a removeable riser with screen. This would let me drain completely, leaving all break materials and hops behind. I would then remove the riser for easy cleaning.......
Bull

You're doomed :D Any brewer with a 1000 ft basement is a recipe for disaster! :D You could do this a million different ways, from simple and cheap to complex and expensive (my favorite). It depends on your brewing style. I think you'll want that RIMS if raising mash temp is a concern. Otherwise you'll be heating sparge water on the stove. Alternatively, you could direct heat in the vessel as long as you have space around the element and your screen isn't TOO fine.

Could you expand on your bottom drain with "removeable riser and screen"? Is it one of those domed drain covers? I'm interested.

Something else occured to me yesterday. Though it would require a bucket and not be a TRUE single vessel system, you could very easily fly sparge with this setup. Lower the level of fluid in the main vessel, use the rims with fresh water supply as discussed earlier, and drain at the same rate to your bucket. Once you reach your pre-boil volume/gravity, dump it back in the BK and get your boil on :D Not that I'd ever do this, but it demonstrates the flexibility of the system :rockin:
 
Nice, I'm still torn between SS Mesh and making a frame for a Swill Voile bag. You'll have to let us know how you think these work. I would think the 6x6 might be too big for the grain, but that 30x30 might just be the ticket!

Go for the mesh! You can find it on Ebay, and McMaster is like $60 for 3' x 4' of 30x30. That's not too much for something that'll last a LONG time if you take care of it......the trick is to be sure you get a mesh size you're happy with.
 
I was thinking of still using one of the sanke's as a permanent hlt as high as possible(8 ft ceiling) with a fill in place system. This would be powered with one 5500watt element,
bottom drain (possibly inverting the keg) and sight glass for easy reading.

I would preheat my water for the brew session and gravity feed to my mash tun. The tun could now also be my BK. I would have to adjust the amount of strike water added (dead space under the basket) to make sure my grains are wet enough.


I actually could try this and if I have trouble raising the mash temp, I could still add the rims. Again, I'm just trying to keep it simple.

The bottom drain in the BK is going to be a 1" x 3/4" bushing. This has 3/4" npt threads on the inside and 1" npt threads on the outside.

Before I start my session, I will screw in a 3/4" copper male adapter with a nipple soldered on if needed. I was thinking of a coppper chore boy as a screen. I cold easily solder this together and make make different height nipples for larger batches.

This would allow me to vigorously aerate and whirlpool my wort after my boil while it is still above 160 degrees. I can the drop in my chiller and cool it down.

Everything will settle nicely and I'll drain into my fermentor leaving all the break/ hops behind.

I would then reach into my BK and unscrew the nipple, wash the BK in place and drain through the bottom to either the drain or a bucket.

The main thing is not having to move anything for the process. :rockin:

Suggestions?

Bull
 
I'd take a look at BK's "simple brewing" build. It's a little closer to what you're describing.
 
I just had a thought;

WHAT IF: You attached an IC/SS coil to the outside of the basket? Wrap the coils around the basket such that they are "in between" the holes and have your inlet/exhaust out the top such that they can go through the lid and use camlocks/qd's.....

Upsides:
1) It'd be a lot easier to do than installing an IC on the inside wall of the kettle....
2) Easier to clean (you have to clean the inside of hops anyway)...
3) Trub gets left in the kettle
4) Coils get sanitized the entire time you mash/boil, no "adding" an IC 15 mins prior

Downsides:
1) Could take up volume in kettle that would be used for wort. Depends on kettle size and OD of tubing used. 50' of 3/8" SS could probably be used with success while still allowing a good fit along sides and not displacing too much volume.
2) Should be drained pretty dry, as steam is a PITA with IC's. Not a huge problem though.
3) May not be AS fast as other methods, especially with 3/8" tubing.

Any ideas?
 
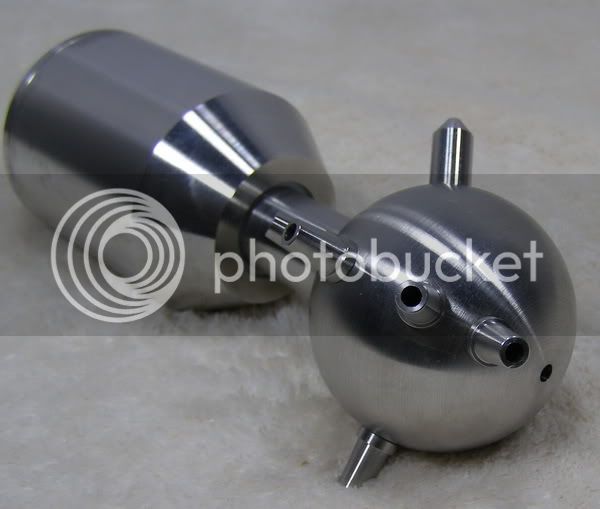
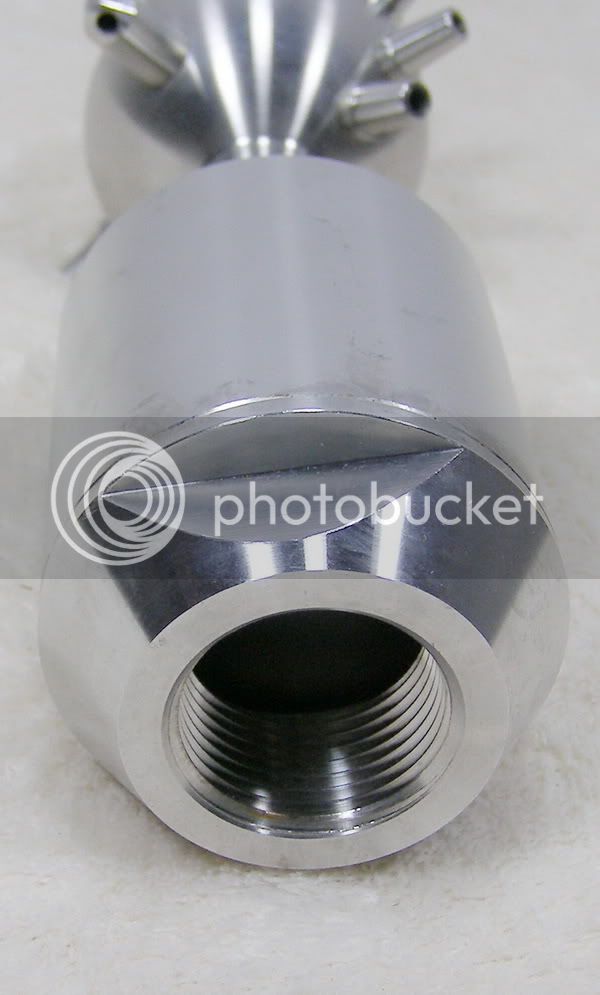
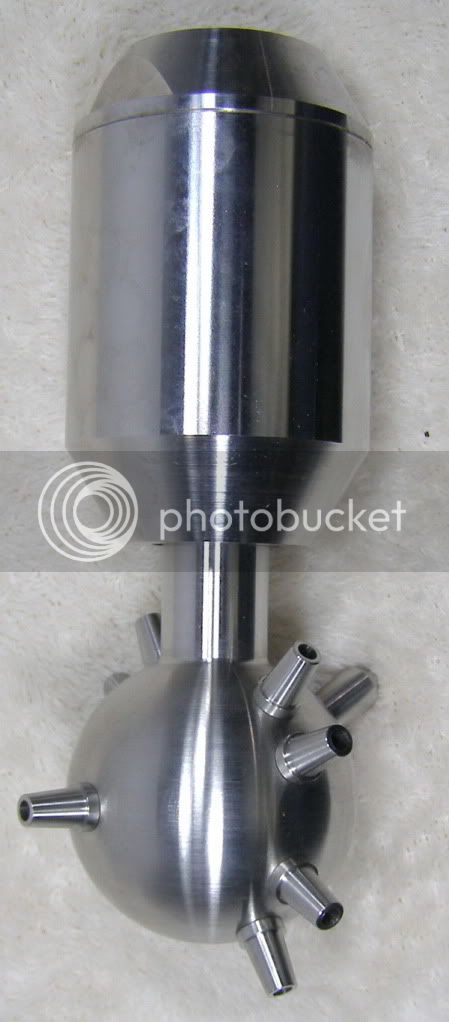
So...here's a sneak peek at one of the "crown jewels" of this system:

SprayBall1.jpg


SprayBall2.jpg


SprayBall3.jpg


I will probably build in the ability to sparge at low flow rates with this. I'd worry about clogging it if I used it for my recirc.

3/4" NPT inlet, 316SS, this thing is gonna be suhweeeet!:mug:
 
The Русская мафия can get you anything you want, for a price...
 
Scuba Steve, your my hero. At some Il brew event, we've got to meet. My single vessel system only exists in my head, but everything your doing is what I doodle on scrap paper. Some day.... Sigh...
 
Scuba Steve, your my hero. At some Il brew event, we've got to meet. My single vessel system only exists in my head, but everything your doing is what I doodle on scrap paper. Some day.... Sigh...

I'm getting KINDA close...I've got a lot of ideas, a big pile of parts, (kinda like The Pol had with his build) and no progress. Since this thing kind of evolved from another design I had, I can already tell I've bought stuff I don't need. I wish I could be one of these guys that has a clean parts list and doesn't spend any more than necessary. Instead, I'm that guy that has all kinds of spare parts I'm keeping "just in case" :D I think I'm going to have to sell some stuff on Ebay!

Anyway, I still need to get a pot/basket and some kind of frame/wheels (anyone in Northern IL know how to weld SS?). I figure I'm going to forego the hoist and install pegs on the side of the basket, like the Speidel Braumeister has.

I'll also need the BCS-460, elements, switches, wire/cords, relays, and outlets. So I'm still a long way off.:p
 
You could also install pegs on the outside of the kettle - 2 on each side, one close to the top and another 6-12" lower. You have a pair of bars with matching holes that you slip over the pegs. The bars have a u-shaped tip where you rest a horizontal support that goes through a pair of loops on the top of the basket. You could make a couple of sets of these bars for holding the basket at different heights, or make the bars out of two pieces that fit one inside the other and the height adjusted with a series of holes and a pin.

My thinking is that you want as little stuff as possible on the inside of the system.

If I were to go the route you describe above, I'd probably go with my original idea of telescoping 1" SS tubing, and add a winch or pulley at the top. It'd be the most useful, still allowing for compact storage and infinite adjustment of the basket.

But, I plan on reinforcing the screen on the inside of the basket with 1" strips of SS sheet along the top and bottom circumference, as well as down each side at the seam. Hard to describe without a pic. I would bolt these in place in a few key positions, and use a thin bead of epoxy to get a nice tight fit. The bolts would protrude a bit on the outside of the basket, and I would use these as my "pegs" and lay a piece of SS rod perpendicular across the top of the pot like the Speidel Braumeister does. Again, difficult without pics. This would be easy, cheap, and clean as it would require no outside modification of the pot or stand. :mug:

There's many ways to build this thing, that's for sure:p
 
How about using that 80/20 stuff? Looks good, possibly cheaper.

Otherwise - Bensenville has a good shop called Ability-welding.
 
Beerocd- Thanks for the tip on the welder. I'll tuck that away ;) I've been looking at the 80/20 stuff....it definitely has potential, especially because I can break it down or add things on at a later time. I'm trying to get a look at what it might cost me...they have a project calculator but I don't have autocad, only sketchup.
 
ScubaSteve, tossing out a crazy idea looking for your thoughts. At one of the Australian web sites where "Brew in a Bag" began, there is some guy who converted a steel utility sink into a brew kettle. Didn't do much to it, I think he lites propane under it and that's probably it. Got to thinking, it would probably be pretty easy to convert a steel sink to a e-vessel (three flat sides for heat sticks) and the opening is WIDE 24" by 24" and maybe... 14" deep? What do you think?
 
ScubaSteve, tossing out a crazy idea looking for your thoughts. At one of the Australian web sites where "Brew in a Bag" began, there is some guy who converted a steel utility sink into a brew kettle. Didn't do much to it, I think he lites propane under it and that's probably it. Got to thinking, it would probably be pretty easy to convert a steel sink to a e-vessel (three flat sides for heat sticks) and the opening is WIDE 24" by 24" and maybe... 14" deep? What do you think?

I think it's a great idea. There's a thread going right now about the prefabricated system that uses the sinks (name escapes me). It'd certainly work....you could probably still use it as a sink with some creative plumbing.....for that matter you could probably ferment in it! :mug:
 
Soooooo, I gave in and got an oxy-acetylene welding kit :D :

It's a Lincoln-Electric Port-a-Torch (made by Harris) and while it's not the best, it's still pretty good for what I want. I can always upgrade along the way...parts are readily available. There's all kinds of arc welders and migs that are super cheap, but with this I can cut, weld, braze, and solder almost ANY metal....and it doesn't require 220v. It was kind of an investment, but I got a sweeeet deal on ebay...brand new WITH tanks for $240 (including shipping!).

This is going to allow me to do a BUNCH of stuff, the sky is the limit...I plan on buying pre-cut SS square tube and welding up a stand, as well as modifying the basket, adding couplers to the kettle, and the list goes on. :mug: I'd probably have paid a welder close to the price of the gear, plus I get to learn a valuable skill!
 
You're never gonna brew.... are you. :(

I haven't made any progress since Christmas - so I'm no better. But I'm not changing my plans daily either. :)
 
Well....I can't brew just yet because I'm in Afghanistan....just sayin' :)

I think getting the torch is going to slingshot me into a whole new realm of brewing and DIY projects......
 
:eek:

So you're sayin' you have a valid excuse and I don't...

Well....I COULD brew beer here (believe me, I've considered it). But it's not worth losing my career over :( So, until I get back I'll just obsess and watch Ebay like a hawk :)
 
Awesome thread! Read the whole thing. Going to let it steep in the brain for a while, but plan on trying something similar myself. Good luck to all

OE
 
Hey guys, just a quick update....i've been amassing tools, and I still need to get several parts for this thing. I was thinking about doing a scaled down 115v 4 gallon version but since I bought the sprayball and several other parts I think i'm committed to the 220v version. Planning on using a 14g Italian kettle I already own and inserting the 44 qt basket. If I sparge, i think i can get away with a smaller vessel and still do 10 gal batches...
 
Go with 220v, the elements/electronics are really not that much more IMHO. I'm still looking around for a 1/2bbl Plastic/Rubber coated keg for my build.
 
I've been thinking about ways to insulate the vessel while still keeping it looking awesome. I appreciate the reflectix and the rubber for the insulating abilities....but I want to make something that is a bit more eyecatching. I think I'm going to go with 2" vertical wood slats around the perimeter, all held in place by 2 leather or metal bands. I think it'll look classy with some nice finish on the wood. I figure I could up the "R" factor by still putting a layer of reflectix around the vessel under the wood.
 
While I think it would look nice, I don't know about how easy to clean that would be. I'm a messy brewer!
 
Well, this will be clean in place....and I use fermcap religiously so I haven't had a boilover in a few years. That stuff is great!
 
Good to see you back here Steve. I'm hoping that you will build this thing and report on it so I can learn from your mistakes rather than my own. :cross:

Actually, I have done my first two BIAB batches, both still in the fermentors, so I am starting to learn what will be feasible for the single-vessel, electric, recirculating, no-sparge, no-chill, clean-in-place version. Well, at least I am learning a few things that will not work.

For example, it is now obvious to me that without a rigid basket the recirculation is not going to result in clear wort, because the shifting of the grain bed when pulling out the bag releases a bunch of particulates.

Additionally, I found that there were hot and cold spots in the folds of the bag material. I probably did not stir enough in the first batch to get an accurate temperature reading, and ending up mashing high. Another argument for a rigid basket.

I also think that I will need both a traditional lower-side valve with a pickup tube for draining the wort, and a dead-center bottom valve to get complete draining for clean-in-place. The amount of break material with these BIAB batches would either clog a filter, or result in a filter that is a bear to clean. I think whirlpooling with a side pickup tube will be a better approach for draining wort. Of course this means that the clean-in-place line will have to be teed off to both feed the spray ball at the top and feed through the valve and pickup tube, draining through the dead-center bottom valve.

I am still wondering for the recirculation whether the grain bed filtering will be adequate with a basket with holes on the sides and bottom, or will require holes only on the bottom. I do not think I can figure that one out without trying it, or hearing from someone who has done so.

All that said, I am finding that BIAB is a perfectly feasible method without the bells and whistles. Planning and building this thing is for my own entertainment rather than necessity. It will be great to end up with a shiny, new system for 10 gallon batches, though.
 
Back
Top