Cut keg top for false bottom?

Homebrew Talk - Beer, Wine, Mead, & Cider Brewing Discussion Forum

Help Support Homebrew Talk - Beer, Wine, Mead, & Cider Brewing Discussion Forum:

This site may earn a commission from merchant affiliate links, including eBay, Amazon, and others.
1st the "time/cost" folks...REALLY? Waste of time? Isn't that the heart of a DIY, Time>cost? I seriously NEVER add my time in. This is a hobby. Do any of you hunt or fish? Do you average your time into the #'s of meat to determine you are eating a $500.00 bluegill/game bird dinner for 1???

As for the cost. Should someone who is about to make a keggle see this, they can get the cut off wheels I mentioned in my previous post, so the actual cost of this mighty fine DIY is under $10 with the bung...

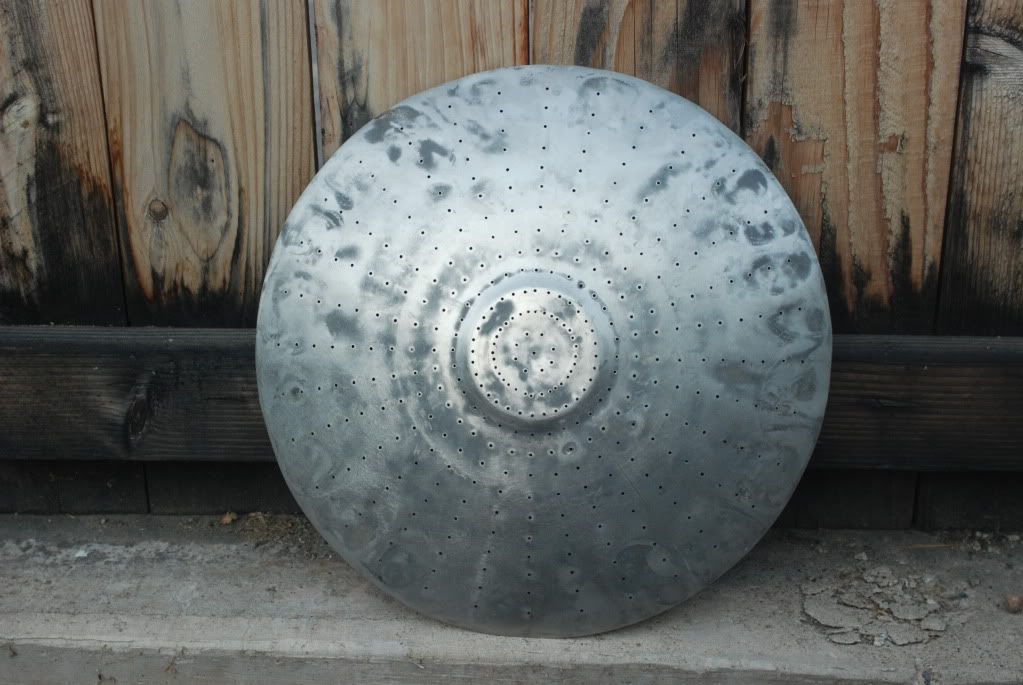
My other "after thought" on this project was it would be REALLY easy to make the holes in a neat/artistic pattern for a truly personalized piece of equipment. That is the only hind sight I can add in other than make the original "cut top" as big as a hole as possible.

:mug:
 
Thanks for this diy, i will be doing this to put a fb in boil kettle to help keep some of the hops/break out of the fermenter. As for the negative comments from some, well yea I could buy this, but hell i could buy beer for that matter. Plus diy is very wife friendly as it doesnt generate receipts.

I'm also interested in doing this....I'm assuming you are using a burner on the boil kettle-what do you plan to use in place of the rubber bung in this build?
 
If I factored in my time as an expense, I should've just given sabco and blichmann my credit card and said "One of everything please".
 
If I factored in my time as an expense, I should've just given sabco and blichmann my credit card and said "One of everything please".

ROTHFLMAO :mug::mug::mug::mug:

No doubt.

I think this project should be stickied and rec'd

The idea of using it in the boil kettle is AWESOME.

I have to drill mine for a drain. Even if I just drill a hole in the cut out lid for a pickup tube and stuff a steel scrubbie in the sanke dipstick hole, BAM.

Great DIY. Great thread. Really cant believe this isnt in use.

Totally the spirit of DIY! :fro::rockin:
 
Anyone go with the triclamp method with a cap with drilled hole for pick up tube? I was just wondering what size triclamp to use and if it worked well.
 
Nothing I can add to this but I really think the customized hole pattern would be awesome!

You could trace a pattern on there and start drilling. After awhile it will be a Zen experience interspersed with gratuitous swearing when the drill bits snap!
 
Anyone go with the triclamp method with a cap with drilled hole for pick up tube? I was just wondering what size triclamp to use and if it worked well.

The flange on a Sanke requires a 2" tri-clamp... I have them on my bottom drain E-HLT and my soon-to-be bottom drain MLT
 
I wonder where is the best place to buy the dip tube assembly. I have a boil kettle that I want to put a dip tube in, and I've been looking for the SS type like that but haven't found it for a reasonable price (It's SS so there may not be any reasonable price!)

Or should I just go with copper since it's cheaper and just as easy if not easier?

Ok, I will now, again, shamelessly plug barginfittings.com here. They sell all the SS parts for this as reasonably priced as I could track down and shipping is $5 if you choose the USPS flat rate. You can even order the stainless dip tube custom bent the way you need it...

I am a stainless steel whore. I love SS and with an all SS setup you never need to worry about it...ever.

I dislike copper/brass because I have seen mixed metals cause corrosion but this is really only a concern if aluminum is involved...IMO it is better to just go SS and never need to replace the part again...:tank:
 
Oh, I forgot about them! I'll have to head over and start deciding on how I want to build this stuff. I'm not terribly concerned about using copper for the MLT or BK. I may also be able to get some stuff from the scrapyard if they haven't sold it all yet. I think they had some stuff that would be good for fluid transfer and RIMS tubes. Just have to decide on fittings.
 
I have been working on a False Bottom from sheetmetal, I came up with a simple jig to allow the holes to be aligned and a design pattern to be left behind. I will do a writeup on it in the next few days. It should work on this application, only problem would be that a keg top isn't exactly flat. Anyway this was a great idea maybe the jig would help.
 
I don't understand how you can lose a half gallon and still get 92% efficiency. Isn't dead space factored into efficiency?


This is a MLT false bottom. Assuming fly sparging, you could leave a ton of water in the MLT system, as long as you stop collecting runnings before the mash pH gets out of the range and tannins start releasing. This shouldnt have an effect on efficiency.
 
Awesome idea! I am in the process of switching to all grain, and have started collecting materials (slowly, as to not anger SWMBO) to build a BRUTUS like stand... Do you think it would it work as effectively if you sunk the cutting disk in further, to make longer slits????
 
i think that a bunch of small slits is the way to go. i noticed that a few grains husks made their way through at the beginning, but after the grain bed was set, it was great. the flow is so good through the pattern that I used, that a flow rate, was not an issue.
 
I trimmed teh old sanke coupler fitting off of the top of the keg top, and grinded it down smooth, so that I am left with essentially a concave disc, that is twelve inches around.

So why cut off the coupler fitting? Why couldn't you just keep it on and put your plug in there? Or would your dip tube have an upward direction on it?
 
I guess it depends on the height of your bulkhead fitting. Mine didn't fit unless it was cut down, and i thought that it looked cleaner.
 
I made a false bottom today based on your idea. I left the coupler on and used the top piece of the shank as well. I brazed a 1-1/4" to 3/4" copper reducer onto it, then plumbed it to the drain. The most time consuming part was drilling the holes, 500-600 I estimate. A couple solid hours with a drill press anyway.

I ended up with this. It fits a 10 gallon cooler very well.

keg-top-fb1.jpg


Below are all of the pieces that make up the keg coupler (except the copper reducer). I used the 3 pieces shown on the left in this pic.

fb-keg-pieces.jpg


I set the keg coupler on top of the copper reducer and brazed them together, then sweated the rest of the copper tubing to the drain. With nothing added to the bottom of the copper reducer, it came out about 1/4" from the bottom of the cooler. Close enough for me.

fb-shank-coupler.jpg


fbdrain3.jpg


kegtopfball.jpg


kegtopfb2.jpg


I'm planning to do my first 10 gallon batch next weekend, so I'll see how it works then. It has a tight fit to the bottom, and can't be raised/moved by stirring, so I have high hopes for it.

:mug: and thanks for the great idea!
 
awesome job man. that looks great. let us all know how it ends up working out. have you done some dry runs with water yet?
 
Just thought I would update. I have done about 6 12 gallon batches since I made mine. I have had no stuck sparges or failures of any kind. Works great.
 
used two that I have made so far, and without rice hulls, and doing a recirculating mash, I had two stuck sparges... Rice huls solved the problem just fine, and did a 12 gallon batch and a high grain bill trippel batch, without a problem at all!
 
Here's my contribution to the keggle lid as a false bottom. I cut the top off, cut pie shaped wedges and then covered with a bit of mesh made from a delicates wash bag picked up at Target for about 3 bucks.
IMG_20110224_204207a.jpg

I've made 6 11 gallon batches with out a single stuck sparge.
 
For larger gain bills I will use 1 mash paddle to hold it in place while stirring. For smaller grain bills I just stir gently. And since I bottom drain a little shifting side to side doesn't break the seal around the bottom.
 
Here's my contribution to the keggle lid as a false bottom. I cut the top off, cut pie shaped wedges and then covered with a bit of mesh made from a delicates wash bag picked up at Target for about 3 bucks.
IMG_20110224_204207a.jpg

I've made 6 11 gallon batches with out a single stuck sparge.


How do you have the mesh attached to the lid?
 
SWMBO made it for me. It's about 2 inches larger in diameter than the lid. She put a draw string around the edge so it's a simple matter to put the material down, put the lid on top, pull the draw string tight and tie it off. All I have to do is tuck the string in so it doesn't end up hanging down into the drain.
 
Anyone have any more pics of their coverted covers to FB's. I have a keg to cut in the next week or so and think that since I have the majority of the items needs to complete the project I just may. I'm thinking about drilling holes and using a union connection with 1/2" rigid copper pipe.

Let's see what you have to share.
 
Great idea I used the bottom of a sanke that was hoplessly damaged. My holes are to small I think, have not used it yet.


028.jpg
 
Just found this post. going from cooler to keggle. Pretty usefull and cool project.
Started drilling all those damn little holes but have had a problem. How the heck dop you keep the bit from dancing around? Do you drill sanke coupling side up or down? I have been doing it that side up and the bit shimmies and shakes and bends like no ones buisness. Any pointers? I have extra lids so maybe I'll do the slits as well and see if there is any difference.
 
x2 on the nail... easiest way to do it, although i do usually use a punch, enless i am too lazy to go find it. I have had some recent problems with mine, one in which the bottom was lifted a bit, and allowed some grain to get by. The other was just a gooey mass of oats and wheat that clogged the whole bed of grain. I cannot be a larger proponent of rice hulls than is possible! I love em!
 
You could put a tack weld on that leftover sanke ring connecting it to the side of your boil kettle. Could be a holder for your Mash paddle/Stirring spoon?
 
I hit mine with an angle grinder + cutting blade to make slots instead of holes. I thought about holes, but the 10 minutes with the grinder swayed me.
 
Yeah, no doubt. This punching holes is for the birds. Been at it a few days (when the kids are getting baths) and holy crude! Taking forever. Next one will be slots
 
!!! I've been needing an excuse to upgrade to keggles... now I have one! Thanks!! Great project, only thing I will change is welding a SS washer to the opening and welding in the dip tube so there is no fear in the boil kettle.

thanks again and keep up the good work! :mug:
 
knocked one of my washer off the BK, had a splash screen laying around that I was going to make into a FB... tossed it ontop the BK to keep stuff from falling in, turns out it makes a pretty good cover so now I have a cut off top for this project when I can get to it. right now I have my cooler FB in my MT, it's pretty small in there but has been working okay, drains good. I don't think it would work for fly sparging but seems to be doing okay for batch sparging. Now i just need the time.
 
I also got a plastic scrubby from the grocery store to put around the base of the dip tube, due to one time occurance of grain getting around edge of the false bottom, and clogging the dip tube. Works great so far, be even I see myself in the future getting an nice professional false bottom, when all of the other needs of my brewery are solved(years from now).
 
Awesome DIY. I had thought about doing the same thing. Glad I found this one, definately, will use this insight
 
Back
Top