Brew rigs: hard plumbed lines vs flexible tubing

Homebrew Talk - Beer, Wine, Mead, & Cider Brewing Discussion Forum

Help Support Homebrew Talk - Beer, Wine, Mead, & Cider Brewing Discussion Forum:

This site may earn a commission from merchant affiliate links, including eBay, Amazon, and others.
Joined
Jul 24, 2006
Messages
14,260
Reaction score
786
Location
Southwest
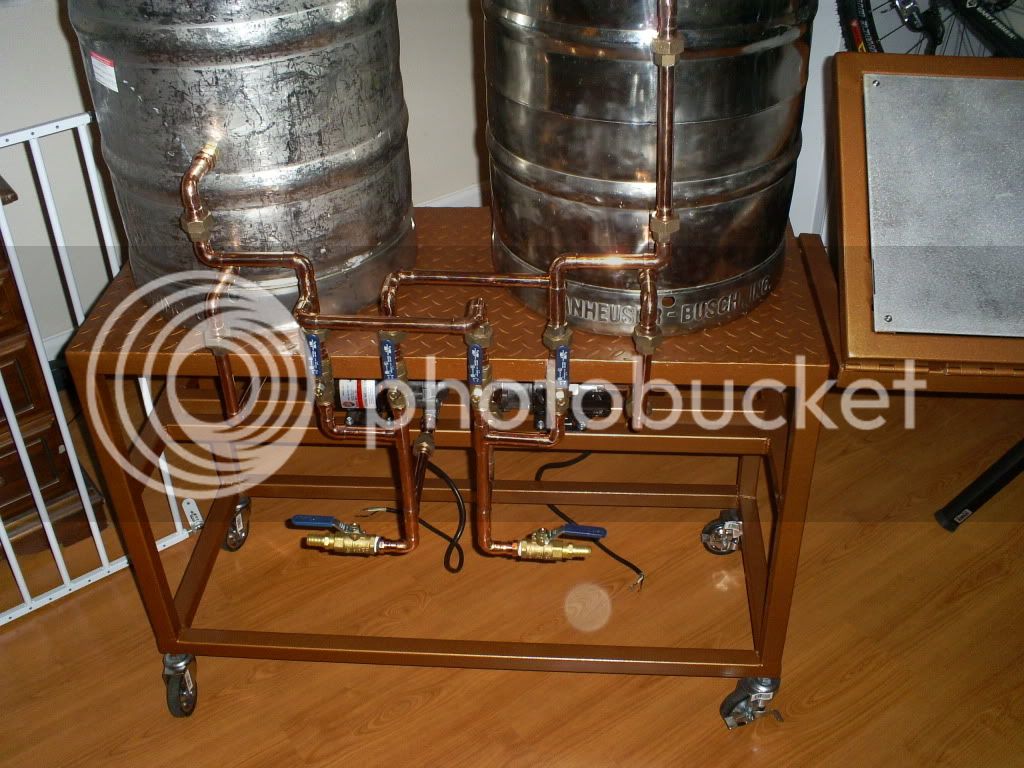
I've been very slowly gearing up for a new and much improved brew rig. Initially, I was going to plumb it with a mix of copper and stainless tubing and pipe, mostly for function, and perhaps for a little bling factor. Lately, I've been considering a semi-permanent installation of flexible silicone tubing, instead (Austin Homebrew carries some great high temp translucent tubing). The pros and cons:

Metal plumbing pros:
Permanent - will not significantly deteriorate over time
Will withstand any reasonable brewing temperature/pressure
Never kinks or collapses
Looks cool

Metal plumbing cons:
Permanent - hard to change if/when the need arises
Not transparent
Copper requires a bit of upkeep to keep it from oxidizing
Installation is time consuming and not forgiving of minor errors

Silicone tubing pros:
Easy to install
Easy to make changes
Translucent - can observe flow or lack thereof
Never oxidizes

Silicone tubing cons:
Can kink
Can collapse under significant pump draw (usually not a problem)
May deteriorate faster than metal
Not shiny and neat-o

I can mitigate the kinking and collapsing by routing the lines in a similar fashion to metal and providing some support where required. I have some silicone tubing that has endured several years of routine use, and it shows no sign of wear.

I like the flexibility that silicone tubing provides. I'm constantly tinkering with new ideas, and rigid lines would prevent simple changes to the routing/valving. I also like being able to see what's happening inside the lines. I've fixed pump priming issues and aeration by tracing the bubbles in the lines.

What do you use? What would you use if you were re-designing your system? What else would you consider? What am I missing?
 
I'm kind of at the same point on my stand, and I think I'm going use both hard and soft lines in mine, atleast for water supply.

The plan is to use copper for the long runs, and then tubing at all of the connection points (i.e. water filter, cfc, etc.)

Right now for the wort lines, it's all flexible tubing. I'm not sure if there is a need to change at this point. I use the braided vinyl tubing from Lowes, which I generally replace every year or as needed.
 
Well, I went with stainless tubing on my build. I custom made a couple of pieces that allowed me to put in a vent valve and tie a tee into the outlet of my pump. I am still working out the kinks and haven't actually brewed with it yet. Of course, every time I read a thread about the pros and cons of hard piping vs. hoses, I wonder if I should have went a different way. Once I get it ironed out, I'll revisit this thread and let you know. - Dwain
 
I really like the idea of seeing my wort during transfer to see if there are any air leaks and just for basic reassurance. I understand the cool factor, but for me, I only use things if they are cool and outweigh the non-cool options.

I do fine the excerpt below kind of funny. It seems like you already know what you are going to do based on this:

Silicone tubing cons:
Can kink
Can collapse under significant pump draw (usually not a problem)
May deteriorate faster than metal
Not shiny and neat-o

I can mitigate the kinking and collapsing by routing the lines in a similar fashion to metal and providing some support where required. I have some silicone tubing that has endured several years of routine use, and it shows no sign of wear.

Every con you have listed is not really a con as you explain it away in the next paragraph. Unless your brewery is going to be a showpiece in a brewpub or something, you should go function over form.
 
I explained away the cons to show why I'm considering silicone over metal. You're right; I have come to a conclusion (for today). But I'm curious what other brewers have done, and I really want to know what has and hasn't worked for others. I can be swayed.
 
I am in the same place with my rig. I have decided to go with copper for a couple of reasons. I have to move my rig in and out of the garage. IMHO, the copper is more durable should i inadvertanly catch the tubbing on something or one of my kids run their bike into it. Secondly, I only need about 21 total feet of copper. I have alot of small pieces laying around so the cost is minimal to me. I am also concerned that the heat from my three burners will somehow get to the silicone tubing.(<--enter Mr. Murphy's law!)
 
Go with silicon until the rest of the brew stand is set up and you are happy with the lay out and function. As a future upgrade you can plumb hard lines where you need them.
 
Yuri, since when have you ever decided to do something because it was easy.... :p
I chose copper, the exterior oxidation is easy to clean with a mixture of white vinegar and table salt. Brings the bling back in a single wipe. The only con I have found is that sometimes water will rest in spots no matter what. So before I put it away I will cycle some boiling water through it.

It is nice though, nice and sturdy and stays out of the way.
 
I decided to brew beer because it seemed easy. In the quest to make it easier, I suppose I've made the process pretty freakin' complex! Have I mentioned my affinity for Rube Goldberg?

Hah! We share the same affliction brother. You just have access to more tools :). Rube Goldberg was a genius, well devised and impractical methods to address simple problems. Nothing wrong with that.

I am sure no matter what you pick, you will hit a point to where you had wished you'd gone the other way. I am going to throw something wild out there just cause you are crazy enough to do it; Pyrex tubing!
 
I've been down this road long ago. I began brewing, like most of us, using plastic tubing and soon began to think about switching to a hard piped system or at least, partially hard piped. Yes, the alure of copper and brass did have an influence. I did try various configurations and abaondoned them all in favor of all flexible tubing. I've got it down now to where I only need three short hoses and one about five feet long. That's it! I went through several upgrades using various tubing and fittings at a significant expense. I finally settled on 5/8" ID braid reinforced PVC. It's substantial enough that it won't collapse under suction and won't kink when hot. It will, of course, kink if you try hard enough, but that's easily avoided by using the proper fittings where needed. One of the hoses is not brad reinforced as it is used only on the output side of the pump. It's more flexible than the braid reinforced hose and this makes it easier to route to a fermenter or a recirc manifold. I use cheap nylon barb x Garden Hose Thread fittings with all female on the hoses and all males on the equipment. Never have to think about which end of the hose I need and the nylon fittings stay relatively cool. I don't need gloves to switch hoses as I did with the previous brass fittings I was using.

So, for me, hard piping was conceptually very attractive. It quickly became much less appealing in actual use. Form follows function for me most of the time, but not always!
 
i use both. copper and tees to travel travel wort across the system etc. anything that needs to be moved or dissconected i just use tubing... im incredably lazy when i brew and the less i have to do the better.
 
Why not use SS tube for the stationary parts and teflon for those places that need to move or can not take stress like Beerthirty's rig. The teflon tube can be formed around a tube bender when heated with hot air gun, and it retains the shape with boiling liquid temperatures.
 
I will be using a mix of both in my rig.

Kettle outputs will be hard plumbed to the pumps via stainless 3/4" tubing and swagelok fittings.

Pump outputs will be routed around the brewery with silicon hose. This way, my pumps are always primed, the kettles are locked in place, and I still have the flexibility of a hose system without a manifold block.

Brouwerij_Boerderij_Kabouter_V2_6_1.png


brewery1.bmp

note: I removed the grant from my final design.
 
I had an initial system with disconnects and silicone tubing. You guys are right the upside is cleaning and you can see through the tubing.

HOWEVER....the big downsides IMHO are the amount of spillage when you move the disconnects. Sticky driveway and garage floor.

Check out this site for the disconnect system and the hard plumbed, over the top brewery we are making.

Homebrew Project


More pictures will come. It was somewhat based on the Just-Brew-It single tier but I have made the ability to fly sparge and completely clean the system without disconnecting any major parts.

I still have a few more joints to solder so I will be posting updated pics.

Not alot of spillage if you use QD's with the internal valves. The valve closes when the QD is disconnected.
 
I too am looking for info on how and what to use. I really like the suggestion to use tubing first and work out the bugs and get the system working and then look into rigging a more permanent set-up.
 
I use the brass Mcmaster QD's WITHOUT the internal valves and I drip less than a teaspoon over the whole brew session. If you close the ball valve on the pump, it stops the flow just long enough to make your new connection.
 
I'm hard plumbed through about 98% of my rig with the only silicon being the line that runs up off of the top of my stand to the lid of my MT. I have 1/2 inch copper that comes off the top of my rig about a foot that also has a ball valve on it... and then a barb that connects up to silicon... and again.. that runs flexible to the top of my MT (HERMS system... and the return to the top of the MT is coming from the HEX in the MLT).

I dunno... I really like my rig being hard plumbed. Granted, I probably don't have the volume done on my rig that some guys do (I'm only about... maybe... 15 batches or so into it) and maybe I'll run into problems but so far so good and I like it.

I have built cleaning into my overall brewing process and I find it extremely easy.

I'll try to give the short version with ballpark made up temps just to illustrate:

- heat up HLT to 152 and BK to 170
- Add strike water to MT from BK.. lose a couple degrees in process
- toss in grain... should hit desired mash temp (152)
- circ MT through HEX in HLT at 152 for 45 minutes on a 60 minute mash
- Stop circ at 45 min and jack up HLT to 175
- after full 60 minutes, run off MT into BK (which I had emptied any remaining water from)
- Sparge from HLT.. leaving HLT still half full since the HEX is there.
- Circ MT for few minutes...
- Run off into BK and start boil.
-Once boil is started... pring HLT to a boil while removing grain from MT... remove MT and hose out... quick scrub with PBW and warm water.... toss MT back on... run boiling water from HLT into it... add a little PBW... and circ through all plumbing while boil is going on or at least 30 minutes....

- add a little more water to HLT, warm it up... not boiling but pretty hot... 165ish.. Drain off the MT and then pump in hot clean water from HLT... circ, drain, done.

Once I chill and pour off into the fermenter... I do the same thing with the BK... hot water, PWB and let it circ on it's own while I'm in the house doing something else. Half an hour later I come out, drain the BK, add clean water,w arm it up, rinse... done.

And then before each brew session... I just circ some star san through my BK "loop" (BK, chiller, pour off valve, etc) for 20 minutes or so while I'm setting everythign else up and I'm good to go.

sorry... minor additional note: Everything is hardbplumbed and connected with unions. The only QD I have is where a garden hose plugs into the overall rig and then on to a water filter as a clean water feed and where the silicon tube connects to the lid of the MT. Everything else is unions. QDs probably would have been easier on connecting/disconnecting the pots from the rig but in the grand scheme of things... I really don't find them to be an inconvenience.
 
100% 5/8" ID flexible tubing for me. Easy to configure and easy to clean. I've got it down to only needing four hose sections. I use the cheap braided PVC from U.S. Plastics with nylon garden hose fittings. No problems with it at all.
 
I have (4) hoses total on my NON hard plumbed rig too. (2) of which are always connected to the pump. (1) jumper to run from the HERMS coil to the return line in the MLT and (1) that I use to transfer from my MLT to the bottom of my BK and then the same hose to run from the BK to the fermentor after the boil.


I use silicone from AHS, simply because in the winter the braided hoses are a PIA to use.
 
I should add that all of the liquid solenoids were the main driver for all of the plumbing... I would have 49 hoses all over the place. I wanted the whole thing to be sit-in-a-chair-and-flip-switches (which it is), with the exception of grain and hops additions.

And what does all of that get me? Ehh... not much... but it was fun to build and it seems to work pretty well.
 
Why not try to get the best of both worlds? Buy some thin metal piping and run silicone through it with QD's on the ends. (this is a crappy sketch i know.. )
Tubing.bmp

You will be able to hard plumb so that it looks nice but leave a large enough hole cut in the pipe that you can insert new silicone when/if it wears out. You will also be able to see the flow.

If you needed too you could always pull the silicone out before a brew session and dip it in whatever to sanitize then reinstall ina couple minutes.

It may be a dumb Idea, but if money wasnt a huge issue it may look pretty nice in the end.

If your going thru all that trouble of bending up the hard pipe you might as well use the proper tubing bender and do it in plumbed stainless tubing and be done with it. Plumb into 4 way valves for your flow direction changes with flow windows added on the needed tubing runs. This would be my plan with flares at the ends for easy keggle removal and cleaning. JMO's.
 
Yuri, I like to think I've gotten to know you a little over the last couple years.

*YOU* will not be happy with silicone. You know that it makes all kinds of sense, that it's the easiest solution, the most rational.

*YOU* will be pulling out those silicone tubes in less than a years' time and hard-plumbing it, GUARANTEED. you wouldn't even be asking the question if you didn't know that the silicone was going to gnaw at you.

Don't fight it, dude, it's what makes you the mad genius scientist we all love and admire.
 
Hey guys,

been busy with my company, i started out with hose and been using my rig, when i get everything dialed in i will hard pipe then, instead of having to take pipe joints apart i just cut a new hose
 
If you do decide to with hard plumbed and you decide to polish it, it's one hell of a commitment... Been on a pipe polishing marathon for a few days now. It does look great though.
 
i recently hard plumbed my rig, before i was using silicone tubing.

since going to copper, i never have any issues with my march pumps. before it was like trying to milk a cow to get the liquid moving.

i am 100% satisfied with going all copper, never looking back.
plus it looks more professional..lol
 
I really like the AHS Silicone 1/2" tubing, and the white quick clamps they sell. The clamps are really easy to open and close, and they do not chew up the outside of the hose. I only need 3 hoses for my gravity 3 tier. Nothing seems to stick to them , a quick rinse and they're clean, and as it was already stated, you can see liquid in the tubing.
Obviously Yuri's system is going to need some hard plumbing for the steam mash, etc. but for transfer of Wort and HL the silicone is hard to beat, esp. knowing how much fun it is to tinker.
 
yeah, I was going to hit it with some Brasso tonight and wax it. Though spraying some clear on it may be better. Have to go make my weekly tithing to Lowes this week any how... Any suggestions? rustoleum clear in a rattle can?

Polishing wasnt the pia part, it did take a long time though. The pain was cleaning out the excess solder from the joints with a bastard file.
 
That baby does look nice, CodeRage!

We went with the pex-al-pex tubing for our system. We really like it, but it is pretty much all function and no bling. It is a 5 layer pipe - aluminum sandwiched between in and outside layer of pex. Typically it is used for high end in-floor radiant heat systems. Good for potable water to boiling temps. The nicest thing about it is it has "memory" - stays wherever you bend it at any temp, never flops or droops onto your hot stand/burner, etc. We actually rarely use our returns / sparge ring in the top of our mash tun / boilkettle now, as it is easier to just bend the tubing to return wherever you want on top of the mash. When we are done, we just wrap them around an ale pale to coil them and hang them on the peg board, or set them on the shelf under the rig. Quick disconnects each end. Attached are a couple pics, you can see how the piping stays in shape over both the mash and boil kettle. More pics in my profile.

Mash-Sparge.jpg


PumpsInAction.jpg
 
Back
Top