Show us your element housings/pots. How did you do it?

Homebrew Talk - Beer, Wine, Mead, & Cider Brewing Discussion Forum

Help Support Homebrew Talk - Beer, Wine, Mead, & Cider Brewing Discussion Forum:

This site may earn a commission from merchant affiliate links, including eBay, Amazon, and others.
Yes I did. If you check out my build in my signature I have pictures of me putting it together before I soldered the whole thing.

@renthispace

Great thread, man, I really do not want to silver solder, gonna figure out a way to make them weld-less

Tim
 
Is there any way to use tri-clover for the enclosure for a fold back element, but in a weldless formation?
 

Nice! I was just looking at the silver soldering thread and decided that's how I wanted to do it... I just didn't want to use a gangbox.

Does the element screw in? In my idea world, I would like to screw it in and solder around the threads. Even with the flange soldered to the kettle, water can still leak behind the threads where the element connects, giving it a chance to contact the leads.

A gasket goes between the two, so it should not leak unless the gasket is damaged or the element is loose.
 
A gasket goes between the two, so it should not leak unless the gasket is damaged or the element is loose.

Of course, I would just rather have that not even be a possibility. I know quite a bit about wiring and electronics, and have a lot of experience with electrical systems and wiring... with that said, they still scare the heck out of me when waters around... even if they are properly grounded with GFCI!
 
Of course, I would just rather have that not even be a possibility. I know quite a bit about wiring and electronics, and have a lot of experience with electrical systems and wiring... with that said, they still scare the heck out of me when waters around... even if they are properly grounded with GFCI!

I don't recommend that you solder the element in. How are you going to prevent the heat from melting the plastic on the element? Are you planning on using an all SS element? If not, good luck getting the solder to stick. Put a nice silicone gasket on the element and be done with it. Mine has been in and out a few times and it's still in perfect condition. You are worrying about something that is not a problem!:mug:
 
I don't recommend that you solder the element in. How are you going to prevent the heat from melting the plastic on the element? Are you planning on using an all SS element? If not, good luck getting the solder to stick. Put a nice silicone gasket on the element and be done with it. Mine has been in and out a few times and it's still in perfect condition. You are worrying about something that is not a problem!:mug:

what plastic are you talking about? Lots of people solder their elements to their keggle, its easy and it does work. There is a thread in the DIY section all about how to approach it to make sure you can wet the SS with solder
 
what plastic are you talking about? Lots of people solder their elements to their keggle, its easy and it does work. There is a thread in the DIY section all about how to approach it to make sure you can wet the SS with solder

I think JayMac wants to solder the actual element into the threads in which it screws into for some reason. You're sure there are threads explaining how to do that? I'm talking about melting the plastic on the element. You don't want to solder the element to anything. It has threads and a gasket for a reason.
 
I think JayMac wants to solder the actual element into the threads in which it screws into for some reason. You're sure there are threads explaining how to do that? I'm talking about melting the plastic on the element. You don't want to solder the element to anything. It has threads and a gasket for a reason.

Maybe I read his post wrong, but in one of the links posted it showed a ferrule for soldering onto a keggle, I assumed that was what the discussion was about.

If it was really about soldering the actual element to the keg I wouldn't duggest doing that
 
Maybe I read his post wrong, but in one of the links posted it showed a ferrule for soldering onto a keggle, I assumed that was what the discussion was about.

If it was really about soldering the actual element to the keg I wouldn't duggest doing that

Ok this is what I intend to do:

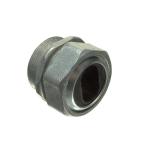
1. A coupling is soldered to a keggle/pot.
2. An element is screwed in to a bushing.
3. The threaded connection between the element/bushing is soldered. The bushing/element are now ONE PIECE. I am not soldering plastic, I am soldering the metal threads of the element to the face and threads of the bushing
4. You thread the bushing in to the coupling to seal, install, or remove the element.

This way it is absolutely impossible (provided the soldering is done correctly) for water to reach the leads of the element. Therefore, if a leak does happen, it's along the bushing-coupling threads, where it will accumulate at the hex portion of the bushing and drip. This results in a connection that has a minimal chance of leakage (through threads only, not relying on a gasket seal), and has a less severe outcome when the leak occurs (you can see the leak, you can tighten immediately to stop the leak, no short/GFCI, brewing can continue easily, etc...)

Does this make any sense? If you screw an element in to a coupling, water can leak along the threaded connection, and reach the leads of the element. If a seal (solder) is made at the threads of the element, its impossible to have a short.
 
I am not soldering plastic
Yes, but most elements have plastic on them about 1/4" from where you propose to solder which will melt.

If you screw an element in to a coupling, water can leak along the threaded connection, and reach the leads of the element.
Not if you use the gasket as is intended. You are over thinking this. Just use the gasket. You will be fine.
 
Just a thought.
These elements are made for household water heaters. They screw in with just a gasket - no soldering. Even over-zealous electric safety codes are fine with it that way.
 
If you heat up the screw plug of the element to soldering temperature you are going to ruin the element.
 
JayMac, I agree with the others that the standard gasket should be adequate, but there's also nothing wrong with trying something new, especially if it makes you more comfortable with the installation. Solder could damage the element so your proposed approach might work better with JB Weld Cold Weld Epoxy ( http://www.jbweld.com/product/j-b-weld/ ). It has a high temp tolerance and it would probably be easier to apply than solder.
 
Compliments of BrewHardware.com

1403197_10205186957303244_4521568049707308757_o.jpg
 
Compliments of BrewHardware.com

1403197_10205186957303244_4521568049707308757_o.jpg

+1 How much easier could BobbyM make it? And affordable as well!:tank:

You solder a bulkhead over a hole in the keg which enables you to connect a triclover element housing with a clamp. No soldering of the element to the kettle. Element/housing is removable by removing the clamp. Simple and easy.....and most of all very affordable. If I can do it, anyone can do it.
 
Last edited by a moderator:
Look three posts above yours brah. Just drill a hole and use a cord grip.

Ya the hole and cord grip won't work with that cord because it's not a round cord, it's three cords in line with each other.

I'll probably just dremel out the box to the shape of the cord, and goop in a little bit of silver RTV around the seal. I can utilize the clip on the cord for strength and grounding, if I add a single stainless bolt to hold it to the housing.
 
Looks like that cord comes with a grip. What's wrong with that?

It's not really a grip, it's just one of those little screw-together tabs like for metal boxes. I'm looking for a strong waterproof connection.

I think i may just take the cord to Home Depot and find a grip there that fits well, then goop in some RTV so it's waterproof.
 
Ya the hole and cord grip won't work with that cord because it's not a round cord, it's three cords in line with each other.

I'll probably just dremel out the box to the shape of the cord, and goop in a little bit of silver RTV around the seal. I can utilize the clip on the cord for strength and grounding, if I add a single stainless bolt to hold it to the housing.

If you're using a dryer cord, don't. I started with those. Major PITA in every measurable category. Save a bit more $ and buy twistlock connectors, SJ00W cable, and use a waterproof gland at the other end where it enters your junction box there.

The dryer cord did work electrically though, so if you're already committed, you will make beer :)
 
It's not really a grip, it's just one of those little screw-together tabs like for metal boxes. I'm looking for a strong waterproof connection.

I think i may just take the cord to Home Depot and find a grip there that fits well, then goop in some RTV so it's waterproof.

Maybe one of these:

1a74494e-ed1f-453c-aa75-b5f98eee3ab7_145.jpg


It is a waterproof SE cable connector. The nut compresses the rubber around the cable. It is an oblong hole so if you find the right size, it may work.
 
If you're using a dryer cord, don't. I started with those. Major PITA in every measurable category. Save a bit more $ and by twistlock connectors, SJ00W cable, and use a waterproof gland at the other end where it enters your junction box there.

The dryer cord did work electrically though, so if you're already committed, you will make beer :)

So I'm not committed, but I liked the clean look of it the most. What exactly was the problem with it??

Maybe one of these:

1a74494e-ed1f-453c-aa75-b5f98eee3ab7_145.jpg


It is a waterproof SE cable connector. The nut compresses the rubber around the cable. It is an oblong hole so if you find the right size, it may work.

This is EXACTLY what I'm looking for!

EDIT: Now just need to figure out what size...
http://www.amazon.com/s/ref=nb_sb_noss?url=search-alias%3Dtools&field-keywords=waterproof+se+cable+connector
 
So I'm not committed, but I liked the clean look of it the most. What exactly was the problem with it??

  • Dryer cord is unwieldy during use - it just doesn't bend easily and won't lay flat on the ground.
  • It maintains bends after you store it.
  • The connector is not meant for repeated in/outs. It's a PITA.
  • The cord is gray, which shows dirt, and looks crappy soon after it's first used, then forever after.
  • The ridges in the cable hold crap that is not simple to clean out.
  • It's not round, so good luck with adding connectors/glands.
  • Off-the-shelf dryer cords come in one length, about 6' from memory.

BTW, here's the waterproof SS gland I used with the 10/3 SJOOW I bought (HD and Lowes carries) and the twistlock connectors/receptacles I used (in case you change your mind, or someone else is looking for ideas).

FYI, for 10/3 cable you need PG21 gland. It's pretty big, but it works.

13-18mm Cables PG21 Stainless Steel Waterproof Gland
gland.jpg

Leviton 2620 30 Amp, 250 Volt, Flush Mounting Locking Receptacle, Industrial Grade, Grounding, V-0-MAX, Black

71PC0z44%2BpL._SL1500_.jpg


Leviton 2621 30 Amp, 250 Volt, NEMA L6-30P, 2P, 3W, Locking Plug, Industrial Grade, Grounding - Black-White

51I9q7GarlS._SL1000_.jpg
 
Last edited by a moderator:
  • Dryer cord is unwieldy during use - it just doesn't bend easily and won't lay flat on the ground.
  • It maintains bends after you store it.
  • The connector is not meant for repeated in/outs. It's a PITA.
  • The cord is gray, which shows dirt, and looks crappy soon after it's first used, then forever after.
  • The ridges in the cable hold crap that is not simple to clean out.
  • It's not round, so good luck with adding connectors/glands.
  • Off-the-shelf dryer cords come in one length, about 6' from memory.

Thanks man... Those are awesome reasons and I'm glad you caught me before checkout. I think I'll build exactly what you have!

EDIT: (to avoid threadjacking... https://www.homebrewtalk.com/showthread.php?p=7076635#post7076635)
 
I was hoping to see the "goop in"!!

-BD

Ahhh, weren't we all?

And here is a little ditty I wrote: [spoken in spongebob narrator voice]

Set aside your silicone, your JB Weld
and other such epoxies.

If you wish to make a seal, use proper fittings,
elbow grease and not one aforesaid proxies.

LS

***edit*** sorry that sucks
 
yeah Dont use the dryer cord I bought it and never used it... it sucks.

I did use correctly rated aviation connectors and speakon connectors though in my builds instead of the hubble style nema connectors and saved like $80 or so this way.
 
Agreed that dryer cord should not be used. Wrong application plus you get what you pay for applies here.

BTW I don't know if it was shown here, but I have the BrewPi stainless element housing in my BK. It's a gorgeous piece!

-BD
 
One thing to add, DON'T make the box completely sealed! You'll want a small hole at the bottom of the box as a "weep hole". If for some reason the seal between the element and kettle leaks into the box, you'll never know until the box fills up and you hear that dreaded "BOOM" from an electrical short. If there is a leak, you'll see it dripping out of the weep hole well before anything happens.

You're not submerging the kettles to clean them.
 
Still Dragon housing here. Another member here welded the TC ferrule to the keggle. I removed the too-small plastic strain releif that came with it, widened the hole, and used a large SS PG21 gland. Works great. Nice to be able to remove the ripple element so easily for cleaning.

_mg_7582-61704.jpg

Hi Andrew, just curious is the hole required for the PG21 gland a lot bigger than the hole that is already drilled in the end cap. I have no way of knowing as Lowes and Home Depot did not have any left by me. So I will probably order two of them online. I wanted to know if my step bits will work and if they are big enough, or if I need to drill them out another way. Thanks for your time!

John
 

Latest posts

Back
Top