2 vessel All Grain Brewing

Homebrew Talk - Beer, Wine, Mead, & Cider Brewing Discussion Forum

Help Support Homebrew Talk - Beer, Wine, Mead, & Cider Brewing Discussion Forum:

This site may earn a commission from merchant affiliate links, including eBay, Amazon, and others.

dummkauf

Well-Known Member
Joined
Dec 26, 2009
Messages
784
Reaction score
18
Location
Minneapolis MN
Ok, I'm a new, but pretty successful, extract brewer with 5 batches under my belt and soon to be 6 this coming weekend. Anyway, after spending a whole bunch of money on DME for this coming weekends batch, it has seriously got me thinking about all grain, as well as the other benefits of going all grain. I've been doing my research and am looking for an economic way to jump into all grain and I think I've got it figured out but am looking for some input before i start buying stuff.

All the all grain setups I see usually involve 3 vessels for holding liquid, what I am proposing is trying to get away with using just 2. I currently have a 7 gallon stainless steel brew pot I am using for my extract brews with a spiggot installed to drain to my CFC for cooling. I also have a large coleman cooler sitting in the garage that I'm thinking of cleaning out and using(or maybe just buy a new one depending on how funky the garage one looks) and either doing the stainless steel mesh filter or the PVC frame on the bottom of the cooler. Which if I've done my research right, my brew day would look like this:
1.) Heat up water to the right temp for mashing(or a couple degrees higher since my cooler will instantly suck up some of the heat) in my 7 gallon brew pot. I am doing full boils already and have a propane burner for heating the water.
2.) Add grains and water to the cooler, and let sit until conversion is complete.
3.) Warm up additional sparge water in my 7 gallon brew pot for sparging while I'm waiting for conversion to complete from step 2
4.) Drain "wort" out of cooler into my bottling bucket(guess this would be vessel #3 huh).
5.) Sparge with the water heated up in step 3. This is basically just pouring hot water over the remaining grain bed left after I drained the cooler right?
6.) Dump all of the wort out of the bottling bucket and back into my 7 gallon brew pot.
7.) Boil wort and add hops as dictated by whatever recipe I'm brewing.(This is basically where I start today with my extract)
8.) Cool, pitch yeast, put in closet.

So, am I missing anything? Or would I really be able to move to all grain by simply converting a cooler into a mash tun and using the existing equipment I already have.

And as for coolers, would cleaning out an old used one be a good idea, or would I be better off just buying a new one(I'm looking to be cheap but could swing a new cooler if really needed)?

Are all plastic coolers made out of food grade plastic? I would imagine they are, but just want to check if there's something specific to be looking for.

Thank you!!!
 
I do all grain in a two container system all the time.
All water for mash and sparge is heated in my liquor tun/boil kettle. This has a spigot to let water get to the mash tun (cooler ). Once the mash is underway I continue to heat remaining water up to sparge temp (or for multi infushion, to the next temp required) - all heat calculations are done using software (beer smith).
Once the final water has entered the MLT for the sparge then the liquor tun becomes the boil kettle (you will need some assorted buckets to transfer your runoff wort back "up" to your kettle - don't do it all in one batch unless you like hot sticky wort everywhere.
 
Search for "Brutus 20". It's the most popular 2 vessel setup and there's been many builds documented here.
 
Search for "Brutus 20". It's the most popular 2 vessel setup and there's been many builds documented here.

Those all look like they involve a pump and extra equipment that I am trying to avoid spending money on. What am I missing here?
 
Actually, I think what I am proposing is a 2 vessel system with sparge. A BRUTUS 20 is a 2 vessel no sparge that just recirculates rather than sparging isn't it? I think what I am missing here is a sparge arm to spray water over the grain bed after I drain the initial mash off the grain bed(hope that makes sense).
 
The moment you sparge, you're into 3 vessels, just as you said in step 4. It is possible to do 2 vessel no-sparge w/o a pump but the MLT must be big enough to hold all grain and FULL water volume:

1. Heat strike water in kettle and transfer to MLT.
2. Standard dough-in and mash.
3. Heat balance of water in kettle (desired pre-boil volume less grain absorption and existing strike water in MLT) and transfer to MLT for mashout.
4. Mix and vorlauf the mash.
6. Drain MLT to kettle via gravity.
7. Boil / hop additions as usual.
 
My method uses the boil kettle 7.5g, cooler mash tun, and spare /old brew pot 3g.
1. Heat strike water in kettle and transfer to MLT.
2. Standard dough-in and mash.
3. Heat balance of water in spare kettle
4. Mix and vorlauf mash
5. Drain first runnings into boil kettle and start boil
6. 2 batch sparges into spare kettle and add to boil after each sparge
7. Boil wort as usual

This allows me to get my wort boiling quicker and I can usually go from start to cleanup/yeast pitch in 4 hours.
 
The moment you sparge, you're into 3 vessels, just as you said in step 4.

Single batch sparge + BIAB is sort of the intermediary.

Kettle #1 heats your water to strike temp, then becomes the mash tun (grain added in bag)
During mash, Kettle #2 heats sparge water.
After mash, grain is drained and moved to sparge kettle; kettle#1 is now the brew kettle, and you start heating it toward boiling.
After sparge, drain the bag and set aside; add second runnings to brew kettle.

(Some people cold sparge, using a bucket in place of kettle #2)
 
So, am I missing anything? Or would I really be able to move to all grain by simply converting a cooler into a mash tun and using the existing equipment I already have.

And as for coolers, would cleaning out an old used one be a good idea, or would I be better off just buying a new one(I'm looking to be cheap but could swing a new cooler if really needed)?

Are all plastic coolers made out of food grade plastic? I would imagine they are, but just want to check if there's something specific to be looking for.

Thank you!!!

You pretty much hit it. That is just about exactly how I handle it. I have a keggle, a single burner and a 10 gallon cooler that I use for 10 gallon batches. I use two bottling buckets to drain the first runnings and first sparge round, then drain everything back into the freshly drained kettle for boiling. Works like a charm.

As far as I know all coolers use food grade plastic on the inside but I'm not sure of that. Give your existing cooler a thorough cleaning. If you can smell anything but freshly cleaned plastic when you are done cleaning it would probably be best to suck it up and buy a new cooler.
 
+12345 for one burner, one HLT/boiler, one MLT, and several buckets.

OP's method is almost exactly what I do.
 
Like jds and OP, I've done this for a while. It works. The volume measurements on the side of the bottling bucket also help if you need to know your volumes.
 
Thanks for your input guys!!!

One final question, I am still doing 5 gallon batches, and will probably be staying at 5 gallons for a while as I can only consume so much beer and like to have a variety on hand :D What size cooler would be recommended? I've seen everything from 40qt(10 gallon), up to the 84qt's used for these. I would imagine having a lot of extra head space in the cooler would be bad for heat retention, but I also don't want to limit myself by going too small either if I ever want to try really high gravity beers that require more grain.

Would a 56qt cooler be too small, too big, or just right for what I am trying to accomplish here?
 
IMO the 10 gal round cooler is the perfect size for 5 gal batches. I started with a 5 gal cooler that I already had, and only used it for a batch or two before buying the bigger one. I've now moved to 10 gal batches, and it's too small. Here's a great chart that shows what kind of gravities you can achieve with various vessel sizes - https://www.homebrewtalk.com/f11/how-big-your-mash-tun-needs-123585/
 
Thank you!! that was exactly what I was looking for....I was curious about the bigger size because that's what size I currently have and would rather not buy a second cooler if necessary :D
 
I would imagine having a lot of extra head space in the cooler would be bad for heat retention, but I also don't want to limit myself by going too small either if I ever want to try really high gravity beers that require more grain.

The danger in going with a cooler that is much larger than your batch size is that your grain bed can be shallow which can make it difficult to get the grain to settle down tight enough to create a good filter for the wort. It's also pretty difficult not to disturb the grain bed when performing the vorlof. 56Q would probably be ok to ideal depending on the shape of the cooler. 84Q is probably too big for a 5 gallon batch.
 
Hmm...so if I were to buy a large 50qt cooler, it would be better to get one that is taller as opposed to longer/wider? Just curious because I was up a Target earlier today and was looking at the coolers and found a 50qt that was taller than the old dirty one I have, but the bottom surface area was way smaller then the current one I have.

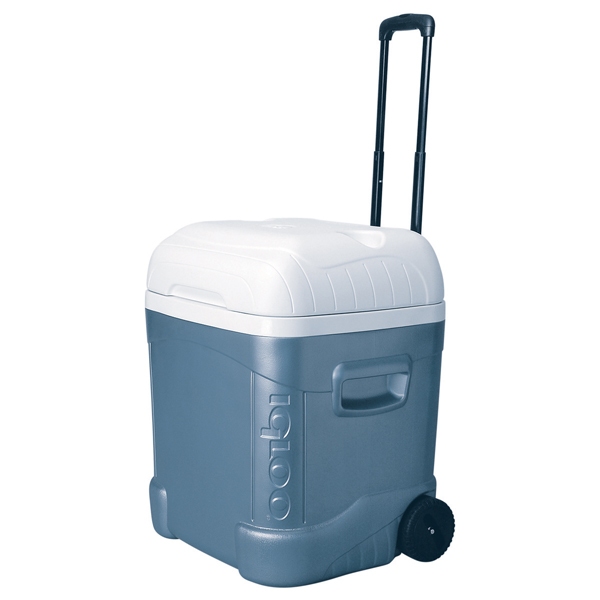
So something like this would scale from smaller 5 gallon batches to large batches should I decide to upscale production:
45332ICRMC70IceBlue_thumb.jpg


Yes, that would work very well.
 
^I agree. The only problem I see with that particular cooler is there is no drain valve at the bottom. You could drill a hole but the coolers with an existing valve are structurally reinforced around the valve which is a nice thing when you are bolting on a ball valve and other hardware.
 
^I agree. The only problem I see with that particular cooler is there is no drain valve at the bottom. You could drill a hole but the coolers with an existing valve are structurally reinforced around the valve which is a nice thing when you are bolting on a ball valve and other hardware.

That's not the exact cooler I was looking at, similar design though. However, the one I was looking at had the drain in the back between the wheels, I'd guess that one has a drain in the same location. The one I saw in the store the spout was hard to see back there but it was there, my main concern was that it angled down and my ball valve may hit the ground because it sticks out further. on the other hand, I could probably get a bent section of 1/2" brass tubing to make it work, I'll have to rummage around the hardware store a bit.
 
All grain beds have an ideal depth. Once again it depends if you batch or fly sparge but basically too shallow= poor filtering action and possible channeling and too deep= stuck sparge. I use a 5 gal MLT for my 5gal batches but if I try to do a 10 gal batch in that then the grain bed is too deep - so I switch to my second cooler (a rectangular coleman type) which would be too big to do 5 gal batches in.
 
Back
Top