The only thing I wonder is whether it's better to solder the locknut to the interior wall so that when you tighten the element in, it's pulling the solder joint tighter. In other words, the whole assembly isn't hanging off the solder. I thought maybe the curved wall of the vessel would be an issue for sealing but if I try this, I'd use a few small C-clamps to draw the curved walls tight to the flat of the nut. Maybe it won't work.
You are using an out of date browser. It may not display this or other websites correctly.
You should upgrade or use an alternative browser.
You should upgrade or use an alternative browser.
Soldering Stainless steel
- Thread starter BargainFittings
- Start date

Help Support Homebrew Talk - Beer, Wine, Mead, & Cider Brewing Discussion Forum:
This site may earn a commission from merchant affiliate
links, including eBay, Amazon, and others.
I'd use a few small C-clamps to draw the curved walls tight to the flat of the nut. Maybe it won't work.
I wouldn't solder it while clamped. This would pre-stress the joint and make it more likely to fail IMO.
Fortunatly for me, I have a greenlee hydraulic punch that I was able to flatten and dimple all the locations I soldered. Im sure a tool could be made like the pull through device but to flatten around the hole instead.
BigJim_inFLA
Well-Known Member
Just wanted to say thank you for all the tips and tricks. Just started an electric brew kettle and soldered the 1" nut for the element and the 1/4" half coupling for the sight glass. Worked like a charm!
StMarcos
Well-Known Member
I did mention this many pages back, but it is worth saying again. You can use a standard mapp gas bottle with a regular torch (no oxygen), and use the 56% Ag solder to braze brass to stainless or stainless to stainless. I'm talking about sanke keg type thicknesses and regular brass or stainless nipples. It's MUCH easier than messing about with flaring, soft solder, and the liquid flux. Not only that, but the joint will be stronger. The paste flux (such as handy flux) is much easier to deal with than the liquid HCl flux. I'm all for making the most of Home Depot stuff to get by with brewing stuff, but when you have a thread this long, with people trying all sorts of measures JUST to make a nipple securely attached to a keg with soft solder, why not just get a bottle of mapp and some 56% Ag and be done with it? You don't have to learn to TIG or oxyacetylene, and you can still call it diy (no paying welders), and it's just better than using 4% Ag soft solder.
`For whatever it's worth, the Harris documentation states that a properly soldered joint will be stronger than a brazed joint, because the higher heat of brazing weakens the metal to be joined. Dunno, but I suppose that they know their products.
I did mention this many pages back, but it is worth saying again. You can use a standard mapp gas bottle with a regular torch (no oxygen), and use the 56% Ag solder to braze brass to stainless or stainless to stainless. I'm talking about sanke keg type thicknesses and regular brass or stainless nipples. It's MUCH easier than messing about with flaring, soft solder, and the liquid flux. Not only that, but the joint will be stronger. The paste flux (such as handy flux) is much easier to deal with than the liquid HCl flux. I'm all for making the most of Home Depot stuff to get by with brewing stuff, but when you have a thread this long, with people trying all sorts of measures JUST to make a nipple securely attached to a keg with soft solder, why not just get a bottle of mapp and some 56% Ag and be done with it? You don't have to learn to TIG or oxyacetylene, and you can still call it diy (no paying welders), and it's just better than using 4% Ag soft solder.
That may be true, but that is what I tried first and I had miserable luck with it. I brazed a 1/2" copper adapter to my Sanke. It worked for two brews, and then it snapped right off. I could see that there had been almost no adhesion to the stainless. I must have used the wrong silver rod (don't know the Ag content) or flux. I tried to repair it but with no better success. The soft-soldered joints on the other hand are holding up just fine so far after many brews.
loldmopar
Member
This video was one of my inspirations too. It was the reason I decided to braze my fittings instead of paying a welder. Here is another good one.
http://www.youtube.com/watch?v=6dF-l-ebX9o
As I'm researching this to figure it all out, I saw the credits at the end of this video. David Holden is a family friend. Looks like I'm going to his shop in the morning to learn how to braze and maybe braze the couplers into my kegs.


Dert said:This process worked well for me!
Ahh looks like you soldered on the outside of the keggle instead of the inside.
-= Jason=-
Sent from my HTC Incredible using Home Brew Talk
Gotta love the ingenuity shown on these forums :rockin:
I'm considering dimpling and soldering a 4" tri-clover ferrule in the bottom of a 20 Litre stock pot.
I'll have to figure out a suitable dimpling tool, but the pot wall thickness is relatively thin, so think that should be fairly doable even with some PVC pipe fittings.
The big question/concern I have is the ability to solder a 4" fitting using this technique. It would seem to me maintaining constant heat around the perimeter of the joint would be quite important to ensure the solder liquefies and solidifies at pretty much the same time around the joint to ensure no unwanted stresses that might cause joint failure.
What are the experienced peoples thoughts on this? Am I pushing the boundaries of this technique and likely setting myself up for disappointment?
Thanks,
Hosko
- Joined
- Nov 18, 2008
- Messages
- 2,058
- Reaction score
- 25
hosko11 said:Gotta love the ingenuity shown on these forums :rockin:
I'm considering dimpling and soldering a 4" tri-clover ferrule in the bottom of a 20 Litre stock pot.
I'll have to figure out a suitable dimpling tool, but the pot wall thickness is relatively thin, so think that should be fairly doable even with some PVC pipe fittings.
The big question/concern I have is the ability to solder a 4" fitting using this technique. It would seem to me maintaining constant heat around the perimeter of the joint would be quite important to ensure the solder liquefies and solidifies at pretty much the same time around the joint to ensure no unwanted stresses that might cause joint failure.
What are the experienced peoples thoughts on this? Am I pushing the boundaries of this technique and likely setting myself up for disappointment?
Thanks,
Hosko
I know this isn't answering your question but why a 4" fitting? I have 2" valves in 15 ga kegs and they drain like a toilet flushing.
Good questionI know this isn't answering your question but why a 4" fitting? I have 2" valves in 15 ga kegs and they drain like a toilet flushing.
")
I'm building a single vessel electric brewery along the lines of the Braumeister/Brewmaster. To get an optimal seal for the malt pipe (22L cooking pot) I'm looking at welding the 4" tri clover in the bottom of the pot and using a flanged seal and some clamping pressure (threaded rod up through the bottom of the pot/kettle) to ensure a tight, leak free seal. Probably a little over engineered, but alot of the braumeister imitations have suffered leaks around this area.
I got brave this morning and made a second attempt to solder a 1 inch nut to one of the 15 gallon cans that a friend gave me a few months ago and I think it was a success! I need to get a heating element to screw in there to leak test it still, but it looks like it soldered all the way around.
I'd like to add my thanks to all who have contributed to this thread - there is an amazing amount of info in here.
I'm in the process of upgrading from 5 gal to 10 gal batches, and planning to go all electric with my new brewery. As practice for that, I just soldered couplings into my old kettle, which I plan to use as HLT in the new setup. I thought I'd add what I learned from my experience so far to the to the data pool.
I tried pulling a coupling into a pan I picked up at the thrift store first, and had trouble with the metal splitting. After a few tries, I came to realize that very careful attention to de-burring the holes made a huge difference, as did liberal application of WD-40 to the pulling tool.
A nice tight fit on the coupling allowed the flux to pool in the valley around the couplings. I applied the Harris liquid flux with a glue (CA) applicator I found at the local hobby shop. This allowed very precise application of the flux without affecting the surrounding areas. I added the solder ring, which sort of "floated" in the pool of flux, and applied the torch to the coupling, avoiding the kettle walls. In a short time, the solder flowed nicely around the fitting. After allowing the work to cool for just a couple of minutes, I took the piece to the sink, and ran cold water over it. There had been only moderate burning of the flux, and what there was flushed away, leaving only a light touchup with BKF to make it shine!
I'm really looking forward to getting my new brewery underway, which never would have been possible without this thread.
orangehero
Well-Known Member
For anyone interested in making dimples for 1.5" TC ferrules:
Stainless Steel 316 Cast Pipe Fitting, Reducing Coupling, Socket Weld, MSS SP-114, 1-1/4" X 1" Female
This part is nice because you can use the other end for making dimples for 1/2" NPT fittings.
Stainless Steel 304/304L Pipe Fitting, Concentric Reducer Coupling, Butt-Weld, Schedule 10, 1-1/2" X 3/4" Pipe Size
Make a 1-5/16" hole.
Last edited by a moderator:
I know this isn't answering your question but why a 4" fitting? I have 2" valves in 15 ga kegs and they drain like a toilet flushing.
Sorry to be off topic, but do you think the 2" is overkill? I was planning the same setup, but balked at the prices of 2" SS full port valves. I went with
1". Have yet to finish the build, though, but i'm' hoping it should sufficient for CIP.
- Joined
- Nov 18, 2008
- Messages
- 2,058
- Reaction score
- 25
Sorry to be off topic, but do you think the 2" is overkill? I was planning the same setup, but balked at the prices of 2" SS full port valves. I went with
1". Have yet to finish the build, though, but i'm' hoping it should sufficient for CIP.
I think 1" will probably be fine.
Ed
nostalgia
Well-Known Member
What kind of flux are you using?
-Joe
-Joe
Yep...FAIL. Leaks like there's no tomorrow. I'll try again later....but I think I need better flux first. I just hate to pay as much as the local welding supply shop wants for the Harris.
You need to get and use Harris Stay-Clean Liquid flux. I've not found anything else that works very well with SS. It's more important than the solder you choose. Plus, the flux is not so expensive to get. Solder? Yea...
peterlonz
Well-Known Member
Can you please supply contact details for Airgas.
Many readers are overseas based & good US contacts for products receommenderd here are very useful.
Thanks,
Pete (Queensland Australia)
Many readers are overseas based & good US contacts for products receommenderd here are very useful.
Thanks,
Pete (Queensland Australia)
http://www.airgas.com/
Airgas is a nationwide distributor of welding supplies wil local outlets all over the U.S.
Airgas is a nationwide distributor of welding supplies wil local outlets all over the U.S.
nate456789
Well-Known Member
I have been following this thread for awhile but I have yet to come across any posting of what size people are using to pull Couplings and half coupling thru the keg walls.
What I am looking for are Concentric reducers to stretch the hole out for the couplings.
The sizes I need them for are 1/2" couplings and 1" half coupling for electric elements.
What is the rule of thumb. Next size down from what you are wanting to pull thru?
I found some on grainger, but not sure what size I should get. They are not cheap being stainless.
Thanks
nate456789 said:I have been following this thread for awhile but I have yet to come across any posting of what size people are using to pull Couplings and half coupling thru the keg walls.
What I am looking for are Concentric reducers to stretch the hole out for the couplings.
The sizes I need them for are 1/2" couplings and 1" half coupling for electric elements.
What is the rule of thumb. Next size down from what you are wanting to pull thru?
I found some on grainger, but not sure what size I should get. They are not cheap being stainless.
Thanks
About 4/5 posts up is this post
orangehero said:For anyone interested in making dimples for 1.5" TC ferrules:
Video Link: http://www.amazon.com/Stainless-Fitting-Reducing-Coupling-Socket/dp/B003H05E7E
This part is nice because you can use the other end for making dimples for 1/2" NPT fittings.
Video Link: http://www.amazon.com/Stainless-Concentric-Coupling-Butt-Weld-Schedule/dp/B003RWTYRS/ref=sr_1_2?s=industrial&ie=UTF8&qid=1318884933&sr=1-2
Make a 1-5/16" hole.
-=Jason=-
Sent from my HTC Incredible using Home Brew Talk
Last edited by a moderator:
I was never able to find the Harris flux but here is an option from Grainger that worked very well for me.
http://www.grainger.com/Grainger/LENOX-Stainless-Steel-Flux-1UYG7?Pid=search
http://www.grainger.com/Grainger/LENOX-Stainless-Steel-Flux-1UYG7?Pid=search
I have been following this thread for awhile but I have yet to come across any posting of what size people are using to pull Couplings and half coupling thru the keg walls.
What I am looking for are Concentric reducers to stretch the hole out for the couplings.
The sizes I need them for are 1/2" couplings and 1" half coupling for electric elements.
What is the rule of thumb. Next size down from what you are wanting to pull thru?
I found some on grainger, but not sure what size I should get. They are not cheap being stainless.
Thanks
way back at the start of this thread is a list of stuff needed to make the tool for 1/2" stuff. the 1" stuff has been twards the end. it freaking long as ever but the info is all in here.
I think i got my stuff from mcmaster.
What is the consensus on how to attach the 1" heating elements? I bought a 1" NPS locknut from bargainfittings before I found this thread. I saw that someone had soldered the same 1" locknut to the outside of a keg. I would be worried that it would fail at some point and make quite a mess. Anyone put the locknut on the inside? That way it wouldn't be hanging on by the solder. I would be interested to hear how the solutions have worked after being put to use as well. I didn't see a 1" NPS SS coupling on McMaster or bargainfittings, but I saw a post that at least one person was pulling a 1" hole, so I am assuming that is for a coupling.
slakwhere
Well-Known Member
i did a half coupling for 1" that worked out fantastically. you need a much bigger dimple tool but it works exactly the same way.
slakwhere
Well-Known Member
it was a NPT (the opposite of the element) but with a hefty coating of teflon tape and some torque it holds liquid just fine.
What is the consensus on how to attach the 1" heating elements? I bought a 1" NPS locknut from bargainfittings before I found this thread. I saw that someone had soldered the same 1" locknut to the outside of a keg. I would be worried that it would fail at some point and make quite a mess. Anyone put the locknut on the inside? That way it wouldn't be hanging on by the solder. I would be interested to hear how the solutions have worked after being put to use as well. I didn't see a 1" NPS SS coupling on McMaster or bargainfittings, but I saw a post that at least one person was pulling a 1" hole, so I am assuming that is for a coupling.
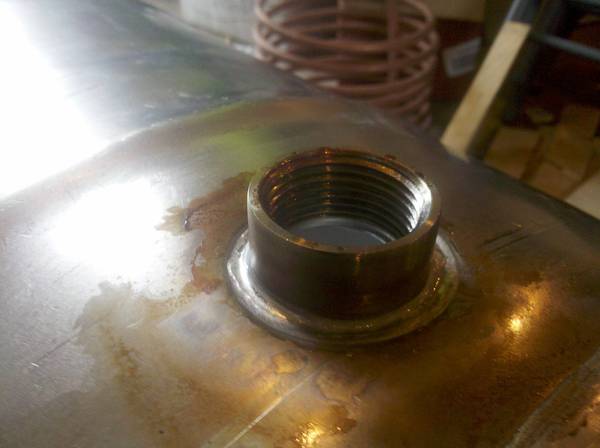
All my half-couplings are just soldered to the outside (not even pulled through like many are doing here). They have been that way for many brews now and are not going anywhere.
A good solder joint is a lot stronger than many give it credit for. Here is a shot of a 1-in half coupling for an element. If you took a hammer to it, I bet the keg would be in bad shape before the coupling ever came loose.
I have been gathering stuff for a new brew system, and just realized the pots I got have "Encapsulated 5mm thick aluminum" in the bottom, and I was planning on silver soldering the drain in the bottom.
Has anyone tried silver soldering something with aluminum sandwiched between stainless plates before? Is it possible and safe?
Has anyone tried silver soldering something with aluminum sandwiched between stainless plates before? Is it possible and safe?
KWiK said:I have been gathering stuff for a new brew system, and just realized the pots I got have "Encapsulated 5mm thick aluminum" in the bottom, and I was planning on silver soldering the drain in the bottom.
Has anyone tried silver soldering something with aluminum sandwiched between stainless plates before? Is it possible and safe?
Never done it but if the solder wicks through the hole, I cant see an issue. Do it.
Thanks for the replies. I know it isn't recommended for Aluminum, but I am soldering Stainless that has aluminum sandwiched in it. Depending on if I can flare the hole good enough or not, the solder may never even touch the aluminum. I am just wondering, if it does touch it is it going to adversely affect the joint? Or is the Aluminum going to suck to much heat away from the stainless and cause problems?
Just trying to avoid ruining a brand new Kettle.
Just trying to avoid ruining a brand new Kettle.
Similar threads
- Replies
- 41
- Views
- 2K
- Replies
- 0
- Views
- 619
- Replies
- 0
- Views
- 579
- Replies
- 0
- Views
- 380
