pvtschultz's eBIAB Build, Finally!

Homebrew Talk - Beer, Wine, Mead, & Cider Brewing Discussion Forum

Help Support Homebrew Talk - Beer, Wine, Mead, & Cider Brewing Discussion Forum:

This site may earn a commission from merchant affiliate links, including eBay, Amazon, and others.

pvtschultz

Well-Known Member
Joined
Feb 11, 2010
Messages
457
Reaction score
9
Location
New Berlin
I have been squirreling away money for most of the summer to build an eBIAB brewery in my basement. My work came through with some bonus money again this year which gave me enough money to pull the trigger on the build. I've been working in the background on this for a few months and never posted anything, so now you can have it all at once.

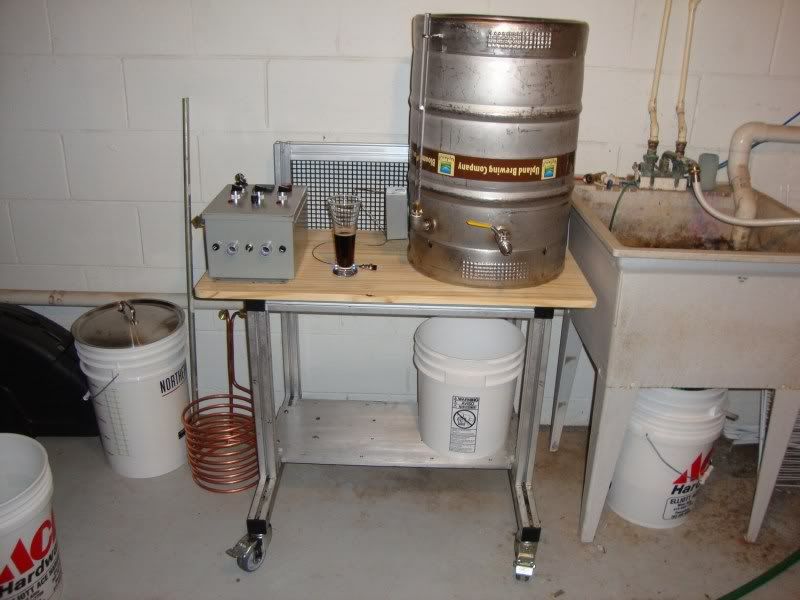
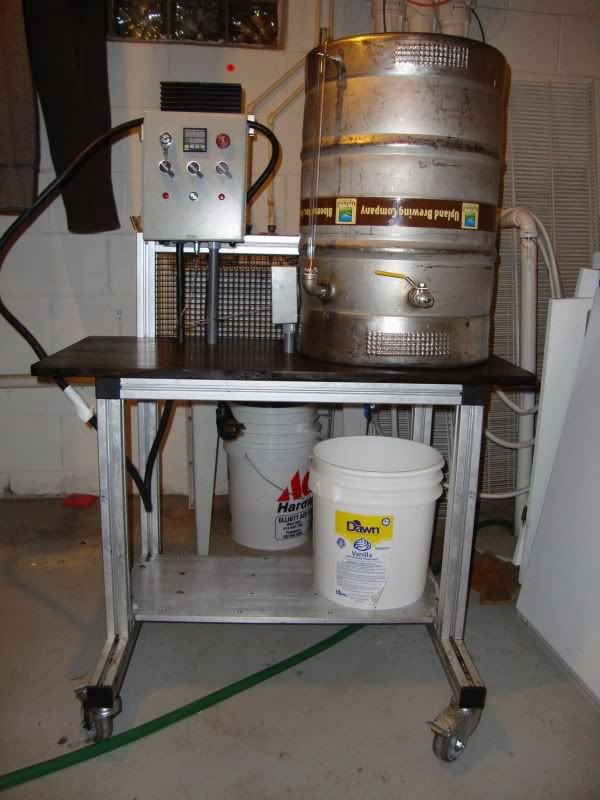
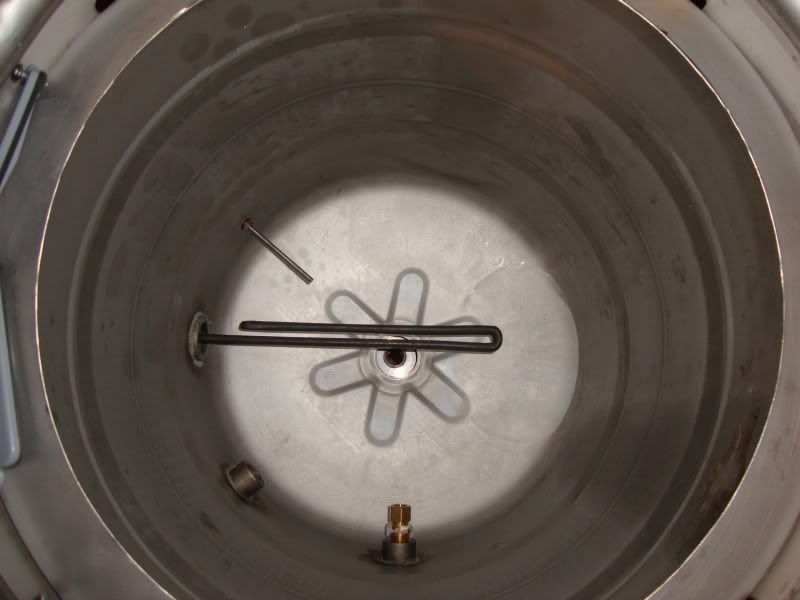
The premise of the the design is to be able to brew year-round without having to drag all of my equipment outside to the garage to use the Cajun burner. I have a decent sized laundry area with 30a 220VAC service, an outside vent, and water; everything needed to brew beer. I decided to stick to a single vessel BIAB setup. I opted for a 5500W element since I have 30A available and I may want to try a larger batch down the road. I legally acquired a couple 1/2 barrel kegs from a friend in the business (use for the second is TBD) and a cart made of extruded aluminum from my employer.

I have a for-profit word carving hobby that used to share the same area as the laundry so that needed to be be partitioned off first before anything could happen to keep the dust out. But first, we needed to clean the basement! I didn't take pictures, but let's just say the folks at Good Will got two truck loads of stuff. I got the wall built, found space for the ferm chest freezer, and started in on the build.

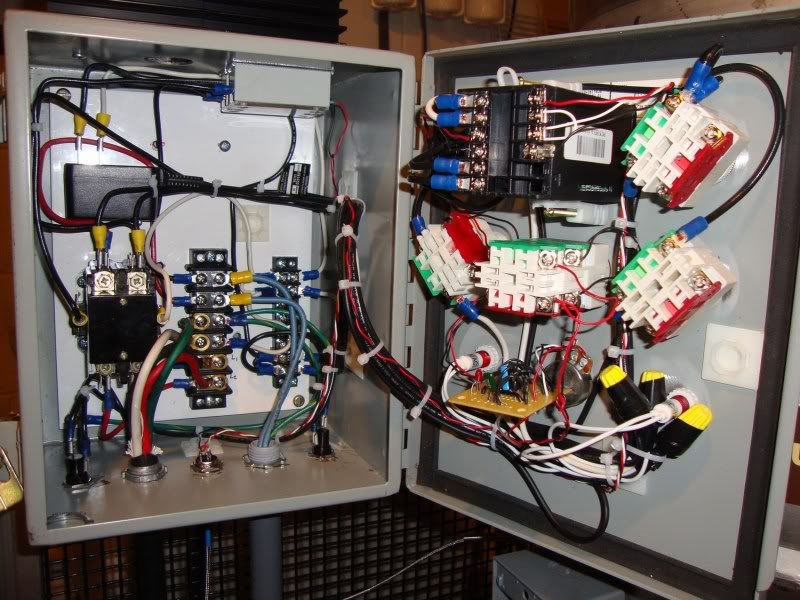
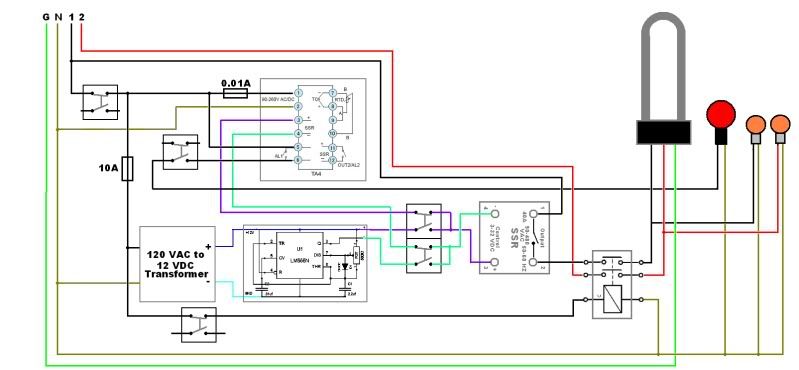
While I was accumulating funds and parts, I took some time to draw up my wiring diagram. P-J has been infinitely helpful (even though he doesn't know it yet) with general design. I opted for a cheap controller which ended up not having a manual PWM function. To rectify, I added a PWM circuit to the control panel which would otherwise be redundant with the Auber unit. BUY THE AUBER UNIT AND SAVE THE EXTRA WORK. So here's the schematic.

eBreweryWiringDiagram.jpg


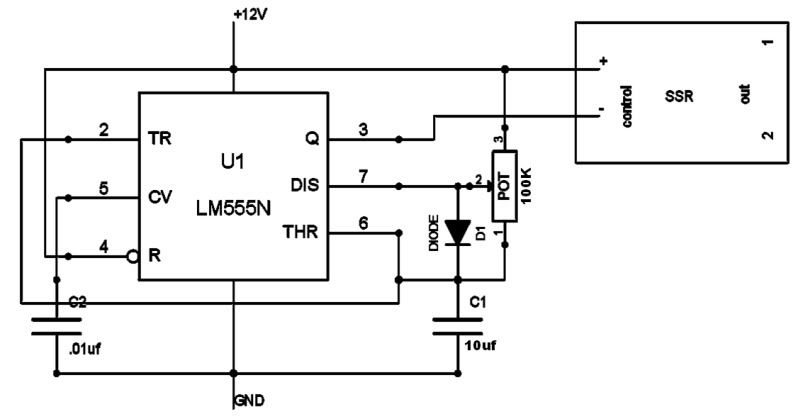
And the PWM circuit that I used.
555PWMCircuit.jpg


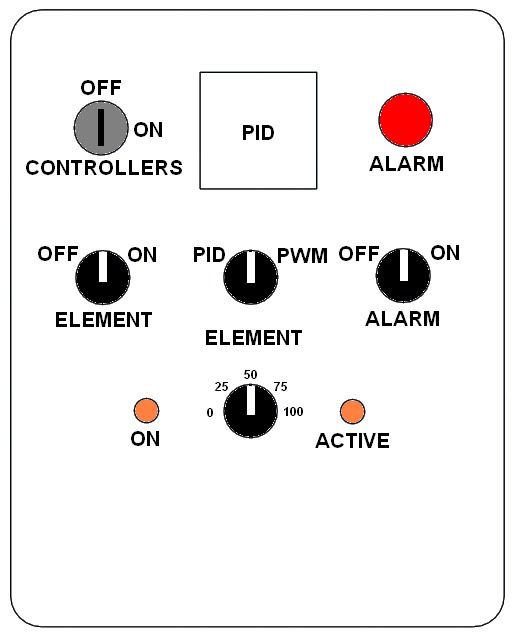
And the layout that I decided for the panel.
eBreweryControllerLayout.jpg
 
Everything kind of happened at once, but I got the cart reconfigured to my needs, completed the keggle, got the controller wired up, and found a top for the cart.

As for the keggle, I drilled the holes with the cheap step bits that Harbor Freight sells. GO SLOW! I burnt up a couple of the steps but was able to get all the holes drilled with the one set. My work had a 1" NPT tap that I used to deepen the taper of the coupling threads to allow the o-ring of the element to seal. I soldered the couplings per the thread in the DIY forum, dimple and all. I cut the bottom off of the keg and used a 2" tri-clamp to utilize the keg thingymobob. I drilled and tapped the 2" cap for a 3/4" NPT bottom dump valve to allow CIP.

I mounted an outdoor outlet enclosure over the 1" pipe coupling using JB Weld (we'll see how it lasts). The keg is grounded to the cart, the element is grounded to panel, and the panel is also grounded to the cart. I am using the Home Depot GFI spa panel for cheap insurance.

https://www.homebrewtalk.com/f51/soldering-stainless-steel-155782/

mini-DSC05657.jpg


I mounted the control panel and determined how I was going to connect the panel to the element. From there I stained the top, applied the polyurethane finish, and finished the wiring.
mini-DSC05661.jpg


mini-DSC05662.jpg


mini-DSC05664.jpg


I know that there is a lot that I forgot to mention, that's the crappy thing about posting it all at once. I'm going to plug it in for the first time tonight and hopefully heat water for the first time. If all goes well, I'm going to brew up the maiden batch of beer next week (timing issues) and try out my new fermentation chamber as well. I'll post again tonight once I get water boiling assuming I did my wiring correctly in the panel. :rockin:
 
Is that a 5500W - LWD element in there from Home Depot? Just asking because that's what I bought for my keggle but haven't installed it yet and now I know what it will look like if that's what you're using. Thanks for the pics.
 
Great job! My keggle is the same way, inverted using a 2" triclover on the sankey port. Why do you bother having a ball valve on the side when you could use the one on the bottom. So you can whirlpool and avoid the trub in the middle?
 
Why do you bother having a ball valve on the side when you could use the one on the bottom. So you can whirlpool and avoid the trub in the middle?

I used to dump the entire contents of the BK into primary. I'm wanting more and more to harvest yeast to use for small test batches of beer and all the extra trub in the beer makes harvesting difficult at best. I'm hoping to whirlpool most of the stuff out of the wort now for less in primary. If anything, I'll be able to use the extra side port for recirculation down the road should I ever want to try that.


And the bad news of the night, the dryer cord that I bought is not the same as the plug that I have on the wall for my existing dryer. Technically I should be upgrading the dryer receptacle to a four prong, but then I would have to buy two new cords and a receptacle. I'm going to run to Menards tomorrow to decide if I am going to replace the dryer receptacle and dryer cord or just find a new cord for my spa panel. Now I have to wait until tomorrow to fire it up.
 
Well, our washing machine took a crap so I found a great washer/dryer set on craigslist. The dryer comes with the correct 3-prong (mine had the range style three straight blades) so I changed out the receptacle and plugged her in for the first time. Everything works except for the damned SSR. Go figure, a guy buys the cheapest one that he could find from China and it doesn't work. I can measure voltage across the load terminals so I have connectivity and I can measure the voltage source to SSR, but it doesn't trigger. I'll have to make sure that I have the polarity correct on it, but it should be.

Is there anyone in the Milwaukee area that has a spare 25+ Amp SSR handy? The good news is that everything else works fine.
 
And I'm not very smart. I had the polarity crossed on the SSR connection coming out of the controller. We're making hot water now.
 
My element is heating when there is no signal from the PID or PWM... I can hear it heating the water in the keggle. Regardless, the GFI trips out after a few minutes with the contactor engaged with power going to the system. I've checked, and rechecked the wiring in the panel and don't see any faults. I'm questioning the SSR, but would that make the GFI trip? I even went as far as disconnecting the ground straps from the keggle (one in the box and one from the keggle to the cart) and that didn't change anything. I realize that the SSR will leak some current, but is it enough to keep heating 5 gallons of water? I might have to relax and enjoy a home brew over this one for the night. :confused:
 
Well, I can't figure out what the darned problem is. The water in my keggle is ~140 degrees F with a PID set point of 100 degrees so the controller is inactive (and no lights are flickering on/off). When I engage the contactor, I can hear the heater come to life and the water begin to sizzle. It will do that for a few minutes and then all of a sudden you can hear the boil/sizzle get louder until the GFI trips. I'm guessing that my SSR is faulty so I'm going to have to try and pull it out w/o screwing up all the wiring in my panel. My wiring diagram is terribly simple: two lines come in to the box, go to the contactor, one line goes to the element and the other goes to the SSR, the second then goes from the SSR to the other leg of the element. I pull off of one of the legs coming in to power the wall wart and PID controller, that's it. I guess I'll have to try and load test that SSR, but I might as well get another one on order so I can get brewing one of these days.
 
sounds like the ssr is stuck closed... The tripping sounds like something else. It looks like you have a 5500W on a 30A breaker so you should have 5A to play with, I would check the resistance on the element for starters and replace the ssr.
 
pvtshultz if you have an amp meter check to see how close the load is on each of your two phase legs. They shouldn't be more than 1-2 amps different. You may also try and bypass all of your electronic parts by wiring the two phase legs of the element directly to the two load side terminals on the black relay on the bottom left and then after disconnecting all other equipment from their power sources (except the one switch for the relay) turn on the element and see if the breaker still trips. If so replace the element.

One other thing a single loose connection can cause nuisance tripping with a gfi. Check all your connections especially your neutral wires.
 
Well, I ordered a couple new SSR's and bought a new element tonight; if anything, I'll have spare parts.

I connected a 50 Watt incandescent light to the switched leg and it lights up at about 50% power when the SSR is off. It functions fine other than that. I then connected a 15 amp load to the switched leg but it was one of those parlor heaters so I didn't let it switch. I let it run at full power for an hour and a half w/o a glitch.

What I did think of while attempting to install the element was the poor way that I tightened the last one down. I did it by hand, grabbing the element in the keggle and twisting it. I'm wondering if I may have tweaked something that caused a leak into the terminals. The element ran for 10-15 minutes on high before the GFCI started tripping. So I'm thinking that everything started getting warm, water seeped in, and began to cause havoc. I'm going to pick up an element wrench tomorrow on the way home from work and tighten the new one the right way and see if I can boil water when I get home.

Hopefully I'll be brewing beer Wednesday night during my regularly scheduled brew day. :mug:
 
And this should explain a few things...

DSC05667.jpg


I replaced the element and it looks like I'll have a spare now. The same thing happened as before. But after a few more tries, the GFI would trip out every time that I turned on the contactor. I started isolating things and determined that somewhere between the contactor and element terminal was grounding out. The only thing in that path was the SSR. So I pulled it off and much to my surprise, it was blown out on the back and arced to my panel. That looks like a pretty obvious short.

I suppose this is the sort of quality to expect what buying from the lowest bidder in China. I found a couple used Crydom SSR's on ebay for a song and hope to be able to get by better with those. My local Grainger carries the Omron units should I have any troubles with the Crydoms.

I bypassed the SSR and went straight from the contactor to the element and am very quickly bringing 8 gallons of water up to a boil. Thank goodness. I was beginning to doubt myself there for a minute.

I currently have two Omron SSR's that I got from a mechanic friend in the industry and I can tell you that the Omron brand in SSR's are considered the industry standard for quality. Just in case you have further problems with your other brands. Good Luck!
 
Well, much to my surprise, the SSR's that I ordered on Sunday arrived with today's mail. I noticed that they were out for delivery while I was at work so I headed straight to my LHBS to pick up the necessary ingredients to make BierMuncher's Centennial Blonde Ale as the maiden batch of beer.

I installed the SSR, performed a quick auto-tune and verified that everything was working as expected. I did one last scrub of the keggle, dumped the water, and filled her up one gallon at a time so I could graduate my sight glass. Everything went w/o a hitch tonight WRT making the beer and I now have 5 gallons or so of beer sitting in my new fermentation freezer brewing away. I ended up with 6 gallons after an hour's boil but hit my OG so my efficiency with this setup is higher. I do need to back off on my mash water volume (I do full-volume mashing) about 1/2 gallon though and I will need to adjust my grains to account for the extra efficiency. I haven't crunched the numbers yet, but it will be over 70% (my old normal efficiency).

If there is still any question about whether a cheap 50 CFM bathroom fan is suitable for exhaust duty, IT'S NOT BIG ENOUGH. I ended up running my dehumidifier during the boil to take some of the moisture out of the air. I had water dripping from all of the cold water pipes in the basement and I'm sure the extra humidity probably wasn't that good for the old wood work. The smell in the house was reduced (SWMBO appreciated that) but I'll definitely be upgrading to a much stronger fan for the next batch. I will also need to add the dip tube that I told myself to add so I don't have to keep bottom dumping. There really isn't enough room under the keggle to dump into a glass carboy so I had to hold it at an angle while dumping which made a nice mess on the floor ultimately. I'll be sure to take care of that for the next batch as well.

All in all it was a good brew session though and I'll never go back to propane burners again. Now that I have this thing wrapped up, I'll try and put together a cost sheet to share. There's been 1,001 eBIAB keggles lately but I might as well leave my small mark in the forum.
 
I know this is like a year and a half old, but wanted to see if you at least had a parts sheet for this build? thanks
 

Latest posts

Back
Top