Chest Freezer Kegerator Conversion Project

Homebrew Talk - Beer, Wine, Mead, & Cider Brewing Discussion Forum

Help Support Homebrew Talk - Beer, Wine, Mead, & Cider Brewing Discussion Forum:

This site may earn a commission from merchant affiliate links, including eBay, Amazon, and others.

Bobby_M

Vendor and Brewer
HBT Sponsor
Joined
Aug 3, 2006
Messages
27,824
Reaction score
9,068
Location
Whitehouse Station, NJ
We chatted about it a bit in this thread: https://www.homebrewtalk.com/showthread.php?t=27120&highlight=keezer and I mentioned I was going to do a video diary of my conversion project. While the first two videos are busy uploading to youtube (dang slow DSL upstream) I thought I'd get a thread going about it.

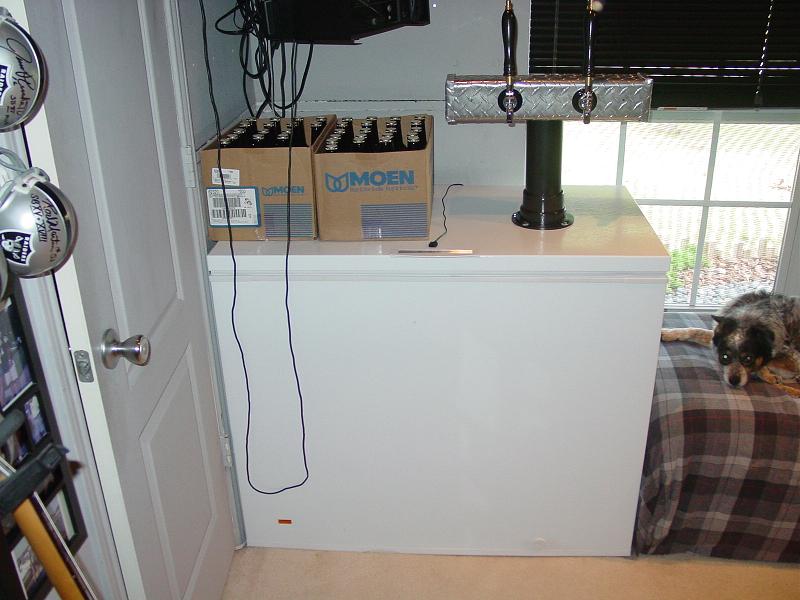
Here's a pic I snapped about midway through the project:

keezer.jpg


The 8.9 cuft Whirlpool holds 5 cornies with room for a 10lb tank on the hump. All your questions will probably be answered in the videos so hang in there, they're coming.

I'd be completely done with the project if I didn't get 6 inches of water in my basement the night of construction!! UGH.
 
Excellent timing. I'm working my SWMBO for just such an "investment".

Can't wait to see how the beveled collar turns out. That's a nice material you used for the collar. What is it...

Oooops.... That was a question....

Guess I'm too impatient to wait for the vid....
 
Great videos! Impressive! Can't wait for the other one(s). I've already got my hands on a 5.0 cubic ft chest type freezer. I can't wait to make my keggerator. You saved me the headache of trying to figure this bear out. Thanks for the inspiration. Brew on! :rockin:
 
It's not quite done yet (minor details are left) but here are a couple pics of mine:

http://tinyurl.com/34anbp

I am extremely fortunate in the fact my wife lets me keep it in our family room! :rockin:

By the way, here is what I currently have on draft:

Tap 1 - AG Sweet Cream Stout
Tap 2 - AG Wildflower Honey Ale
Tap 3 - AG English Nut Brown Ale
Tap 4 - AG Orange Blossom Cream Ale

- GL63
 
Part 2 may be a couple weeks out. Just after finishing this video, I went in the basement to grab a beer to have with dinner and that's when I found a big flood. Now all the crap that was down there is in the garage blocking my kegger project into the corner. Dang it.
 
Heh heh... that stock sealing strip was a pain in the ****ing ass on mine....

Glad to see it coming along... good luck w/ your cleanup after the floods here. Your house is kinda up that little hill so I figured you would be fine. Luckily you aren't in bound brook! Maybe your next project will be a sub-pump...lol...

I personally would have used 4 swivel wheels on the bottom, but I'm diggin' the lawn mower wheels!
 
You guys have all been doing great work.

I found an example of someone divying up the freezer space to create 2 zones, one for fermentation and one for serving. I thought I'd pass this on.

Just by crudely fashioning a polystyrene divider, he was able to create a 10° - 15°F differential.

To separate the fermentation chamber from the serving chamber, I picked up some foamed polystyrene (PS) board at the local hardware store. I cut it to size and used the interference fit to maintain its position in the freezer. By placing the thermocouple and the heater in the fermentation chamber, the temperature of fermentation is controlled to within + 3°F. The serving side sees cooling whenever the fermentation chamber sees cooling. However, the insulator board keeps the heat on the fermentation side. Hence, I have found a natural 10 to 15°F lower temperature in the serving side. Moving the insulator board one direction or the other changes the dimensions nicely for the chambers. Adjust to your own requirements.
http://www.oregonbrewcrew.com/freezer/freezer.html

I know that you guys can do better than that!

Again, nice work!
 
I still dont see much of a difference between fermentation temps and serving temps. I personally don't drink beer at 38°F because I want to taste it. The whole "colder is better" notion that BMC has ingrained into the male psyche... its a ****ed up way to get guys to drink their swill. I wind 50°F beer VERY enjoyable... (not to mention your chest freezer will work less :) )
 
sirsloop said:
I still dont see much of a difference between fermentation temps and serving temps. I personally don't drink beer at 38°F because I want to taste it. The whole "colder is better" notion that BMC has ingrained into the male psyche... its a ****ed up way to get guys to drink their swill. I wind 50°F beer VERY enjoyable...

I use a fridge with a contoller to get fermentation temps here in PHX.
70-75°F cannot be achieved without spending 100's of $$ per month in AC.

This is a huuuge problem for those of us in warmer climes without basements.
 
You could easily set your AC to 85°F which isnt out of this world, place the primary in some water w/ a towel on it, and a fan blowing on there. That would net you 75°F...
 
Very nice Bobby!
Both the kegerator and the video where nicely done. :mug:

Sucks on the basement deal. Took me 3 hrs to get into Somerset yesterday.
 
sirsloop said:
You could easily set your AC to 85°F which isnt out of this world, place the primary in some water w/ a towel on it, and a fan blowing on there. That would net you 75°F...

I could also fire up a wood stove and boil my wort.
You're going to have to trust me on this.
 
Very nice work. It is nice to see a kegerator put together well, I will be copying some of the finer points like having the collar flush with the freezer body and handles attatched to the lid. Well crafted.
 
I think it is going to depend on the viewer. For myself, I'm pretty handy and could figure it out on my own if need be, but some people need more guidance. However, you kept the pace moving along and it never got tiresome watching. That wasn't very helpful feedback, was it? :)
 
agreed... I'm a resourceful guy so showing the "drill cam" while you pull a couple already loosened screws out is just kinda dead time. I liked it more towards the end of the second movie where you just explained what you did and cut to the next section. You could have gone into detail about how you put those corner cleats on the lit...showed using the router and all that fun stuff. I think most people taking on a project like this have used a router or at least know that you used one to make that kinda cut, so it would be pointless to add that detail.
 
possible...maybe on a week night...my schedule just got PACKED now that i'm shooting every weekend...

You have a tripod?
 
Loved the videos. I don't think you over explained anything. I'm not super at wood work so some of the tips you gave I thought were very helpful (like how to use the hole saw going through both sides to avoid ripping up the wood).

Question for you though. Instead of doing the cleats on the corners, would a couple of 90* angles work on each corner? I'm thinking this would be an easier solution for me. I'll use my neighbor's miter saw to make the 45* cuts and the angles to connect and brace the corners (along with some carpenters glue and silicon).
 
Yeah, I don't see any reason some corner brackets wouldn't work out. You might have to drill some new holes in them so that you get a screw in the metal skin of the lid and not into just the foam. To be honest, I didn't use them for the simple fact that it would require another trip to Lowes and I had some scrap laying around. It might have taken me LESS time to go buy some hardware rather than fabricate the cleats and mortise them into the collar. Oh well, I AM trying to justify buying a router table and bits a while back.
 
Just got my9.0 CU chest freezer from best buy. Finally get to mount my take on jester's draft tower. will post pics tommorrow. I can fit 4 cornies and a 15# CO2 tank, plus room for bottles and i don't have to make a collar.
 
Hey Bobby,

You mentioned trimming the wood collar with quarter round? I'm not familiar with trim that is that small that it can cover and "smooth" the outside corners of joined wood or the length of a piece of lumber.

Can you elaborate a bit on what exactly it was and where (in Lowes or HD) you get that type of trim? Is it an applicay (sp) stick on?

Thanks.
 
Okay. That makes more sense. I thought that it sounded a little strange. I think I heard "so I applied a quarter round ..." thinking it was "applied". When in reality it was applying a 1/4 round router bit to the joint and edges.

DUH... :eek:
 
Yeah, 1/4" roundover on the corners and 1/8" on the edges just to keep them from being sharp to the touch. You could pull off the same thing with sand paper wrapped around a block of wood. I just like my toys.
 
Hey Bobby, excellent job on both the kegerator and the videos. I like how you talked about a step, then showed the finished step, without showing things like cutting the inner plastic lid, stapling the seal etc...
 
attitude said:
Heres what i got so far. Still need to add the temp control and 2 more taps, then were stylin


Your dog looks evil in that picture.

Nice set-up though.
 
I've got the kegger complete and I'm just waiting for some time to edit down the video. I'll tell ya, plumbing for 5 kegs is a PIA and time consuming. I currently only have 4 kegs filled with beer. The 5th is half filled with sanitizer. I figured I'd leave it in there, pressurized so I can swap the beerlines over for a quick rinse now and then.
 

Latest posts

Back
Top