10 Gallon Cooler Price

Homebrew Talk - Beer, Wine, Mead, & Cider Brewing Discussion Forum

Help Support Homebrew Talk - Beer, Wine, Mead, & Cider Brewing Discussion Forum:

This site may earn a commission from merchant affiliate links, including eBay, Amazon, and others.

mangine77

Well-Known Member
Joined
Sep 29, 2008
Messages
260
Reaction score
1
Just called home depot. I was so surprised with it being december and 10 degrees here, but they have 2 left. $37.00 a piece.

I'm not going to do any better than that am I?? I think I should grab these while I have a chance. Then I could brew right in the garage and not worry about losing temps right?
 
Thats about the price I paid for mine. I got 1 and now regret not getting a second since every time I check they don't have them. If it turns out you never need it you could prolly sell it on this board for that price + shipping since they seem to be hard to find in some areas.
 
Ok. Next question. Following the tutorial on converting these into tuns, how easy is this to really do?

I'm not the most mechanically inclined:cross: I'm not an idiot or anything, but I would hate to ruin these. Is it pretty straight forward as long as I get the right parts and follow the directions?

Has anyone run into big problems with this project?

Not difficult at all. If you can tighten a worm clamp and wrap threads with teflon tape, you can do this. Seriously.
 
Three tiers yes, unless you want to start buying pumps and such.

Converting the cooler does not modify the cooler itself... you arent cutting it or drilling it. Simply swapping out valves.

I do recommend using 1/2" components though, as they have a much greater flow rate and will set you up better if you want to build a RIMS, HERMS or make a single tier with pumps. ALSO, if you are using gravity to run the system, 1/2" will make fluid transfers much quicker for you. 1/2" components will not cost you but a couple bucks more. There is a thread on here that shows how to convert using 1/2" stuff too.


I have had both, just my .02
 
Maybe I missed it but is this a 10 gallon round igloo type cooler? If so I think the price is good.

If not, $37 may be a bit high, I got my 2 13 gallon rectangular coleman extremes for like 19.99 a piece or something from kmart.

As far as converting, it is very easy to hook everything up, the only problem I found was running around Home Depot / Lowe's trying to find all the little pieces that are needed.
 
Three tiers yes, unless you want to start buying pumps and such.

Converting the cooler does not modify the cooler itself... you arent cutting it or drilling it. Simply swapping out valves.

I do recommend using 1/2" components though, as they have a much greater flow rate and will set you up better if you want to build a RIMS, HERMS or make a single tier with pumps. ALSO, if you are using gravity to run the system, 1/2" will make fluid transfers much quicker for you. 1/2" components will not cost you but a couple bucks more. There is a thread on here that shows how to convert using 1/2" stuff too.


I have had both, just my .02

Is this setup more conducive to a certain type of sparge? I would have though fly sparging, but i read in another thread on here, that his setup is mainly for batch?

So is this different from the equipment that is suggested in this tutorial?
Cheap and Easy 10 gal Rubbermaid MLT Conversion
 
Is this setup more conducive to a certain type of sparge? I would have though fly sparging, but i read in another thread on here, that his setup is mainly for batch?

So is this different from the equipment that is suggested in this tutorial?
Cheap and Easy 10 gal Rubbermaid MLT Conversion

Three tiers is great for fly sparging, or batch, no difference really. The 1/2" conversion just requires that all of your part diameters are increased. The pipe nipple, washers, seals, ball valves etc.
 
Three tiers is great for fly sparging, or batch, no difference really. The 1/2" conversion just requires that all of your part diameters are increased. The pipe nipple, washers, seals, ball valves etc.

So all of these parts that say 3/8", 5/8", get everything 1/2"??? All this stuff will still fit? Sorry if this is a dumb question.
 
It will fit, mine are both converted with 1/2" components.

No, you will be getting larger components if you convert to 1/2". The thread on here that you are referring to is based on 3/8" components. So you will be going 1/8" larger.

Basically you will get a 1/2" nipple, washers that will fit over that nipple, 1/2" full port ball valve... and seals that will fit over the 1/2" nipple.
 
So for this setup, am I doing 2 identical conversions. I'm buying two coolers. One is the HLT and one is the MLT. They are converted exactly the same way right?

So I need to buy two of everything (as far as components)?
 
Its a very easy thing to make. The most difficult thing will be finding 5/8” stainless steel fender washers. My local home depot and lowes only go up to 1/2". Honestly I forget if I ordered it online or used something not stainless steel that was food/beverage safe.
 
Yes, two of everything.... it is easy, take your time, read, and ask questions.
 
Please stop reading if you get annoyed with noobie all grain questions.

I'm going to make these converted coolers tonight but I don't understand how that braided hose keeps the grains in the cooler without clogging?

I still need to purchase a circular manifold right? I don't just pour the wort into the tun on top of that supply hose obviously.

I've been on here all day and looking for a step by step brew process using two round orange coolers in your setup and I can't find one. Any links??
 
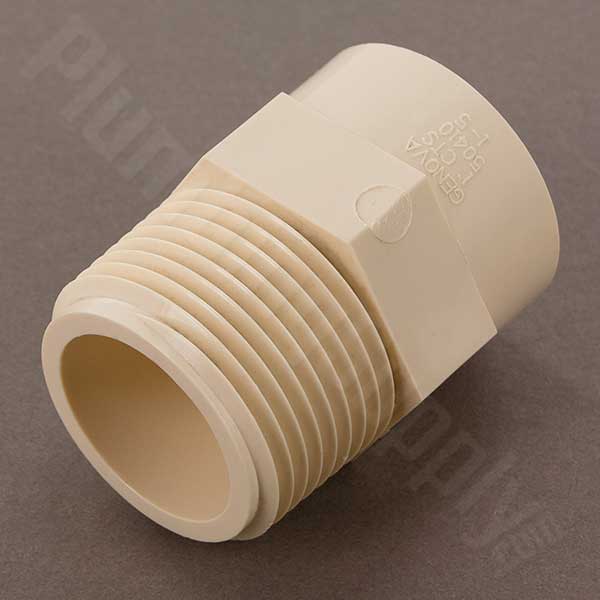
So assuming you're building it like THIS then there are changes for the 1/2 conversion. I don't think I would ever need 1/2" while sparging (I never go past half open on my 3/8), but if you do start using pumps, you'll want 1/2.

The 1/2" parts may actually be cheaper and easier to find. The only exception is the 5/8 washer that's already hard to find may get even harder in 3/4?" that you'll need. 3/4 is a guess, see what fits in the store.

You will also need more (and larger) washers for the 1/2". Again, using the 1/2" pipe in the store, finding the right o-ring should be easy.
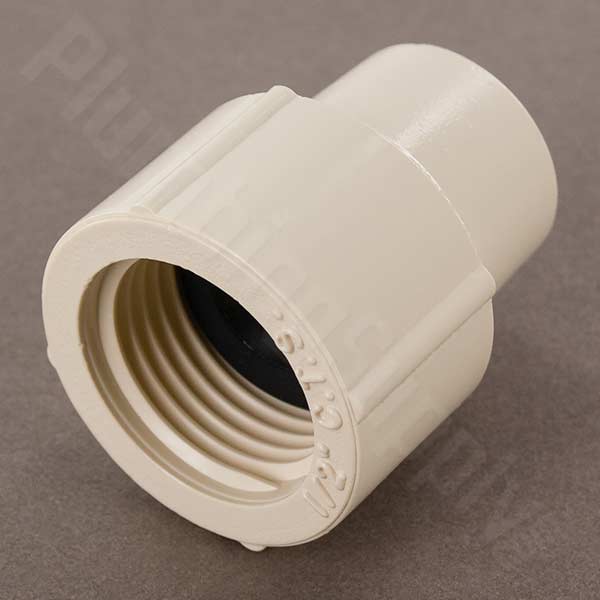
The original design uses the existing rubber washer in the cooler (it's white in the pictures). you can't use that for 1/2. With 1/2 inch, you may be able to find rubber "washers" instead of o-rings which may actually be better.

The object is to have an o-ring on the inside and one on the outside, and squish them and the cooler wall between the washers to form a seal.

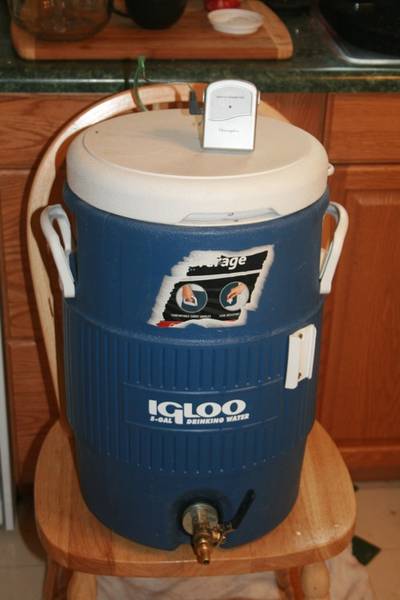
ALSO, be careful with the stainless braid. You buy a stainless braided sink hook up hose and remove the braid from the outside. Some of the hoses have a silver PLASTIC braid on the outside now, stick with stainless.
You can buy a real long braided hose (icemaker hookup) for a buck or two more than a short one and use it for 2 (or 3 or 6) coolers.

I took the "spring" off the of a spiral notebook and put it in my braid so it wouldn't get crushed (like they do in some radiator hoses). Some say it's not needed, but it was free and I believe it is better.

Brush up on your cuss words because you will poke yourself with the braid once or twice (hopefully not under the fingernail like me):D

To your "2 of everything" question, you don't really need 2 braids. I have a 5 and a 10 so both of mine have braids because they swap duties depending on the size of my batch. I'd at least get the barbed fitting so you can a braid in the future - you need a "nut" there anyway, so the barb is futureproof.
 
Please stop reading if you get annoyed with noobie all grain questions.

I'm going to make these converted coolers tonight but I don't understand how that braided hose keeps the grains in the cooler without clogging?

I still need to purchase a circular manifold right? I don't just pour the wort into the tun on top of that supply hose obviously.

I've been on here all day and looking for a step by step brew process using two round orange coolers in your setup and I can't find one. Any links??


Ok, you need to slow down; I understand your excitement, but this can be a lot to digest. I especially value when someone tries to seek out the information on their own, rather than being spoonfed the information.

The supply hose in the MLT acts as your separation medium; you need something to separate the grain from the wort- be it a manifold, SS braid, etc. etc.. This is where you mash your grain. Water from the HLT goes into the MLT at a volume determined by your grainbill (1.25 qts of water/lb of grain). Once the mash is completed, you open the ball valve on the MLT to begin draining the sweet wort and then sparge (rinse) the grain to flush away any remaining sugars to get your pre-boil volume. If you plan on fly-sparging, a manifold is your best option. The SS braid is pretty much limited to batch sparging (my preferred method).

Something I would highly suggest you read is this. The author, Bobby_M, is very active here as well.

Arguably, you don't need two coolers. The second cooler (the HLT or hot liquor tank) just holds the strike and sparge water. You can do this just as effectively with a largish pot as indicated by the few pictures in the other thread that you started. I don't have a second cooler- just my cooler MLT. I use the pot that came with my turkey fryer as my HLT.


:mug:
 
I took the "spring" off the of a spiral notebook and put it in my braid so it wouldn't get crushed (like they do in some radiator hoses). Some say it's not needed, but it was free and I believe it is better.
I just made a spiral out of vinyl hose and it works like a charm.

Brush up on your cuss words because you will poke yourself with the braid once or twice (hopefully not under the fingernail like me):D
It helps if you tape it before you cut and "push" the existing hose through. If you pull it, it acts like Chinese Finger-cuffs.
 
The braid and the husks of the grain are a good filter. I grind very fine and have never clogged a braid.

Don't laugh, but I don't use a circular manifold, I use an upside-down Frisbee with a bunch of 1/8 holes in it to diffuse my water. (hey, I said no laughing!) It sits on my grains and I have a single pipe that pours into the middle of the Frisbee.

You just need to diffuse the water somehow so that it washes through all of the grain, not just straight through the center.

I have plans for a circular manifold, but the Frisbee must work because my efficiencies are in the high 80s.
 
I plan on fly sparging for now. I think I will experiment with both eventually.
 
I just converted one for an mlt. It was fairly easy. I ended up getting everything at home depot. I'll try to post pictures of the finished product soon, but below are pics of the individual parts I used. I toyed around with the idea of the stainless braid, but was concerned that it might get crushed during large mashes and thought it looked like a pain in the butt to clean. The copper is rigid, so it won't crush and it's easy to take apart and clean. I ended up cutting the slots with a bansaw and it was very easy. Copper is soft and it cuts like butter.

Parts:
1-1/2" cpvc male adaptor
cpvc-male-adapter.jpg


2-1/2" cpvc femail adaptor
cpvc-female-adapter.jpg


1-1/2" cpvc ball valve
cpvc-ballvalve.jpg


1-7/8" HDPE grommet
rubber_grommet.jpg


You also need teflon tape, a couple very short pieces of 1/2" cpvc pipe, cpvc glue and a 1/2" threaded hose barb. I ended up ordering my hose barb from more beer and got a nice stainless one for less than $5. At some point I'd like to upgrade all the cpvc to stainless, but could not justify at this point.

The biggest difficulty in the whole project was figuring out a way to make sure you get a good gasketed seal in between the inside wall of the cooler and threaded bulkhead. The cpvc fittings have fairly narrow shoulders that don't provide a good seating surface. I ended up finding an HDPE grommet like the one shown above and cut off one of the flanges. I used this to seal against the cpvc mail adaptor on the inside of the cooler. I also had to modify a steel washer to go over the mail cpvc mail adaptor on the outside of the cooler to provide a secure surface to tighten the femail adaptor against. This modification to the washer included tapering the edges to match the tapered indentation on the outside of the cooler.

Hope this helps, and as I said, I'll post pics soon.
 
So I can't find the stainless 5/8 fender washer or the regular 3 5/8 washers that I need for the outside. Should I go online, or have others substituted and made it work.

I found all of the other parts and I'm excited to put this together. I just wish I could find these washers.
 
So I can't find the stainless 5/8 fender washer or the regular 3 5/8 washers that I need for the outside. Should I go online, or have others substituted and made it work.

I found all of the other parts and I'm excited to put this together. I just wish I could find these washers.

I took a look at mine and it looks like I substituted a copper 5/8" fender washer for the inside. I was able to find the ones for the outside because they don't need to be food safe. If you want to do it the same as the original one then I would go online, it will end up being quicker and cheaper than wasting gas driving around looking.
 
So I can't find the stainless 5/8 fender washer or the regular 3 5/8 washers that I need for the outside. Should I go online, or have others substituted and made it work.

I found all of the other parts and I'm excited to put this together. I just wish I could find these washers.

Do you have a Fastenal nearby? I'm blanking on the part# right now, but I know that's where I got my fender washers for this build. Alternatively, you can use a rubber or neoprene washer to build the seal on both sides of the cooler wall.

Check out this pic of my MLT- you can see the rubber washer:

IMG_5256.JPG
 
I was lucky, I found them at Home Depot when Lowes didnt carry them. It is hit or miss with the chain stores.
 
I bought stainless washers at Lowes and drilled them out with a step drill (and a vice). A step drill is the only way that you can open up a hole in thin metal like that, a regular bit will grab and wad it up. In Huntington Beach, we found some huge brass washers for dirt cheap that required no drilling! It was an Orchard Hardware. Next time I'm out there, I'm stocking up.
 
So, because a flat washer is thicker than a fender washer, couldn't I just use 2 of those on the outside instead of 3 of the thinner fender washers?

Or does it have to be three? I'm just guessing that two of the regular 5/8" washers is close to the overall thickness of 3 fenders. Am I way off here?

I didn't even need 3 on mine, I got away with 2. It just has to be enough to prevent leakage.
 
Why does the original poster of this tutorial say in the post that if you are a fly sparger, this isn't the setup for you?

I thought that this would work well for fly sparging.
 
Why does the original poster of this tutorial say in the post that if you are a fly sparger, this isn't the setup for you?

I thought that this would work well for fly sparging.

Because the SS braid encourages channeling, something you don't want with fly-sparging. You want the bed to set and be as undisturbed as possible during the sparge.

If you want to fly-sparge, manifold. If you want to batch sparge, SS braid or manifold.

See: http://www.howtobrew.com/appendices/appendixD.html
 
Back
Top