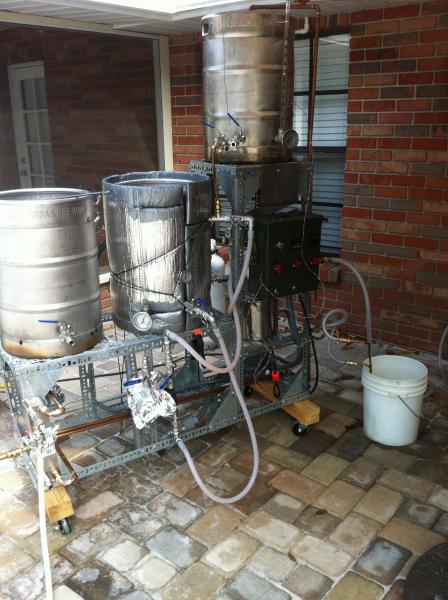
Weldless brew stand.

Homebrew Talk - Beer, Wine, Mead, & Cider Brewing Discussion Forum

Help Support Homebrew Talk - Beer, Wine, Mead, & Cider Brewing Discussion Forum:

This site may earn a commission from merchant affiliate links, including eBay, Amazon, and others.
Just won a football pick 'em pool... Overall season champ, $635 prize. Net $462 after the $173 entry fee.

So......... Going to start ordering soon!!!
 
Duh! I obviously didn't read your post well....sorry! :mug:

Haven't tried it myself. After thinking about it for a few days I plan on ordering the galvanized tonight.
 
Deric said:
Duh! I obviously didn't read your post well....sorry! :mug:

Haven't tried it myself. After thinking about it for a few days I plan on ordering the galvanized tonight.

It's alright lol. I am just debating ordering the green stuff from mcmaster or getting the galvanized from lowes
 
This is my weldless stand. It's made of Super Strut from Home Depot. this pic is from last spring. It's not a HERMS anymore. I've added a panel and a RIMS tube to heat the mash.
0641.JPG
 
Nice, I always wondered about bulding a stand out of Kindorf. It seems a little flimsy though. How does that bad boy hold up under all the weight of full pots?
 
Here is my take on the Wallace. I just finished my 5th batch. I am very happy with material. I opted for the non-green metal. It was a good choice for me as I have already had a boil over and burnt wort to several spots on the frame. I think this adds a really nice patina to the look.

It really was like building an erector set. If anyone is considering, I give this two thumbs up.

Cheers!

image-3232256820.jpg
 
Plankton
When I build my stand I plan to build it very similar to your picture instead of on one level.
I would prefer to keep to one pump instead of two.
Do you care to elaborate on the construction details and part list?
 
Plankton
When I build my stand I plan to build it very similar to your picture instead of on one level.
I would prefer to keep to one pump instead of two.
Do you care to elaborate on the construction details and part list?

Second that. That is what I had in mind for mine so if you have a write up on your build that would be awsome.
 
How difficult is it to maintain a stable mash temperature with a direct fired recirculating keggle mash tun? I want to do something like this but don't quite have the money to go the brutus route yet. About how many times do you have to fire the burner to heat up the mash on average?
 
If you have good circulation requiring a large false bottom and your burner/kettle distributes the heat evenly then you will not have a problem. The trouble occurs when you burn the grains on the bottom or scorch the wort due to low of circulation or hot spots. Going this route you would ideally want a burner that can be run at a low enough level that you would not have to cycle it off and on often during your mash. So you would want a low BTU burner with lots of surface area for you mash tun, and a high BTU burner for your Boil and HLT.
 
How difficult is it to maintain a stable mash temperature with a direct fired recirculating keggle mash tun? I want to do something like this but don't quite have the money to go the brutus route yet. About how many times do you have to fire the burner to heat up the mash on average?

Too many variables to respond on what is 'average'.
Insulation properties of your Mash Tun
Size of the batch
BTU output of mash burner
Flow rate of re-circulation
Size and type of kettle
Ambient temperature
 
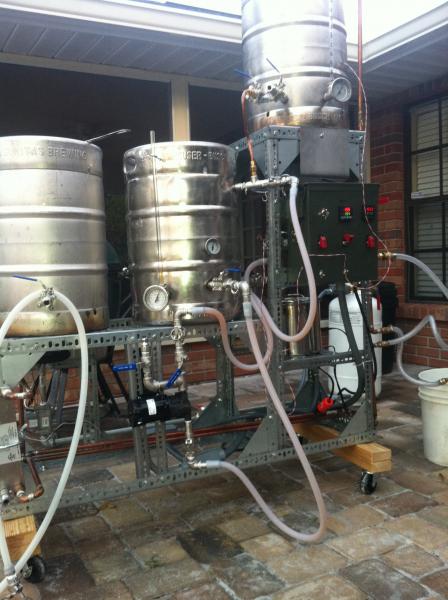
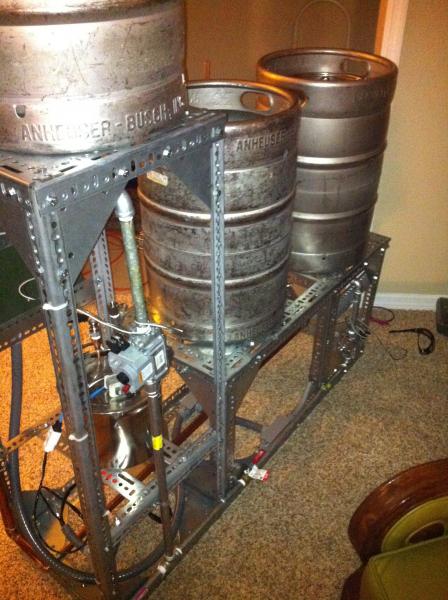
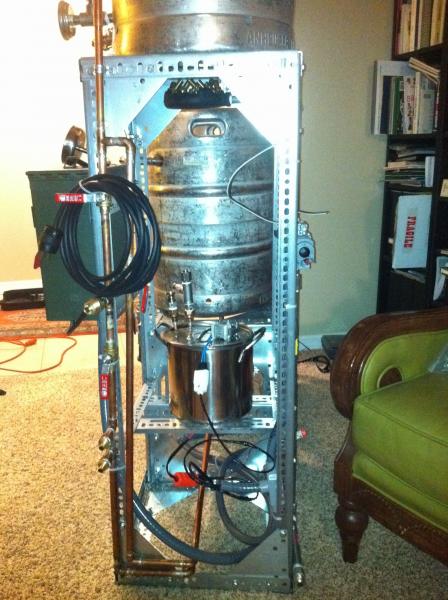
Here you go. I basically started with a Wallace plan and adjusted it to gravity feed the HLT. The plan is pretty simple. The width is 16 inches. The length of the first tier is 38 inches long. The total length is 54 inches long. The height of the lower tier is 21 inches tall. The height of the top tier is 46 inches tall. I purchased the parts listed on the weldless brew stand webpage. However, I ended up buying additional parts to incorporate the second tier. One item of note, you will need 3 bags of the bolts. The parts can be found on "Wallace" (The Weldless Brew Stand) - ALEiens Homebrew Club

Parts list:

Keggle fittings all were bought from Bargain Fittings Based on your plan for the keggle build, you will need to determine which fittings you will need to purchase. On hindsight, I bought my fittings before I talked to the welder. I was fortunate to live in an area where there was a professional brew welder to help me out. I ended up with some extra stuff which I did not need. BTW- I live in the Tampa area. The welder I used was Jay the Welder. He did a great job for me.

For the burners, I used the 10 jet burners for propane from bayou classic. I am running these using a 1/2" pipe and 0.5psi. It has worked great for me. Propane Jet Burners, 10 Jet Propane Jet Burner 618LP

I wanted to automate the HLT, so I used honeywell VR8200 with standing pilot light with auber PIDs. THe honeywell valves run on 24Vac, so you will need to get something to step down 110. I used a door bell power supply from HD. On my boil kettle, i just used a on/off switch to the valve to control the flame (no PID on the boil kettle).

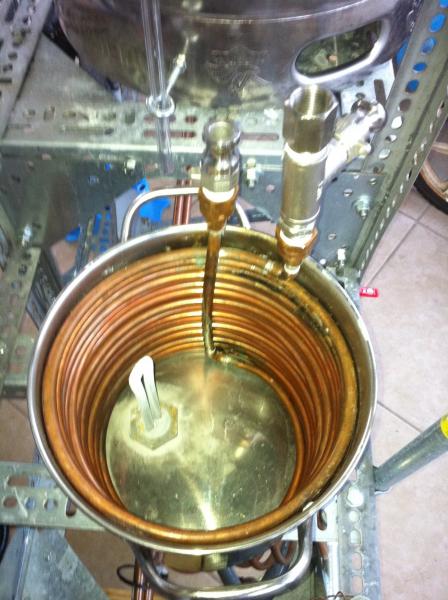
In order to maintain mash temps, I incorporated a heat exchange. I found a $3 2gallon kettle at walmart. I put in a 1500W heating element and run it off of a PID. This has been really great at maintaining the temps during mashing.

For cooling the wort, I found a good site that sells many different plate chillers. There are many to choose from. I picked a 30 plate chiller for about $100 and it cools quickly. I put in copper tubing to the plate chiller and I single point of attachment for the water line. To make filling the HLT easier, I ran a copper line to the top of the HLT.

Bobby has a good tutorial on how to build a hop screen. I built one and it works great.

I hope this helps.

full pic.jpg


back view.jpg


side view.jpg


hex.jpg


photo.jpg
 
Can you show more on the wiring of the honeywell? I want to do something similar but have no real wiring experience
 
The standing pilot HW valves are pretty simple. There are only two wires to connect and they come from the 24vac transformer. For my hlt I used a PID to switch the burner on/off. This wiring was a little more complex than my abilities as I could not understand the wiring instructions from Auber. Luckily i had a friend with a EE degree. On hindsight, it is pretty simple. On my boil kettle, I used a 2pole switch in line with 110 going into the transformer. Note, I used two separate transformers to powers each valve. I imagine there is probably a way to power both valves with one transformer.

I will post some photos later.

Cheers
 
Does anyone have recommendations on a heatshield to go with the BG14 burners? I fired this up for the first time yesterday and didn't have my cement board properly placed and melted my polycarbonate sight glass. Luckily I only had 4 gallons or so in the boil kettle so I didn't lose any wort.
 
Where do you all get the propane hoses? in the 43 pages on this thread i saw no mention of that. I have everything ordered minus the hoses and black pipe.

Thanks!
 
Charlie, I used to have a 10 gallon cooler as my mashtun and didn't have any problems with it getting too hot from the burners. I was using the 70,000 btu agrisupply ring burners.
 
Got most of the parts to put one of these together. Still waiting on the gas manifold, second pump and a few odds and ends. Plan on mashing in a cooler....think I'll probably build a heat shield for it just in case. Still need to fashion up some shields for the burners and pumps.

When I ordered parts from McMaster I went a head an got the casters thinking that $100 was worth knowing it would be stable. I wish I wouldn't have....they kinda suck. They roll nice and support the stand OK but they don't lock fer ****! :mad:
 
Started my stand this morning. Figured i'd share my progress with you. I made it custom to fit my 20gal kettles.

IMG_4289.jpg


IMG_4292.jpg


IMG_4295.jpg


IMG_4296.jpg


IMG_4297.jpg
 
Additional bracing is on the way. I ran out of parts using the original bill of materials. I was not planning diagonal braces just additional vertical supports. It's 6' long.
 
Vertical bracing really doesn't give you that much more support. You're basically passing deflection down to the lower rail, that's why I hinted at diagonal bracing. Once you hang your burners and fill those kettles you will know what I'm talking about.
 
I will be adding two center casters on either side as well. Which i was hoping would be like making two 3ft stands as far as support goes. Good thing is, it is so easy to add and change things until it is perfect. McMaster is right down the street!
 
Back
Top