Show us your sculpture or brew rig

Homebrew Talk - Beer, Wine, Mead, & Cider Brewing Discussion Forum

Help Support Homebrew Talk - Beer, Wine, Mead, & Cider Brewing Discussion Forum:

This site may earn a commission from merchant affiliate links, including eBay, Amazon, and others.
Omarke, nice work though looks dangerously top heavy and tip prone. Hopefully a safety cable ties it off when in use.
How does the aquarium pump hold up to the heat? I have several but didn't think they could tolerate brewing temperatures.

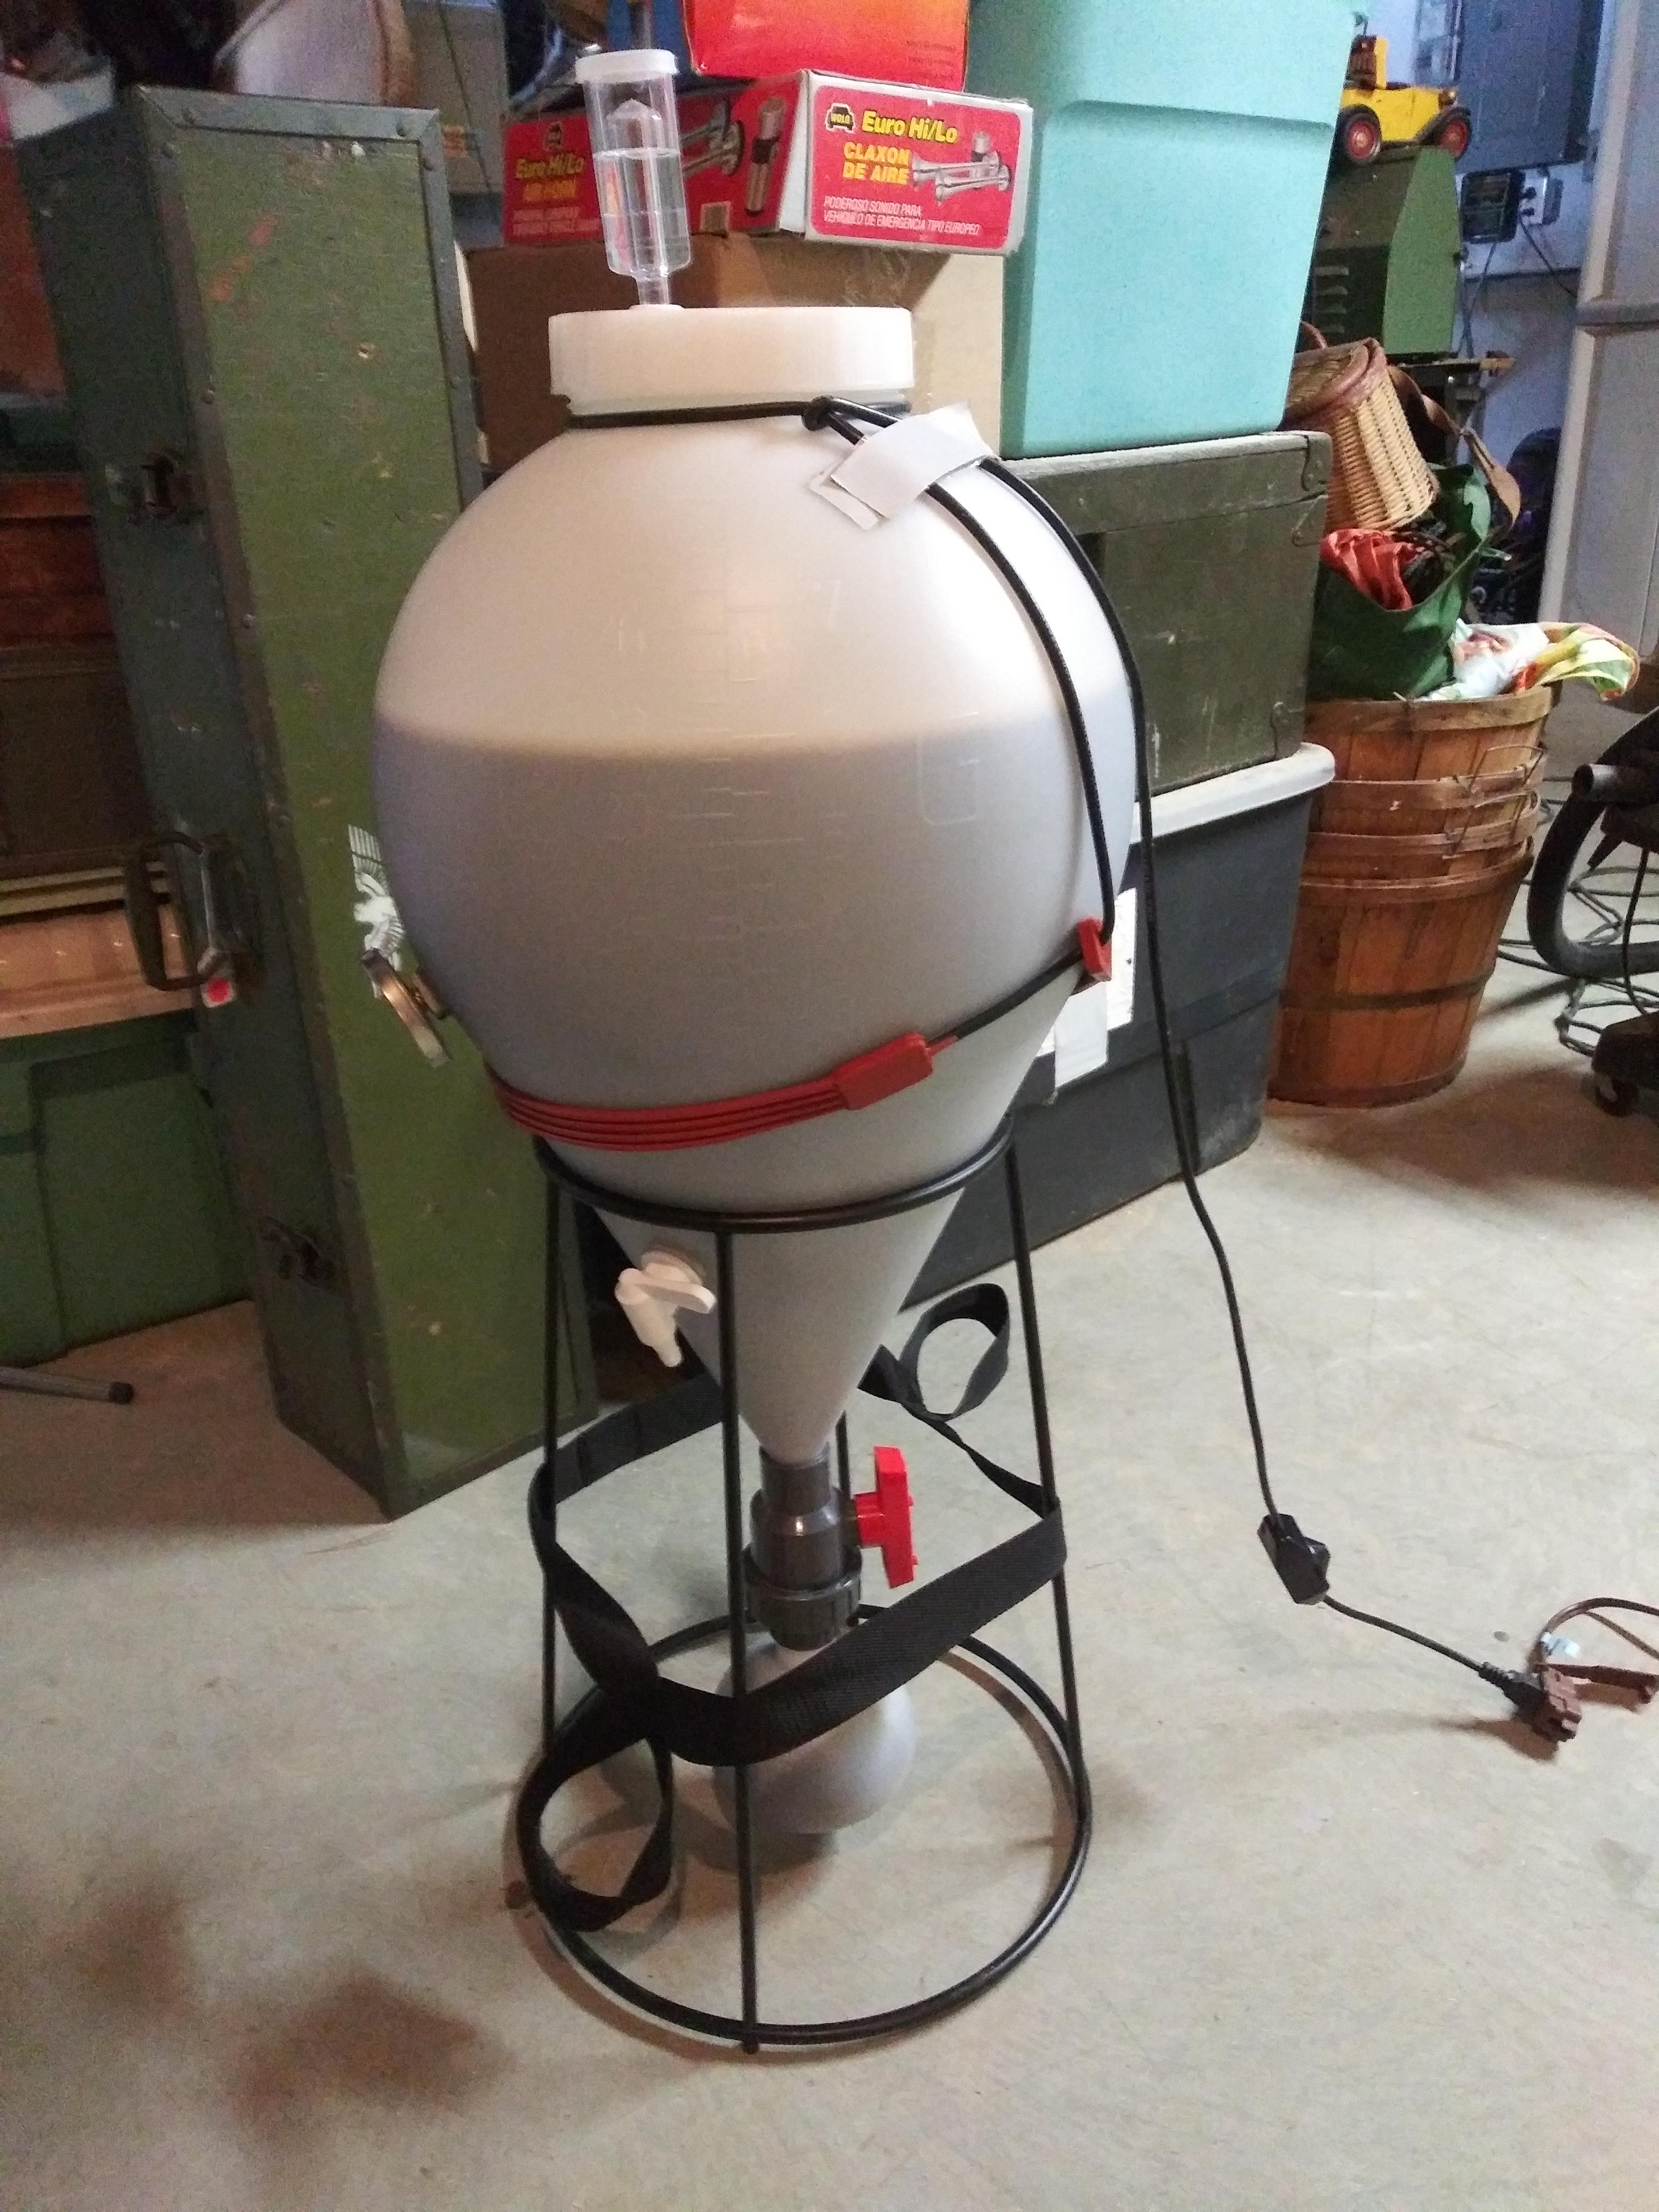
Hello, i use the submersible pump and aquarium chiller only during the fermentation and the crash cold stages, as you can see the bottom tank (unitank) has a jacket for water, it is empty while mashing and boiling, after boiling i use it to pass water slowly to cool the wort down from boil to pitch temperature, the water entering is room temperature and is hot at exit then goes to drain.
After pitching the yeast i move the unitank to a small room where i have 2 hoses coming from outside the room through the wall, this hoses are from the aquarium chiller which is placed outside the room so the heat exchanger can be more efficient, then i just installed a small submersible pump on the floor inside the room, then connect the 2 hoses to the unitank´s jacket and set the fermentation temperature on the chiller and that is all.
About being dangerous, it is not, i have placed base to receive and clamp the 1-1/2" tube leg on the floor to hold one of the 3 legs, but after many cookings i realized it does not need it since the tank is very stable.
 
Whatever this thing is...it looks awesome! Do you have any brew day footage? I’d LOVE to see this thing in action. Post it up on Youtube for folks to check out. I really like the originality and engineering that went into this.

Hello, thank you for appreciating the originality, it is really a new setup for brewing, when i wanted to learn the process i read about it and i could not stand the idea of having so many tanks to brew and to separate the grains from the wort and ferment, so i went crazy and design the zeus machine which solves many problems, or at least makes it easier to brew and better.
Attached is the basic diagram of how it works
The cold water is showed in blue, hot wort in orange, boiling in red, and cold wort and beer in yellow.
Also the grains are in light brown and fermentation sediments in dark brown.
I havent made a complete video yet that shows the full process but i have several videos on my facebook page https://www.facebook.com/cervezazeus/
 

Attachments

  • diagrama zeus.png
    diagrama zeus.png
    249.3 KB · Views: 302
Was getting tired of lifting water up to my HLT on my gravity setup, so made some changes to my brew stand - got a pump and a second induction burner (also a larger brew kettle) for a 2 tier brew house.

Nice setup. I use an induction plate for my starters, but I've never found one that could do a larger boil.
What kind are these?
 
Nice setup. I use an induction plate for my starters, but I've never found one that could do a larger boil.
What kind are these?

They are 220-240v Buffalo Induction Hobs (3000w). Brought them from the UK to Malawi - We've got UK plugs here, so can plug them directly into the wall. I am generally bringing 7.5 gallons from mash/sparge temps up to a boil in around 30 minutes.
 
Tweaked/added a few things (plate chiller w/immersion pre-chiller set in cooler filled with ice, water filtration system, sight glass for mash recirculation & hop spider). Brewed yesterday and the system worked like a champ! 6 gallons of wort cooled down to pitching temp in about 10 minutes using less than 15 gallons of water.
IMG_2913.jpeg
 
In my 8 years of brewing I started with a borrowed 10 gallon pot, than a BIAB keggle and than a 3 vessel 30 gallon propane setup. And now this. Same 30 gallon pots but all electric now. The one in my profile pic. If I had known back then, what I know now, I could have saved a lot of money. I just installed a wall fan and my 4'x2' hood arrives later today. Brewing with the doors closed in my 14'x28' brewery.
Next step? A bigger brew kettle.
30 gal. Electric.jpg
 
I’m with you on that one. Nice looking system (jealous). My brother brought up the spike systems many years ago and it was the first time I’d heard of all electric. Ashamed to say I turned my nose up at it and thought “that isn’t how home brewers do it; you need to use a turkey fryer burner and be out in the weather”.

Naturally now that I’ve done more brewing, have a house of my own and I’m not so naive, I think about how I could have an awesome basement brewery.
 
Here is my setup. 200,000 BTU natural gas burner connected to CO2 sensor solenoid to cutoff gas if chews up too much O2, 8.5 gallon megapot, vent hood, and sink capable of fully submersing carboys and kegs. Thumbnails show closeups of brewing setup. Pump from pot to dudadeisel plate chiller and recirculates back into pot via copper tube that whirlpools wort in the process. Can go from full boil to 60 degrees in 5 minutes using tap water. Not pictured is my brew jacket fermenter setup that keeps fermenting temps within .3 degrees of what is set. Full batch takes about 3 hours with sanitation and cleanup after.

FYI--this is an early photo during the build--wiring is covered up!
IMG_3774.jpg


IMG_1388.jpeg IMG_1389.jpeg IMG_1390.jpeg
 
Here is my setup. 200,000 BTU natural gas burner connected to CO2 sensor solenoid to cutoff gas if chews up too much O2, 8.5 gallon megapot, vent hood, and sink capable of fully submersing carboys and kegs. Thumbnails show closeups of brewing setup. Pump from pot to dudadeisel plate chiller and recirculates back into pot via copper tube that whirlpools wort in the process. Can go from full boil to 60 degrees in 5 minutes using tap water. Not pictured is my brew jacket fermenter setup that keeps fermenting temps within .3 degrees of what is set. Full batch takes about 3 hours with sanitation and cleanup after.

FYI--this is an early photo during the build--wiring is covered up!
View attachment 618958

View attachment 618955 View attachment 618956 View attachment 618957

That is an awesome setup, and I'm in particularly digging the proximity of that full size sink! My only suggestion would be to get a bigger pot, even if you never use it on brew day. This setup with an 8 gallon pot seems to be akin to an 8000HP top fuel dragster running on street tires!
 
Thanks, 501irishred--the sink IS in fact the most important thing I ever did to improve the brewing process!

Hoping to up my brewing game with larger pot--currently works great for five gallon batches (room to spare) but would like to start doing 10 gallon batches soon!
 
I thought of similar but I wanted to be able to rotate it, drop it down and remove it. So I had to custom make it.
How about mounting a pipe on your stand and then put this thing over the pipe without screwing it down. Then you could rotate it.
 
New member - first time posting. Thought I'd share some photos of my setup, which is a bit different than some. I mash in the basement (using a grain/grist hopper to make mash in easier), collect the wort in a cooler/grant, and then pump it from the basement to the kettle outside using a pipe that I ran through the wall. After the boil and whirlpool are over, I let the still hot wort gravity feed to the fermenter in the basement, which is where I chill it using a Jade Cobra immersion chiller, an angle drill and a whirlpool paddle. I can chill 10.5 gallons from over 200 degrees to 70 in 5 minutes or less using 48-50 degree tap water.
Hopefully the photos upload OK.
20190327_083041.jpg
20190327_105329.jpg
20190327_105340.jpg
20190327_124748.jpg
20190327_124854.jpg
20190327_131125.jpg
 
Quite ingenious setup! Looking for more info on the hopper if you’ve got it. Thanks.

Thanks! The grain hopper is actually a wall mounted dog food dispenser that I bought from Amazon:

https://www.amazon.com/Bergan-11732...&sprefix=wall+mounted+dog+food,aps,142&sr=8-1

It was bigger than I needed, so I cut the top section off and added a piece of wood and eye hooks so that I could easily hang it and remove it from the wall. I saw someone on YouTube using one of these for the same purpose, but he had his hanging by ropes from his ceiling. Here are a couple of pictures. Just open it enough to get a good, steady flow of grains, and stir to easily prevent dough balls.
20190327_083049.jpg
20190327_083534.jpg
 
New member - first time posting. <snip> and then pump it from the basement to the kettle outside using a pipe that I ran through the wall. After the boil and whirlpool are over, I let the still hot wort gravity feed to the fermenter in the basement <snip>

Now that is unique and solves much of the "it's too cold outside to brew" issues.
Welcome to posting!
 
Now that is unique and solves much of the "it's too cold outside to brew" issues.
Welcome to posting!

Thanks. I also made a kettle insulation jacket that I use after flameout during the whirlpool on cold days to keep the wort temperature from dropping below 200+ degrees. This keeps me from having to sanitize the transfer hoses and wall pipe, and let's me brew year-round in NJ. I also use a remote BBQ thermometer so that I can monitor the kettle temperature from the warmth of my basement.
 
Thanks. I also made a kettle insulation jacket that I use after flameout during the whirlpool on cold days to keep the wort temperature from dropping below 200+ degrees.
I don't whirlpool at the high a temp as in my experience it extracts too much bitterness and evaporates too much of the aroma compounds. Depending on what you're going a whirlpool around 160 might be worth trying. (and I know there's a lot of debate about this so, YMMV).
to sanitize you could siphon Couple gallons of starsan solution from an outside bucket to an inside one.

Thanks for the suggestion. I've been able to deal with the bitterness that happens with a high temp whirlpool using BeerSmith to calculate the additional bitterness that the whirlpool adds and adjusting my hops quantities to hit my IBU target. However, my beers often lack any real hops flavor (I generally don't make hoppy styles, but still...). I'll try letting the whirlpool temp drop and see if it helps.
 
57627438165__476A58AC-2FEC-4916-B510-25BA23F05CE7.jpg


10 gallon hlt PID controlled with recirculation pump to transfer hot liquor
10 gallon mash tun false bottom
Hellfire burner on natural gas
Immersion chiller with ice pump
 
Back
Top