
I somewhat recently bought a DIY CFC built using the methods outlined here https://www.homebrewtalk.com/f51/counterflow-chiller-tutorial-51793/
I highly recommend that you read the build above - it was the inspiration for this chiller.
I was less than thrilled with the build quality so I decided to make my own.
This chiller could probably benefit from being longer, but the numbers below are good enough for me. Less wort will be lost with this chiller than longer ones if inadvertently left in chiller.
Construction steps:
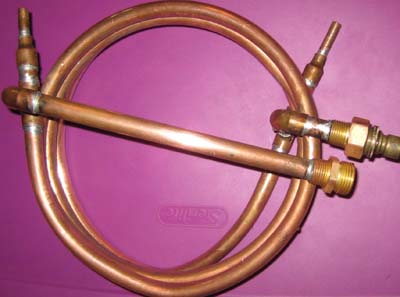
1. Straighten out both 3/8 and 5/8 hose
2. Put dish-soap (lube) into large hose, push small hose through. If you're like me you'll cuss a lot but eventually get it.
3. Coil pipe around something round. I Used a corny keg.
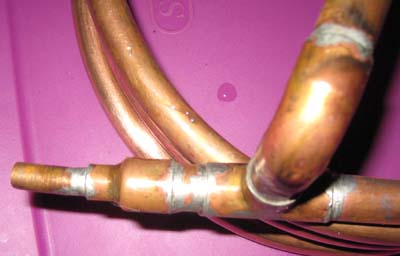
4. Using pipe cutter, cut off appropriate amount of 5/8 hose to give room for fittings.
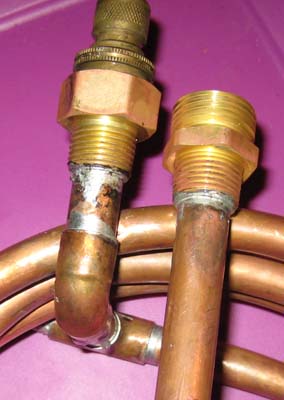
5. Attach T, small (1-2") piece of copper hose, and reducer which has stop drilled out in that order to each side of chiller.
6. Garden hose fittings should slide over 1/2 copper pipe. They may need a little... encouragement.
7. Use elbows and scrap pieces of copper pipe to get garden hose in and out to go where you'd like them.
8. Solder everything. Remember to remove the rubber from the female garden hose coupler.
Parts and Cost breakdown:
10' 3/8 OD 1/4 nom copper hose. 9.99
10' 5/8 OD 1/2 nom copper hose 22.80
2 - Reducing coupling 1/2 X 1/4 1.30 each 2.60
2 - 1/2 copper T 0.86 each 1.72
2 - 1/2 elbow 0.55 each 1.10
Watts A-663 3/4 Male Hose x 1/2 mip 3.39
Watts A-677 3/4 Female Hose X 1/2 FIP 3.43
Had a ~1' scrap piece of 1/2 copper 1.00
Total: 46.03
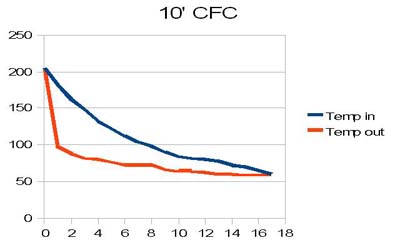
Test parameters:
5 gallons water at boiling.
Water circulated through CFC and back to kettle with march pump at 1.25 gpm
Garden hose flowing at 6.6 gpm
Groundwater temp 56*F
Data:
Reported in minutes and *F
Dial thermometer probes stuck in inlet and outlet of chiller. Inlet should be roughly the mean temperature of kettle.
Time Temp in Temp out
0 **205 ** ** 205
1 **182 ** ** 97
2 **162 ** ** 88
3 **148 ** ** 82 At only 3 minutes already past DMS formation stage
4 **132 ** ** 80
5 **122 ** ** 76
6 **112 ** ** 73
7 **103 ** ** 72
8 ** 98 ** ** 72
9 ** 90 ** ** 66
10 ** 84 ** ** 64
11 ** 82 ** ** 64
12 ** 80 ** ** 62
13 ** 78 ** ** 60
14 ** 72 ** ** 60
15 ** 70 ** ** 58
16 ** 65 ** ** 58
17 ** 60 ** ** 58

I highly recommend that you read the build above - it was the inspiration for this chiller.
I was less than thrilled with the build quality so I decided to make my own.
This chiller could probably benefit from being longer, but the numbers below are good enough for me. Less wort will be lost with this chiller than longer ones if inadvertently left in chiller.
Construction steps:
1. Straighten out both 3/8 and 5/8 hose
2. Put dish-soap (lube) into large hose, push small hose through. If you're like me you'll cuss a lot but eventually get it.
3. Coil pipe around something round. I Used a corny keg.
4. Using pipe cutter, cut off appropriate amount of 5/8 hose to give room for fittings.
5. Attach T, small (1-2") piece of copper hose, and reducer which has stop drilled out in that order to each side of chiller.
6. Garden hose fittings should slide over 1/2 copper pipe. They may need a little... encouragement.
7. Use elbows and scrap pieces of copper pipe to get garden hose in and out to go where you'd like them.
8. Solder everything. Remember to remove the rubber from the female garden hose coupler.
Parts and Cost breakdown:
10' 3/8 OD 1/4 nom copper hose. 9.99
10' 5/8 OD 1/2 nom copper hose 22.80
2 - Reducing coupling 1/2 X 1/4 1.30 each 2.60
2 - 1/2 copper T 0.86 each 1.72
2 - 1/2 elbow 0.55 each 1.10
Watts A-663 3/4 Male Hose x 1/2 mip 3.39
Watts A-677 3/4 Female Hose X 1/2 FIP 3.43
Had a ~1' scrap piece of 1/2 copper 1.00
Total: 46.03
Test parameters:
5 gallons water at boiling.
Water circulated through CFC and back to kettle with march pump at 1.25 gpm
Garden hose flowing at 6.6 gpm
Groundwater temp 56*F
Data:
Reported in minutes and *F
Dial thermometer probes stuck in inlet and outlet of chiller. Inlet should be roughly the mean temperature of kettle.
Time Temp in Temp out
0 **205 ** ** 205
1 **182 ** ** 97
2 **162 ** ** 88
3 **148 ** ** 82 At only 3 minutes already past DMS formation stage
4 **132 ** ** 80
5 **122 ** ** 76
6 **112 ** ** 73
7 **103 ** ** 72
8 ** 98 ** ** 72
9 ** 90 ** ** 66
10 ** 84 ** ** 64
11 ** 82 ** ** 64
12 ** 80 ** ** 62
13 ** 78 ** ** 60
14 ** 72 ** ** 60
15 ** 70 ** ** 58
16 ** 65 ** ** 58
17 ** 60 ** ** 58
")
