You are using an out of date browser. It may not display this or other websites correctly.
You should upgrade or use an alternative browser.
You should upgrade or use an alternative browser.
My HLT project
- Thread starter WortMonger
- Start date

Help Support Homebrew Talk - Beer, Wine, Mead, & Cider Brewing Discussion Forum:
This site may earn a commission from merchant affiliate
links, including eBay, Amazon, and others.
OP
OP
Sorry, haven't gotten to test them yet. I was so excited about getting them and wanting to show them off. I plan to test them tomorrow given I can get my other lid project done so I don't lose heat through the top. I went looking for another ice cream machine motor for my mash mixer motor. You say you have a couple of kegs waiting for some good use. Do you have a kettle yet? What size system are you wanting to build or already have? I recommend using one for a kettle if you don't have one yet and the other as a fermenter, or as a keg. I am a big fan on coolers for HLT and MT rather than kegs. I only have kegs because ten years ago when I built mine they weren't using coolers (well, I couldn't read about it if they did). I do love how easy stainless is to clean, but man are these are heavy dudes now. I am reworking my gravity fed three tier beer-tree stand so I can hang these from a side hook rather than use the 3/8" bolt and nut system for hanging them I do know. The bolts tend to want to back out when I am hanging the tuns and kettle and there is no room for lock nuts. I plan on welding on hooks and that should take care of making hanging much easier. I am really looking forward to the rest of this brewery update project now that I have these two ready to use again. Guess I will brew with the stand the way it is now and weld, wire, and paint it later after I get the beer flowing again.
Please let me know about your setup BeWilder. I am always curious as to what people use or wish to use for their breweries/potential breweries.
Please let me know about your setup BeWilder. I am always curious as to what people use or wish to use for their breweries/potential breweries.
OP
OP
I found this and wonder about trimming the blades down and adding a longer shaft to reach into my HLT 1/3 way down.
http://www.homedepot.com/webapp/wcs/stores/servlet/ProductDisplay?storeId=10051&langId=-1&catalogId=10053&productId=100062867&N=10000003+502551+90419
Think it can get that much water moving around the element inside there?
http://www.homedepot.com/webapp/wcs/stores/servlet/ProductDisplay?storeId=10051&langId=-1&catalogId=10053&productId=100062867&N=10000003+502551+90419
Think it can get that much water moving around the element inside there?
I don't think this motor has much torque. I have that fan and it kicks butt, but I'd imagine only a few thin horizontal tines would be all it could turn through the mash but it would also turn too fast. It would work if you geared it down.
OP
OP
Not mash, Liquor. Mash will be mixed with a ice cream machine motor.
Yeah, I don't know what I was thinking... the thread title should have given it away.
I still have the same concerns, the RPM on this thing even on low is pretty fast but I couldn't guess how much slower it would go with some drag on it.
I still have the same concerns, the RPM on this thing even on low is pretty fast but I couldn't guess how much slower it would go with some drag on it.
OP
OP
Any recommendations for a small stirrer that would fit on my HLT lid?
Nwcw2001
Well-Known Member
Here is how my mind works. Get a old bathroom fan motor and blower wheel. The metal type would work best but I think for $15 I could afford the plastic replacement wheel. You could put a dimmer switch on it to adjust the speed.
Here is a picture of what I mean.

I bet you could extend the bar with drill bit extenders.
Here is a picture of what I mean.
I bet you could extend the bar with drill bit extenders.
OP
OP
I don't know how I missed posting this here, lol. This makes the 3rd thread to post this picture in now. I am wondering about this.
springer
Well-Known Member
WortMonger said:Any recommendations for a small stirrer that would fit on my HLT lid?
I dont remember where I saw it but someone used a windshield wiper motor mounted to the lid wired it to an inverter
OP
OP
springer said:I dont remember where I saw it but someone used a windshield wiper motor mounted to the lid wired it to an inverter
Yeah, I posted a picture a while back. This guy in New Zealand did it and was way cool, but I want to stay with something simple and already 120V.
Here is Llew's Brewery pictures page. Here is an awesome page I just found trying to search for Llew's. Seems they have rated all these different home breweries and have links to their home pages. The Brutus 10 is in there too. Just liked them so I thought I'd throw them out there for others to easy link to.

2ndstorey
Well-Known Member
I just dropped a fountain pump in there to move things around. It is not rated for those temps but there hasn't been a problem yet. I get a lot of water movement, it cost very little and its one less thing on the lid.
You're going to get a decent amount of convective circulation without anything added. I don't know that I'd worry about automating it until you find it to be a problem.
OP
OP
Very true Bobby_M. That is a lot of money/time for copper that I could use for other brewing stuff in the mean time. I'm still looking for a local place that has 3" steel tubing end caps for the ends of my brew stand. I don't even know what kind of a store would carry them.
CodeRage
Death by Magumba!
mcmaster has em.
43425K186 $11.50 for welded
44605K391 $16.40 for NPT
Those are black seamless steal. Stainless caps are $100+
43425K186 $11.50 for welded
44605K391 $16.40 for NPT
Those are black seamless steal. Stainless caps are $100+
OP
OP
I mean the plastic/rubber ones that are ribbed you poke into the end of 3" square box steel.
Like these,

I wish I knew someplace to just go pick 5 up.
Like these,
I wish I knew someplace to just go pick 5 up.
OP
OP
Ok, finally drew out my mash rake design. I know I said no copper earlier after my friends motorized mixer and rake I made a while back, but.... It is just so easy to fabricate with and not as expensive as other options once thought all the way through. Here you go, let me know what you guys think. I think I will get a lot of mixing going on and prevent any channeling (not that I worry due to batch sparging).
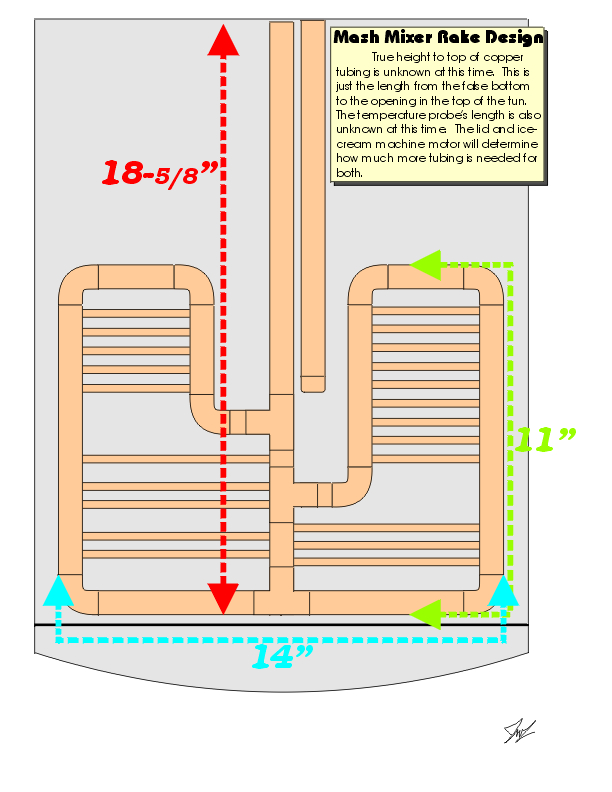
Here is the rakes mixing coverage.
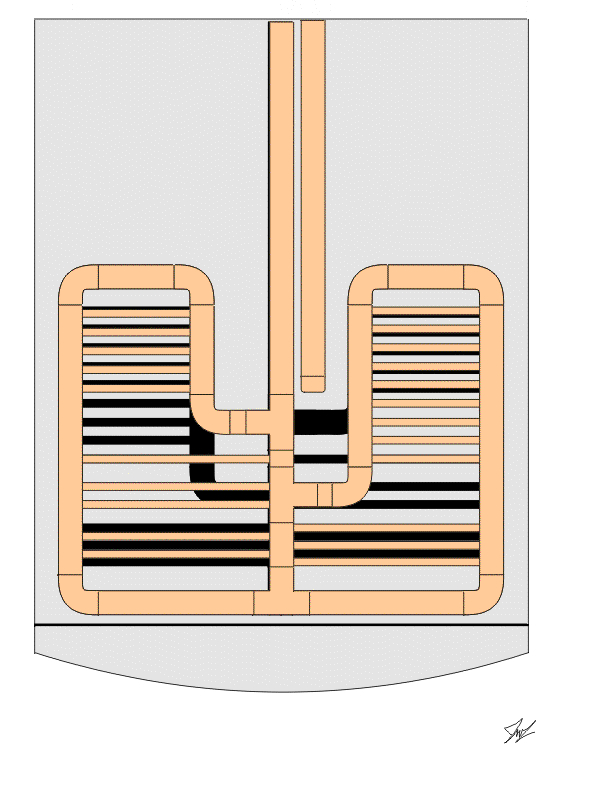
Here is the rakes mixing coverage.
IMHO, way overkill, way too much stirring surface area. It's going to take so much torque to move those 1/2" pipes through the mash at the outer edges like that.
A single stainless tube going down the center with a few 1/4" solid bars shoved through some thru-holes at 2" increments would do fine. It will be more like "raking" through the mash.
Onlinemetals.com has 1/4" x 12" 304 stainless roundbar for like $1.57 each. I think a simple pressure fit into holes in the center shaft would do fine.
OP
OP
Hmmm, I was thinking 1/4" copper pipe, but maybe the smaller SS would do better. Don't know about pressure fitting though. I do know soldering.
I don't know if thin copper has the nuts to stand up to the constant tension. By pressure fit, I just mean you'd drill the holes in the center tube to like .24 and hammer the .25" rods through. Just a bit of friction to hold them in place.
aekdbbop
Well-Known Member
WortMonger said:Ok, I had some time to kill before I could get the tuns lined from the Line-X guy. I decided a pattern would make the project look that much more professional and set out to make something very "beery." After several different pattern design thoughts, I decided on a very squared style barley design. It is made from cardboard that I wrapped with duct tape for protection.
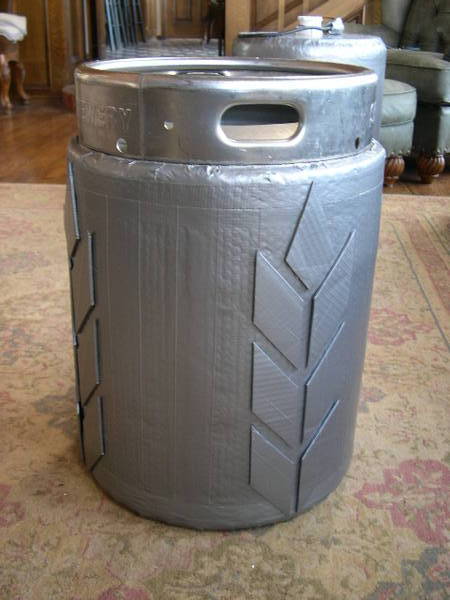
Since it is my mash tun, I thought it fitting and am very pleased with the way it turned out. It has a total of 4 barley designs going around it. I was so pleased in fact that I have now decided to do another design for my hot liquor tun. I think something wavy like water but still sharp in line so it fits well with the barley design. I hope I am as pleased as I was with the mash tun. Boy, I cannot wait to get these lined and looking even better. With that latest thread about the Gator-Grit keg polisher, I can see in my minds eye a very beautiful setup.
how much did they charge you to spray your keg?
OP
OP
$50. Expect to pay more if you go with any paint color. This was leftover paint from another project so it was chosen, but he under quoted me on the initial $35. Without any paint and only one shot of the stuff I would figure you might get it done for $50. The guy didn't pay much attention to my project because he thought it was easy. I told him how disappointed I was with how they looked after the first time and he agreed. I wish they had only been sprayed once, but my design still shows through pretty good.
Whatcha plotting on covering?
Whatcha plotting on covering?
aekdbbop
Well-Known Member
WortMonger said:Whatcha plotting on covering?
My MLT.. going to wrap it in that reflectix stuff, then get it coated hopefully..
have you tested yours out yet? how does it insulate?
OP
OP
Nope, no test as of yet. I completely forgot how much insulation and liner was going on these and didn't get longer bolts to hang the tuns on my stand. I was going to clean and test everything yesterday, but I am heading to the hardware store for 5" X 3/8" carriage bolts. Should get some info up tonight hopefully, if not tomorrow. I am pitching a starter today for my stir plate and so I will brew one way or another this weekend. I guess that would be the ultimate test, lol but I am hoping to have a preliminary test before. No one foresees 5" X 3/8" carriage bolts not holding these tuns do they? I mean through 3" box steel so only 2" is actually sticking out for holding power.
OP
OP
Cool, got the bolts at HD  and some wing nuts. I kept forgetting to trade the old nuts for wing nuts for years now so I finally accomplished that goal, lol. The 5" carriage bolts were not threaded the whole way which I like much better, only about 2" at the end were and that is all I need. So, I JB Weld-ed them in their places so now they don't try to pop out while attaching the tuns to my brew stand which, is another project that has been in the works for sometime and kept being forgotten. Tomorrow, when the weld is dry I will hang everything and start my test run. Just got the yeast started so I am for sure brewing this weekend, WOO-FRICKIN-WHOOOO!!!!!!! Bout time.
and some wing nuts. I kept forgetting to trade the old nuts for wing nuts for years now so I finally accomplished that goal, lol. The 5" carriage bolts were not threaded the whole way which I like much better, only about 2" at the end were and that is all I need. So, I JB Weld-ed them in their places so now they don't try to pop out while attaching the tuns to my brew stand which, is another project that has been in the works for sometime and kept being forgotten. Tomorrow, when the weld is dry I will hang everything and start my test run. Just got the yeast started so I am for sure brewing this weekend, WOO-FRICKIN-WHOOOO!!!!!!! Bout time.
OP
OP
OK, got it all put together last night and filled and fired the HLT. As I expected the rise wasn't that great and the underneath side of the lid got really hot. I think I do need a stirrer because the heat really comes off the element and then out of the water. I feel if stirred, I could keep more of the heat going back down as opposed to out of the water. That aside, I was planning on pre-heating to close-to-temperature and then transferring to the controlled HLT.
Here's the numbers as I could take them, I was a little busy.
7:25pm - Fired up 15 gallons in the HLT, temperature 60*F
9:25pm - 111*F
10:25pm - 137*F
11:37pm - 170*F
So, close numbers for my element and 15 gallons of water are "around" .5*F/minute heating or 27.5*F/hour. Very slow!!! But.... The new MT held this 170*F water with added PBW to 135*F today at 11:30am. I added it at 12:30 this morning before I went to bed. 3.1*F per hour loss, not bad for a stainless keg that was room temperature when the 170*F water was added. Then I left the lid off while adding the PBW and stirring, so... I figure I lost a couple of degrees right at the start. Still, I think that is pretty impressive as far as heat retention overnight.
So, am I happy? Yes, could I have been happier? Yes, but they do what I wanted them to and with the steam on its way I don't think I will be too far from my "dream".
I am building my steam injector soon as that should get me completely controlled in my MT and give me some extra ummph for my HLT. I still think I will need to pre-heat my initial HLT water in my kettle with propane and then transfer, but that is what I have been doing forever anyways. Now I will have control once it is in the HLT which has never happened, so very happy about that. If you want a HLT that heats electrically you do need 240V, but for control this works great (which was the purpose).
OP
OP
Well, fired up my boil kettle yesterday at about 1:30 PM filled with my strike and half of my sparge water. Got it up to 170*F while I was grinding and prepping my brew day. Transfered via my pump/grant combo to the HLT and set the Ranco. First new feedback from the system, I need to get the incoming water a little hotter before transfer. The tun (~65*F) absorbed close to 10*F from the incoming water leaving me to wait 10 minutes for the new HLT to get it up to my wanted 165*F.
Doughed-in 7.5 gallons water at 165*F (from underneath my false bottom in a tun full of grist) at 2:00 PM on the dot and hit 156*F????? Ok, I freaked a little when I didn't hit 152*F. Then, I remembered that my MT has thermal layers when first filled and the bottom could be a little lower leaving an average temp of 152*F, my wanted rest temperature. I really need a longer thermometer. This floating dairy business doesn't cut it for my tun for anything other than leave it and read it later type stuff. I came back at 2:33 and the thermometer read 154*F (the reason my first readings aren't used for anything other than a "wanted couple of degree over-shoot"), and then the same reading before I pulled my mash-out decoction. I really can't wait to get my motorized mash mixer going to get more accurate readings right off. I simply can't stir enough, and I am scared I will release to much heat sometimes while stirring without a lid. The mixer will avoid all that and make dough-in even easier.
Pulled my decoction fraction of 3 gallons of mash, and fired it up on my kitchen stove. For my first decoction I was worried about scorching or sticking, but I think I pulled enough liquid with the grains to avoid this. I stirred with a spatula so I could scrape the bottom of the pot and it was fine the whole way through. I boiled the decoction for 10 minutes and returned to the main mash. Since I rounded off my needed fraction for temperature rise I was a little over 168, but planned for this and kept it at/under 172*F. Let it rest 15 minutes after a nice stir, and started my vorlauf.
Wow, I usually have to blow in my drain hose to get the flour and small stuff out before I can drain, not this time. It was still gunky, but seemed more broken down from usual (maybe just an occurrence). I recirculated for a couple of 1 gallon pitchers and then ran it into my kettle through a small kitchen sieve and then through the hop sack I had just filled with my first wort addition hops. I was pleased to find only a few grain pieces in my sieve and most came at the end of the drain. I then hurriedly filled the MT back up with 9.5 gallons of 168*F water, stirred, and rested for 5 minutes. Recirculated my runnings for a couple of pitchers-worth and drained the same way as before into my kettle getting just over 13.75 gallons at 10 Brix (1.041). Ouch, a little shy of my wanted 1.044 pre-boil gravity, but I do have more wort (a little bit anyways). To finish my wow, clearest pre-boiled wort I have ever seen, EVER!!! I have done mash-out with infusion before and it produces a slick wort, but nothing to compare with this decocted mash-out.
Boiled for 60 adding my hops as seen in the recipe and man, when I added my super moss it started getting chunky. 10 minutes later, I flamed-out and added steeping hops. I noticed that the wort was crystal at the top around the hop sack and started my chill. I drained the kettle through a screened funnel into my grant/pump combo and quickly learned why the wort was so clear at the top, lol. I changed up my pick-up tube to draw from the center and so now I get everything. It clogged up the funnel real quick, but I didn't want all that gunk in my Therminator. I recirculated the wort into the hop sack after pre-screening and it quickly started filling the sack. So, I finally just ran it into the kettle and removed the funnel and screen and let it go. It did just fine and I don't think the hot break and trub will be a problem next time since I have no hop particles adding to it, so I will just run right through the Therminator next time and not worry so much about the chiller. Ended my boil at 5:00 and had everything chilled and in the fermenter by 6:00. Checked the gravity with a refractometer and got 10.4 Brix (1.043) not happy. That is 7 points shy of wanted gravity, but after redoing my numbers I see my efficiency wasn't as high as I put into the program. I also had more wort than wanted, so the numbers aren't off as bad as it looks. This time I didn't aerate with my O2 because of how much splashing occurred during chilling and recirculating, and because I want to see what stir-plate yeast can do (a first for me). Got the wort down to 60*F and pitched and transfered. Checked today and the fermenter still hasn't gotten up to 65*F, but I can smell CO2. I just adjusted the spunding valve on the fermenter so I can start to see it build. I am setting it for 5 psi this time around and will keep checking gravity to know when to start carbonation.
So, I'm off and running and love the new system. A few more additions and it will be perfect.
Where are the pics of the kegs mounted on the stand?
OP
OP
I keep taking pictures, and then cleaning and getting rid of more of the garage junk (actually my Mom is throwing her old stuff away so now I can). Then I want to take more pictures. I might just go out and take some right now.
OP
OP
Here they are on the newly painted stand about to be used.
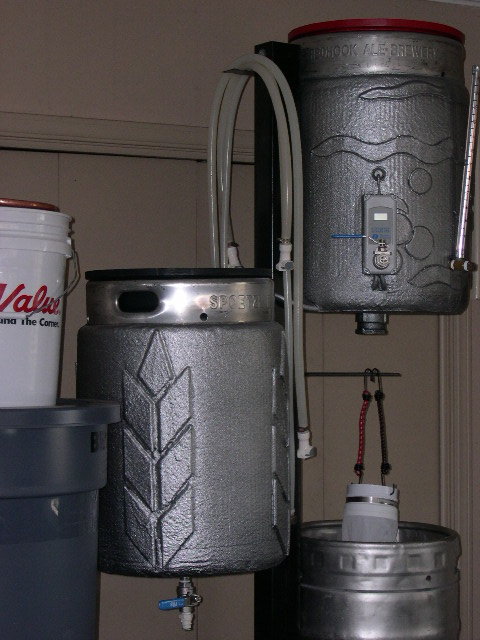
And a whole shot of my new brewery and brew area.

I loved using the new tuns. I am rigging up my Therminator to a more permanent mount on the grant/pump combo. I just need to get some SS sheet and have it bent and drilled so the pump will combine with it. I am going to love my ability to chill lagers fast this summer with the new setup (Recirculated ice water after using regular tap to get down to temp).
If you guys want any pictures in particular just let me know. I had so many I went through and deleted most on my computer, but will take whatever you guys want to show you.
And a whole shot of my new brewery and brew area.
I loved using the new tuns. I am rigging up my Therminator to a more permanent mount on the grant/pump combo. I just need to get some SS sheet and have it bent and drilled so the pump will combine with it. I am going to love my ability to chill lagers fast this summer with the new setup (Recirculated ice water after using regular tap to get down to temp).
If you guys want any pictures in particular just let me know. I had so many I went through and deleted most on my computer, but will take whatever you guys want to show you.
Jared311
Well-Known Member
Hey WortMonger, I figured I should let you know I stole your idea with the truck bedliner. I currently have my three kegs welded and wrapped in insulation. I decided to go the DIY path and ordered some herculiner roll on bedliner. I will let you know how it turns out.
Jonnio
Well-Known Member
- Joined
- Dec 30, 2007
- Messages
- 1,489
- Reaction score
- 10
Hey WortMonger, I figured I should let you know I stole your idea with the truck bedliner. I currently have my three kegs welded and wrapped in insulation. I decided to go the DIY path and ordered some herculiner roll on bedliner. I will let you know how it turns out.
Please post some pics too - this was my plan if/when I can find some kegs to convert.
OP
OP
Yes, please. I would love to see how tough the DIY stuff is. Look forward to seeing the project.
Jared311
Well-Known Member
DIY Roll-On Bedliner = MESSY!
Well the kegs came out looking very similar to yours, but I can't say the same to my unfinished basement. Thank god I placed cardboard everywhere. I used one gallon of black Herculiner and it seems to have made a decent coating for all three kegs. Here's my concern, I used reflectix insulation which is somewhat thick. Even though the bedliner has solidified, you can still push it inward due to the insulation. Can you do the same with your kegs? I am thinking of using some sort of adhesive layer to create a hard surface and then apply a couple more coats. I have pictures, I just need to upgrade my account so I can post them.
Well the kegs came out looking very similar to yours, but I can't say the same to my unfinished basement. Thank god I placed cardboard everywhere. I used one gallon of black Herculiner and it seems to have made a decent coating for all three kegs. Here's my concern, I used reflectix insulation which is somewhat thick. Even though the bedliner has solidified, you can still push it inward due to the insulation. Can you do the same with your kegs? I am thinking of using some sort of adhesive layer to create a hard surface and then apply a couple more coats. I have pictures, I just need to upgrade my account so I can post them.
OP
OP
Yep, they are about as " squishable" as a Brute trash can. Glad you got it done and can't wait to see pictures.
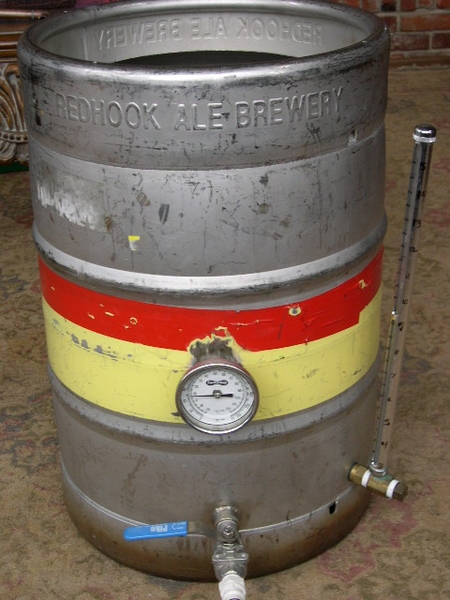
This is what my HLT looks like now. I will be replacing the gauge style thermometer with a thermowell for my Ranco unit.
What kind of QD is that?
OP
OP
They are 1/2" polysulfone.

I got them at usplastics.com. Absolutely love them and would never go back. A great investment.:rockin:
I got them at usplastics.com. Absolutely love them and would never go back. A great investment.:rockin:
DIY Roll-On Bedliner = MESSY!
Well the kegs came out looking very similar to yours, but I can't say the same to my unfinished basement. Thank god I placed cardboard everywhere. I used one gallon of black Herculiner and it seems to have made a decent coating for all three kegs. Here's my concern, I used reflectix insulation which is somewhat thick. Even though the bedliner has solidified, you can still push it inward due to the insulation. Can you do the same with your kegs? I am thinking of using some sort of adhesive layer to create a hard surface and then apply a couple more coats. I have pictures, I just need to upgrade my account so I can post them.
I read all the way through, and first of all, WortMonger, GREAT work. I came across this thread because I'm looking to start converting some Kegs into HLT, MLT and BK in the coming months, and I wanted to do some research. This has been very inspiring!
Jared311, I see you upgraded your account, but never posted any pics. I'd love to see the final product!
Ace_Club
Well-Known Member
Sorry, I know this is an old thread, but I just got finished reading it and was wondering if Wortmonger could post any pictures of the carriage bolt connections for his kegs. I'm just beginning my three-tier design and I like the idea of fastening the kegs to the center post using carriage bolts.
Cheers!
Cheers!
OP
OP
I have no pictures of it, but... it is very simple. I used thick carriage bolts (I think 3/8" off the top of my head) and simply JB Weld-ed them into the holes I drilled through both sides of my brew stand. This holds them steady for hanging my kegs, which also have a hole drilled into one side of the top skirt. I then use wing nuts to secure them. Very, very simplistic. Let me know if you need more information.
Hey DRoyLenz, thank you very much and glad it is inspiring for you. I didn't see I had a reply or I would have responded a while back. I honestly didn't see it until danielwhitted replied. I too would like to see jared311's pics.
Hey DRoyLenz, thank you very much and glad it is inspiring for you. I didn't see I had a reply or I would have responded a while back. I honestly didn't see it until danielwhitted replied. I too would like to see jared311's pics.
Similar threads
- Replies
- 7
- Views
- 1K
- Replies
- 1
- Views
- 364
- Replies
- 2
- Views
- 1K
- Replies
- 25
- Views
- 1K
- Replies
- 4
- Views
- 534