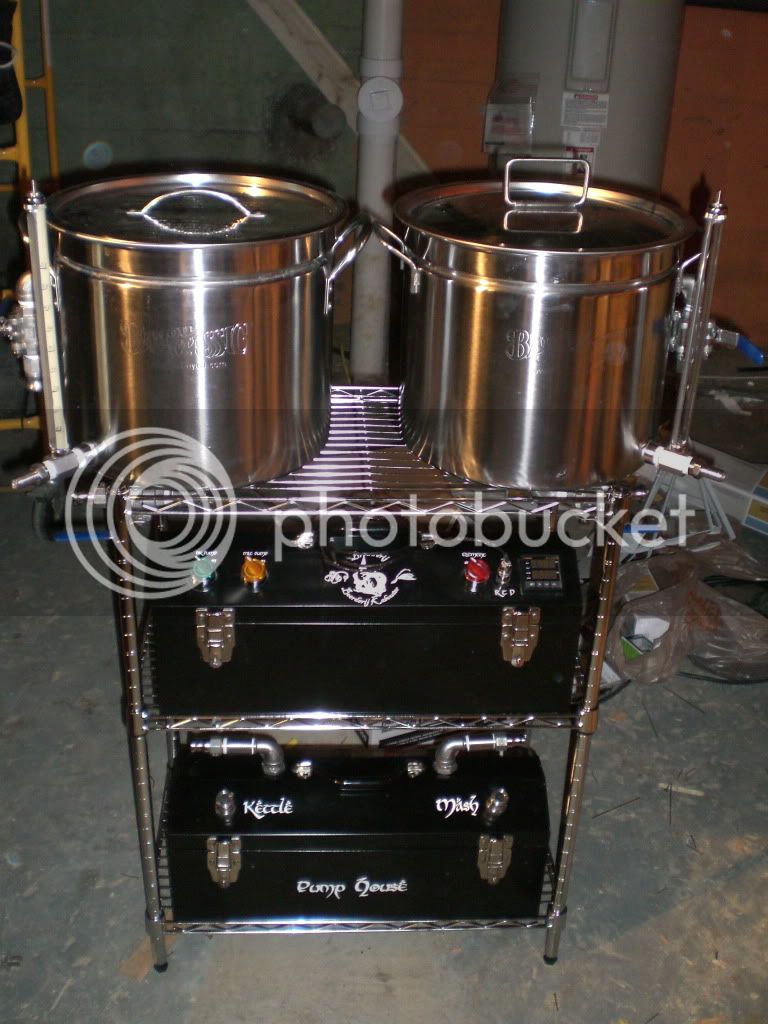
Pump In (Inside) a Toolbox - Stainless

Homebrew Talk - Beer, Wine, Mead, & Cider Brewing Discussion Forum

Help Support Homebrew Talk - Beer, Wine, Mead, & Cider Brewing Discussion Forum:

This site may earn a commission from merchant affiliate links, including eBay, Amazon, and others.

OCBrewin

Supporting Member
HBT Supporter
Joined
Jul 22, 2010
Messages
251
Reaction score
21
Location
Orange County
Hello all,

So I have been browzing around trying to figure out how others were using their march pumps. I really wanted it to be portable, but I also had not quite seen a design that I liked. All of the pumps seem to be mounted with the head in a very breakable location.

Anyways, some stainless quick disconnects, Computer parts, a stainless HF toolbox and some switches and GFCI outlet later and I have something that I am happy with - it really came out clean and exactly what I was looking for, a completely protected pump with options for future expansion.

Basically the design consists of a stainless toolbox in which the pump is completely isolated from the outside. There are quick disconnects permenently mounted to the side of the box which in turn are flexibly mounted to the pump head. Something else that I did was to make the box have a computer style mail plug so that there are no wires hanging out when not in use.

The first switch turns power on to the GFCI outlet from the external power chord. The second switch turns on power to the small three outlet power strip that is wired to the load side of the GFCI outlet - this allowed me to not have to hard wire the pump, as well as gives me two additional outlets that are energized with the pump for future fans, lights, temp probes, etc..

All in all I am very happy with the out come - please feel free to comment and let me know of anythign that you see may be a problem or some additional features that might be useful. I am plannin a mayden brew sesh with this box next weekend.

Oh, and for those wondering - the flow control is a stainless ball valve that is part of the hoses that connect to the quick disconnect. This way I do not have a big valve sticking out an waiting to be caught on something while not in use...

Cheers!

IMAG0406.jpg


IMAG0404.jpg


IMAG0412.jpg


IMAG0413.jpg


IMAG0405.jpg
 
Well, I have seen several members on this forum that have their pumps mounted in much smaller boxes, some even in sealed conduit boxes that are not much bigger than the pump itself. Many of them express that over heating is of no concern. But, just in case there are 2 ~1" dia. holes on the opposite side of the quick disconnects that should provide some ventilation.

That's the beauty of not wiring the pump directly to the GFCI but instead wiring it to a 3 outlet power strip - if I need to add a fan in the future it is simply plug and play!

Here is a pic of the back of the box showing the 15A male pronged power inlet - really keeps it clean, and the power chord simply stores inside the box when not in use.

IMAG0408.jpg
 
Very cool spartan! I don't know how I missed your box while searching! (and I thought that I was being original...) haha, oh well. That's exactly how I will mount the fans if I need them, but I don't think that I really will, esp with only one pump... we'll see.

I was going to try to mount them hard plumbed that way too originally but simply didn't have the room in my small box - so I ended up using the silicon hoses, which work really well.
 
very cool. well done! this would be a great project actually for a club to do (as the club) so that members could then check out the pump if/when needed.
 
I don't remember all of the costs of each part, as I have been collecting brewing parts and have a bin of parts laying here for builds, but the parts list is:

1. Harbor Freight SS toolbox -$15 on sale
2. March 809HS pump - $120 on ebay
3. IEC 320 C13 Male Recessed computer Inlet - $3 at frys
4. C14 power chord - free, extra at work
5. Dual black AC wall switch, Black 15A GFCI, boxes and SS cover plates - don't remember, but about $20 from HD total, I think...
6. 2 - 1/2" x 90deg street elbows (brass, pickled...) - ~$10
7. 2 - 1/2" male thread x barbs (brass, pickled...) - ~$8
8. About 18" of 1/2" ID Silicon Tubing. ~$3/ft
9. 2 - 1/2" male thread x barbs (Stainless) - ~$8
10. 2 - Camlock SS quick disconnects - don't recall individual price, but prob about $5 ea.

All in all, it will probably cost about $200 for a completed, and usable box. Wow, it hurts more if I look at it all added up! haha... But this is about the same exact parts list as many other pumps-in-boxes out there - I just added a recessed plug, and isolated the pump from the elements, so mine is just a change in configuration really.

Happy Brewings!
 
Hmmm... if there was actual interest in buying some completed boxes I would definitely be up to it. The main problem would be finding the $120 pump - that was a deal that took me a while to find.

Maybe a completed box with everything except the pump - simply plug in the pump to the wired power strip and attach the hoses... that would definitely be doable...
 
I may actually build one of these since I HATE the cover for my pump and it is not mobile, being bolted to the stand...
 
Hmmm... if there was actual interest in buying some completed boxes I would definitely be up to it. The main problem would be finding the $120 pump - that was a deal that took me a while to find.

Maybe a completed box with everything except the pump - simply plug in the pump to the wired power strip and attach the hoses... that would definitely be doable...

That's a marvelous idea, build it without the pump and you're golden! I'm sure you'd have some takers!
 
Well, if any are interested I'd definitely be up to it! This being the prototype and all, I am very pleased with the outcome - but I know I can do better and already have ideas to make the design even cleaner and better.

Cheers!
 
I've got an LG 3-MD-HC and a Harbor Freight 30mins away. I'm going to have to try and stop by there very soon. ;)
 
Cool. For all who do this themselves - or any other box of this type - I would say that the best feature of this unit is that the pump is not directly wired to the switch/outlet.

Just wire up a power chord and you open up so many options for future expandability, not to mention not having to chop the end of your pump chord off should you ever decide to use it elsewhere.
 
I actually want to thank the OP for posting up the pics + build. This box has inspired me. Late last night I thought of a way to wire in a digital temp read out from a DIY inline all SS thermo and improve (ever so slightly) on the switch and outlet arrangement. With the holiday so close I do not know if I will get it all done before then but I will post up pics and such when it is done.

Just as an FYI to anyone going to HF to buy a box. There are 2 sizes within a few inches of the other one. You want the bigger of the 2. (I bought the wrong one.) The smaller one is less money and has a large grove in the lid near the front. I will be exchanging the smaller one for the larger one. The wife was rushing me so I made a rash decision on the fly. :mad:
 
Well, I have seen several members on this forum that have their pumps mounted in much smaller boxes, some even in sealed conduit boxes that are not much bigger than the pump itself. Many of them express that over heating is of no concern.

i have the same pump mounted in a similar box and overheating definately concerns me. the windings start getting close to 300 degrees while pumping boiling liquid if i didnt have a fan in the box. the hotter you get, the more the magnets loose their power (this is the main reason you cant operate any old pump above its max temperature rating- its not that it will melt, its that the magnets wont handle it). eventually if you run it too hot for long enough they will become too weak to spin the impeller.
 
Thanks audger,

I didn't notice that the pump lost any power or got really hot during the test runs or the first session - but I am adding a fan anyways.

I plan on enlarging two holes opposite the quick disconnects to about 3" dia. One will house a small 120v exhausting fan. From the other hole I will run a flexible tube to the motor. So, the fan will suck the hot air from the box and the tube will dump all of the cool intake air directly on the pump / motor. Both holes will be covered with some nice case-fan covers. Should work nice and still be clean.
 
Not really any updates to speak of.... I've brewed several batches, without adding the fan (purchased, just not installed yet) and have had no problems. I seriously cant remember how I brewed without a pump before. My beer is so clear now since I can recirculate the mash for so long and get a nice solid whilpool going in the BK.
 
Not really any updates to speak of.... I've brewed several batches, without adding the fan (purchased, just not installed yet) and have had no problems. I seriously cant remember how I brewed without a pump before. My beer is so clear now since I can recirculate the mash for so long and get a nice solid whilpool going in the BK.

Awesome to hear!!! I brewed with a buddy recently who had pumps and that is what sparked my wanting for a pump.

Can you provide any more info on how you wired the box with all the switches and whatnot.

Thanks for the quick reply!
 
I completely stole this idea for my control panel/pump housing and can attest to the fact that there are no issues whatsoever with overheating.

Here's my wiring diagram if you're interested.

toolbox wiring diagram.jpg
 
Very cool A4J! - so you have all of your controls for your electric brewery systems in this same box as the pump? Very nice.

Jester - if you're just wanting to do the pump box without the heating element controls and what not the wiring is very straight forward.

GFCI outlets have a 'line' side and a 'load' side. My power comes in (from my recessed computer male inlet) goes through my top switch and is wired to, or energizes, my GFCI. This is the 'line' connection - from there you can wire other outlets (my mini power strip in this case) to the 'load' side - anything wires to the 'load' side of the GFCI is also protected. I have it so that the 'load' wires are switched by the bottom switch on my box.

Wiring it this way I have a protected box with switches for main power (outlets controlled too) and a seperate switch for the pump. I can control the pump independently from the outlets just in case I have something else plugged in there that I want to keep running.

Let me know if that helps.
 
I've completed my version of this project using an LG 3-MD-HC pump and some switches/spare parts from my parts bin in the garage. No overheating, no issues priming and overall I feel much better about toting my pump around since the head isn't susceptible to being broken. There is even a tiny bit of space left in there for storing my plate chiller after I've drained it. I'll attempt to get some pictures up later. Cheers and thanks for the inspiration!
 
I took a 1/2" SS Ball Valve and put a type B on one end and a type F on the other. I store it inside the toolbox and attach it to the outflow of the pump when I'm brewing.
 
Wyzazz thats a great idea!

I just have two hoses without valves and two with valves at the end. The ball valve has a barbed fitting on one end that's in the tubing and a type F on the opposite.

I think I like Wyzazz's idea more though, and may need to do some modifications...
 
Well, here she is! I didn't integrate a GFCI since all the outlets I use are GFCI protected & all the parts I used were from my parts bin in the garage. The receptacle and switch are from an old EMC UPS, the plumbing parts I had lying around in my plumbing box. I picked up the toolbox with a 20% off coupon and used an old extension cord instead of the small power strip. I put washers on either side of the camlocks for some stability, no issues yet with the ball valve getting torqued too much.

sdc12801.jpg


sdc12805a.jpg


sdc12806p.jpg


sdc12807.jpg


sdc12808.jpg


sdc12809okd.jpg
 
I took a 1/2" SS Ball Valve and put a type B on one end and a type F on the other. I store it inside the toolbox and attach it to the outflow of the pump when I'm brewing.

I am planning a build MUCH like this one but I have to wonder if the ball valve is even needed? I have a valve on my pump now that has never been set to anything other than wide open... with a valve on the BK/MLT/HLT I just do not know if there is really a need for the one on the pump side?
 
This is a 1/12HP pump, the March by comparison is 1/25HP. It's actually very rarely that I run it wide open, to recirculate my mash I have to throttle it down at least halfway. Then when running it through my Plate chiller I again have to throttle it down. I've got no real basis for comparison since I've never owned a March Pump, but this thing is a beast!
 
I do not use a ball valve on the pump outlet. Only one ball valve is needed in series to restrict the flow.

CIMG7119.jpg


My pump box is on the bottom. I use the ball valves on the kettle returns to throttle the flow. Less parts, simpler layout. During hose changes, I just pinch the tubing while making the change to maintain my prime. Both ways work just fine.
 
Very cool Wyzazz! I'm glad that others think that this is a good idea too - it really looks clean and keeps the pump head safe.

I agree with needing the washers to get some solid surface to crank on the disconnects, as the stainless shell of the toolbox is pretty thin... I ended up cutting a 1/4" piece of hardwood hobby board that I had lying around and drilling two holes in it to use as a 'backing plate' for my two disconnects. That really gives them some stability. I think you can see it if you look at the first post with the photos.

Thanks for sharing!
 
I ended up cutting a 1/4" piece of hardwood hobby board that I had lying around and drilling two holes in it to use as a 'backing plate' for my two disconnects. That really gives them some stability.
I didn't even notice that. That would've actually been easier since I had a couple scrap pieces of board I could've used. Instead I had to take an extra trip to Lowes to get a couple of washers.

I noticed that both you and wyzazz used wood boards to mount your pumps on. I just mounted mine directly to the base of the toolbox.

I had the washers on hand so I didn't even think twice about it. I used wood for the base because I felt it would be a little more sturdy than the plastic bottom of the toolbox. I mounted the pump to the wood, then mounted the wood to the toolbox with 6 screws from the underside.
 
Back
Top