You are using an out of date browser. It may not display this or other websites correctly.
You should upgrade or use an alternative browser.
You should upgrade or use an alternative browser.
Show us your sculpture or brew rig
- Thread starter Onescalerguy
- Start date

Help Support Homebrew Talk - Beer, Wine, Mead, & Cider Brewing Discussion Forum:
This site may earn a commission from merchant affiliate
links, including eBay, Amazon, and others.
Im_Lars
Well-Known Member
Thanks, all electric and lots to do still. Hope to have the first brew day by the end of the monthLars, great build. What do you still have to do to it? mount burners? or is it electric?
No Thor and Mag haven't shown up for a brew day yet. I was trying for the old factor cart look.Hey Lars, with a user name like that, you must have brewing buddies named Thor and Magnus, because that stand is totally medieval!:rockin:
SmokeHavel
Member
You guys make my head hurt! I have been reading this thread for three days now (and I am only on page 63) and am so homesick for my stove top stock pot. I have about two years more work to do here in Saudi Arabia before I can even have a beer! I now have way too many ideas to implement, I think I will needs to build one of each system just to free up some memory in my brain. HERMS, RIMS, CHEM.... beer beer beeeeer! My home is in White City, KS. and my name for my brewery is Wedrinkbeer KGB Inc..
I was thinking about making a three tier system that is sectioned. Meaning that I would build the single tier frame then add a semi-permanent two step frame that could be removable. This would be removed once I evolve to more of a RIMS. Like I stated, I am only on page 63 of this thread and I have 60 more to go. So I don't know if anyone has done this yet. Please let me know what you think of this idea. The step framing could be used for a two batch brew day after removing it from the main frame setup.
George
Old factory cart, I can see that, with the cast iron wheels. While brewing this summer during a 94 degree day, my rubber wheels left 1/2" dents in my driveway blacktop. My wife asked why there were holes in our driveway, of course I knew what they were from but played dumb. P.S. you are going to love that big DUDA chiller.
Huaco
Well-Known Member
My HERMS "Brew-B-Que". I can cook an 80# pig while brewing 12 gallons of fine beer! Starting to add automation...
Rauchbier anyone???
Rauchbier anyone???
I haven't toasted or smoked my own barley on it but I could. The grill has 2 large gas burners but there is also charcoal/smoke box on the far side.
doublehaul
Well-Known Member
JesperX said:Just finished the first brew day on my new setup. It's super basic but it's convenient, affordable, easy to move and gets the job done.
I'll be adding a pump for the HLT on the bottom before the next brew, the rest of it is all gravity fed. Broke it in with a nice American Brown Ale and hit all the targets pretty close, the FG was a little low because I thought I'd lose more to boil off with these new kettles but I guess I was wrong.
That is sweet- details?
SmokeHavel
Member
Here's mine
View attachment 69449
We have since added a wooden bottom and here it is with the keggle.
Nice rig, I noticed the missing wheel.... many choices for naming your brew now. ie. Wheel Gone Bad Brew; The Missing Wheel; Chuck Wheel Wheat, just to name a few.
SmokeHavel
Member
Ok, I really really like the Tri-clamps. Is there that much of a difference using Tri's over QD's?
SS_Brewing_Co
Well-Known Member
- Joined
- Nov 18, 2011
- Messages
- 116
- Reaction score
- 5
SmokeHavel said:Ok, I really really like the Tri-clamps. Is there that much of a difference using Tri's over QD's?
I prefer tri clover because they are super easy to use and clean and the don't leak. QD's (from what I hear) leak over time. The down side to tri clover is they are expensive. Every connection needs two ferrules a gasket and a clamp. And if you get Barbed ferrules The price only goes up. In my opinion they are worth ever penny.
SmokeHavel
Member
In the UK they often call boil kettles "coppers" for this reason. Even if they're no longer copper.
Kal
I thought "copper's" were the men that chased you during prohibition for drinking.
hafmpty
Well-Known Member
Ok, I really really like the Tri-clamps. Is there that much of a difference using Tri's over QD's?
I prefer tri clover because they are super easy to use and clean and the don't leak. QD's (from what I hear) leak over time. The down side to tri clover is they are expensive. Every connection needs two ferrules a gasket and a clamp. And if you get Barbed ferrules The price only goes up. In my opinion they are worth ever penny.
They are easy to clean and if you have them actually welded to your kettle like the Sabco Kettles (see www.brewmagic.com), you don't ever have to worry about grime and gunk in the teflon tape used in standard threaded fittings. For cleaning I simply detach the fitting, run a brush through the port and viola, it's clean. Nasties can't hide anywhere.
Some guys install NPT/tri-clamp adapters to their kegs and such, but in those instances, I'm honestly not sure why. The whole purpose of the tri-clamp is to be sanitary. That's why they are often called sanitary fittings. But with the threads, teflon tape, etc. they are not sanitary. They do look nice though. It could be like SS said, mainly for leak proofing. It seems to me that unless you're installing in a truly sanitary setup, the added expense doesn't seem worth it.
Don't mean to derail. Maybe those with tri-clamp adapters could chime in if they have something I'm missing.
JesperX
Well-Known Member
That is sweet- details?
The shelving is just some heavy duty adjustable chrome wire shelving I ordered from www.theshelvingstore.com. 4 x 44" posts, 2 x 34" posts, 6 x 4 inch swivel casters, and 3 x 24" square shelves. Came to about $225 after shipping and it comes with more clips than you'll probably ever need. The shelving is rated to 800 lbs evenly distributed so it doesn't even bow under the weight of an almost full 10 gallon rubbermaid mash tun.
Mash tun is your standard home depot cooler with a 1/2" stainless ball valve conversion kit. For lautering I made a CPVC manifold and connected it with a 1/2" threaded CPVC fitting:


The kettles I picked up from Spike Brewing, they have a couple small dents here and there but nothing game breaking. They get the job done for a great price. Both kettles have two horizontal welded couplers. HLT has ball vave on one, T fitting with 6" probe thermometer and sight glass on the other. The BK has ball valve and just an elbow fitting with a sight glass. I picked up all the fittings, thermometer, and sight glass equipment from brew hardware. Once I get a pump, I'll use it to pump from the HLT on the bottom to the mash tun and I won't have to do any lifting other than to clean the mash tun when I'm done.
Burners are just your average banjo burner and I've got a separate propane tank for each, although you can limp by with just one if you really need to.
My New baby


I've been trying to figure out what the source of the metal in this stand is. It looks like something I've seen many times and I can't put my finger on it. Enlighten me...please!
SS_Brewing_Co
Well-Known Member
- Joined
- Nov 18, 2011
- Messages
- 116
- Reaction score
- 5
limulus said:I've been trying to figure out what the source of the metal in this stand is. It looks like something I've seen many times and I can't put my finger on it. Enlighten me...please!
Unistrut. It's common with electrical panels and such.
Unistrut. It's common with electrical panels and such.
Thanks. I've probably seen that stuff at HD
I've been trying to figure out what the source of the metal in this stand is. It looks like something I've seen many times and I can't put my finger on it. Enlighten me...please!
Yes its Strut look up "B-Line"
http://www.cooperindustries.com/content/public/en/b-line/products/bolted_framing.html
its like an erector set for adults!!!


SteveMillerTime
Well-Known Member
- Joined
- Jan 7, 2012
- Messages
- 85
- Reaction score
- 11
My super simple solution to a gravity fed system 

Just finished my new brew table. This is a picture of how it should lay out when i'm finished.
A couple other pic's

this is bloody amazing! I want one.

RoxtonBrewing
Well-Known Member


fermentinginpa
Well-Known Member
Wow, great setup RoxtonBrewing!
+1
love the looks of your stand. Well done.
love the looks of your stand. Well done.
Hex
Well-Known Member

My gravity powered pilot brewery!
Direct fire mash work good!
I call it a jiffy pop mash tun.
Ceramic insulated under five layers heavy duty aluminum foil.
Search forum for lauter cane construction.
Im_Lars
Well-Known Member
Just finished my new brew table. This is a picture of how it should lay out when i'm finished

A couple other pic's
Sorry I accidentally deleted the pictures. Thanks for the PM. Back up

tally350z
Well-Known Member
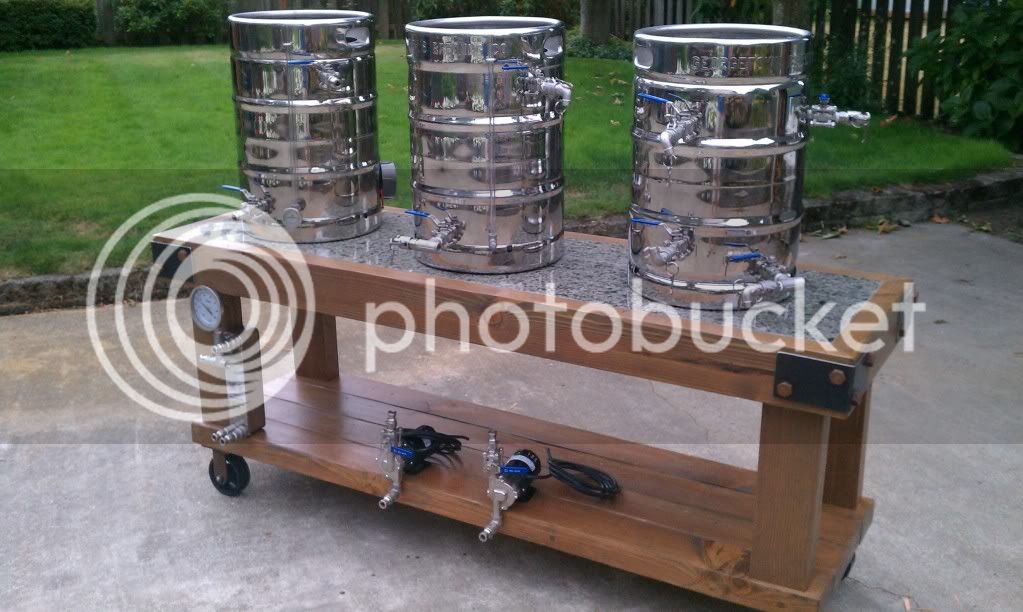
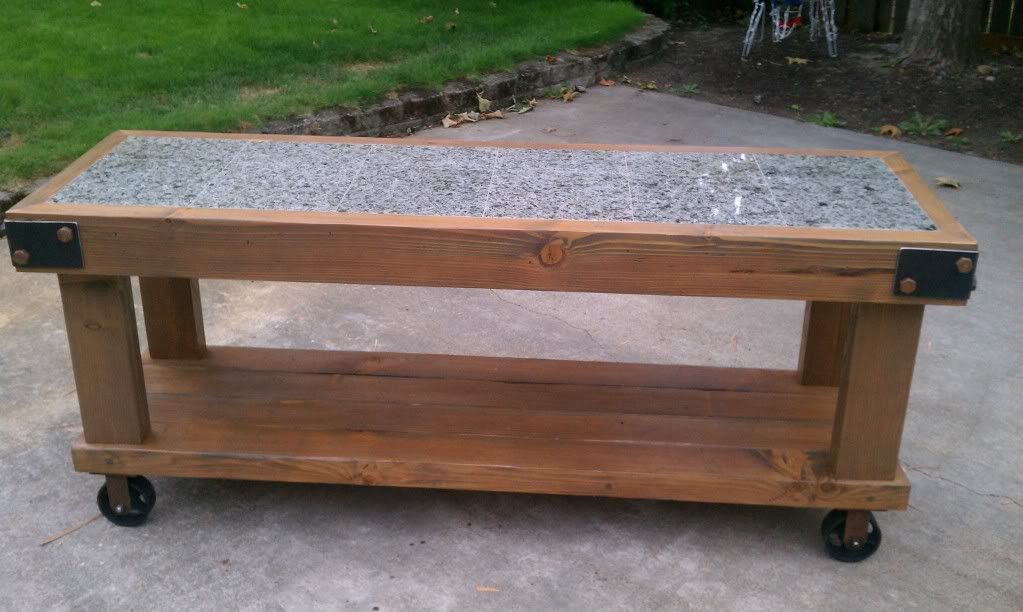
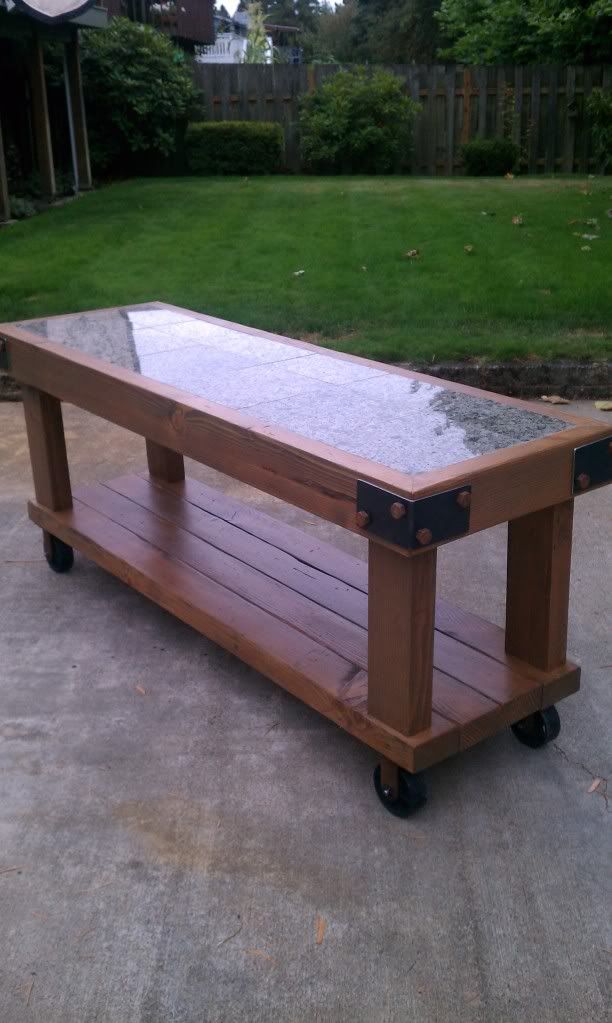
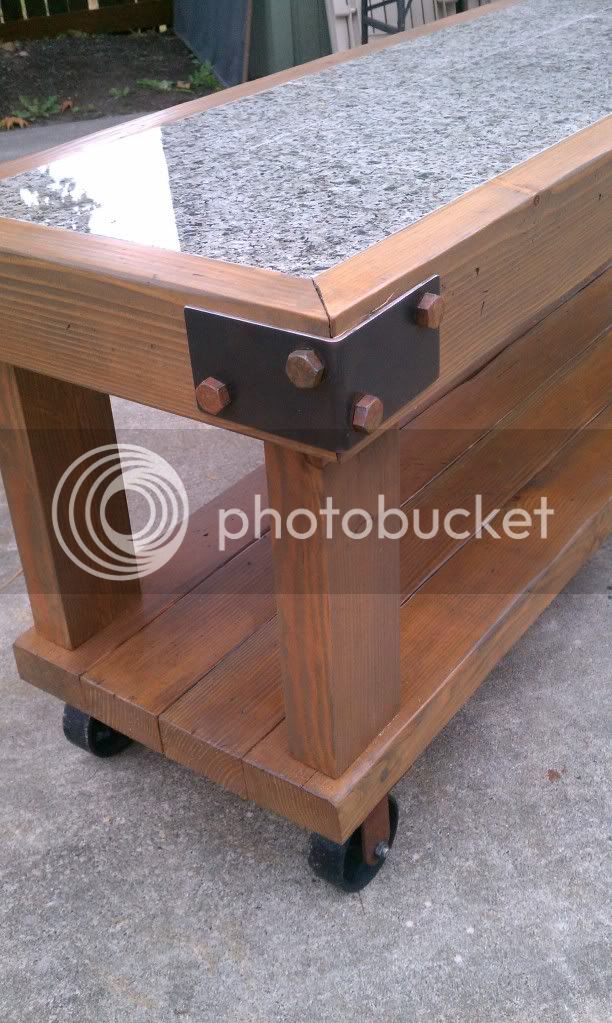
So I finally got around to getting my stand close to finished. I have to add some more fittings in the mt and bk, and put in the fb in the mt.


It is almost time to retire old blue it has made a lot of good beer…
But sometime change is good. This is a little early I hope the rest of the parts come in this week and start some test on it and maybe a brew this weekend.


But sometime change is good. This is a little early I hope the rest of the parts come in this week and start some test on it and maybe a brew this weekend.
EngineerByDay
Member
Blichmann kettles: 15/15/20
10" Banjo burners - 30 psi
Quick Disconnects everywhere
Stainless steel fittings throughout
March Pump Stainless Steel
75ft copper heat exchanger
15G plastic conical
Arctic Air 22cf upright ferm chamber with digital temp control (heat/cool)
Kenmore chest freezer with 6 cornies and 2 10lb CO2 tanks


10" Banjo burners - 30 psi
Quick Disconnects everywhere
Stainless steel fittings throughout
March Pump Stainless Steel
75ft copper heat exchanger
15G plastic conical
Arctic Air 22cf upright ferm chamber with digital temp control (heat/cool)
Kenmore chest freezer with 6 cornies and 2 10lb CO2 tanks
Nice setup, love the coil... you make that yourself?
EngineerByDay
Member
Nice setup, love the coil... you make that yourself?
The coil is from Northern Brewer, but I made the bracket to hold it. I needed to keep the coil centered in the volume of water and off the bottom of the HLT. It is also quite rigid, so I can connect/disconnect one-handed no problem.
I am still working on mine and planned on doing a build thread after i got a bit further on with it.. But here are some pics.
Starting to go up.
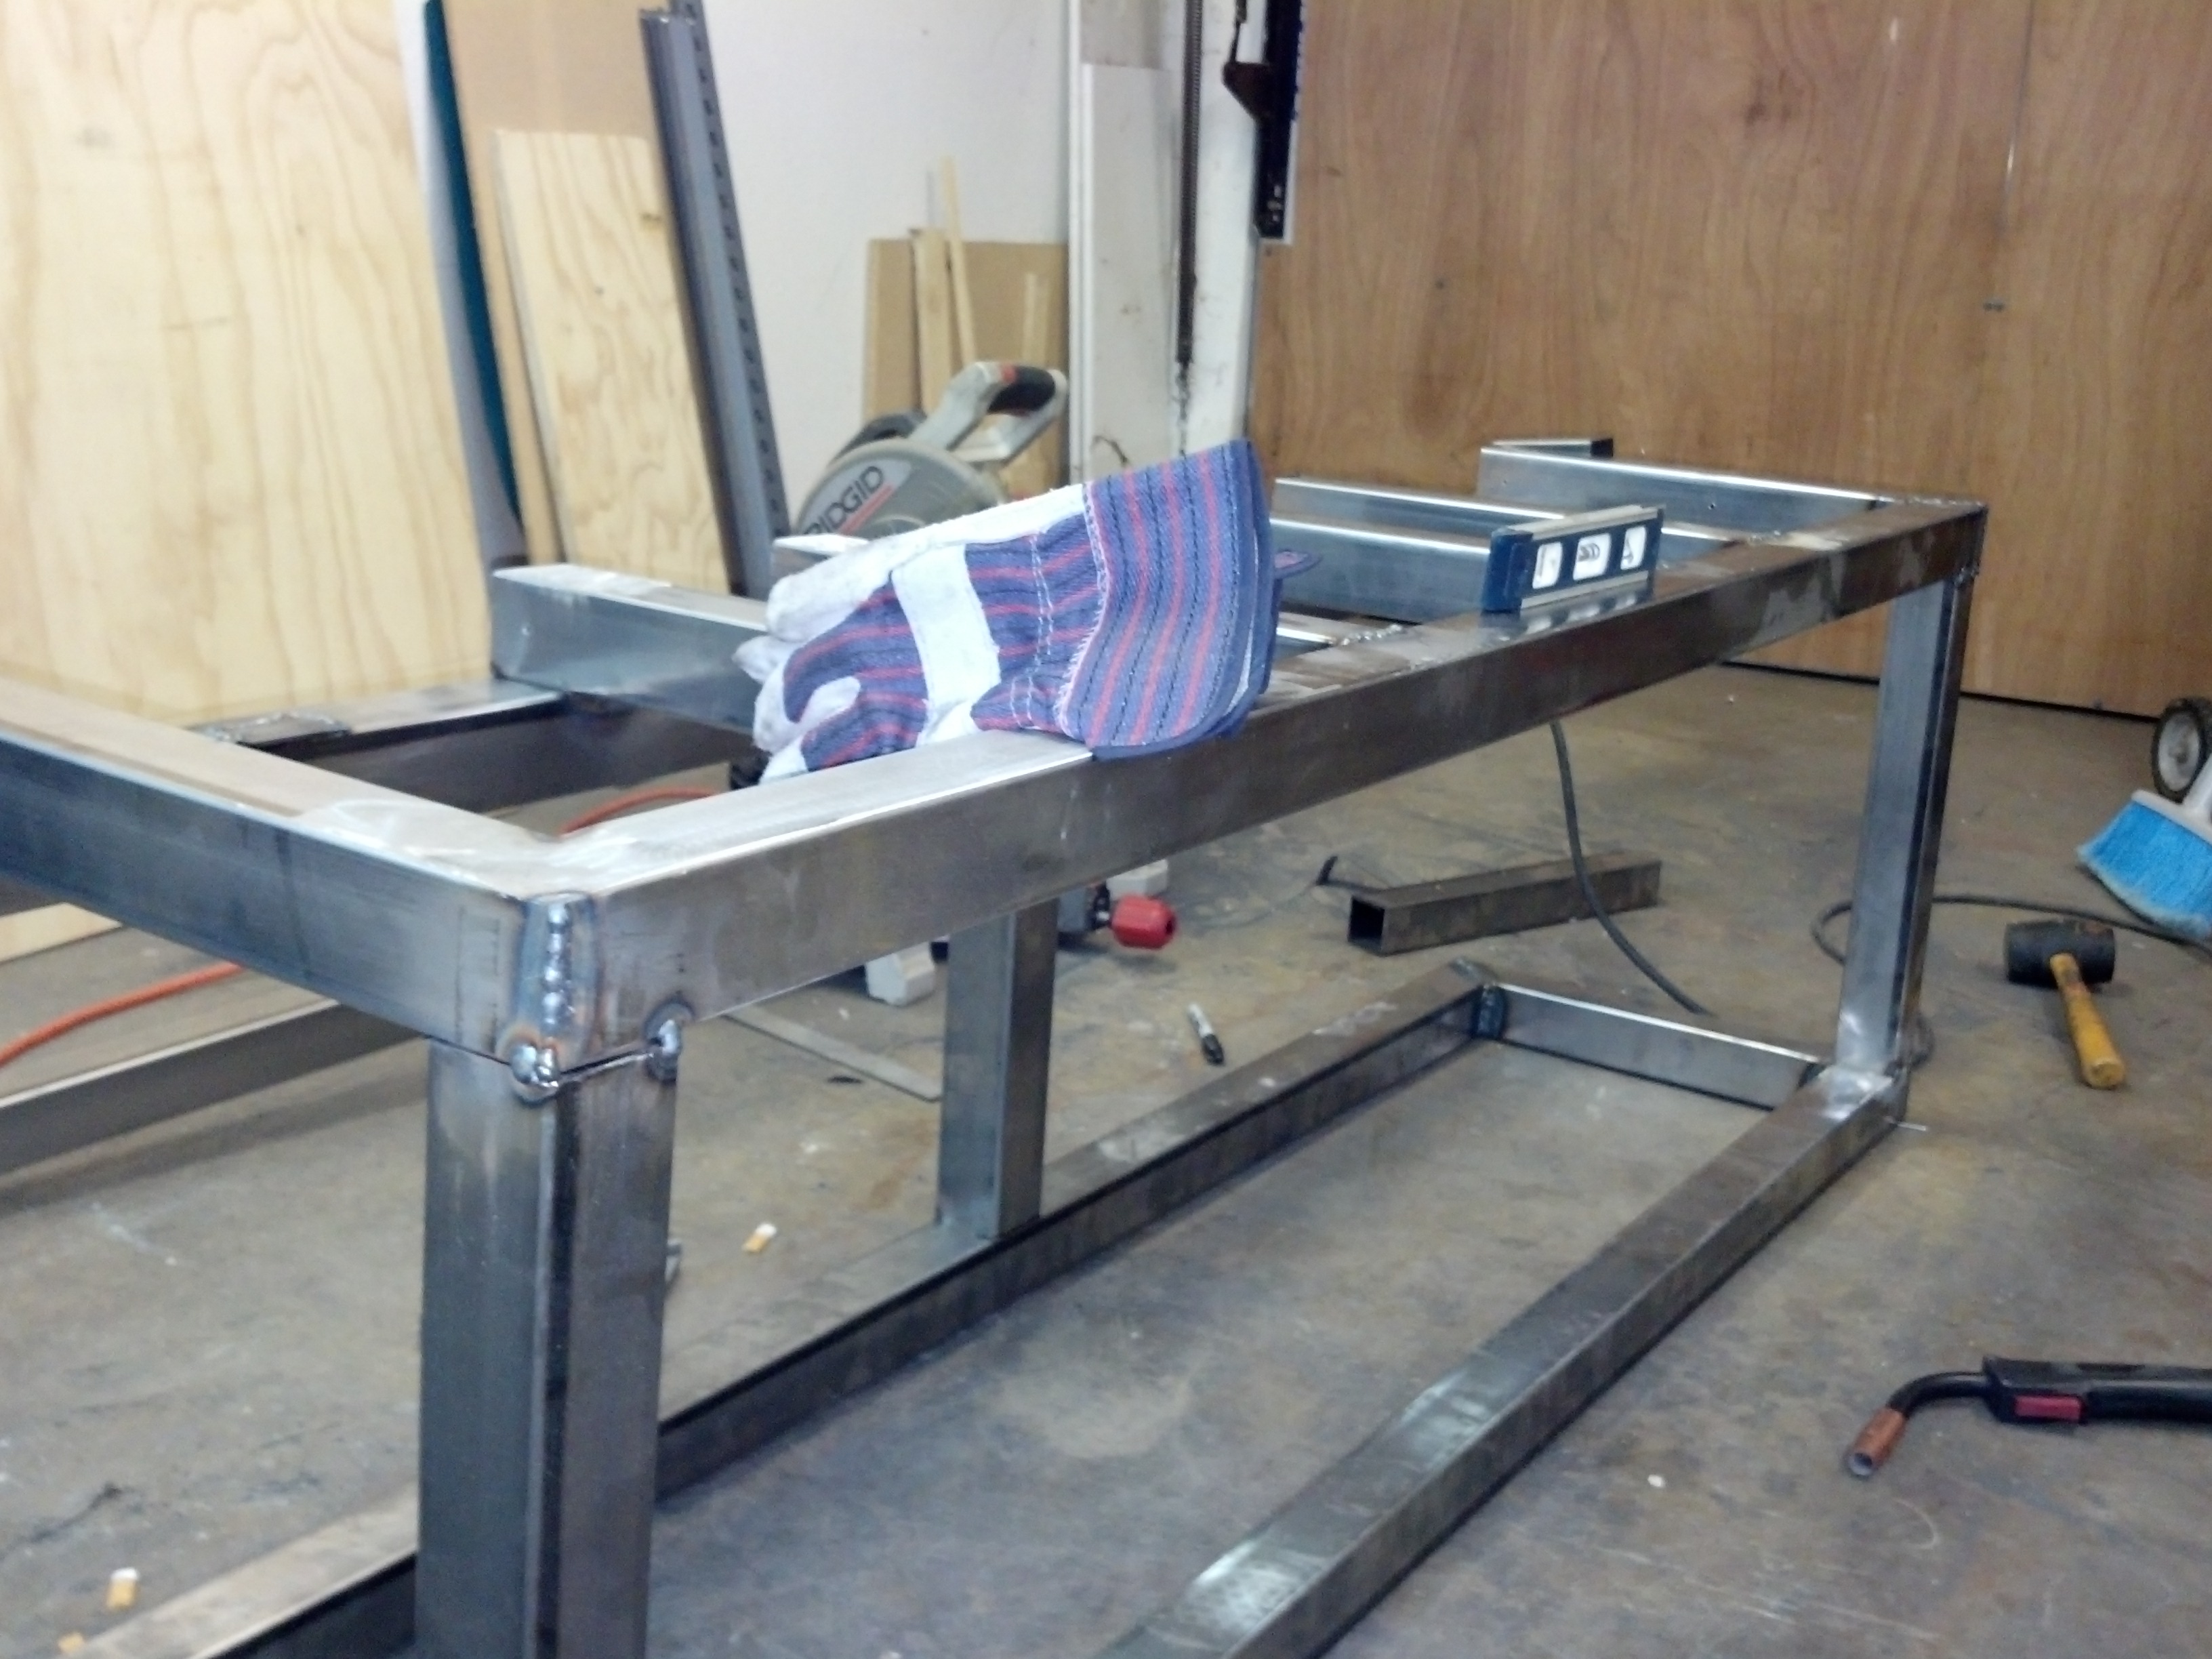
Starting to clean up some of the welds.

Paint and casters on.

Burner shields just sitting in place.

Another burner shield mounting pic. I welded a tab to the back of the frame to hold it from twisting.

I hope to get a good amount of time this weekend and finish the trim work on the burners and start plumbing the gas.
I will take any input.
Cheers fellas.
Scott
Starting to go up.
Starting to clean up some of the welds.
Paint and casters on.
Burner shields just sitting in place.
Another burner shield mounting pic. I welded a tab to the back of the frame to hold it from twisting.
I hope to get a good amount of time this weekend and finish the trim work on the burners and start plumbing the gas.
I will take any input.
Cheers fellas.
Scott
Espi (Scott), did you paint stainless steel? Is there a reason to put high temp paint on stainless (other than wanting to see the stand in a diff color)?
The stand isn't stainless. Just the burner shields are. Its just standard 16 gauge 2 inch square stock. I am sure this is the nicest this thing will ever look.
Gotcha. Assumption on my part; it just looked super shiny after you welded it together.
Kyled93
Well-Known Member
Had to make a few adjustments last night. Tonight the SS pumps get mounted!


Similar threads
- Replies
- 4
- Views
- 746
- Replies
- 2
- Views
- 1K
