You are using an out of date browser. It may not display this or other websites correctly.
You should upgrade or use an alternative browser.
You should upgrade or use an alternative browser.
DIY Thermoelectric Temperature Control
- Thread starter Yuri_Rage
- Start date

Help Support Homebrew Talk - Beer, Wine, Mead, & Cider Brewing Discussion Forum:
This site may earn a commission from merchant affiliate
links, including eBay, Amazon, and others.
Jester4176
Well-Known Member
With the Ice Probe, couldn't you mount it through a tub of some sort that holds water, and the carboy is submerged in? Just my thinking, but rather than cut up a keg, and weld stuff together. Instead, you could use a large rubbermaid tub, insulate it, and cut a hole in the lid for the carboy to stick out of. If you used ice bottles to initially drop the temperature of the carboy, the probe should be able to maintain lower temps fairly decently. Am I wrong in thinking this?
Jester4176 said:...but rather than cut up a keg, and weld stuff together
do you know who started this thread?
Jester4176
Well-Known Member
mageac said:do you know who started this thread?
My point exactly. Not all of possess the tools that would allow us to make ANYTHING, nor do we possess the skills to do so. I'm just thinking of alternatives for us...laymen type folks.
I made a fermenter using a corny like yuri is doing, however I bought the iceprobe instead of making my own. I just bottled my first batch using it and I was able to keep it at 65 C with not much trouble at all (keg was insulated however). My next project is to build a TEC "air conditioner" for a fermentation cabinet I built.
I'm thinking about doing something like this so I an lager, after reading this thread. There are lots of peltier cooler's on ebay anywhere from 20-400+ watts. I was thinking putting a carboy/plastic bucket in a tub of water surrounding it and having say 2-3 coolers @ 70ish watts with fans and maybe a block of Al or copper if I run across some for free, epoxy/thermal grease onto the chip with the heatsink and fan on the other side above the water. Then insulate the tub/bucket thing. I was really wondering if something like this can get the temps down in the lagering range. Maybe replace the Al/Cu blocks that go in the water with heatsinks of one of the materials.
Lol, just curious if there have been anymore upgrades in design to Yuri's cooling project. Man is that guy mechanically inclined.
OP
OP
Believe it or not, I've actually been busy BREWING rather than creating brew gadgets. Usually it's the other way around. So far, no more luck with the self-cooling fermenter. I REFUSE to give up on it, though! More to follow, I'm sure!
Yuri, any links to some research I could do on figuring out mathematically what it is going to take to do this? I'd like to figure this out on paper before I chooses to dive into it and I'm not all that familiar with the peltier devices (energy needed to cool X volume) nor on surface area vs heat disipation, efficiency of the devices, etc.
OP
OP
I found some wattage/BTU calcs for heating and cooling a given volume, but I don't have the link handy.z987k said:Yuri, any links to some research I could do on figuring out mathematically what it is going to take to do this? I'd like to figure this out on paper before I chooses to dive into it and I'm not all that familiar with the peltier devices (energy needed to cool X volume) nor on surface area vs heat disipation, efficiency of the devices, etc.
It seems to me that I have plenty of power available, but I'm not transferring heat effectively at all. I'm tempted to buy one of those IceProbe gadgets just to reverse engineer it. I thought I was going to get two 7 gallon cooled fermenters for the price of a single IceProbe, but at this point, I've got two ruined cornies and a bunch of aluminum shavings to show for my work. I'm going to make this work, and I'll share the secret(s) when I figure it out!
MrFebtober
Well-Known Member
Yuri_Rage said:It seems to me that I have plenty of power available, but I'm not transferring heat effectively at all.
Yuri, great stuff and you seem to really be on the right track. I used to fiddle with overclocking PCs and have worked with thermal conduction a bit, so I have thought of a couple things for you to check/consider:
1. Thermal grease improves heat transfer, but I've always read (on overclocker-type websites) that it is most effective when used in as thin of a layer as possible and used between two polished surfaces, so that the majority of the transfer is metal to metal, while the grease fills in the inevitable flaws in each surface.
2. Quality thermal grease is (apparently) important. I've personally observed better heat transfer using Arctic Silver instead of the generic white pastey stuff. It's a bit pricey, I suppose, but I've used the same tube for dozens of applications over the years and have probably used less than half of it.
3. How hot does your new, large heat sink get? If it's still practically too hot to touch for very long, then the system would would definitely benefit from an additional fan. You could set them up in a push-pull configuration with one at each end of the sink and moving through the fins length-wise (from bottom to top according to your earlier setup pictures) Or you could go with a higher CFM fan.
I agree that you aren't sunk yet and there's more cooling to be found. It'll just be a journey of tweaking and experimenting. Keep it coming!
MrFebtober
Well-Known Member
enfox said:When it comes to a heatsink, is one that is 12"x7"x1" better or worse than one that is 6.5" x 4.75" x 2.75" ? I am trying to disipate the heat off a 350 watt pelt.
Three things to consider (i'm not usually a list-writer, honestly!):
- Which one is heavier?
- Which looks to have more surface area (how many fins per inch, etc.)?
- which can be most practically fan cooled?
Try this tool to see what answer you come up with (you'll need to count the number of fins)
BTW, Yuri, they also have a peltier calculator tool here that you could play around with, though it looks like it would be much more useful it you could put in the results and calculate the thermal resistances instead.
OP
OP
Nothing to add...yet...been very busy lately!
Philip1993
Well-Known Member
- Joined
- Jul 5, 2007
- Messages
- 1,644
- Reaction score
- 19
Yuri,
Great project and lots of food for thought. I may have to tinker with this one a bit. That said, here's a couple of thoughts.
- Heat transfer is maximum when the delta T is highest. Hence, your cooler rod is most efficient at the top of the liquid column. This will also cause some convective currents as the cooler fluid drops down the column.
- Without a circulation pump, the liquid around the rod will form an envelope that is closer to the rod temp than the ambient fluid. This will decrease the delta T and reduce the efficiency tremendously. I suggest a small pump that draws from the outlet and returns to the inlet.
- Even the temperature gradient through the rod will decrease the effectiveness of the heat transfer from rod to peltier device. For optimum results, the cold face of the peltier should be presented with the ambient fluid temp. This means (almost) wort to peltier contact.
All that said, I would recommend you try the following:
- Make an aluminum chiller block of substantial mass. I haven't looked up the temp coefficient of aluminum, but I'd consider 1kg a good starting point.
- create a 1/4" bore that snakes through the block creating as much tubing (i.e. surface area) as possible. Since I lack machine tools, I would probably make a 2" coil of copper and cast it into a block of Aluminum.
- Attach the peltier cold side to the block. Make an insulating plate with a hole the side of the peltier. The insulator goes between the chiller block and the heat sink to prevent thermal xfer.
- Use a heat sink with a ton of surface area, sink grease, and killer fan. Your peltiers maximum cooling is X degrees below the hot side temp. As such, the hotter the hot side is, the warmer the cold side is. Ideally, you would submerse the hot side in a cooler of ice water. Realistically, you want the heat sink surface as near ambient air temp as possible for maximum performance.
- Plumb the in and out lock valves to the chiller block with appropriate tubing and a small pump.
- Insulate the corny. Heat gain from the surface of an SS tube is huge. Get some aluminized thermal bubble wrap, and use a wrap about 2" thick. Alternately, drop the corny into a cardboard concrete form and fill the gap with liquid foam. If you go this route, buy 2 part mix-n-use foam as the spray can stuff requires air and does not harden throughout in large volumes.
Just my $0.02,
Philip
pldoolittle, I think you make a few interesting points, but:
1. A pump is pretty impractical for the inside of a fermenter. The pump generates heat, introduces risk of contamination (more so if submerged pump), and power cables or tubes must be run into the fermenter.
2. mixing metals like Alu and copper is a very bad idea in an ionic solution like beer. I'm into the whole water-cooling thing with computers, and while galvanic corrosion can be averted, it usually requires a retardant like antifreeze. Envision green gunk floating in your beer...
Otherwise I generally agree. Cool down that hot side, get more surface area on both ends, and insulate the heck outta it. I'm pretty sure Yuri already most of those in mind, though.
Philip1993
Well-Known Member
- Joined
- Jul 5, 2007
- Messages
- 1,644
- Reaction score
- 19
Actually, I was thinking about an outboard pump. In fact, the entire unit would be outboard and connect to the in and out ball lock fittings. That way you could chill any old corny. In fact, if you got creative with some T's, you could use it to chill a corny as you serve from it.
Alternately, someone like Yuri could weld two 1/4" nipples into the side of the fermenter just below the "waterline". That would reduce stirring up the trub and convection currents would carry the cooler surface fluid down.
Hadn't thought about the negatives of Al/Cu. No biggie. Just substitute SS for the block, or use SS tubing cast into an Al block. The only moving part the beer encounters is the pump body. And for a diaphram pump, that's just a viton cavity with one flexible wall. Cleaning is nothing more than connecting the ball locks to a container full of santizer and flushing well.
PLD
A wholly external system does make a lot of sense, in that it'd be much easier to create a high surface area contact with the wort; an inverted Alu CPU heatsink would probably make for an excellent (and cheap) solution for cooling the liquid. I would almost suggest a water block, but there's too much of a risk of it getting gunked by the fermenting wort.
The downside is that it'd be a bit harder to clean, but you could just power up the pump and run PBW or Oxyclean through it and the fermentor for a while; should take care of most everything.
The downside is that it'd be a bit harder to clean, but you could just power up the pump and run PBW or Oxyclean through it and the fermentor for a while; should take care of most everything.
theoriginalryan
Active Member
im guessing you gave up on this project. Break my heart to, because i have about 20 TEC's that i need a use for, and i wanted to try something like this with it. I think the biggest problem with the system is the hot side of the element. If you are sticking a heatsink with a fan on the hot side, its just blowing the heat back around the fermenter. what about using water blocks on the hot side and piping it off the a radiator, that was getting the heat away from the fermentor. I would be willing to donate atleast 10 TEC, in the hope that you, the weld master, could get this to work. what do you think?
Ryan
Ryan
conpewter
Well-Known Member
I know, old thread. Was wondering if anyone had updates on this. What you really need is a 9" or so round tube about oh.... 2-3' high made of one large peltier, maybe plated with SS (is that possible?) then just plug it in, that would just be great
I guess the actual practical idea is... less powerful TEC, just more of them spread over some sort of fermenting vessel. Something with a flat side would work best of course
I guess the actual practical idea is... less powerful TEC, just more of them spread over some sort of fermenting vessel. Something with a flat side would work best of course
theoriginalryan
Active Member
I did some test before i got in to it good, what i found is that a peltier system is just not really going to have enough watts of cooling power to cool a actively fermenting brew. I cant remember the exact statistic, but it was something like every .004 of gravity dropped, temp rises 2 F. with the amount of heat (or cold) disipation of 5 gallon of wort in there also, the amount of TEC you would need plus power supply and time invested just wouldnt be worth it. better off just buying an old fridge.
I did some test before i got in to it good, what i found is that a peltier system is just not really going to have enough watts of cooling power to cool a actively fermenting brew. I cant remember the exact statistic, but it was something like every .004 of gravity dropped, temp rises 2 F. with the amount of heat (or cold) disipation of 5 gallon of wort in there also, the amount of TEC you would need plus power supply and time invested just wouldnt be worth it. better off just buying an old fridge.
This does seem to be the problem with using a peltier device for cooling. It's actually more expensive and more difficult than a fridge.
OP
OP
For me, this is abandoned for now. I know it's not without merit, but I don't have the time and resources to devote at the moment. Perhaps I'll revisit at a later date.
For now...I have a fence, deck, and brewhaus to build, a garage to set up, and some ideas for outfitting the brew rig in a new location.
For now...I have a fence, deck, and brewhaus to build, a garage to set up, and some ideas for outfitting the brew rig in a new location.
jameswardpeterson
Well-Known Member
The problem with peltiers is that they are incredibly inefficient. (as stated above) they are something like 8 times less efficient than the standard cooling system used in refrigerators and freezers. the best thing to try would probably be to improve the surface area on the heat sinks...
theoriginalryan
Active Member
or just skip it and throw it all in a fridge and save the headache. As some projects go, i think this one might be more of a pain then it worth. Want something cool to do, ive seen a pulse jet engine camp stove(has it own name, just cant remember what it is) that could boil a gallon of water in a minute five seconds. have fun
Ryan
Ryan
SHvanBommel
Well-Known Member
- Joined
- Nov 5, 2007
- Messages
- 548
- Reaction score
- 57
this is kind of old and I hate kicking dead horses some more but... What if you were to make the rod longer (say so long that it sits about 3 inches off the bottom of a carboy) and modified a stopper so the heatsink+TEC could be above the mouth and still have a spot for an airlock... does this make sense?
theoriginalryan
Active Member
what you are saying makes sense, but trying to use a TEC to do this just doesn't. you would just be better off hacking up a micro fridge and going from there. TECs just cant put out the watts of cooling that is needed easily.
lamarguy
Well-Known Member
TECs just cant put out the watts of cooling that is needed easily.
I'm joining this party late, but I'm going to have to respectfully disagree.
I've purchased and modified a TEC-based wine cooler to ferment down to ~55F. In stock form, it could go to ~62F, but it took 24hrs. All I did was (1) install a higher amperage TEC, (2) install a higher flow fan, and (3) do a bit of airflow modification on the rear of the unit to better dissipate heat.

So, yes TEC technology is viable. But, it has to be designed correctly.
")
Also, I'm controlling the heat/cool cycle over a one-wire network connected to a laptop. Works well in the winter and summer and has +-1F accuracy. Overkill, perhaps, but it meets my needs perfectly.
I really think thermoelectrics can be used for keeping fermentation temps in check. I think they might not be up to the task for lagers, but should work fine for ales.
lamarguy, I have been kicking around a similar idea, scrapping the parts from a wine cooler to keep my fermenter cool. seems like everything one would need is in the box; power supply, thermostat, peltier device, heatsinks, fans. My only problem is that I have been unable to find a wine cooler for less than ~$80 and the ones in that price range seem to have a very limited temperature range.
Here's my take on it:
I picked up this little guy called a PAC400 made by waffer/masscool for $20: Masscool AC-PAC400 PC AC Portable 82W PC Air Conditioner AC-PAC400
its basically a thermoelectric cooler for a computer. a quick google search will yeild many reviews in where it is shown to be inadequate for computer cooling, but does show the ability to drop incoming air temp by a solid 10 degrees F. I think that should be good enough to keep my fermenter from getting too warm, especially during the first 48 hours or so.
my idea was to build a "son of fermentation chiller" style box, but instead of trying to keep it cool with ice, I would mount this PAC400 device in the top, recirculating and cooling the air inside the box.
the most obvious issue would be to power this thing, which requires up to 6-7amps at 12 volts DC. my plan is to use an old atx power supply from a computer laying around for this task.
next thing to tackle would be a thermostat. I found this kit for $9 plus shipping: Thermostat Electronic Kit MK138. it is adjustable from 41F to 86F, perfect range. it uses a small thermistor to determine temperature. I would think it would be pretty easy to extend the leads a few feet to drop inside a thermowell
now to hook this all up:
the ATX power supply supplies plenty of power at 12volts, but wont turn on unless one specifc wire is grounded. the relay on the thermostat should have no porblem completing this task as the turn on current is only a few milliamps.
the thermostat will require 12volts all the time to work, however. the ATX power supply has a constant on 5volt rail. using the plans I found here: LM2577 5V to 12V DC Converter step up Voltage Regulator I should be able to build a 5 volt to 12 volt converter for less than $10. using this, I can take the constant 5volt power, convert it to 12 volts to run the thermostat, when the temperature rises above whatever I set it out, it will switch on the rest of the ATX power supply, providing the 12 volts to the PAC400 cooler. once the temperature drops back to below the setpoint, it will shut off the 12 volt side of the power supply and continue to monitor temperature, turning back on as neccesary.
if I can house the thermostat and voltage converter inside the ATX power supply, I should have a pretty clean setup that should give me good control over fermentation temps. I picked up the PAC400 and have ordered the thermostat. I just need to get the parts for the 5v to 12v converter, so it will still be a week or so before I can start putting it all together. all in all, it should cost a total of about $40, not including the foam board for the box.
lamarguy
Well-Known Member
amarguy, I have been kicking around a similar idea, scrapping the parts from a wine cooler to keep my fermenter cool. seems like everything one would need is in the box; power supply, thermostat, peltier device, heatsinks, fans. My only problem is that I have been unable to find a wine cooler for less than ~$80 and the ones in that price range seem to have a very limited temperature range.
It seems like you've put ample thought into the project.
My only concern would be finding a thermoelectic unit with enough capacity to bring the internal ambient temperature down 20F below the ambient room temperature. The one you posted a link to is woefully insufficient (52w). I've found that you really need a thermoelectric unit in the 80w - 90w range.
Recall that during the first few days of active fermentation, the temperature of the liquid can rise 5F - 10F above ambient air temperature. So, if your house is at 75F and your target liquid temperature is 65F, then the air temperature inside the insulated box needs to be at 55F - 60F.
Personally, I found the most efficient route was to buy a preassembled cooler and thermoelectric unit (such as the Edgestar Wine Cooler) and modify it with an external temperature controller. I went with the wine cooler because the interior dimensions are square (no compressor hump) and I can use the thermoelectric unit for heating/cooling fermenting ales year-round.
I also use an upright frost-free freezer with a Love temperature controller for fermenting lagers, storing grain, etc.
With that said, technically, the most efficient cooling solution would be to circulate a coolant through pipes run inside the fermenter. That would maximize the total energy transfer, but it also creates a lot of headaches to design and build.
I figured I would bring this thread back from the dead with some updates as I have finally gotten around to playing with this. I tried out the plan I had outlined above and here are the results:
Built a chamber using 2 sheets of 3/4" foam board glued together- Ugly, but seems to work
Built the Velleman thermostat and rigged it up to control a computer power supply- Seems to work well, I ended up using a separate 12volt wall wart to power the thermostat. Also, the control knob is analog, so it does not have a precise digital readout, but its 12volts, cheap, and easy to build.
The PC Air conditioner- knocked a solid 5 degrees off the ambient temperature. Not that great, so I replaced the TEC module with a 136 watt unit from ebay. This unit completely overwhelmed the heatsink. After an hour or so, temperatures inside the chamber were the same as outside. I overvolted the hot side fan at 17 volts (-12volt plus +5volt wires) and this made no difference.
I stripped the heatsink/TEC assembly from the plastic casing of the PC air conditioner and powered the upgraded TEC with 5volts, instead of 12. Using this method, the hot side heatsink remained cool to the touch and I was able to get a solid 10 degrees below ambient inside the chamber.
I am pretty sure the cooling power of the 52watt@12volts unit is about the same as the 138watt@5 volts. So a combination of removing the plastic shrouding and overvolting the fan is what most likely made the biggest difference.
The hot side heatsink is very small and I am sure it is not of that great of quality. It is obvious that the cooler I can keep the hot side, the cooler the cold side will be. My next step is to replace the hot side heatsink with a computer processor one. It looks like the 4 pin, through-motherboard mounting bracket will be the easiest to adapt. I will have a rummage through my local comptuer store's clearance isle to see if I can find a suitable heatsink. I am sure a water cooling setup would be optimal, but I would rather not invest that type of money or space at this point.
I do apologize for not having any pictures, as I do not have my digicam with me, but I will try to get pictures up soon.
SpanishCastleAle
Well-Known Member
I think this idea is very interesting...should have known Yuri would have tried it years earlier.
A friend at work just let me borrow the 12V cooler that came with his Mini Cooper. I haven't tried it yet but it's got a big cooling fin on the outside with a fan...and another big cooling fin on the inside. What I'd like to try is to just buy a similar cooler and modify it (i.e. hack it up) such that it cools an insulated chamber just big enough for one carboy. For a person like me (no welding experience and such) it seems like the easiest way...if it works that is. But if that Peltier unit can keep a small cooler @ 45 F then I would think it could keep an insulated fermentation chamber in the 60's. And here in Florida...60's is an accomplishment.
A friend at work just let me borrow the 12V cooler that came with his Mini Cooper. I haven't tried it yet but it's got a big cooling fin on the outside with a fan...and another big cooling fin on the inside. What I'd like to try is to just buy a similar cooler and modify it (i.e. hack it up) such that it cools an insulated chamber just big enough for one carboy. For a person like me (no welding experience and such) it seems like the easiest way...if it works that is. But if that Peltier unit can keep a small cooler @ 45 F then I would think it could keep an insulated fermentation chamber in the 60's. And here in Florida...60's is an accomplishment.
theoriginalryan
Active Member
I did some test before i got in to it good, what i found is that a peltier system is just not really going to have enough watts of cooling power to cool a actively fermenting brew. I cant remember the exact statistic, but it was something like every .004 of gravity dropped, temp rises 2 F. with the amount of heat (or cold) disipation of 5 gallon of wort in there also, the amount of TEC you would need plus power supply and time invested just wouldnt be worth it. better off just buying an old fridge.
Once it starts actively fermenting the TEC can not keep up with that amount of mass. (5 gallon of fluid is a lot of mass to keep cool) The best bet is just to go to a pawn shop and buy a small fridge some college kid pawned off and start from there, you will get much better results, with less headaches. Believe me, i want this idea to work, but its just not practical. put a as much jugs of warm water in that cooler you can fit and see how long it takes to cool them. You will have a better idea of what im talking about then
lamarguy
Well-Known Member
brewphilly18 asked a few questions about my Edgestar setup, but his message box is full...So, I'm adding my response to this thread.
(1) Is it necessary to rig the whole computer setup for temperature control?
No, but it's handy for automatic temperature control and logging. It also allows for easy heating support during the winter months.
(2) Will the unit hold temperature on its own without an external temperature control?
Ah, I believe the factory temperature range is 58F - 65F, which only covers a small percentage of ales.
(3) Could I just use a Ranco or Johnson Controls to regulate temperature?
Ya, it's possible but you'll need to wire the relay to control the 12v DC circuit from the unit's power supply. That allows the internal fan to continue to run for even cooling. But, you'll lose one of the main benefits of a thermoelectric device - the ability to heat and cool.
SpanishCastleAle
Well-Known Member
FWIW, I e-mailed Koolatron (apparently an early user/mfr. of 12V coolers using this techonology) and they said all of their 12V coolers except the very smallest model (and old models) use the same cooling module. So I don't need to get one of their larger coolers in order to get more cooling power. Almost any of their models will do.
lamarguy
Well-Known Member
FWIW, I e-mailed Koolatron (apparently an early user/mfr. of 12V coolers using this techonology) and they said all of their 12V coolers except the very smallest model (and old models) use the same cooling module. So I don't need to get one of their larger coolers in order to get more cooling power. Almost any of their models will do.
By "cooling module", do you mean the TEC? The other models may use larger heatsinks and fans, which increases the heat exchange efficiency due to the greater temperature differential.
ClaudiusB
Well-Known Member
My stir plate is equipped with TEC cooler.
I used the TEC module out of a Wal-Mart six pack cooler to keep the starter temp in check.
The garage temps are in the 90s around this time of the year.
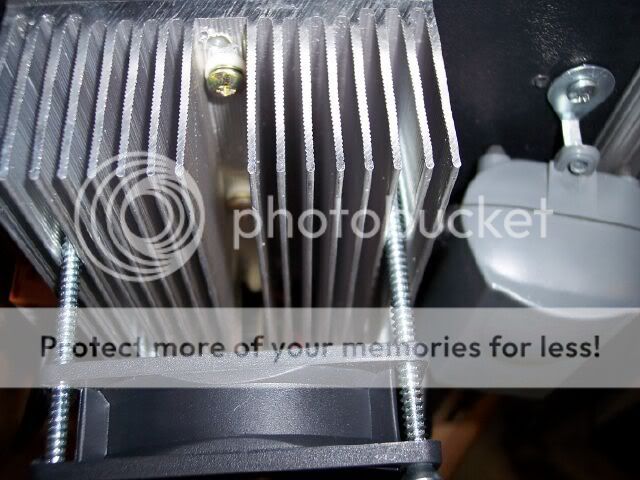
To better dissipate the heat from the heat sink I moved the fan back and installed a shroud.
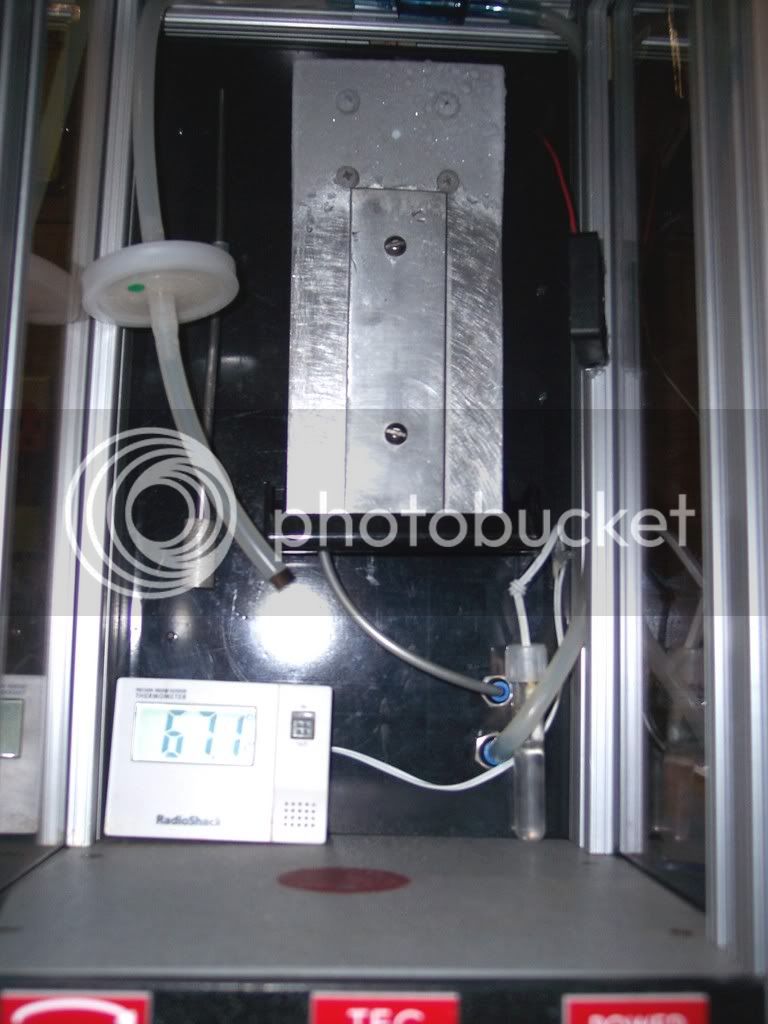
On the cooling side I installed a large plate to transfer the heat out of the enclosure better.
TEC module without the shroud
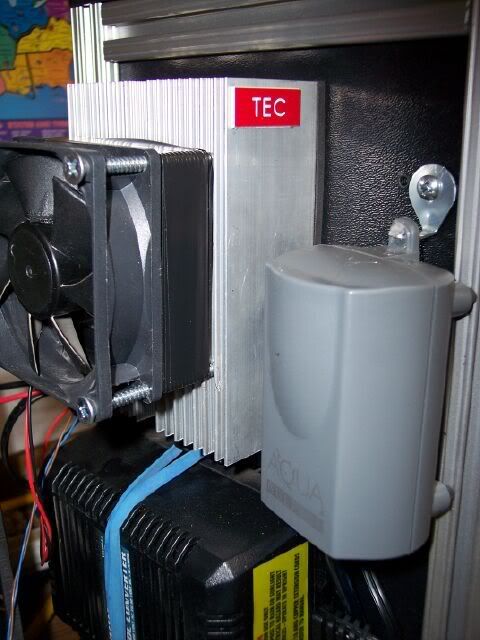
Plastic shroud installed
Ice is building up on the plate.
A very small fan blows the enclosure air over the plate
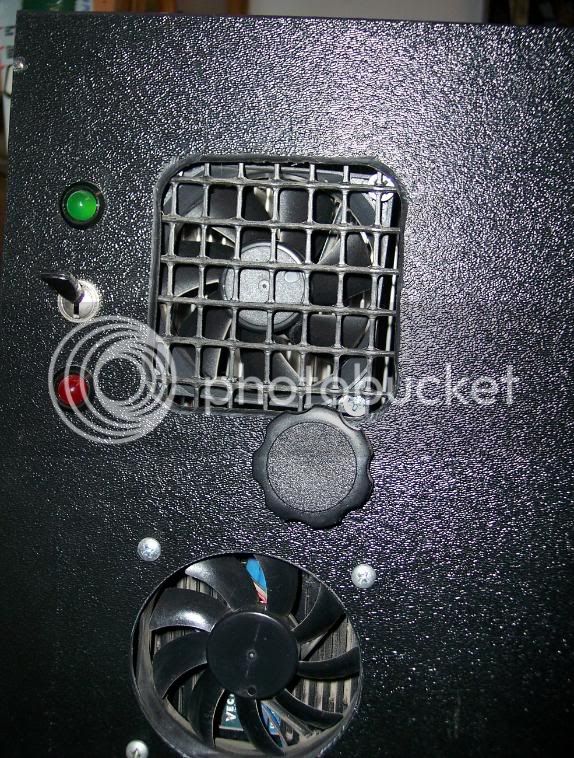
Heating and cooling switch.
I never used the heating option.
The top fan is the TEC cooling fan, the bottom cools the 12 VDC power supply.
Cheers,
ClaudiusB
I used the TEC module out of a Wal-Mart six pack cooler to keep the starter temp in check.
The garage temps are in the 90s around this time of the year.
To better dissipate the heat from the heat sink I moved the fan back and installed a shroud.
On the cooling side I installed a large plate to transfer the heat out of the enclosure better.
TEC module without the shroud
Plastic shroud installed
Ice is building up on the plate.
A very small fan blows the enclosure air over the plate
Heating and cooling switch.
I never used the heating option.
The top fan is the TEC cooling fan, the bottom cools the 12 VDC power supply.
Cheers,
ClaudiusB
SpanishCastleAle
Well-Known Member
I mean the whole kit and kaboodle...both the internal and external heat sink, fan, Peltier device, DC adapter plug, etc. all encased in a plastic enclosure. At least I think that's what he meant. I actually told him exactly what I intended to do (i.e. buy a cooler and hack the cooling unit from it and then use the cooling unit to cool a beer fermentation chamber). Here were his exact words:By "cooling module", do you mean the TEC? The other models may use larger heatsinks and fans, which increases the heat exchange efficiency due to the greater temperature differential.
Yuri may have proven that last statement incorrect but...whatever.Yes they all use the same module except the older models and some small ones. You would be better off buying a cooler and taking the parts out of it because it would cost alot more to purchase the heatsink assembly and coldplate and motor seperately
EDIT: I just re-read my e-mail to Koolatron and in my questions I specifically wrote: "...entire TEC ‘module’ (TEC with cooling fins/fan/etc.)"
Very cool...ClaudiusB...pardon the pun.
Similar threads
- Replies
- 4
- Views
- 1K
- Replies
- 0
- Views
- 886