Frodus's 10-gal electric HERMS with HMI/SCADA

Homebrew Talk - Beer, Wine, Mead, & Cider Brewing Discussion Forum

Help Support Homebrew Talk - Beer, Wine, Mead, & Cider Brewing Discussion Forum:

This site may earn a commission from merchant affiliate links, including eBay, Amazon, and others.

frodus17

Well-Known Member
Joined
Jun 16, 2015
Messages
143
Reaction score
26
Location
Portland
Thought I'd do a quick intro and start a thread for my system.

Me: I'm an EE with a background in automation and control systems. I started brewing late last year and since have moved from Extract to All-grain. While propane worked well, I love that there's an option to do an electric system. I've been lurking for months and building my plan.

The brew equipment:
  • 1 - BK - Bru-Gear ProBoiler 10 Gallon Electric Kettle with upgraded 1.5" Tri Clover Ball Valve
  • 1 - MLT - Bru-Gear ProBoiler 10 Gallon Electric Kettle with upgraded 1.5" Tri Clover Ball Valve
  • 1 - HLT - Bru-Gear ProBoiler 10 Gallon Electric Kettle with upgraded 1.5" Tri Clover Ball Valve
  • 1 - Bru-Gear 10 gallon HERMS kit
  • 1 - Bru-Gear 10 Gallon False Bottom
  • 3 - Bru-Gear ProBoiler Dip Tube
  • 2 - Stainless steel, inline, chugger pumps
  • 1 - Electric Control system (More below)
  • 1 - 48" x 24" Chrome shelving for brew stand
  • I've also already got a kegerator, some 3 and 5-gallon corny kegs as well as a Stout Tanks 7.3 gallon Conical fermentor

Electric Control System
  • 4 - Watlow MicroDIN Modbus PID temperature controllers
  • 1 - Obvius Acquisuite Data Acquisition server and Gateway (for Modbus RTU to Modbus TCP conversion and data logging)
  • 1 - Veris E50 power meter with 100A CT's.
  • 1 - Lantronix Wibox to convert ethernet to Wifi
  • 1 - Raspberry pi running MySCADA HMI via webserver
  • 1 - LCD/Android HMI for controls and display
  • 2 - 40A SSRs for the heating elements
  • 2 - 10A SSRs for the pumps
  • 1 - Main contactor
  • 1 - E-stop
  • 1 - Key switch enable
  • ? - applicable fuses and circuit breakers


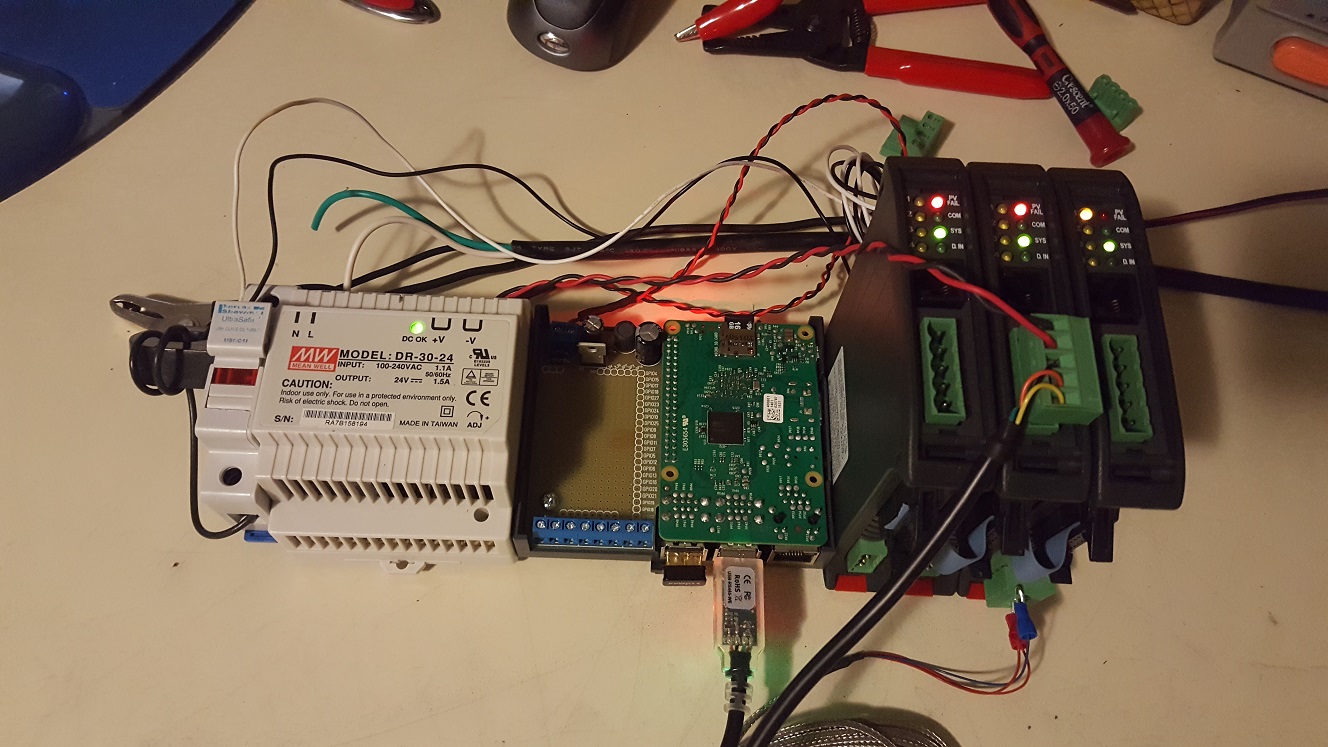
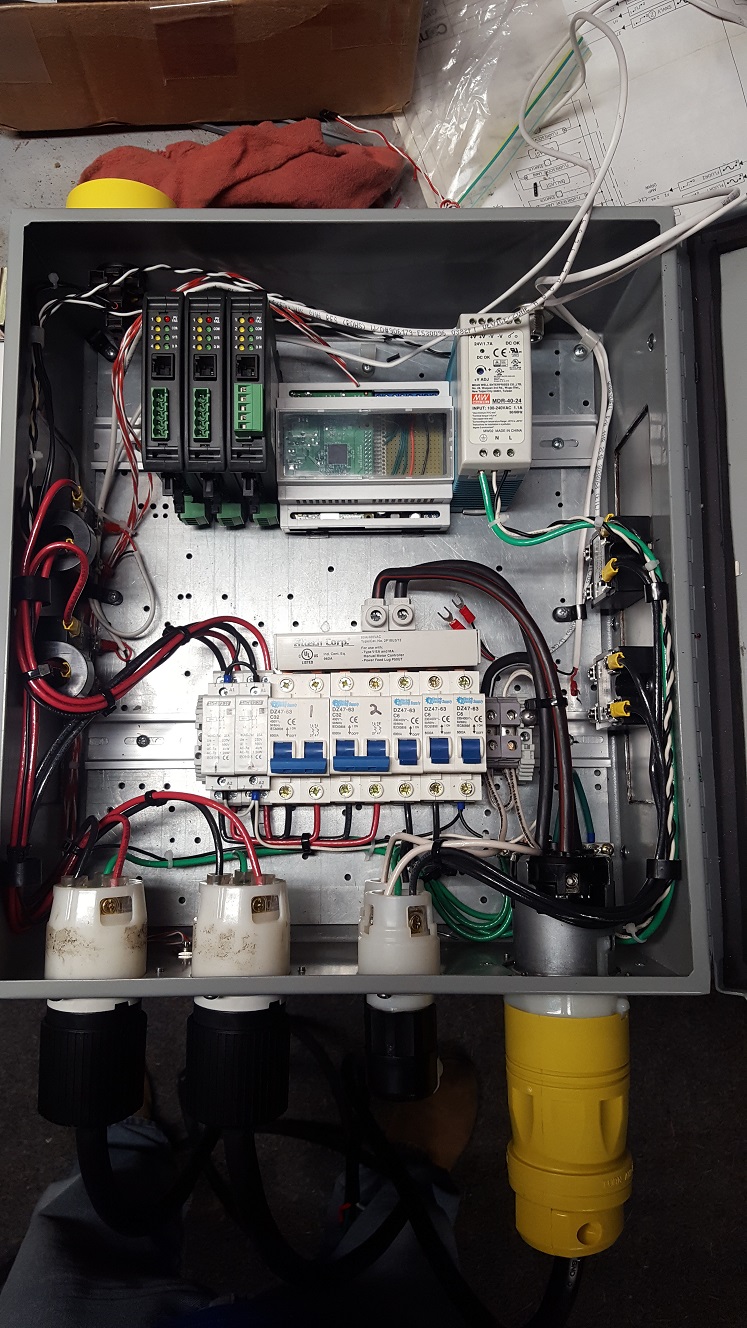
I'm using a software called MySCADA to create an HMI to access the PID controllers via Modbus and control them on/off as well as setpoints. At this point, I'm planning on using some GPIO on the Raspberry pi to turn on/off the SSR's for the pumps via button on the display. The Veris meter will be there to log how much energy is being used. I may simplify things a little bit, but this is the overall system at this point. This also allows me to do almost everything though the display (Switches, buttons, indicators, alarms, SMS/Email alerts, trending, digital temperature display, etc). There will be little automation, this is just a way to extend the limited capabilities of display-based PID's and mechanical switches and indicators. It also keeps wiring very clean and simple.

One PID will be used for the BK, one will be used for the HLT, one will be used to monitor the MLT temperature and the last will be used as an AUX temperature (likely for the exit of the BK as it goes into the fermentor).

For brewing, this is a single tier HERMS system, nothing special there. The cool thing about the Bru-Gear equipment is that the HERMS coil is in the lid. This allows me to use it on any of the 3 kettles. My plan is to use the HERMS kit on the HLT for the first part of the brew, and move to the kettle after the boil. I want to experiment with recirculating cold water from the HLT through the HERMS coil in the BK to cool it off like an immersion chiller. I'd basically add ice to the HLT, fill with water, and transfer heat via the HERMS. This way I don't have to run hose-water through, and it also helps clean the system when I'm done.


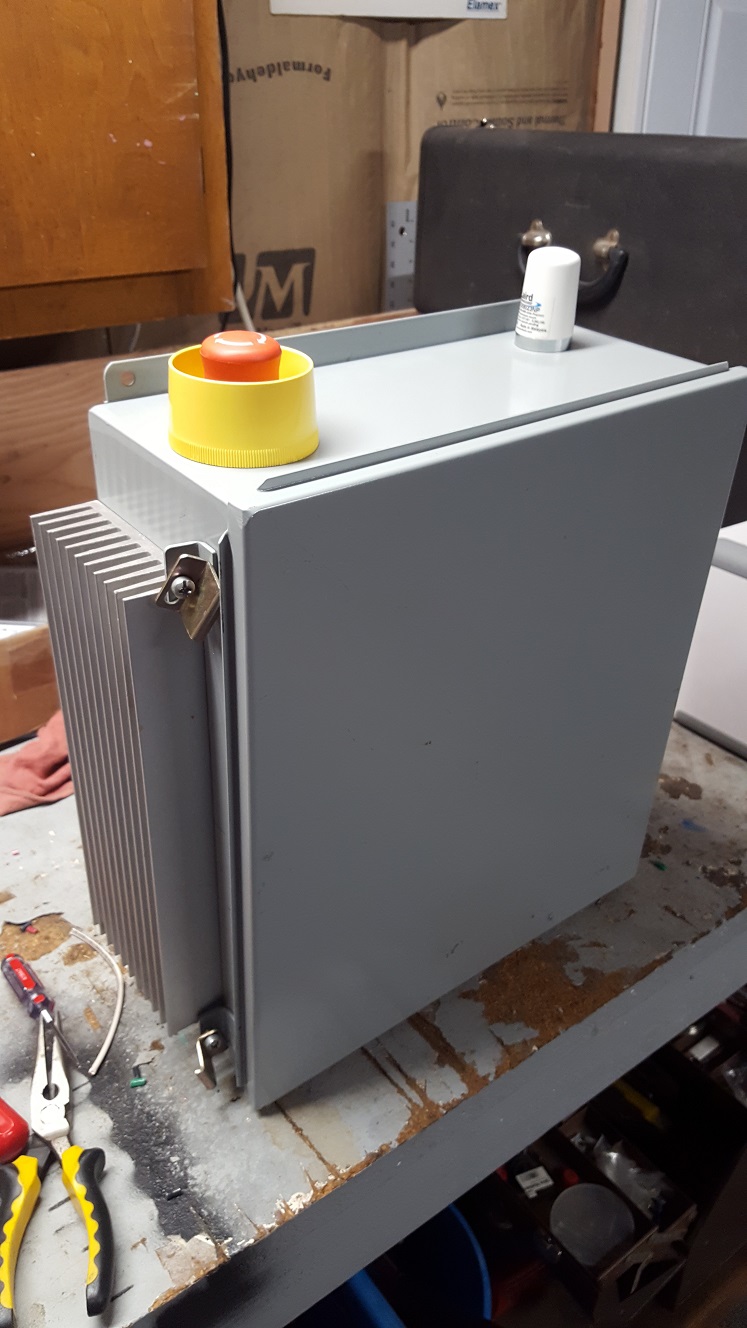
I got my Bru-gear last week and the equipment looks great and is going to work well for what I'm trying to do. I bought the PID's from broncosaurs on this forum and should get shortly. Currently building the panel and ordering some parts like elements, element TC fittings, whirlpool TC fitting, recirculation fittin and some more valves.

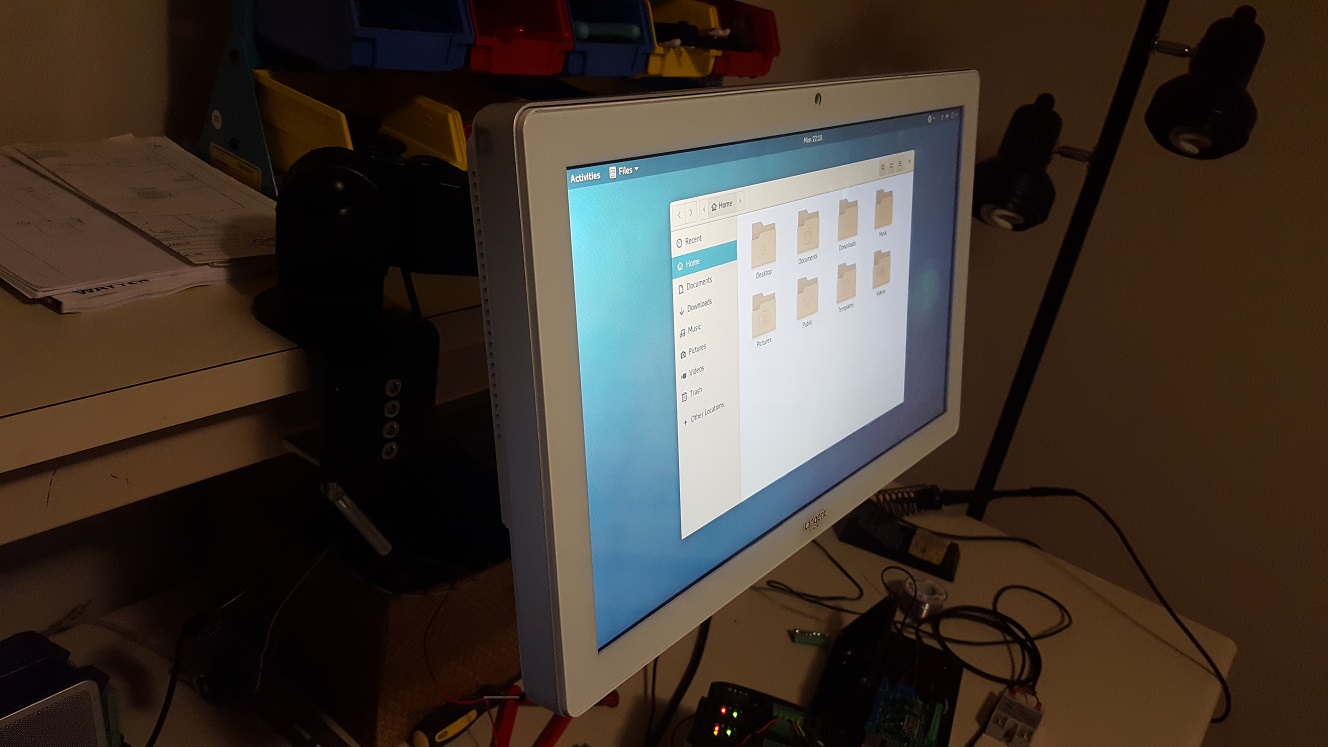
I have been working on the HMI a little, getting more familiar with it. Right now I've got it running on a Raspberry Pi communicating to a Modbus IO card that I've got. Still working out some details, but its very flexible and well worth the cost (Under $60).

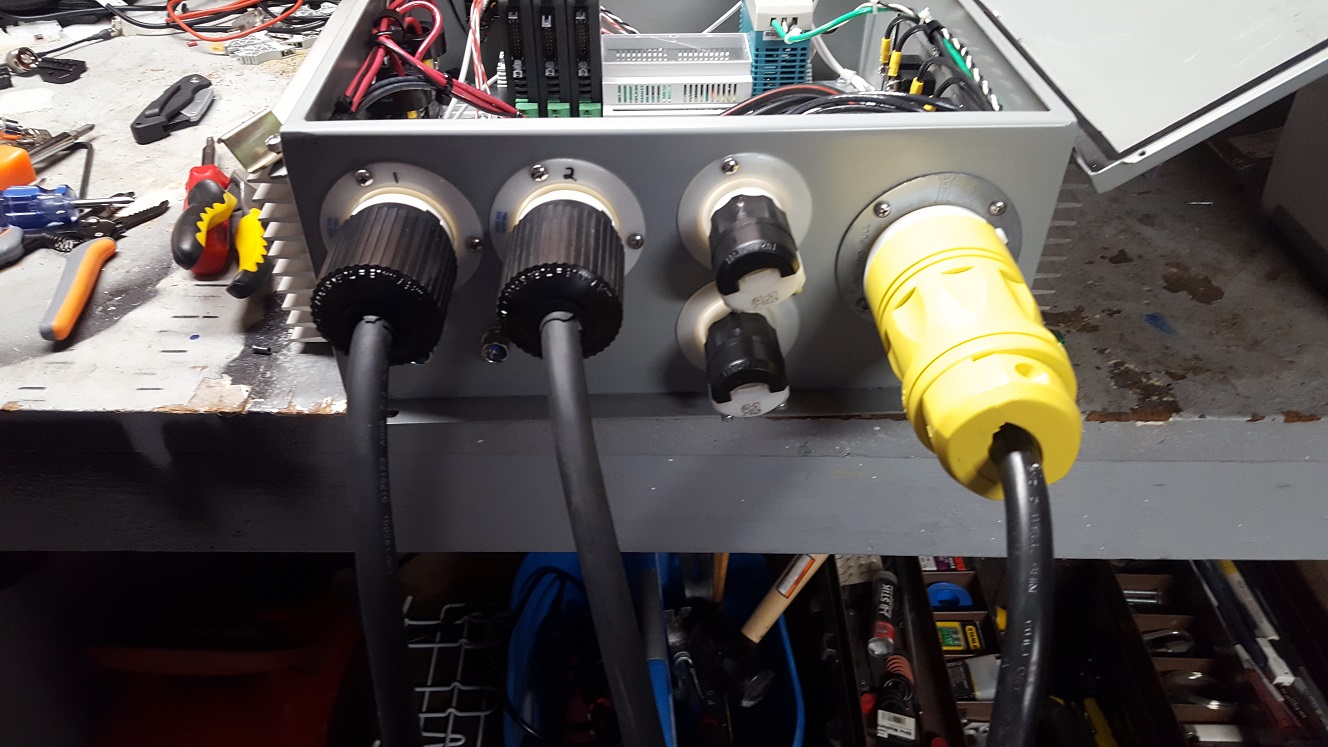
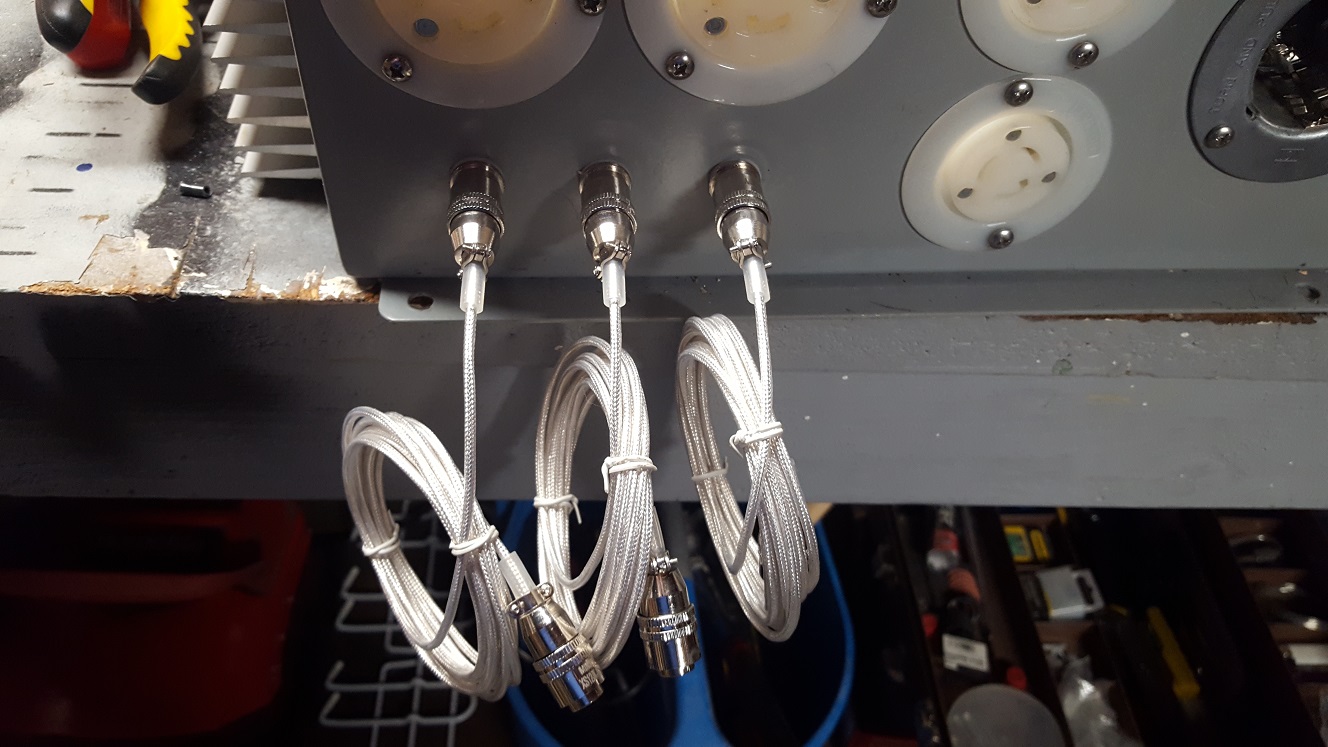
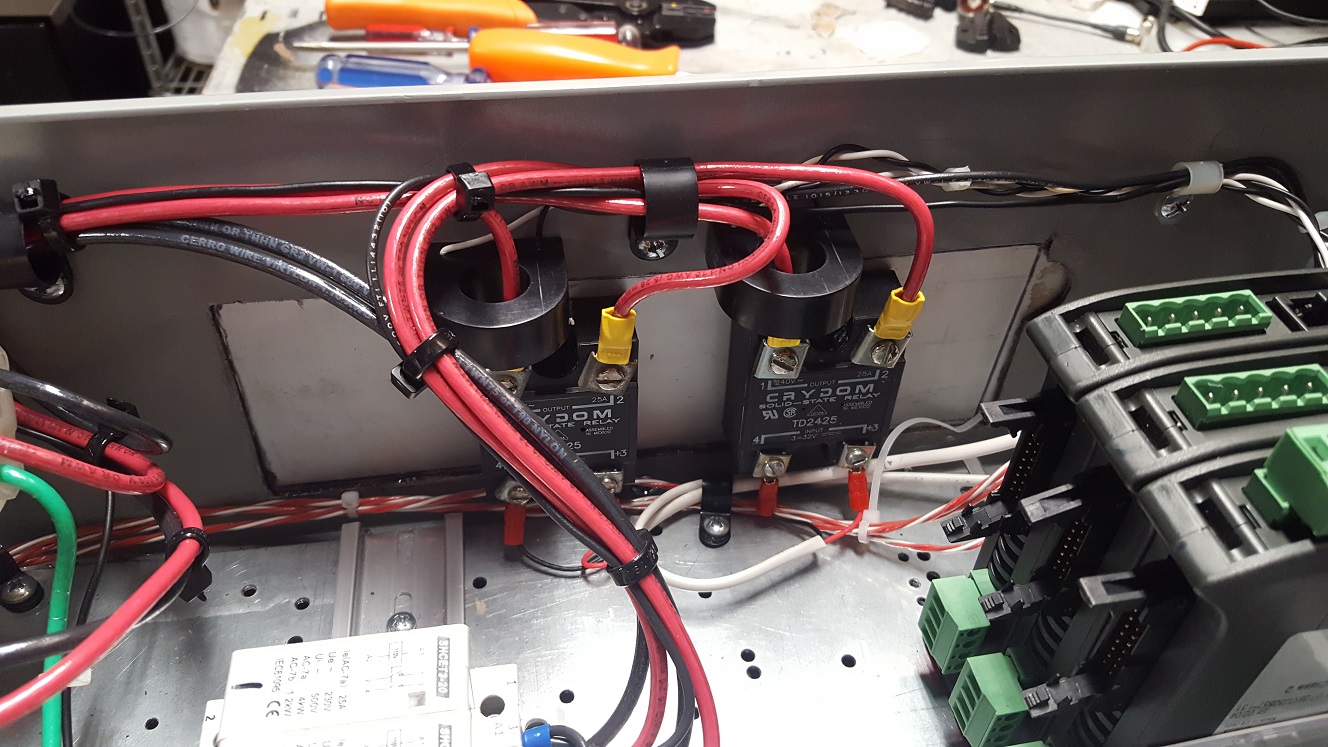
Here are some pictures of the control box and the first-pass of the HMI:

20151212_174338-1.jpg


20151212_174332.jpg


20151212_174326.jpg


20151212_174323.jpg


20151213_220234-1.jpg


20151213_220321.jpg
 
I followed your build a ton. I like the chrome racks, and have a ton of them extra and built a roll cart. Hoping I can hang the control box off the side and make it somewhat modular.
 
And I like your website (cool url)!

You wouldn't happen to have a block diagram of your control system, would you? I think I follow, but would like to understand it better. Modbus is a good application, but I am wondering the benefit since everything is local (one control box).

I see you ride (helmet kinda gave it away and your website sealed the deal). I also happen to ride (dino juice tho' - sorry!). Shamless pic of me at the Dragon a few years ago:
Dragon 10-11-06-4.jpg
 
Thanks! The website has been fun. Need to update more. The pinball machine from last year was a blast. Smoker has been working well. Haven't added a ton of brewing stuff yet, but I will!

Why so complicated? Well, it isn't, but all I do all day is work with the Obvius Acquisuite and work with modbus devices.... do I need it? nah. Can likely just use the Pi + the PID's and be done..... but why not monitor power and do some other cool stuff along the way! Most if it is test equipment or slightly damaged, so it works out well. Might also use a Click PLC for some things, we'll see.

Nice bike, owned a VFR700F, SV650 and now a Brammo Empulse R.... so you can see why I like electric brewing.

IMG_9430.jpg
 
PID's came in today. Same thing a panel mount will do, but all DIN-rail mounted.

I'll work on a schematic....kind of planning phase now.

basically:
Tablet -> wifi -> Raspberry pi running MySCADA -> Acquisuite -> Watlow PIDs + Veris E50 + Click PLC (Maybe)

I might get rid of the Acquisuite if I can do Modbus RTU with the Raspberry PI/MySCADA, but there's some cool stuff I can do with it, just for fun.

20151221_202753[1].jpg
 
I've had quite a bit on these shelves without any issue. They're rated for 600lbs each shelf, 3600lbs total for a 6-shelf unit.

5 Gallons of water is ~40lbs, so lets say 60lbs for HLT, 40lbs for MLT + 20lbs of grain , 50lbs for the boil kettle so maybe 180lbs, and another 70lbs for the kettles and fittings. Still well under. Regardless, I'll be testing first for sure. More worried about side to side flex. I'm also removing the casters.

I can always find/build something if I think it isn't going to work.
 
It might technically be rated for that, but that doesn't mean the shelf is not going to sag over time.
 
I've got 5 sets of these in my garage, all with plenty of weight on each shelf...tools, kayaks, auto parts, etc. They're solid and none have sagged at all. They're industrially rated shelves.

Am I going to blindly walk into this without testing a little bit? Heck no, but each shelf is rated for 600 lbs and I'm maybe doing a third of that for maybe a couple hours. My guesstimate above is fully loaded which is very unlikely to happen.

Plenty of people use em.
 
I have not seen any sag issue with mine. I would be more concerned with the anchors slipping. They use a wedge design but the ring tabs on the inside of the plastic wedges could be sheared off. So backup clamps or pins might be good insurance.
 
Got the PIDs last night, haven't tested them, but I think they'll do great. They do auto and manual modes and have SSR and alarm outputs. Might see if I can use the outputs dorectly for something else and force them on and off to turn the pumps on and off.

Theres much more control over modbus than through a keypad.

Going to focus on building the panel and wiring the garage with a 40A GFCI breaker and a 240v receptacle before I do much more with the actual brew equipment.


Unrelated to this project, but brew related, friends and I did an extract brew porter last weekend that is looking good so far. Plan on adding hazelnut extract and vanilla and age with some bourbon barrel staves in the corny.
 
Good idea. I was thinking about that last night.

I found these, aluminum clips with C-clips to keep from slipping:
http://www.webstaurantstore.com/met...-sleeves-with-zinc-rings-4-pack/4619986Z.html

or collars like this:
https://www.superiorshelving.com/st....htm&storeid=1&cols=1&c=detail.htm&itemid=APL

Those are pretty nice. I was under the impression that the sleeves are not necessarily interchangeable, so they might not fit some other brand of shelving. You could also drill a hole and run a sheet metal screw in each corner.
 
Cheap enough to try. Might see if amazon has some to test. Most shelves are the same standard. But a few are not. One of the sites is the same brand I own, so I'm hoping. The clip is nice to lock it
 
I got a lot done yesterday with respect to the MicroDin PIDs and Communication with the HMI. I got the PIDs from another member, broncosaurs, first part of last week before I went out of town. They're nice little controllers and DIN rail, so no cutting the panel.

They use RJ11 connectors for the Modbus daisy chain, so I had to make up some short cables to go between them, and another to wire to my Modbus RTU to TCP gateway. The gateway is just so I can access over the local network. I added the device to my gateway and added some registers to read (another feature of the Acquisuite) and picked some registers I'd like to see easily. It worked well and I got all 4 up and running.

I also got some software from Watlow called Watview that allows easy configuration and monitoring of the MicroDin PID controllers for testing. I reset them to factory and set to my preferences for units/decimal places/etc. They're pretty slick and have Autotune, Manual mode, PID mode and flexible inputs for both RTD and Thermocouples. I had a couple Thermocouples that I used to test and they read pretty accurately.

I also bought a Raspberry Pi. The MyScada software has options to run on a PC, Android device, Apple device or on a raspberry Pi via webserver. The Android option is nice, but locks me into one device. Using the Raspberry pi, I can use any web-enabled device. The image installs easily and installation is quick (although not documented well). I tested on my TV/Blu-Ray player, Android tablet, Android phone and on the Pi itself via HDMI monitor. On click loading of the project files to the Raspberry pi and its up and running.

Going to get a Raspberry PI din rail mount so it mounts better and is protected:
http://www.alliedelec.com/hitaltech-usa-10-0012225-rmb/70615572/

More on MyScada Home:
http://www.myscadatechnologies.com/?page_id=2673

I worked a bit more on the HMI too. The first shot was just something I threw together and will likely be the basis for what I want to do. Yesterday, however, I wanted to test functionality. I tested a switch that toggles a bit on and off on the PID controller Auto/Manual modes. I can easily switch from Manual and Auto modes. Today I'll play with visibility, as the SV is applicable for Auto control, and Power level is applicable for Manual mode (different modbus registers).

Also want to see if I can "trick" the PID controllers to manual mode, 100% so I can turn on and off the pump SSRs. This would be nice to avoid needing the Click, although I need to figure out what I want to do with respect to a couple of timers. Might see if I can do that with scripting within the MyScada software.

20151221_202753.jpg


20151229_085023.jpg


Acquisuite.png


MyScada_Test.png


20151229_085124.jpg
 
Went to a local surplus place and got 4 - 25A SSRs. I plan on 4500W coils for 10gal batches, so this should be just fine. 2 of the 25A are good for the motors, but I may get 40A SSRs for the 2 coils. Also got a ton of nice aluminum DIN rail. They didn't have any decent Circuit Breakers, Fuse holders or Contactors, so I'll order those online.

I found a nice case that would allow me to DIN mount the Raspberry Pi:
http://www.alliedelec.com/hitaltech-usa-10-0012225-rmb/70615572/

Ordered a USB wifi dongle with connections for an external antenna. I've got an external antenna from Laird that is sealed and will be mounted on the outside of my cabinet, as wifi doesn't work well in a metal box.

I'm not going to install any buttons or switches on the panel for now. I'm going to do that all with the HMI, as it has great alarming capabilities, logging, indicator icons, switches, gauges, etc. I will likely still do an alarm of some sort, but it'll be minimal. Right now, Just the E-Stop and Key Switch will be on the panel.

MyScada supports using the GPIO on the RPi directly, so I may use that for auxiliary stuff like the Contactor (not directly of course), buzzer, etc. My brother installed MyScada and is playing around with it too. He's a Java geek and has volunteered to help me out a bit. This will allow coding to support things that need some "smarts", rather than just controlling the PIDs.

I've had the RPi running the HMI for the last week and it hasn't crashed. It's pretty cool to look at historical data for the one PID that has a Thermocouple. I can see how the temperature fluctuates in our house with the schedule on the thermostat.

Going to see if I can get the Rpi to communicate directly with a Modbus device, which allows me to get rid of the Acquisuite Gateway. The fewer components the better. I picked up an RS485 USB cable and will experiment with that tonight.
 
It has been a busy few weeks, so I haven't done much other than finalize planning and play with a PLC.

I had a local welder shorten the long (6") TC thermowells that came with the Bru gear equipment down to 3". The thermometers are only 3" to begin with, and they don't really do much at that length. The main reason was that this allows me to remove the HERMS coil. I couldn't before because of the long thermowells.

I want to be able to remove the HERMS to put it into the BK, fill the HLT with ice and recirculate water through to cool the wort while I whirlpool. It'll effectively be an immersion chiller. I can effectively get rid of the plate chiller I have from my previous setup.

For the PT100 sensors, I ordered these:
http://www.auberins.com/index.php?main_page=product_info&cPath=20_15&products_id=469

They're NPT PT100 sensors with cable. They'll go in my NPT thermowell and fit really nicely. I didn't like the short lengths on TC PT100 sensors, plus they were all really expensive. This route allows me to use the PT100 or the thermometer in the future in the same thermowell.


I also ordered some parts from Norcal brewing solutions. First I got the 1.5" Element adapter. It looks like it's going to be the best overall solution for a corded connection:
http://www.norcalbrewingsolutions.com/store/Heating-Element-Adapter-1.5-Inch-Tri-Clover.html

Second I got 2 whirlpool arms. One for the HLT to recirculate the water to normalize temperatures, the other for whirlpooling in the boil kettle:
http://www.norcalbrewingsolutions.com/store/Tri-Clover-1.5-Inch-Custom-Whirlpool-Arm.html

Last I got a Tri Clover compression tube adapter so I can use my Blichmann auto sparge with a 1/2" NPT female coupler:
http://www.norcalbrewingsolutions.com/store/Tri-Clover-Compression-Tube-1.5-Inch-x-1.5-Inch.html

Overall idea is to be able to measure all 3 kettle temperatures, and control 2 of them via their heating elements/PID controller. I'll also have an Aux temperature sensor to use as needed (wort temp in fermenter, grain temp before going into MLT, etc).


I haven't done a lot on the panel at this time. I need some more time to start wiring things and mount it all. For now I'm going to manually control everything. I'm working on some PLC code to control the PIDs. I don't want to allow the user to have both elements on at the same time, so I may disable the ability to turn one on if the other is already on. I can also map some inputs to drive SSRs for the pump motors. Slowly re-learning some PLC code and modbus comms for the Automation Direct Click PLC. I also need to code 2-3 timers so I can track several things at once.

Finally, I ordered a GFCI breaker to go in my electrical panel and will be wiring that to an outlet in the garage. I picked a 40A, which would give me a little overhead. I'm going to use two 4500W elements (one in HLT one in BK) as I'm normally only brewing 5 gallon batches.
 
Got the whirlpool, element adapters and adapter for recirculating in my mash tun. These element adapters are very nice!

I'm also using a Blichmann auto-sparge and Jay made a nice little adapter that fits very well on the TC fittings so I can use it. I'm pretty much done with the hardware side of the build, minus some elements and hose.

20160125_190158.jpg
20160125_190215.jpg
20160125_190204.jpg
20160125_190707.jpg

Also got the Auberins sensors. I ordered them too short, but they let me send them back in exchange. I got the 7" ones and will fit them to the Thermowells so they're all the way in. They read very accurately with my PID controllers. Here's pics of the shortened thermowells and the Auberins sensors:


20160125_190259.jpg
20160202_202922.jpg
20160202_203020.jpg


I'm going to spend the weekend doing some panel design. I got the CLICK PLC talking to my modbus gateway and can turn on and off a relay by touching a button on the HMI screen. I'll use this to turn on/off each element and put in some logic so both cannot be on at the same time.

I also need a couple of timers, so I'll write some logic to run those and display/reset/start/stop on the HMI screen. Still figuring out what is best for that.

I should be installing the 40A breaker and outlet in my garage this weekend as well. That might push to next week, we'll see.

Still need to order 4500W elements, circuit breakers, 50A SSRs, contactors and some various terminals this week so I can start wiring the panel now that I've tested/proven out the controls side.
 
My buddy made a nice wood top for the brew-stand. Needs to be trimmed a little on the edges, but really fits nicely and will make a nice top.
20160126_170737.jpg
 
Well, until it gets wet. Make sure to protect it.

I use bare underlayment plywood on my brew table... I felt that if I try to seal it of paint it that finish would cause more issues with the heat from the bottom of the kettles than plain wood... surprisingly I have not had any issues with nasties from spills onto the wood myself.
 
Well, until it gets wet. Make sure to protect it.

I've treated the entire board with Mineral oil. I intend fully that it will get water marks on it and beat up, so that's fine. It's just to protect the pots from the metal racks.
 
Got the wood trimmed and fitted, and spent some of Sunday putting everything together and did a leak test. I only had a couple leaks at the pump and everything went pretty well. The whirlpool and the auto-sparge are going to work great!

Here's a pic of the brew stand, a picture of the HERMS coil (Which I may use as an Immersion Chiller too), and a closeup of the Auberins temp sensors mounted:

20160206_133731.jpg

20160206_134013.jpg

20160206_132707.jpg


Here's the whirlpool in action:


Here's a video of the sparge setup, and an overview shot (haven't installed auto-sparge yet):
 
Last edited by a moderator:
Got a 240V 50A outlet installed below my breaker panel today. Got a GFCI breaker and installed in my breaker box and ran some flex down to a retrofit box. I used a stud/cable finder but I didn't see the cable that was behind, so I cut a little high. Easy to cover over. Wired a 50A stove outlet for L1/L2/N and Ground connections. Tested everything and we're good to go.

20160212_154054.jpg

20160212_154100.jpg


Ordered the last components for my control panel this week, so should be able to finish the build next weekend if all goes well. Also ordered two 4500W elements.
 
Haven't posted in a while, sorry for that.

Found a Valley Grain Mill for $50 on craigslist and used it to mill my steeping grains and it worked great. It's adjustable and well-built. Mounting to a bucket lid soon. Too good of a deal to pass up.
20160225_181558.jpg 20160225_181610.jpg

I got my heating elements in and wired to a dryer plug. Then I ran a 5-gallon extract batch through one kettle. I also tested using the HERMS coil as an immersion chiller and it worked awesome. I threw it in there at the tail end of the boil to sanitize, and then turned off the element and ran water through. It cooled fairly fast, especially when recirculating the wort through my whirlpool arm.
20160222_211354.jpg20160222_211537.jpg
20160227_144359.jpg20160227_144406.jpg
20160228_143712.jpg20160227_152930.jpg
20160227_152945.jpg

Also used my conical for the first time, and I prefer this over a carboy. Easier to clean and no racking to secondary, just drain the yeast and you're good to go.

20160228_153223.jpg


Ordered the last pieces to my control panel, the 50A flange mount inlet and a couple of L5-15 flange mount receptacles. We have a punch at work for the holes and once those are installed, only wiring is left. Once the panel is finalized, I can start to tweak my HMI a little. Since I'm going to run a PLC for controlling the pumps, I can also add some countdown timers and a couple other IO points an read/write from the HMI. For now I'm only doing manual/auto and a PID setpoint through the HMI, and turning pumps on and off.
 
I've been busy planning our wedding, so I've only been brewing extract without the control panel and no power control. It's OK, but it boils really hard.

Things have been progressing though. Got a bucket mount built for the grain mill, got the rest of the parts for the Control panel. Got the inlet/outlet holes cut into the enclosure at work. Here's some pictures

20160430_152702.jpg

20160417_185858.jpg

20160419_063058.jpg

Also got some circuit breaker busbar that really helps simplify wiring and eliminates the need for several bus terminals. It looks like this:

WithAndWithout.jpg


Also got more done on my control panel. Hoping to tweak this version a little more:
Capture.PNG
 
Long time no post.

This summer has been really busy! I got married and we also bought a house. Had to do a bit of work to winterize the house and get some pluming and remodelling done so this system took back seat.

Need to get a 240V receptacle wired up in the garage and get the panel finished up. Did a little bit of work getting the receptacles mounted and a little bit of layout.

Still trying to decide if I want to put the power meter inside the panel, as it'll be a little tight.

Here's some pictures:
14264932_10104693731760783_4415860420738259217_n.jpg
14330111_10104693731840623_4958587560369768564_n.jpg
 
Doing some more mounting of items this weekend. Changed the PID's over from Watlow to Eurotherm (smaller and better features). Trying to get it all running so I can run some batches through it. Basic design is the same, just need to wire it up and mount parts.
 
Looks like you're on a build timeline similar to mine. I'm trying to take my time and get it right the first time, but the closer I get, the stronger the temptation to start slapping things together "temporarily." Must. Resist.
 
Yeah, bought a house a year and a half ago, so that took all our attention. Now it's brew time, and I can finish some projects.
 
Another little update. I've been working on the interface some more, as well as getting the panel wired up. I still need to get the low voltage stuff wired to the PID controllers, get the modbus wired and install the wifi dongle/antenna cable.

I'm using some of the unused outputs (alarm ouputs) on the PID controllers to drive the SSR's for the two pumps. I've also wired the E-Stop to the coils on the two 2-pole contactors for the heating elements in case I need to shut down. This will let me keep control power live.

The PID's have a nice feature on them where you wire in a Current Transformer. This will let you see how much current is going through each SSR. This allows me to ensure that I can tell if a heating element is open circuit if the SSR is on and I see no current, or that the SSR is shorted if the SSR is commanded off and I see current.

Also, since then, I got a medical grade Touchscreen computer and a mounting arm off eBay. This will be my new interface for the brew panel, and will also allow me to check on the temp chambers. Here's a video of the interfaces of both:


Here's some pictures of the panel mounting and wiring:
Touchscreen:
20180416_221049.jpg

20180416_220233.jpg

20180416_220258.jpg


Panel:
20180422_203742-1.jpg

20180422_203527.jpg

20180422_203523.jpg

20180422_203601.jpg

20180422_203618.jpg
 
Back
Top