Gas Burners with Love TS and Pilot Light Demo

Homebrew Talk - Beer, Wine, Mead, & Cider Brewing Discussion Forum

Help Support Homebrew Talk - Beer, Wine, Mead, & Cider Brewing Discussion Forum:

This site may earn a commission from merchant affiliate links, including eBay, Amazon, and others.
There are a lot of stands being built with the Love TS controllers with gas burners and pilot lights.

I just finished assembly this weekend on my stand with this setup and thought I would share a video of the Love switches in action so you can see them working.

If anyone in the planning stages has any questions, feel free.

Love TS Controllers


Hey MNBugeater, Thanks for the video! I've modeled my automation after your setup. Beneath the LOVE Controllers you have two switches. You said the one on the right is to give power to the solenoid, what is the light to the left...power to the controller? And what is the big light on the upper right of the control panel?

Thanks!
 
If you must have a gas fired system with a pilot light why don't you make a metal wind shield with a open side facing the burners preventing the pilot from being blown out allowing the thermocouple to go cold shutting down your main burner? Safety works pilot out no burner. I would rather have a spark ignition system, havn't seen a little breeze blow a spark out yet plus still have all the safety systems built in. Heck even an old Honeywell 24 volt system controller with the carbide glow ignitor and flame sensor is more reliable than a pilot light, this pilot light stuff is 1920's floor heater design thinking. Yes a strong draft can even blow a water heater pilot out. Carbide ignitors are brittle and expensive. I would go to a spark ignition like the new gas stoves use. But then it's your system do what you think is best, me 100% electric heating. No burning frames, valves, sight gauges, insulation wrap, empty propane bottles half way thru not counting the price of propane.
 
If the pilot goes out, then the gas shuts off...no safety issues. Seems simple enough for me. How do you incorporate a saftey measure if there is a spark ignition?
 
If the pilot goes out, then the gas shuts off...no safety issues. Seems simple enough for me. How do you incorporate a saftey measure if there is a spark ignition?

You use ignition modules in conjunction with valves made for the purpose. Dual valves will have a pilot valve and main valve built in. When the pilot is lit by the spark, the main valve opens, if it goes out, the main valve closes. Other setups without dual valves spark the burner directly; module opens valve and sparks burner when there is a call for heat. The modules have safety feature that shut the valve if there is no heat after a given time.

KD
 
Would THIS work connected to THIS? Can someone explain what I am looking at on the pilot assembly and how to connect it?

Thanks!

Brewvegas
Are you trying to copy MN's system with standing pilot or do you want spark ignition?

The valves you show require you to hold down a button for 30-45 seconds while lighting pilot or burner. Since you have to be at the valve to light them, there is no advantage to using any kind of spark ignitor with these.
 
This is what I am working with:

burner.jpg


Gas Burner: LINK

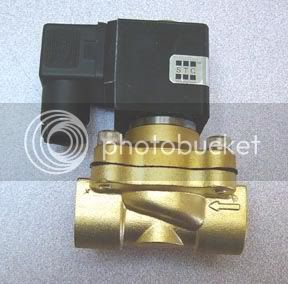
STCNCValve.jpg


STC Normally Closed Gas Valve: LINK

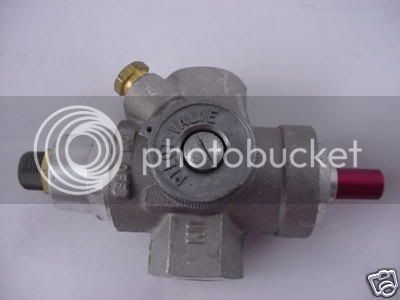
PilotValve.jpg


Pilot Valve: LINK

I guess my only option with the Pilot Valve is to go gas pilot light (which makes sense because of needing to hold down the button), I wasn't thinking about spark ignition unless it is an option with the parts I already have.

I'm looking for a little help as to what parts I need and where to get them to get the Pilot Valve hooked up.
 
You need some aluminum pilot tubing:

a858_2.JPG


A pilot burner with the appropriate orifice:

95991.jpg


Thermocouple:

1428_1_bl.JPG


And a way to attach the pilot ot the burner.

To get this:

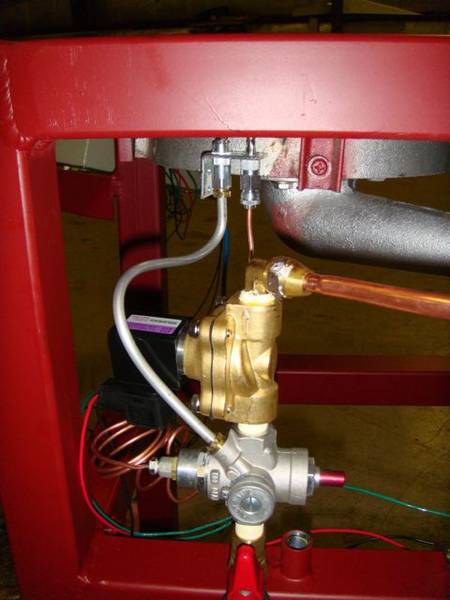
BurnerValveAssembly.jpg
 
If the pilot goes out, then the gas shuts off...no safety issues. Seems simple enough for me.

Simple is when you wait and wait then begin thinking why the temps are dropping and there is no main burner on then you discover the pilot light has blown out again, and for how long? I never said anything about safety issues. This is a ok system if you have the time to watch your pilot lights all the time. That is why I mentioned a wind shield. Not what I would call an enjoyable brew day, one more problem I don't need with my brewing. If this pilot system makes you happy go for it that's the great thing about this brewing forum with different opinions and ideas added by many.
 
You use ignition modules in conjunction with valves made for the purpose. Dual valves will have a pilot valve and main valve built in. When the pilot is lit by the spark, the main valve opens, if it goes out, the main valve closes. Other setups without dual valves spark the burner directly; module opens valve and sparks burner when there is a call for heat. The modules have safety feature that shut the valve if there is no heat after a given time.

KD

The Honeywell module has no pilot light at all, the main burner is ignited by the glowing carbide element, within 2 seconds if the flame sensor does not detect heat from the main burner the system shuts down. It will recycle 3 times then shutdown. There is no pilot light at all just the main burner.
 
The Honeywell module has no pilot light at all, the main burner is ignited by the glowing carbide element, within 2 seconds if the flame sensor does not detect heat from the main burner the system shuts down. It will recycle 3 times then shutdown. There is no pilot light at all just the main burner.

Beemer, not sure what you are referring to in my post. I was describing two spark setups, one with pilot (which I have), and one direct burner fire. I prefer the pilot since it proofs the flame with minimal gas.
 
Anybody have a figure on the cost of an electric igniter system? I did a fast check and it looked to me that the electric setup was going to run the cost way up. As well as add more complexity to the system.
 
Anybody have a figure on the cost of an electric igniter system? I did a fast check and it looked to me that the electric setup was going to run the cost way up. As well as add more complexity to the system.

It will run the cost up, butif you have access to salvaged parts, you can do it dirt cheap. My valves and modules were given to me for a few beers by a civil engineer friend. It seemed complex to me too, but in reality it was quite simple to put together; and extremely gratifying.
 
korndog; the systems I have worked on like in all my rentals plus my own house go from a stone cold burners to a glowing carbide ignitor for the main burners with a flame sensor probe next to one of the burners once the mains are lit the flame sensor signals the module to stay gas on. Within 3 seconds or less if the sensor does not detect heat the system shuts down. Full safety control, no pilot light involved in the system to blow out at off heat demand times. Just your basic White-Rodgers Model 50E47-843 furnance module ignition control system, no pilot light burning to get blown out at off burner times. My mistake posting Honewell, that was what I replaced with White-Rodgers units. These units have been trouble free except me air blast or bottle brush cleaning in the fall the burners and banging into the brittle cabide glow ignitor while cleaning the burner dust out a big mistake. They break like a dry flat toothpick and cost $36 to replace, don't ask. Replacement White-Rodgers modules cost me $67 each but have never failed me, a costly $67 test replacement unit once when it was the flame sensor that had failed at the spade fitting on the module, my dumb azz mistake not metering it late one night with a rental heating problem live and learn as the tenant comes first. The best part I can install different cards into it allowing how long the carbide ignitor glows yellow how many seconds long before and after the ignition takes place.
 
korndog; the systems I have worked on like in all my rentals plus my own house go from a stone cold burners to a glowing carbide ignitor for the main burners with a flame sensor probe once the main with the flame sensor is lite. Within 3 seconds or less if the sensor does not detect heat the system shuts down. Full safety control, no pilot light involved in the system to blow out at off heat demand times. Just your basic Honeywell furnance module ignition control system, no pilot light burning to get wind blown out at any time. These units have been trouble free except me air blast cleaning in the fall and banging into the brittle cabide glow ignitor. They break like a dry toothpick and cost $36 to replace, don't ask. Replacement Honeywell module cost me $67 each and have never failed me, a costly $67 replacement test unit once when the flame sensor had failed at the spade fitting on the module, my dumb azz mistake not metering late one night with a rental heating problem, live and learn.

Oh yeah, no doubt. Kladue has posted this setup on this board. I was just saying that there are alternative configurations.
 
You need some aluminum pilot tubing:

a858_2.JPG


A pilot burner with the appropriate orifice:

95991.jpg


Thermocouple:

1428_1_bl.JPG


And a way to attach the pilot ot the burner.

To get this:

BurnerValveAssembly.jpg


KD, I can't seem to find the .010 LP Orifice. Can you give me any pointers?
 
Oh yeah, no doubt. Kladue has posted this setup on this board. I was just saying that there are alternative configurations.

corndog; back at reply #23 by kladue "1st, light burners with electric ignition nodules, first method would be to use a pilot burner and flame sensor assembly". "2nd, 24 volt ignition module and ignition and flame sensor rods".

What I added was a different ignition process by a glowing carbide element for ignition to this thead as it was not mentioned by kladue or anyone else on this thread. The "24 volt ignition module" posted above is a spark ignition system. The carbide element I mentioned is powered by 120 volts AC with no relation to any of those two systems kladue mentioned in reply #23. I just wanted to add a different type of system that is available for others looking for a burner ignition system that still has all the flame detection safety and shut down features. Not a pissing war just another ignition method idea.
 
Carbide ignitors work great in dry applications but I contemplated the results of a boilover, spill, or unlucky dropped item when burner is exposed during storage.
 
corndog; back at reply #23 by kladue "1st, light burners with electric ignition nodules, first method would be to use a pilot burner and flame sensor assembly". "2nd, 24 volt ignition module and ignition and flame sensor rods".

What I added was a different ignition process by a glowing carbide element for ignition to this thead as it was not mentioned by kladue or anyone else on this thread. The "24 volt ignition module" posted above is a spark ignition system. The carbide element I mentioned is powered by 120 volts AC with no relation to any of those two systems kladue mentioned in reply #23. I just wanted to add a different type of system that is available for others looking for a burner ignition system that still has all the flame detection safety and shut down features. Not a pissing war just another ignition method idea.

Sounds like a good setup.
 
I've finally gotten most of the parts and am staring assembly. I've got the STC Gas Valve (picture in previous post).

Can someone help me figure out how to wire this thing? I'm not sure where/how to access the leads.

Thanks...BrewVegas
 
I've finally gotten most of the parts and am staring assembly. I've got the STC Gas Valve (picture in previous post).

Can someone help me figure out how to wire this thing? I'm not sure where/how to access the leads.

Thanks...BrewVegas


There is a single screw in the plastic housing. Unscrew and pull off. Pop the terminal block out of the housing and you will see three terminals. #1 is hot, #2 neutral, #3 is ground if you need it.

KD
 
Thanks...KD. That's what I needed.

It looks like the last thing I need to figure out is how to wire this and the love controllers. I'm sure there is plenty of documentation here, I just need to find it.

Thanks...
 
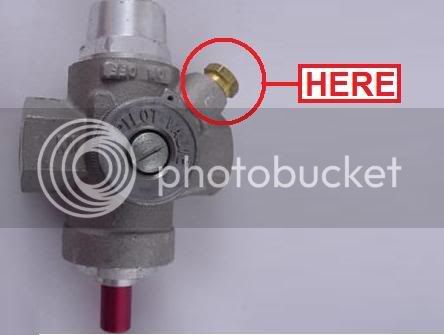
I've got the correct OD tubing going into the Pilot Valve and Pilot Assembly but it's leaking on both ends.

PilotValve-Here.jpg


I've got copper tubing slid into the brass lock nut and it's screwed down tight, but gas still leaks out of it.

Also, the flame on the pilot light assembly is pretty low. And I do have the LP oriface installed.

I thought about soldering it on both ends, but then I wouldn't be able to screw them into the housing.

Thanks for any suggestions.

Those nuts have compression ferrules on them. They need to be torqued down pretty tight to compress them. They are made for aluminum pilot tubing but I suppose if you have the precise copper o.d. it would work.
 
I'm thinking about doing a similar setup -- Does anyone have the part numbers that MNBugeater used for his solenoid valve and safety pilot?
 
Yeah... I got both my pilot valves from eBay for like $40 each and the Solenoid valves from STC.
 
Lots of great info on this thread and it's helped me plan out my single tier sculpture very well. I wanted to make sure I understood things correctly, though, in that the parts previously mentioned here with the pilot valve and STC valves, will work with a propane setup and not natural gas. I think I have all the parts mentioned and should be able to put things together. I have 3/8" black piping for the gas plumbing so I have purchased everything in 3/8" npt parts. If someone could verify that the propane would be fine with this setup I would greatly appreciate it. Thanks for all the great input here!
 
Lots of great info on this thread and it's helped me plan out my single tier sculpture very well. I wanted to make sure I understood things correctly, though, in that the parts previously mentioned here with the pilot valve and STC valves, will work with a propane setup and not natural gas. I think I have all the parts mentioned and should be able to put things together. I have 3/8" black piping for the gas plumbing so I have purchased everything in 3/8" npt parts. If someone could verify that the propane would be fine with this setup I would greatly appreciate it. Thanks for all the great input here!

You are using low pressure propane; right? Your pilot light will need an LP orifice.
 
Sorry I lost track of this thread there were a lot of questions asked. I think kladue and korndog answered most of them.

The exact parts numbers I used were the STC 2W160-10 (3/8" - the 1/2" is a different part number. I think the "-10" is different) and the BASO H19AL-1.

I have all the exact part numbers with costs and sources (most eBay) in a spreadsheet of my entire build. PM me if you want it and what format you want it in. (i.e. MAC - Pages, Excel - PC, PDF -this wont do you much good if you changing numbers and want to keep a running total)
 

Those would do what you are looking for them to do. Open a valve upon active pilot and close if no pilot, which is all you are looking for. However, those are SERIOUSLY expensive. I paid $12.50 for mine. I bought them on eBay, but the seller name doesnt even exist anymore. I would keep looking. They shouldn't be that expensive.
 
Thanks for the info. I'll keep my eyes out for a good deal and then get the safety valves. I am ordering my solenoids now so should be pretty close to having everything together. Any idea the best way to try and mount the honeywell pilot burner to a burner like this:

https://www.pelicansky.com/productdetail.aspx?id=230&cat=85


Or is there a different pilot light burner that might work better?

If you need to mount it at all I would look at mounting it to your frame. But in reality, between the copper thermocouple wire and the aluminum gas tubing, you wont need to 'mount' this to anything. You should be able to position this where you want it and it will stay in place with the strength of the tubing. If you wanted to attach it someone, I used flexible metal strapping like is used to strap pipes. You can attach one end your stand and bend in position and then attach your pilot to the other end. But it isnt really necessary.
 
Back
Top