Building a stir plate, check out this USB adjustable computer fan

Homebrew Talk - Beer, Wine, Mead, & Cider Brewing Discussion Forum

Help Support Homebrew Talk - Beer, Wine, Mead, & Cider Brewing Discussion Forum:

This site may earn a commission from merchant affiliate links, including eBay, Amazon, and others.

matts

Well-Known Member
Joined
Dec 5, 2009
Messages
93
Reaction score
4
Location
Lyons
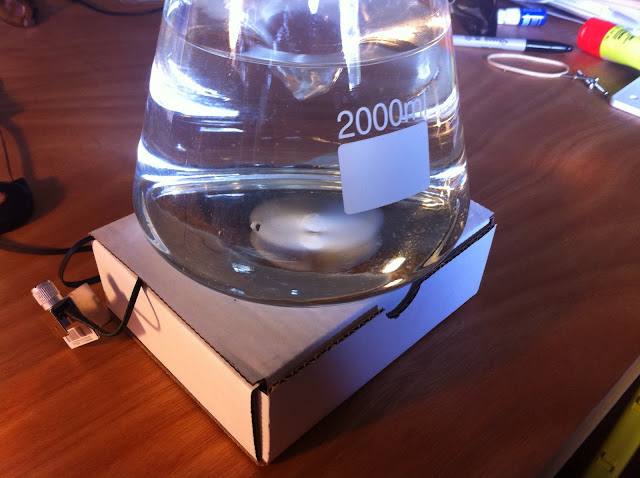
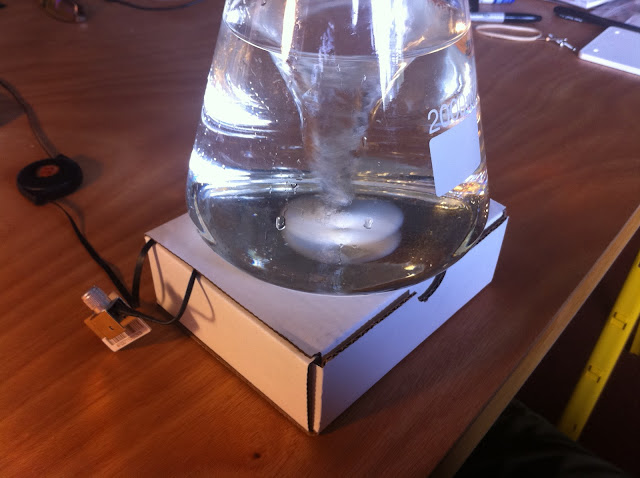
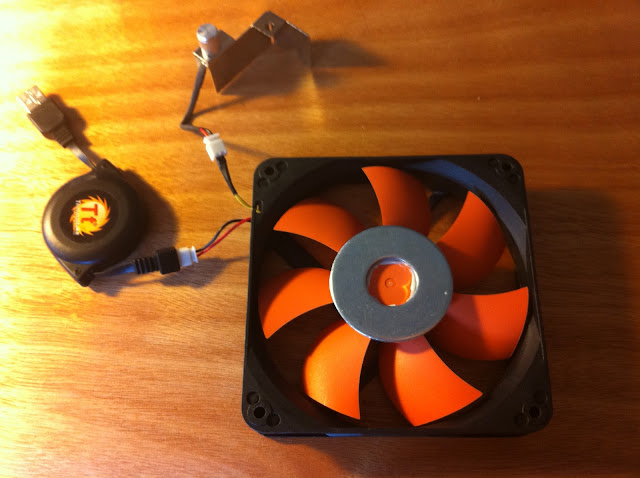
I know there are tons of stir plate build threads on here, but just wanted to share this fan I found on Amazon and see if anyone has tried using it. It is USB, so you could just use any of the myriad of USB equipped phone chargers to power it. It already has a speed control, so no wiring needed at all! Just would need to make a case that would leave the speed control knob accessible.

It's only $11.50 on Amazon

http://www.amazon.com/dp/B00080G0BK/?tag=skimlinks_replacement-20

51qK1C-adTL._SL500_AA300_.jpeg
 
Last edited by a moderator:
To poorly paraphrase Revvy,

"Don't ask what we think, Do it and show us how well it works!"

Honestly though, looks pretty badass with the retractable cable.....
 
To poorly paraphrase Revvy,

"Don't ask what we think, Do it and show us how well it works!"

Honestly though, looks pretty badass with the retractable cable.....

lol...acquiring a suitable fan is the easiest part of the project. Those fans do look promising and at a reasonable price as well.
 
I actually have a couple of those to cool a hard drive dock, actually.
 
lol...acquiring a suitable fan is the easiest part of the project. Those fans do look promising and at a reasonable price as well.

looks like with a bit of basic soldering you could move that adjustable knob to the outside of a box. If my other stir plate opportunity doesn't work I'll try this as well. :rockin:
 
ZOMG..... yes...

I think this is the answer to my overly powered 18V power supply and fan.

I have extra usb wallworts so this would be a simple plug in play.

now do I want to stay with a 80mm fan or step up to a 120.

I already have a hole cut in my box for a 80MM fan so I think I 120MM would need a new hole cut or new lid made.


which fan to get ?


-=Jason=-

IMG_20110625_135017.jpg


IMG_20110625_135029.jpg


IMG_20110625_135040.jpg
 
so what was the verdict did that fan work fantastic or what?


-=Jason=-

The fan is awesome. It's very high quality and works great. Much higher quality than you would expect for the price.

Been focusing on some other projects (fermentation chamber, greenhouse) and I haven't put it all together yet though. It's super hot here and I haven't been able to think about brew anything without a cool space to put my carboys.

One cool unexpected aspect of the fan is that the small control knob is only held on with one screw and can easily be moved. So when I get it mounted up, I'll move it to the edge of the mounting surface for easier access.

-Matt

awesome, how slow does the fan turn do you think my problem now is even at my slowest setting on my current setup its still to fast.

-=Jason=-
 
awesome, how slow does the fan turn do you think my problem now is even at my slowest setting on my current setup its still to fast.

-=Jason=-

I think this fan is going to work great. On the slowest setting there is hardly any air coming from it and you can barely hear it. I'm really stoked to get this going with the stir bar and see how it all turns out.

The side of the fan that I'm going to glue the washer to is even perfectly flat. This is going to be a piece of cake.

You've inspired me to get working on this, maybe I'll even try to get it going tonight.

Edit: Crap, can't find the washers. So annoying!
 
Put it all together in a make-shift setup. It was ridiculously easy. Took maybe 30 minutes all together. Going to build a better box, but thought I would share these pics.

Slowest speed:

IMG_0690.JPG


Fastest speed:

IMG_0687.JPG


Edit: That's a 2 inch stir bar. Worked first time flawlessly. Never threw the stir bar.
 
so I got my 80mm fan yesterday and just got it hooked up tonight..


ZOMFG..... this fan is exactly what you need.

**** that other DIY theard that requires trying to find a fan that will work with your power supply and Potentiometer. as seen in this thread here: https://www.homebrewtalk.com/f51/my-stirplate-cheap-easy-build-86252/


so don't waste any time at all, but buy this USB FAN with speed control and plug into one of your USB walworts im sure you have laying around the house.

-=Jason=-
 
Sure Westphalen, I was going to post pics of the whole process, but forgot. Here we go:

Shopping List:

The parts of the fan after it has been disassembled:
(I already glued the washer on here, pretend it's not there)

IMG_0683.JPG


The glue I used:
(It doesn't set immediately, this is useful for centering)

IMG_0689.JPG


Centering the washer:
  1. This is the same technique for centering a thrown pot on a potter's wheel for trimming.
  2. With the fan spinning, hold the pen steady and bring it towards the washer until it just touches.
  3. Turn off the fan and look where the mark is. If the mark is equal all around, you're done. If the mark is only on one side, nudge the washer in the opposite direction of the center of the mark.
  4. Repeat until the mark is equal all around.
IMG_0684.JPG


Affixing the magnets:
I didn't permanently attach the magnets because I wanted to allow for adjustments. I just put a drop of Loctite on the washer beneath each magnet. This worked so well that I didn't need to permanently attach them.​
IMG_0686.JPG


Et voila :rockin:

IMG_0687.JPG
 
Last edited by a moderator:
To poorly paraphrase Revvy,

"Don't ask what we think, Do it and show us how well it works!"

Honestly though, looks pretty badass with the retractable cable.....

+1,000,000,000,000

Too many possible innovations have been shot down on here before even getting out of the box by asking for people's opinions. No one ever thinks that some of the dissenting opinions could simply be based on being po-oed that they didn't think of it first.

An others are simply because some folks have an inability to think out of the box.

A good example is the Using a Pasta Maker to mill grain thread, the first few posts after the OP asked about it were shot down for "x, y, and z" reasons- couldn't be motorized, wasn't strong enough to crush grain- and I showed how they were used to condition polymer clay by jewelry artists which fresh out of the pack is much harder than grain, and how they were often motorized by the artists, once the nay sayers were shut down, folks had a hey day, and have come up with awesome innovations, and solved how to knurl the rollers. The poor OP saw the few posts and never bothered trying because of all the "experts" who said it couldn't be done- then was shocked several months later to see that it had.

Remember, at one point "scientists" were 100% postive the earth was flat, that the sun revolved around it, AND the bumblebees can't possibly fly.

That is one badass fan, now if you could also rig some sort of hydrometer probe that was also usb driven, you could spin your starters and monitor when it is ready as well.

:mug:
 
Absolutely fantastic. Thanks for the quick response.

Would this be an acceptable alternative to the out-of-stock magnets?

http://www.amazon.com/dp/B005HYCSLS/?tag=skimlinks_replacement-20

I haven't used any other sizes besides the ones I list here. Those are slightly smaller in diameter but I think they should work fine. I would probably go with these instead though just to be sure it works flawlessly. They are the exact same dimensions as the ones I have.
 
Last edited by a moderator:
Think the 80mm fan is fine, Flo? What size starter have you tried it in? Sorry, can't view your video here at work.

Going to jump on this and if the cheaper fan works adequately, then giggity.
 
iijakii said:
Think the 80mm fan is fine, Flo? What size starter have you tried it in? Sorry, can't view your video here at work.

Going to jump on this and if the cheaper fan works adequately, then giggity.

Makes 2L's just fine. I don't think it would have a problem spinning 5L.

-=Jason=-
Sent from my HTC Incredible using Home Brew Talk
 
Got my 80mm fans tonight and the stir bar, I think I will complete this over the weekend if all goes as planned. Thanks for the insight folks, CHEERS!
 
This is the exact thread I needed after getting some free glassware for making starters. On top of that, I've got an old desktop that I ripped the power supply box out of to make the perfect enclosure. Thermaltake fan ordered from Amazon.

Thanks all!

Oh and first post.
 
Just finished getting my 2 stir plates together and tested with water. I threw in some pepper so I could see how well it would suspend the yeast AND looks like it will work wonderfully! Just curious how to be sure not to drop the stir bar into the fermenter? I almost lost it down the drain when pouring out my pepper-water...


Also, I keep a magnetic wreath hanger (for a front door) in my brew box. That way if you pitch the bar in the carboy by accident, you can easily fish it up the side of the glass.

Well that answers that.... Pretty Slick!
 
Quick question...

I just picked up one of these fans, absolutely love it! My problem is that I used a magnet from a harddrive, and may have missed getting it exactly centered. I can't turn the fan very high without the bar being tossed. I think it works well enough, but don't like the idea that the it might toss the bar 5 minutes after I walk away.

Is it possible that the magnet is too far from the bar? Or do I need to pull the fan, find some way to unglue the magnet and try again?
 
What I did on mine, since the computer magnet was curved and difficult to determine the center, was I put my stir bar on it while positioning. I think it is more important to have it centered magnetically than by mass, so the bar spins around a point rather than a circle. The two centers may be the same or may not, I'm not sure. I eyeballed it this way and mine seems to work.
What you could do with yours is open it up and put the stir bar on it and see how it looks, maybe even turn it on. If it is noticeably off center then yeah I would unglue it and try again.
 
Sure Westphalen, I was going to post pics of the whole process, but forgot. Here we go:

Shopping List:

The parts of the fan after it has been disassembled:
(I already glued the washer on here, pretend it's not there)

IMG_0683.JPG


The glue I used:
(It doesn't set immediately, this is useful for centering)

IMG_0689.JPG


Centering the washer:
  1. This is the same technique for centering a thrown pot on a potter's wheel for trimming.
  2. With the fan spinning, hold the pen steady and bring it towards the washer until it just touches.
  3. Turn off the fan and look where the mark is. If the mark is equal all around, you're done. If the mark is only on one side, nudge the washer in the opposite direction of the center of the mark.
  4. Repeat until the mark is equal all around.
IMG_0684.JPG


Affixing the magnets:
I didn't permanently attach the magnets because I wanted to allow for adjustments. I just put a drop of Loctite on the washer beneath each magnet. This worked so well that I didn't need to permanently attach them.​
IMG_0686.JPG


Et voila :rockin:

IMG_0687.JPG
Matts, thank's for the fan link. I know this is an old thread but, I just received my fan after doing a stir plate search and your post seemed the easiest, so I purchased the 120mm fan when I received it today I quickly put it together to see how it would work. I had some 2" fender washers and some ceramic magnets around the house, I used a glass of water with a nail to see what it would do, it spun the nail but not with very a big vortex,I cant imagine it will do a good job when I use a heavier 2" stir bar and 2L flask which I have on order. I notice in your material list you used the same washer(you used the smaller fan), but you used Rare Earth Disc Magnets not the ceramic ones that I used, my questions are, do you think the magnets will make a big difference in performance ? Second question, do you think I should use a bigger washer to spread the distance of the magnets to get a better result? If there are any other suggestions you have I would appreciate them.

200_4704.jpg


200_4707.jpg
 
Last edited by a moderator:
Hi Junior. The rare earth magnets make all the difference. I don't think it will work otherwise, especially once your starter is full of yeast. I used the same 120mm fan as you. It still works flawlessly. Get the rare earth magnets and you're golden.

Edit: As for the washer, I don't think you should go bigger, just get smaller and stronger magnets.

Matts, Thank's for the fast reply and the good news about the magnet issue. I thought you purchased the smaller fan?
 
Matts, Thank's for the fast reply and the good news about the magnet issue. I thought you purchased the smaller fan?

Hi Junior, sure thing, glad to help. The first link I posted to start this thread had the link for the smaller fan, but then I found the larger one and went with that. I figured the larger unit would have more torque. Flomaster bought the smaller one and I think it's working for him.
 
Have a question, here is my prototype, would this work better with a hole cut into the base? Once again, thank's to all for the help.

200_4708.jpg
 
Have a question, here is my prototype, would this work better with a hole cut into the base? Once again, thank's to all for the help.

Junior, I like your design. Fans are designed to have air moving over the motor. In your design, the fan motor will get good ventilation for releasing heat. I didn't have a problem with this in my enclosed box, but I have wondered if the unventilated enclosure will shorten the lifespan of my fan.

You don't need to cut a hole in the top, the earth magnets' power will go straight through that cardboard. Even if you made it plastic or wood, it will still be fine.

Edit: One thing I would change is to figure out a way to get those mounting screws flush to the surface. You are going to want to get a good flask for your starters. They have pretty wide bases and won't be able to sit properly with those screws sticking out.

Matts, thank's for the quick reply. I plan on using some plexiglass I have laying around, I will also counter sink nuts,have a flush base for the flask. If you know,what would be the dimensions of the base that you would recommend for a 2liter flask?
 
Hey Matt's, Here is my latest version, all I have to do is get a piece of glass or plastic, I figure a piece 7"x7", for a 2liter flask. Once again, thank's for the link for the fan and all the advice.

200_4720.jpg


200_4721.jpg
 
Matts, final version, I am so anal.Once again thank's for the link for the fan, made this build easy for a handy but electrically illiterate brewer. Can't wait for my first starter attempt!
#1 Low
#2 High

200_4788.jpg


200_4789.jpg
 
Back
Top