My New Fermentation Cabinets

Homebrew Talk - Beer, Wine, Mead, & Cider Brewing Discussion Forum

Help Support Homebrew Talk - Beer, Wine, Mead, & Cider Brewing Discussion Forum:

This site may earn a commission from merchant affiliate links, including eBay, Amazon, and others.
Thanks. When I wired it up, I made certain to not bypass anything except the existing thermostat - specifically to ensure it would continue to be frost-free. So far there has been no noticible leaking out of either of them, although I haven't checked the drip pan to see how full they are, etc. I'll try to remember to check that out tonight.

The model I used is the 13.7 cu.ft. upright Frigidaire that Lowes sells.
 
That Hanna HI 190M stirrer is rated at 1 liter maximum. You don't have any problem stirring 2 liter starters with it?
 
Can I ask a really dumb question? :drunk:
...Why are you running starters inside of the fridge?
 
the freezer is controlled at ale or lager temps, so he would use the appropriate temperature (that he'd ferment at) to make the starter as well. You can let starters ferment warmer, but when you've got a nice controlled space, might as well make use of it.
 
Aha, I guess that makes sense. I never thought about the starter's temperature before. Huh. :D
 
theoretically you are going to decant the starter beer before use, so it can be done hotter than normal, but there's some debate on yeast mutation, etc. I would do this setup he has, but my ale freezer died on me. Mainly I'd do it to have them safely located and out of the way.
 
Thanks. When I wired it up, I made certain to not bypass anything except the existing thermostat - specifically to ensure it would continue to be frost-free. So far there has been no noticible leaking out of either of them, although I haven't checked the drip pan to see how full they are, etc. I'll try to remember to check that out tonight.

The model I used is the 13.7 cu.ft. upright Frigidaire that Lowes sells.

Have you noticed any temperature fluctuations when it goes into defrost mode?
 
Wow, I'm REALLY impressed with this thread. (as I am with all of John's creations). I just wish my tiny apartment could handle the fury of that much brew porn!
 
Have you noticed any temperature fluctuations when it goes into defrost mode?

None actually - I am currently just taping the temp probe against the side of the fermenator which I'm sure helps with any minute temp swings...

So far, I am really pleased with their performance. I can't tell you how much being able to precisely control fermenation temp has improved my beer...
 
Wow, I'm REALLY impressed with this thread. (as I am with all of John's creations). I just wish my tiny apartment could handle the fury of that much brew porn!

Just wait until I release my latest creation... I'll be ready to publically show it off and talk about it in another week or so.
 
What do you have your differential set to on the Love? Where do you have your probe?
Wiring? Bypass thermostat, Splice hot to 8, ground to 7, jump 8 to 10, 11 and 7 to compressor?

Thanks
KD
 
I run each of them with a 1 degree differential. The probe runs right next to the wiring for the controller. Right now, I am just taping it to the side of the fermenator. I haven't looked into it yet but I'd really like to put a thermowell in the fermenator...

These are apparently the new Love controllers as they required different wiring than my previous models. I'll go take a photo of the controller wiring here in a minute and post.
 
What do you have your differential set to on the Love? Where do you have your probe?
Wiring? Bypass thermostat, Splice hot to 8, ground to 7, jump 8 to 10, 11 and 7 to compressor?

Thanks
KD

Well, I just realized you didn't ask for the controller's wiring... duh. I unfortunately wasn't thinking when I converted them or I would have taken better photos of what I did to replace the thermostat. Basically all I had to do was find a common as the hot leg was already being switched by the existing thermostat.

On this freezer, the wires to the existing thermostat were blue and black. I tapped into a common, white wire to power the Love.

It was really quite simple...

Awesome. Thanks!
 
That looks great man! I have two questions for you. The first being what is the advantage of the love controller over an analog Johnson (besides looking nicer)? And secondly, I too have use the plastic sheeting in the inside of my mini fridge. My gasket seals nicely to the fridge, but I am now able to pull the side of the gasket away from door. I am not sure if yours does this as well, and if it even affects anything. I cut it with a razor knife and need to bring my dremel up to clean up the cuts but any input would be great! Hope this makes sense. Thanks!
 
I've never used the Johnson controller but I don't imagine it is precise as the Love. Also, the Johnson is made to just toggle the power running to the fridge / freezer and that is not the route I wanted to go with these as I didn't want to short circuit the auto-defrost, interior light, etc.

You can easily tell if the door is making a good seal if a slight vacuum is created inside the fridge / freezer and its a little hard to pull open the door. I haven't noticed any seperation and am definitely getting a good seal on the doors...
 
I see, thanks for the info on the controllers. As far as the door, it seals to the fridge fine (magnetic). It is the part that covers the screws that is a little loose. I have not noticed any air coming out between the door and the gasket, but the door is rather cool. Oh well. :mug:
 
I've written this up as an article for the next edition of Zymurgy. It is the same edition that BrewPastor will be in for his jacketed Conicals... Anyway, I took another picture of the love controller and thought I'd share. This is the newer Love controller. I have used a 3-conductor wire to run to the love controller. The white wire is used for the common, the black wire is used as the hot in from the source, and the green wire is used as the hot out to the compressor. Pretty simple...

DSC00618.jpg
 
Awesome stuff man, I can only dream of the day I need a conical :)

I actually just finished my keezer this weekend i'm just waiting on my love controller to come in the mail. I was going to mount in the collar but i'm afraid of the damp and cold conditions leading the unit to an early demise. Have you noticed any issues with this?
 
I've written this up as an article for the next edition of Zymurgy. It is the same edition that BrewPastor will be in for his jacketed Conicals... Anyway, I took another picture of the love controller and thought I'd share. This is the newer Love controller. I have used a 3-conductor wire to run to the love controller. The white wire is used for the common, the black wire is used as the hot in from the source, and the green wire is used as the hot out to the compressor. Pretty simple...

DSC00618.jpg

Looking forward to reading the article. Great stuff JB. I have spare Love that I need to wire into my freezer which is a slightly larger version of your Frigidaire.

KD
 
I've written this up as an article for the next edition of Zymurgy. It is the same edition that BrewPastor will be in for his jacketed Conicals... Anyway, I took another picture of the love controller and thought I'd share. This is the newer Love controller. I have used a 3-conductor wire to run to the love controller. The white wire is used for the common, the black wire is used as the hot in from the source, and the green wire is used as the hot out to the compressor. Pretty simple...

Would that be the November/December issue?
 
I received the Jan/Feb edition of Zymurgy today - my article is on pages 22-25. I think I did the project justice...

Just got my Zymurgy today, recognized the cabinets and who made them even before I saw your name. Congrats.
 
Got one of the fermentation cabinets finished this evening. I replaced the inner door with textured sheeting like in my walk-in cooler. That stuff is $30 per sheet and the freezer door is too large to cut two solid door panels out of one sheet - so I had to improvise and piece it together at the bottom.


John,
Where did you get the textured sheeting you refer to above?
Thanks,
JD
 
I found the sheeting today - thanks.

On the outlet you wired in the fridge, why didn't you use a GFCI outlet?

The compressor motor, when it starts, can draw enough current to trip the GFCI. This is why the refrigerator outlet is exempted from being connected to a GFCI in the NEC (In fact, I think it can't be a GFCI, but I am not an expert).
 
I believe he is talking about the outlet I used inside the freezer... no, I didn't even think about using a GFCI outlet but I don't think it would have fit as there wasn't much room in there to allow for it. The outlet has actually become pretty handly...
 
I believe he is talking about the outlet I used inside the freezer... no, I didn't even think about using a GFCI outlet but I don't think it would have fit as there wasn't much room in there to allow for it. The outlet has actually become pretty handly...


Yes - inside the freezer.

I have my freezer running with a Love two stage controller.
The reason I ask is I'm thinking about wiring two outlets inside the freezer.
Outlet one will be hot all the time (for stir plate) and Outlet two will be hot when my second stage controller turns it on (for heater).

I'll have to see if a GFCI outlet will fit there otherwise I might mount a box on the back side wall inside the freezer.

JD
 
Has anyone tried to do this now that these freezers have a computer pannel on the front? The problem I'm noticing is the auto defrost and the thermostat are altogether now on a computer mother type board. If you wire the love controller in after this board and leave everything else alone it will work. However the freezer goes into auto defrost after a designated run time on the compressor. by wiring the love in after the stock computer pannel the freezer's computer will think the compressor is on longer than it actually is and go into auto defrost mode much more frequently affecting the temperature. Any thoughts???
 
Has anyone tried to do this now that these freezers have a computer pannel on the front? The problem I'm noticing is the auto defrost and the thermostat are altogether now on a computer mother type board. If you wire the love controller in after this board and leave everything else alone it will work. However the freezer goes into auto defrost after a designated run time on the compressor. by wiring the love in after the stock computer pannel the freezer's computer will think the compressor is on longer than it actually is and go into auto defrost mode much more frequently affecting the temperature. Any thoughts???

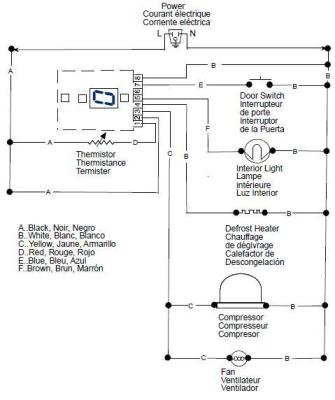
I was researching a similar question (adding a love temperature controller to modern freezer with thermistor, high temp. alerts, and defrost that interacts with its own electronic temperature control), and ran into your question. I have a Kenmore (Frigidaire) model with the following schematic.

The defrost cycle does kick on based on compressor run time, but it also appears to have a thermostat that opens the heater circuit once the evaporator temp reaches 40 degrees F. I'm hoping that means the defrost will still work, but will not really heat the freezer much at all.

Anybody see a problem with hooking the love controller switch on the yellow (C) wire, in between the freezer controller and the compressor? The high temp alert will always be on (unless the temp gets down to 23 F), but shouldn't everything else work like the ones done by John Beere?

frzr_schem_km.JPG
 
Thats look like the wiring diagram for the 13.7 fridgidare I was looking at, at Lowes. I was going to hook it up that way, and thats what prompted my question. I think using "A" to power the unit. Then cutting "C" and wiring it to go to the compressor from the new controler is the way to go. If you can't disable the "to warm alarm" I was thinking of disabling "D", but this would in essence remove the defrost feature..... but I'm not that worried about that. Sure I will cold crash the temp. to clear the beer but the majority of the time I should be in the 50 degree range.

Keep me informed on any progress you make I'm very interested and I'm sure others will be too.
 
I've been following this thread and thought i would ask for some help. I'm modifying a Frigidaire refrigerator and i'm confused about the red wire. I'm connecting the Love TS 13010 Can anyone help? This is a single door refrigerator that looks just like the freezer that John Beere has modified with the exception of the red wire. This unit has an external thermostat with a heater to operate the fridge when the ambient temperature falls below freezing. I hope the electrical diagram shows up on this post.

Frigidaire Refrigerator schematic.jpg
 
Well my Lowes had the frigidare 13.7 on close out so I got it about 100 bucks cheaper than it usually is. I was wondering about your progress. I have the plastic sheeting installed with the lower section of the door so the light goes on and off. I'm thinking about taking it off and digging into the foam near the bottom by the hinge. Hopefully this will allow me to splice into the wiring where it goes out of the bottom of the door to acess power, and the yellow compressor wire. What did you end up doing??
 
Well my Lowes had the frigidare 13.7 on close out so I got it about 100 bucks cheaper than it usually is. I was wondering about your progress. I have the plastic sheeting installed with the lower section of the door so the light goes on and off. I'm thinking about taking it off and digging into the foam near the bottom by the hinge. Hopefully this will allow me to splice into the wiring where it goes out of the bottom of the door to acess power, and the yellow compressor wire. What did you end up doing??

My plan has been to get another freezer to use as my real freezer and free up the 13.7 cu. ft. upright (the current "real" freezer) for conversion. Unfortunately, I've been traveling for the past several weeks and haven't been able to get the replacement freezer until this weekend.

I'm going to approach the wiring job from the bottom, back of the freezer since I should be able to tie into the main power and yellow switched power to the compressor without messing with the door. If everything works, I'll put the controller in the door (like the OP). Hopefully, I'll get some work done on it this week.
 
Back
Top