Checked gravity on 2 in primary.
You are using an out of date browser. It may not display this or other websites correctly.
You should upgrade or use an alternative browser.
You should upgrade or use an alternative browser.
What I did for beer today
- Thread starter iaefebs
- Start date

Help Support Homebrew Talk - Beer, Wine, Mead, & Cider Brewing Discussion Forum:
This site may earn a commission from merchant affiliate
links, including eBay, Amazon, and others.
Soaked off labels and washed bottles. Friend dropped of 2 cases of Fat Tire bottles. 4 went straight in the trash, I was not dealing with someones chew spit... rest got a 3 hour soak in hot water and PBW. One of my favorite bottles as far as removing labels. They float off. Also tossed in 6 Lift Bridge(Duluth MN) bottles, I had to use a razor blade to get the labels off those... since I doubt I will buy that beer ever again I won't have to do that again!
Importers in China put translated labels on the back of bottles that have a glossy coating (hard to soak) and glue that will be on this planet long after the cockroaches die out. I've found that when you've got difficult labels like that, giving them a bunch of random slits with a knife before soaking allows a much better soak and makes removing the labels a lot easier.
Alternately, if the labels have a thick but uniform sticky backing like Brewdogs beers, a regular water soak sometimes loosens them up enough to pull off in one piece while an Oxy soak often deteriorates them just enough that you have to pull them off in tons of sticky pieces.
Some labels are simply terrible, but for many it's just a matter of following the right strategy for the right label.
Picked up some super cheap Cascade hops of questionable origin and started two 1.2 liter side-by-side all-DME test batches to compare Yakima Chief cascade hops and these cheap ones. Had enough wort left over (by design) to mix the dregs of both in a third water-bottle fermenter and pitch some wild yeast I caught in a forgotten hydrometer sample a couple months ago. Let the party begin!
Brewing up a batch of a "clone" of a local traditionally brewed vienna lager. Guys at the local brew shop have been fine tuning a clone for forever and I'm making a batch with the latest untested tweak. Hopefully this one turns out well because I'm really looking forward to it.
ChelisHubby
Well-Known Member
- Joined
- Mar 29, 2014
- Messages
- 1,327
- Reaction score
- 276
Cold crash and Gelatin a batch and clean a keg with a few bottles too.
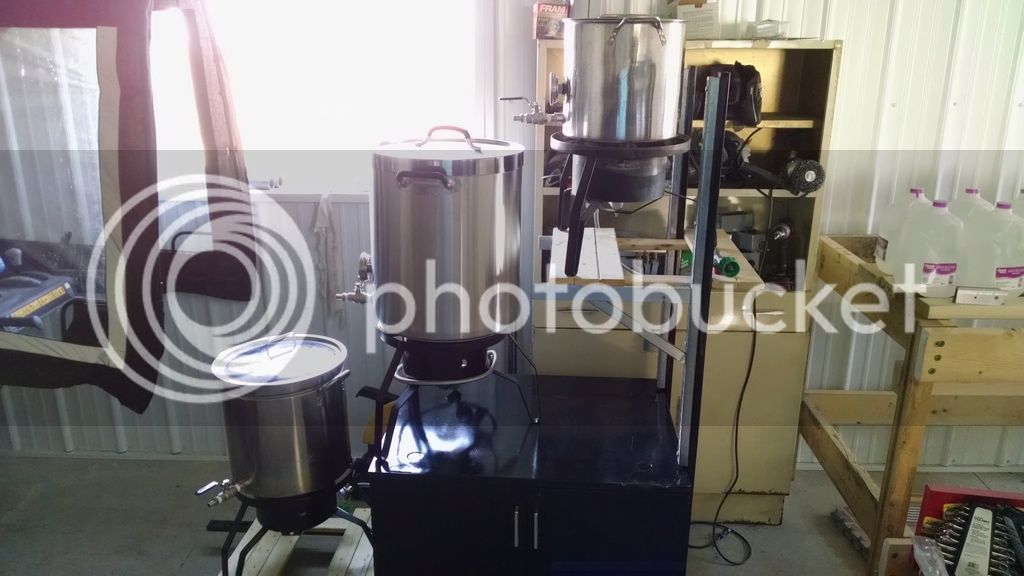
Made a mill table and storage center this morning
View attachment ImageUploadedByHome Brew1463863086.792503.jpg
Kegged two beers for local live pour comp
View attachment ImageUploadedByHome Brew1463863155.299541.jpg
My fav of the two is the golden stout the other is a peach beer that just didn't really come thru like I was wanting
View attachment ImageUploadedByHome Brew1463863193.277501.jpg
Peeling labels and cleaning bottles... Replanted hops... Long story.
Brewenstein
Well-Known Member
More work on the brew stand, built the burner shelves. I know those burners will heat the wood underneath them so I left a gap on purpose to help cool things. Need to bolt the lower one down after I decide if I need to raise it more so I can gravity drain to a bottling bucket. Upper shelf needs to be bolted down and I need 2 L brackets on the uprights for safety.
I'm trying to figure out some guy hasn't snatched you up! Great work!
I bottled off two kegs today to kill them. Then cleaned them up and kegged an amber and a mocktoberfest ale. My plan is to let the mocktoberfest sit in my keezer until September and start drinking it then. Not sure I will be able to resist for that long.
filthyastronaut
Well-Known Member
- Joined
- Aug 10, 2015
- Messages
- 529
- Reaction score
- 152
Bottled my Wit. I added juiced nectarines at flameout and left out any kind of orange peel, and I think it succeeded in imparting a stone fruit note in place of citrus.
Also brewed a White IPA bittered with Warrior, 5 oz. of Equinox in a theoretically 0 IBU hopstand at 170 degrees, which will be dry hopped with 3 oz. of Equinox.
Also brewed a White IPA bittered with Warrior, 5 oz. of Equinox in a theoretically 0 IBU hopstand at 170 degrees, which will be dry hopped with 3 oz. of Equinox.
MaryB
Well-Known Member
Drank a 6 pack... planted garden today and back is screaming at me!
Peruvian802
Well-Known Member
Kegged a lemon wheat ale that I came up with. Hopefully it will bring the sunshine back!
View attachment ImageUploadedByHome Brew1463948610.193974.jpg
View attachment ImageUploadedByHome Brew1463948610.193974.jpg
Stillraining
Well-Known Member
View attachment 355213
Bottled 50 bottles of my Cherry BMC clone. 4.6%abv. Nice and clean, crisp drinker. Can't wait for it to be carbed!
Hey Tactiacl:
I cant help but notice your caps don't look like they are fully crimped..You may want to recheck them...They look like long shoulder bottles but those crimps look like the ones I get when I try to cap shot shouldered bottles. Maybe its all in the camera lens distortion or something but they look incompletely crimped to me.
Yeastieboy
Well-Known Member
Hey Tactiacl:
I cant help but notice your caps don't look like they are fully crimped..You may want to recheck them...They look like long shoulder bottles but those crimps look like the ones I get when I try to cap shot shouldered bottles. Maybe its all in the camera lens distortion or something but they look incompletely crimped to me.
Looks to me like the photo is pre-crimp.
Tactical-Brewer
Well-Known Member
Hey Tactiacl:
I cant help but notice your caps don't look like they are fully crimped..You may want to recheck them...They look like long shoulder bottles but those crimps look like the ones I get when I try to cap shot shouldered bottles. Maybe its all in the camera lens distortion or something but they look incompletely crimped to me.
Looks to me like the photo is pre-crimp.
Yep, I snapped the pic before I crimped them. I was crimping and SWMBO was putting them away as soon as I was done. Little assembly line action going on :rockin: so I wanted to get a pic before they were all put up in boxes to carb up lol
Lets see, toasted 4 lbs of coconut to go in the coconut milk stout, put together a 6.5 gallon raspberry lime cider kit, fished the collar of my keezer, chaulkboard sprayed the top of the freezer, stained the collar, ran all the airlines, marked the collar for the shanks and then couldn't find a single freaking 1/4 inch drill bit in either of my 3 kits...the one thing i needed to do to finish today...who loses 3 drill bits in the same size
ChelisHubby
Well-Known Member
- Joined
- Mar 29, 2014
- Messages
- 1,327
- Reaction score
- 276
Brewed a bitter for a friend and kegged a blonde for me and a few bottles
losefreeze
Member
- Joined
- Jul 8, 2013
- Messages
- 13
- Reaction score
- 8
Tactical-Brewer
Well-Known Member
Oceantendency
Well-Known Member
Cleaned my new 10 gal SS Brew Tech kettle and polished up my old kettle to sell. Bought new copper tubing for new wort chiller.
PrairieDawg
Well-Known Member
Racked my Spruce Ale to secondary this morning.
Had a little sample. Seems to have the flavor profile I was looking for.
There is more than just a hint of the spruce taste.
I am going to pick some more fresh tips, vacuum pack, freeze and try this later in the fall again.
Had a little sample. Seems to have the flavor profile I was looking for.
There is more than just a hint of the spruce taste.
I am going to pick some more fresh tips, vacuum pack, freeze and try this later in the fall again.
Built two awesome homes for my hops.
I always feel good about the things I put together for my brewing until I come back on these forums and get completely shown up....
Looks great!
Today I placed the order for my next 2 batches.
Cream of 3 Crops &
None More Black
Should be here tomorrow some time according to the folks at ritebrew.com
going to be my first brews since January and I'm kinda jonesing for a brew day.
Cream of 3 Crops &
None More Black
Should be here tomorrow some time according to the folks at ritebrew.com
going to be my first brews since January and I'm kinda jonesing for a brew day.
losefreeze
Member
- Joined
- Jul 8, 2013
- Messages
- 13
- Reaction score
- 8
I always feel good about the things I put together for my brewing until I come back on these forums and get completely shown up....
Looks great!
I truly appreciate the compliment
philipCT
Brewniversity student
- Joined
- May 10, 2013
- Messages
- 771
- Reaction score
- 171
Built two awesome homes for my hops.
This looks. Really sweet. What kind of wood is that, looks like redwood? And what are the dimensions of the boxing wood on the bottom?
losefreeze
Member
- Joined
- Jul 8, 2013
- Messages
- 13
- Reaction score
- 8
This looks. Really sweet. What kind of wood is that, looks like redwood? And what are the dimensions of the boxing wood on the bottom?
I used the new weather shield pressure treaded wood safe for gardens. The dimension of each box base is 10w x 3d x 18 inch H. Boards for base were 1x6s. Each box will be filled with 12 inches of good gardening potting/top soil with 6 inches original clay underneath. The trellis is built with 4x4x12 poles buried 1ft into original clay, holes filled with rock and the will have the additional 12 inches of added soil. The headers are made of 2x8x12 boards that were dog eared on the ends. Beams were bolted in at base in 3 spots per with 3/8th lag bolts.
Still to be done is run horizontal balauster 2x2s across the top for horizontal support and growth for plants as well as fill boxes with dirt, run twine and plant hops and other assorted veggies.
philipCT
Brewniversity student
- Joined
- May 10, 2013
- Messages
- 771
- Reaction score
- 171
Winemaker brewing 1st batch of beer! Brewers best IPA... here we go with another brewdiction...
We welcome you (heh, heh, heh)
philipCT
Brewniversity student
- Joined
- May 10, 2013
- Messages
- 771
- Reaction score
- 171
Okay, so this is more of a what I did for beer this week kinda thing - busy week...
.
And I suspect I'm not done for the week yet")
.
- got ingredients for 10g Pilsener at the blessed LHBS
- made separate starters of the Wyeast Czech Pils and Wyeast Budvar strains
- brewed up 10g Pilsener wort and split into two 5g carboys in separate ferm chambers, pitched starters
- bottled 3 beers, 4 bottles each, packed and shipped to Ballast Point's OG20 competition
- bottled another 3 beers for a local competition at Cask Republic
- kegged a Robust Porter, ahem, excuse me, an American Porter, that had been aging in a 5 liter Bourbon barrel for a month
- ordered a roll of stickers with the beer label artwork as a freebie for the beer I'll be pouring at a fundraiser in 2 weeks
- ...and of course: kept the hops watered
And I suspect I'm not done for the week yet
Last edited:
philipCT
Brewniversity student
- Joined
- May 10, 2013
- Messages
- 771
- Reaction score
- 171
I used the new weather shield pressure treaded wood safe for gardens. The dimension of each box base is 10w x 3d x 18 inch H. Boards for base were 1x6s. Each box will be filled with 12 inches of good gardening potting/top soil with 6 inches original clay underneath. The trellis is built with 4x4x12 poles buried 1ft into original clay, holes filled with rock and the will have the additional 12 inches of added soil. The headers are made of 2x8x12 boards that were dog eared on the ends. Beams were bolted in at base in 3 spots per with 3/8th lag bolts.
Still to be done is run horizontal balauster 2x2s across the top for horizontal support and growth for plants as well as fill boxes with dirt, run twine and plant hops and other assorted veggies.
...and it looks like you stained it to get that redwood look - am I right?
I just found this weathershield stuff for sale at the depot and I was just about to build out a few new hops beds so thanks again for the timely post!
Kegged my Amber Hopper & brewed 6g AG batch of Kölsch. Cleaned up all the brew equipment.
Tactical-Brewer
Well-Known Member
Put some of the wild yeast sample in a starter I made up and on the stir plate. Hoping it takes off
losefreeze
Member
- Joined
- Jul 8, 2013
- Messages
- 13
- Reaction score
- 8
...and it looks like you stained it to get that redwood look - am I right?
I just found this weathershield stuff for sale at the depot and I was just about to build out a few new hops beds so thanks again for the timely post!
Didn't touch the wood outside of putting it together. The weather shield was that red in store.
MaryB
Well-Known Member
Put a coat of polyurethane on my burner shelves, cut back the bottom steel supports so just hold the burner... and added casters in case the weight makes them sag.
starsman20
Well-Known Member
MaryB
Well-Known Member
Second coat of polyurethane on the burner shelves. Bolted down the burner on the metal part of the stand and revamped how I mounted the casters so they were closer to ground contact.
And not beer but I enjoyed a fresh picked garden salad!!! First greens of the spring always taste so good! Thinned a few of the larger radishes and put them in it too.
And not beer but I enjoyed a fresh picked garden salad!!! First greens of the spring always taste so good! Thinned a few of the larger radishes and put them in it too.
Similar threads
- Replies
- 21
- Views
- 754
- Replies
- 89
- Views
- 3K
