Research/Industrial Style CFC

Homebrew Talk - Beer, Wine, Mead, & Cider Brewing Discussion Forum

Help Support Homebrew Talk - Beer, Wine, Mead, & Cider Brewing Discussion Forum:

This site may earn a commission from merchant affiliate links, including eBay, Amazon, and others.

GearBeer

Well-Known Member
Joined
Mar 4, 2008
Messages
727
Reaction score
4
Location
Clarkston, MI
This project was inspired by Bobby_M's Counterflow Chiller Tutorial.

Bobby's design is an example of a shell and tube heat exchanger. My main problem with the design is that the shell and tube (hose and refrigeration copper) are both pliable and, thus, subject to the effects of gravity. The resulting contact between the tube and the shell reduces the efficiency of the heat exchanger. My solution is to use 1/4" hard copper tubing inside 1/2" hard copper tubing.

I ran some computations based on this design, the excel sheet can be found here. These calculations determined the necessary chiller length to be 5.32 feet with the output water temperature at 96.8 degrees Fahrenheit. To ensure the temperature drops enough the design I'm making is significantly longer than 5.32 feet.

Assumptions and Notes: I took the starting temperature of the wort as boiling and the finishing as 70 degrees. The starting temperature of the water was determined using my brew thermometer in a bucket with water flowing into it. The water flow rate was also determined experimentally. The wort flow rate was assumed at 1 gallon/min. These calculations assume 100% efficiency and no fouling, so are not representative of real world function.

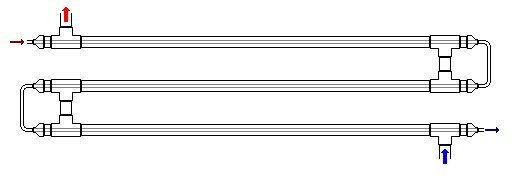
Here's a basic schematic of the design I whipped up in paint. The wort is traveling through the small tube in the center and the water through the shell. The small red arrow is wort in, the small blue arrow is wort out. Similarly, the large blue arrow is water in and the large red arrow is water out.

chillerschematic.jpg


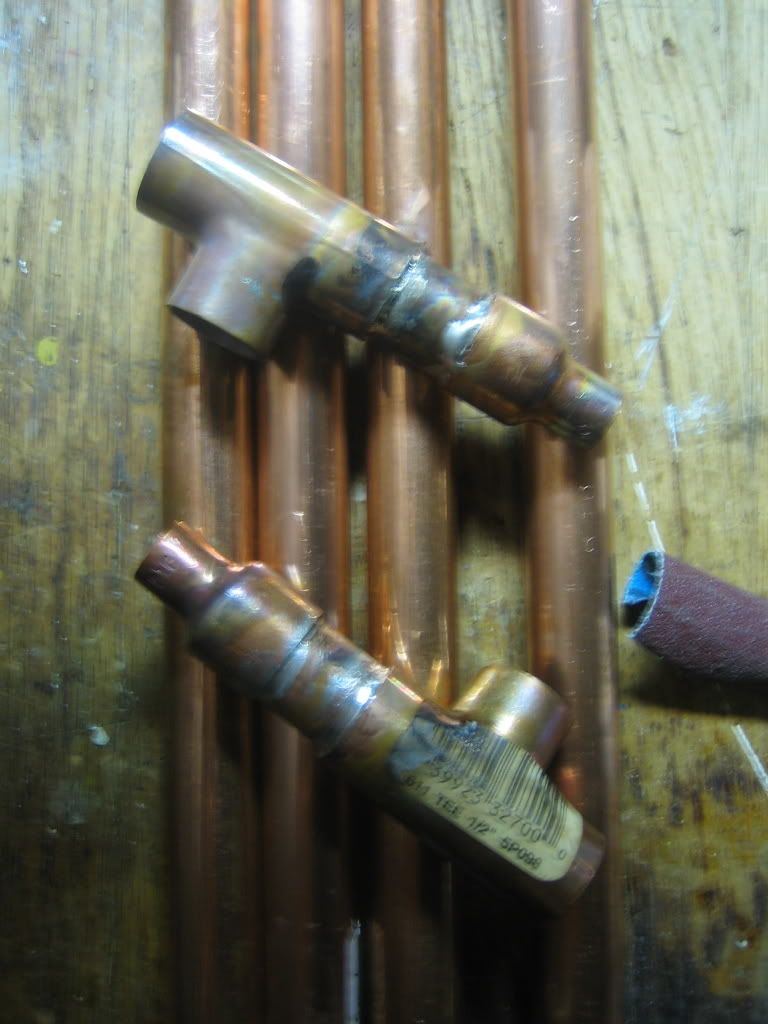
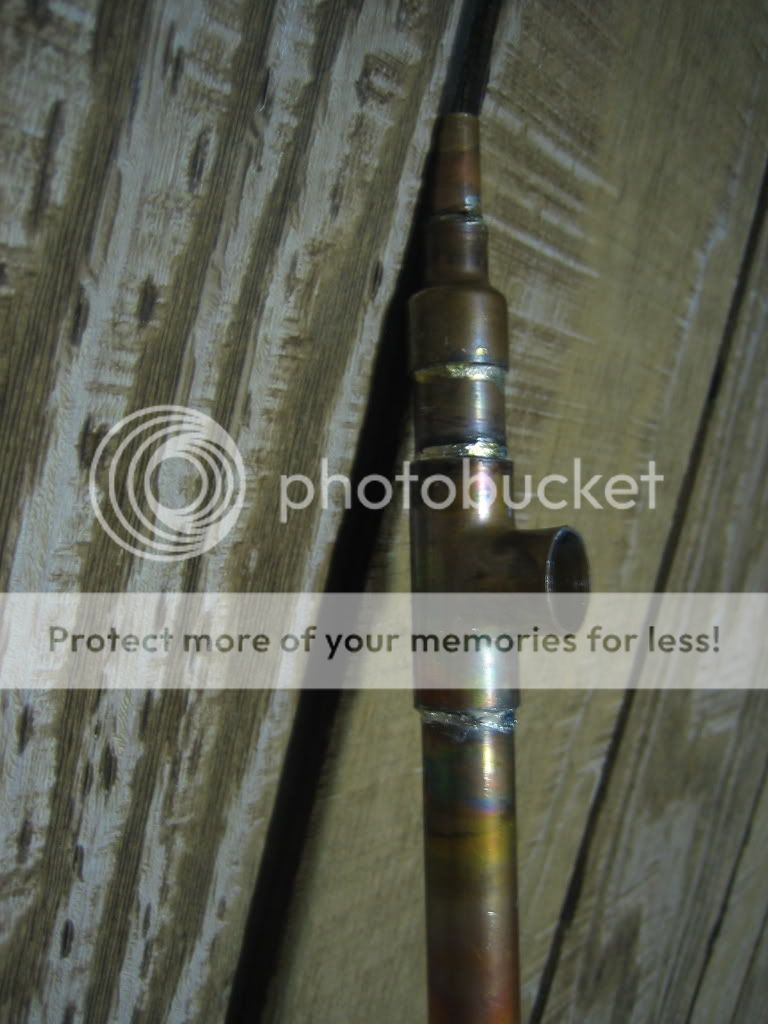
The end designs are identical to Bobby's (except he's a much better solderer than I am). They do have to be drilled out to so the 1/4" copper can be put through.

CFC-1.jpg


I ordered the 1/4" copper tubing in 10' lengths from McMaster. They were about $14 + shipping. The 1/2" copper came from Lowe's. If you can find 1/4" hard copper tubing locally more power to ya, but all my local plumbing places had discontinued it.

CFC-4.jpg


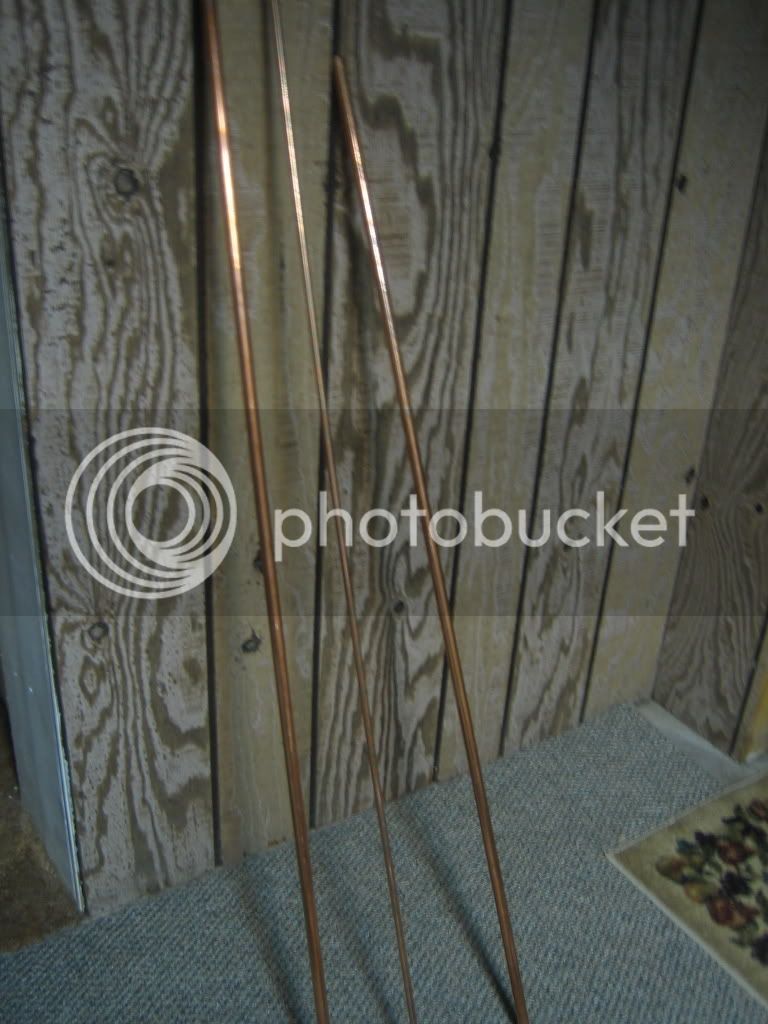
I cut the 1/4" copper tubing into 5' lengths and the 1/2" copper into 53" lengths. This leaves 3/4" on either end to attach the loops that take the wort to the next exchanger.

CFC-3.jpg


I'll post a BOM when I've finished the project, since the parts I need keep changing.

This design will be somewhat large but my intent is to mount it on my (eventual) brewstand.
 
I like the idea but at the same time wonder if an Ebay plate chiller might be close in price to the overall cost of the project. I actually found 3 lengths of 3/4" copper that someone threw on the curb (can you imagine that I came upon it before it was snatched up by the scrap metal lurkers)? I might try this using 3/8" pipe as the inner core as to increase the flow during cold tap water months. 1/4" is definitely restrictive (which is not always a bad thing).

I'd suggest coupling the individual runs with high temp hose instead of solid pipe only so you can occassionally run a long 1/4" brush though the tubing for cleaning.

Where are you going to mount this thing? I'd probably attach it to the bottom front of my brewstand. Let me know how it performs.
 
In theory, your design is all well and good, but in practice, you're probably not going to get to a real excited state when you use it. The 1/4" tubing is just too small to handle anything but finely filtered wort, under normal usage it's going to plug up and make your brew day pretty crappy (3/8" is prone to plugging). It seems like a lot of work to re-invent the wheel.
 
Nice find on the copper. I have at least three ratty small pickups up and down my street early on trash day.

I am a little worried about the flow through it since I'm going to be using a gravity syphon while I'm still extract brewing. Depending on how bad the flow is I may force it with a pump later. The reason I tried to keep the flow small was to increase the relative surface area. From an effectivity standpoint there shouldn't be any problem with the slow flow, since the "problem region" is between boiling and 70.

I don't have to worry too much about "cold tapwater months" because I'm on a well.

I've been considering what to do with the transitions for some time. My original intent was exactly as you said, to connect it using hard tubing. I got some soft copper tubing to make a neck so I can syphon from my 26 qt extract brewpot and I have more recently been considering making loops using that. However, you make a good suggestion with the high temp hose. Are there any common places to get that locally?

I agree on the mounting location. putting it on the front of the brewstand would offer relatively good access for operation and cleaning.

Regarding the cost of the project: it's probably going to be close, but I made this one myself. :rockin: (Not to mention your suggestion would offer a cleaning capability that the plate chillers can't offer.)
 
In theory, your design is all well and good, but in practice, you're probably not going to get to a real excited state when you use it. The 1/4" tubing is just too small to handle anything but finely filtered wort, under normal usage it's going to plug up and make your brew day pretty crappy (3/8" is prone to plugging). It seems like a lot of work to re-invent the wheel.
It sounds like we might have a confusion of terms here. When I say 1/4" tubing I'm talking about 1/4" ID tubing, which is 3/8" OD (the same dimensions as the tubing used in Bobby's coil design).

EDIT: However, you're probably right on the reinventing the wheel, but I'm not a practical person. Classic car rebuilders rarely are. :D
 
I think for brewstand mounting, this offers an advantage over my coil design. I can't leave it on the bottom shelf of the stand during flame on or I'd melt the hose.

The high temp stuff I'd use is probably either silicone or thermoplastic. Mcmaster sells them both as do online HBS.

I suppose you could also use compression couplings and use semi-rigid copper as the end loops but I think I like the idea of seeing the flow through a semi opaque tubing like silicone. The thermoplastic and copper is completely opaque.
 
It's been a while since I used my old CFC, so you guys can correct me if I'm wrong here...

I agree that there is going to be some efficiency loss due to the copper not being centered inside the hose in a typical CFC - but the typical CFC design (with somewhere in the ballpark of 25 feet of copper) is already so efficient that it can chill wort to within a couple degrees of tap water temp, which is just about optimal performance.

Therefore, further improving efficiency will really just allow you to make it shorter and achieve the same performance. Which certainly isn't an awful idea in general, but... How much shorter? maybe 20%? maybe a little more? For a typical CFC design, shaving 20% off the length would probably only cut about 5 feet - which would only cut the physical size of the chiller by an inch or two of height, and even with today's awful copper prices, could save you as little as $5. Sounds like a case of diminishing returns to me.

And that's when comparing apples to apples - when you factor in the fact that this straight tube system requires way more copper, it seems like it's bound to cost way more for the same level of performance.

Now, what Bobby just said about it being ideal for mounting on a brew stand makes a lot of sense - that's a pretty good justification, if that's your actual goal. And don't get me wrong - as an engineer, I can definitely see some appeal to building a more efficient chiller, even if it costs more and the actual performance isn't really any higher :)
 
The Tim Taylor in me is just picturing a 3 pass system of highly polished copper tubing mounted to the front of the ol' brewstand...Argh Argh Argh..

FWIW, the 25' CFC puts out wort that is about 1ºF higher than the incoming tap water, when both flows are maxed out so I see where Funken is coming from. If you can get that performance out of say 10' of centered copper, I'd say it's a winner. I've never considered chopping off a foot of my CFC at a time until I found the threshold between size and performance because it works fine for now.
 
The initial impetus for this project was the increased efficiency. Since then, the mounting advantages caught my eye and I'm really looking forward to seeing how slick my mounting strategy can be.

I jotted the calculations on a bar napkin and pitched 'em awhile ago but your number rings close, I think, about 20% efficiency improvement. The cost difference shouldn't be too severe, since the 1/2" pipe and the rubber hose are comparable. In the research I did it looked like rubber hoses were all upwards of $30 and the 1/2" copper pipe was ~$22/10'. The only rubber hose my Lowe's had in stock was ~$40/50'.

Really I just want to have something different. :D
That's why I own this:
BashattheBeach2007-42_sm.jpg
 
It was a non-original 360. It's a 74 that had the 318 two-barrel...ugh. I eventually sprayed it Plumb Crazy Purple and it just didn't have that same GRRRRR. I lost interest and sold it in a time of stupidity.
 
I used Bobbys tutorial to build my CFC, but made one small change that I think probably increased efficiency but have no way to prove it. before sliding the tube through the hose, I made small bends(no kinks) back and forth like a snake that couldn't be seen once the tube was in the hose. I felt that this would set up a more turbulent flow of coolant around the tube and also reduce the contact of the tube laying against the inside of the hose as it was coiled around the cornie. I haven't used it yet but am hoping to within a week.
 
I bribed my brother to make me the cfc from the tuturial. It's 30' of coper. I won't get to try it until I rig up a pump or figure something else out for it, but it's staring at me making me itch to use it.

I've got all my parts for the basic stand together, should start cutting and welding this afternoon.
 
Anything outside of my exact instructions will void your warranty. ;-)

The truth is, it's hard enough shoving the tube through the hose so trying to quasi-convolute the tubing is just extra work. If I'm getting wort out that is already within 1ºF of the coolant temp, I'd say any modifications would be very incremental (such as making it longer and possibly getting it to within .8ºF of the coolant temp).

I'm still trying to figure out what to do with this cool little coil...
coppercoil.jpg

coppercoil2.jpg
 
it's all copper, even the fins. I'm thinking post chiller in a bucket of icewater or instant hot water exchanger.

Back on topic... The more I think of gearbeer's idea, the more I want to build it.

Since I have 3/4" pipe already, I'm going that way with the 1/2" OD rigid copper inside.

5175K43
Copper Tubing for Drinking (Potable) Water Low Pressure Type M, 3/8" Tube Sz, 1/2" OD, 5'L
In stock at $10.95 Each

The Tees...
5520K131
Solder-Joint Copper Tube Fitting for Water Reducing Tee 3/4" Sckt X 1/2" Sckt X 1/2" Sckt
In stock at $1.98 Each The only side of the TEE I need at 3/4" is the side touching the Long runs. The coolant loops will connect with 1/2" pipe.

On the ends of the Tees where the wort pipe exits, I'll reduce the 1/2" down to 3/8" with these:
5520K237
Solder-Joint Copper Tube Fitting for Water Bushing Tube End(Male)X Sckt(Fem), 1/2" X3/8" Tube Sz
In stock at $0.96 Each

I might want to put something between the inner and outer jackets to create a slight turbulence in the coolant. Maybe I'll run a loose coil of copper wire.


The biggest problem I have is trying to decide if I should go for 2 or 4 passes. I want the coolant in/out to be on the same side of the stand.

One of the cooler things about the way that each pass is linked via an exterior tube is that you can add or remove passes to test the effect on the efficiency. Whoever builds it first can tell everyone else how many feet you need.
 
the tubing was easy enough to slip through even convoluted(I used the plastic cap that came on the tubing to prevent snagging and added plenty of dish soap to the hose). If I had known how well your standard chiller worked before I probably would not have bothered. live and learn.
So on the new style cooler, are you going to polish it and make it shiny?
 
Back
Top