Fermentation Chamber Build

Homebrew Talk - Beer, Wine, Mead, & Cider Brewing Discussion Forum

Help Support Homebrew Talk - Beer, Wine, Mead, & Cider Brewing Discussion Forum:

This site may earn a commission from merchant affiliate links, including eBay, Amazon, and others.

Flaviking

Well-Known Member
Joined
Apr 3, 2012
Messages
239
Reaction score
10
Location
Pompano Beach
So I am starting to brainstorm for my fermentation chamber. I have already bought and gutted a small Excellence mini Fridge.

I am looking for some help on this as it is my first go round and I am sure you experienced DIY'ers could tell me something I dont know that I don't know.

The plan is to immulate this Kelvinator box fridge. The bottom part will have a drawer that can hold two cases of bottled homebrew, the top portion will be shorter than that (around 34" tall x 35" wide) This should be large enough to hold two 6.5 gallon glass Carboys.

$(KGrHqF,!hkE8ke0CyvpBP8FjcfsG!~~60_3.JPG


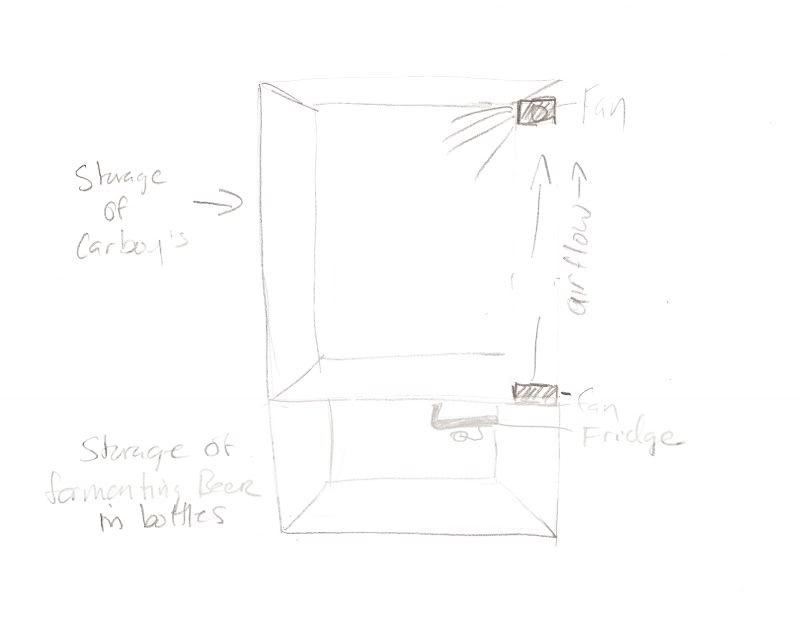
I want to have a two chamber temperature control (I think) using two ebay sc-1000 aquarium temperature controllers. One controller in the bottom chamber controlling the condensor, the second controlling the temp of the fermentation chamber by operating fans connected to the lower unit and pulling air up from the bottom.

Here is my very simple design:

scan0001.jpg


I know pulling air from the bottom is not the best idea, but I am concerned the condesor I have is not long enough to reach the top as its very short., And I am not sure I want to mount it on the upper side of the unit.

The whole thing will be insulated with 2" foam board.

Please let me know if you think this is just a flat out terrible idea, or if you have any ideas you think would work better.

Thanks in advance!
 
Hi

The gotcha is going to be getting the two STC-1000's to play nice with each other. You want the compressor to be on when the fans are on. The compressor may also be on when the fans are off.

Bob
 
Hi

The gotcha is going to be getting the two STC-1000's to play nice with each other. You want the compressor to be on when the fans are on. The compressor may also be on when the fans are off.

Bob

Yeah,

I am thinking maybe its best to just use one STC-1000 that controls both the fans and the compressor and locate it in the actual fermentation chamber. That should keep the bottom portion cooler than the top, which is what I want anyways. Kind of a Rich uncle of fermentation chiller approach.

I got the base built yesterday and I am fitting the compressor and heat coils tonight, then hopefully finishing it this weekend or next. Does anyone have any good ideas for how to move the cold air?

What fans work best? I was thinking of getting some insulated HVAC conduit and attaching it from the bottom of the bottom portion to the top of the top portion on the outside, as I have some space in the back to tuck it into. Not sure if this is the best plan though.
 
Hi

If the gizmo is in an inhabited area, you want quiet fans. Newegg sells a lot of different computer fans pretty cheap. Get some that are rated below 30 dba (20 if you are picky). Fans > 120 mm seem to be the best bet to move enough air quietly.

Power them up off a anything that supplies 12VDC. Any old wall wart that will put out an amp will run far more fans than you will have.

Since the fans are at 12V and the compressor is at 120V, you either will need to run the wall wart off of the switched juice or have an extra relay to switch the other voltage.

You might consider trying a setup where the "upper" controller runs both the fans and the compressor. Let the "lower" controller just run the compressor. With enough fiddling of set points and cut in / cut out's it could be made to work.

If you are planning to vary the temperatures a lot and want accuracy in both chambers, I'd drop the STC's and just get one of the fancier control cards. It'll save a lot of frustration ....

Bob

Would something like this work?

http://www.ebay.com/itm/100-240V-AC...r_Supplies&hash=item2ebe8174f1#ht_3539wt_1185
 
Hi

Looks fine to me. There *might* be another one out there for 50 cents less...:D. One amp is more than you need, but you can't get much cheaper than the one you found regardless of the current.

Bob

I actually found a old 12v that was used for a comcast cable modem or something...

So I think I am heading back to the drawing board here.. not really sure what to do.. I was thinking having the cooling coils in the actual fermentation chamber would give me the most accurate temperatures.. and at the end of the day, that is what I am most concerned about.

I want to keep the bottles cool during their bottle conditioning, but fermentation is the top priority ( I can always store the bottles elsewhere),. And I think if I cool the top chamber, it will be much easier to draw air from there into the lower chamber and keep the top chamber at the most accurate temperature.

This way, Ill have the STC-1000 operate both the compressor and the fan and that should keep both chambers at the same temperature.
 
Just ordered the STC-1000.. Found one calibrated to Ferenheit...

Man... Saturday can't get here soon enough!!! I want to get building again!!!
 
Just ordered the STC-1000.. Found one calibrated to Ferenheit...

Man... Saturday can't get here soon enough!!! I want to get building again!!!

Hi

It can be a STC-1000 *or* it can run in F. It can't be both :D:D:D... Which one did you get?

Bob
 
Hi

No idea what STC stands for.

The gotcha with the one you grabbed (at a *very* good price) is that it's either heat only or cool only (one set of control contacts). I'd bet a warm beer :drunk: it's heat only. It also only runs in 1F steps which isn't quite as fine grained as the 0.1C steps on the STC. I like to tweak things...

My guess is that the 5A contact rating in the spec is actually incorrect and that its really rated for 15A at 110V. I'd tear it open and check the relays before I ran it over 5A though. They pop open easily enough.

Bob

Interesting... I live in Florida.. So I am really only concerned with cooling.

How can I tell if it is 5A contact ratings? What is that? and why do I need it?

I'm ok with a 1F degree steps.
 
Never mind I ugooglized it..

So.. how can I tell if its 5a or 15a will they be labeled as such?... Should I just send it back if they are indeed 15a?
 
Hi

Ok, your compressor (or what ever) pulls power from the wall. There's likely a label on it that tells how much. A small fridge likely pulls 1 or 2 amps. A 7 or 8 cube freezer might pull 5 amps. You want the contacts on the relay to be rated to handle more current than your load will pull. Running a 10 A load on 5A contacts is a bad idea. Running a 10A load on 40A contacts is just fine. The relay inside the controller is labeled with it's current rating.

Based on the description of the controller, I suspect it's heat only. It probably does not have a compressor protection timeout.

From past experience - It's going to cost you almost as much in postage to send the gizmo back as you paid for it. After sending it back you may / may not ever see the refund. As it is it's very useful as a thermometer...

If you are doing ales, you may be doing fermentation up in the 60's. That may or may not work in mid winter.

Bob
 
hey Bob,

So this is the manual they sent me. You think its a croc? Sound like you can use it for heating and cooling.


THERMOSTAT MANUAL
Technical parameters:
◆ Temperature measuring range:-58℉~194℉
◆ Temperature controlling range:-58℉~194℉
◆ Temperature measuring difference:±1℉
◆ Resolution: 1℉
◆ Accuracy: ±1℉(-58℉~70℉)
◆ Sensor type: NTC(10K/3435)
◆ Power suppler:110VAC
◆ Power consumption:<3W
◆ Relay contact current:Rated 5A
◆ Data retention:YES
◆ Operating temperature:32℉~122℉
◆ Storage temperature:14℉~140℉
◆ Size:78X71X29mm(L*W*H)
◆ Weight:110g
Instructions:
Indicator Status Description:
The left side of screen WORK lights as working lights use,flashes to indicate cooling or heating delay,LED light is that cooling or heating work。
Display as the left set of the SET indicator light use, LED light is that in the set state.
Function:
Press the RST key to open the thermostat, running, press the button for 3 seconds, turn off the thermostat.
Cooling and heating functions:
Cooling mode: When the measured temperature value ≥ set value + hysteresis, start out, the relay; when the measured temperature ≤ the set value, turn off the output relay off.
Heating mode: when the measured temperature value ≥ set value, turn off the output relay is open; when the measured temperature ≤ Set value - hysteresis, start the output relay.
Cooling and heating mode settings:
Press SET button and hold more than 3 seconds,enter the menu display, the screen appears HC code, Press SET button to display mode, press ▲ or ▼ to adjust the display, C said cooling mode; H said heating mode.
Hysteresis function:
Hysteresis setting limits the maximum interval between the engine off, this machine off on a minimum interval between 1 ℃, up to 16 ℃.
Hysteresis settings:
Press SET button and hold more than 3 seconds to enter the menu displayed, use ▲ or ▼ transferred to D code screen appears, press the SET button to display the hysteresis set value, press ▲ or ▼ to adjust the parameters.
Temperature calibration settings:
Press SET button and hold more than 3 seconds to enter the menu displayed, use ▲ or ▼ transferred to CA code screen appears, press the SET button to display the correct temperature setting, press the ▲ or ▼ to adjust the parameters.
Delay protection function:
In the cooling mode, the first power, when the measured value is higher than the difference between set value + return start immediately when the machine is not cooling, set the delay time required to run the machine to start cooling; large interval of two adjacent cooling start in delay time, the machine immediately starts cooling, cooling the two adjacent intervals is less than the delay time starts when the machine needs to run the remaining delay time to start cooling. Delay time from stop instant starts. Heating mode, cooling mode with the same delay.
Delay protection settings:
Press SET button and hold more than 3 seconds to enter the menu displayed, use ▲ or ▼ transferred to PT Code screen appears, press the SET button to display the time delay protection settings, press the ▲ or ▼ to adjust the parameters.
Upper and lower functions:
HS and LS control setting limits set point temperature range, for example: HS is set to +15, LS is set to -10, the temperature set point can only be between -10 and +15, -10 when the press when the display ▼ key to display the value is still -10 and will not fall; When the +15 when press ▲ key to display the value is still +15 and not rise. If set point is outside this range need, you must first change the value of the HS and LS can be achieved.
Upper and lower limit settings:
Press SET button and hold more than 3 seconds to enter the menu displayed, use ▲ or ▼ transferred to HS or LS code screen appears, press the SET button to display the upper or lower limit set value, press ▲ or ▼ to adjust the parameters. HS said cap. LS said lower limit.
Menu code selection:
Symbol Details Setting range Factory settings Unit
HC Heating/cooling H/C C
D Return difference setting 1~30 15 ℉
LS Min.temp.set value -58~194 -58 ℉
HS Max.temp.set value -58~194 194 ℉
CA Temp. calibration -12~+12 0 ℉
PT Delay time 0~15 10 Minute
Fault tips:
◆ When the sensor is disconnected, the display shows --- and sound an alarm, and close the heating wire.
◆ When the sensor detects the temperature lower than -58 ℉, shows the LLL.
◆ When the sensor detects a temperature higher than 194 ℉, shows the HHH.
Caution:
◆ Heating, cooling load must not exceed the output contact, or may cause machine damage and cause a fire.
◆ A variety of connection wires and terminals connected to pressure well, otherwise, will cause the machine reliability.
◆ Be sure to separate power wiring, relays, sensors, otherwise it will damage the machine.
 
Hi

That looks like it will work. I have not seen that version before. The other single output ones are heat only.

Bob
 

Latest posts

Back
Top