Canning Starter Wort

Homebrew Talk - Beer, Wine, Mead, & Cider Brewing Discussion Forum

Help Support Homebrew Talk - Beer, Wine, Mead, & Cider Brewing Discussion Forum:

This site may earn a commission from merchant affiliate links, including eBay, Amazon, and others.

joety

Supporting Member
HBT Supporter
Joined
Oct 28, 2008
Messages
1,401
Reaction score
21
Location
Germantown Wisconsin
I'm sure this has been covered to death, but my search skills must be lacking.

My M-I-L cans tomatoes, jelly, peaches, relish and other things using a hot water bath system consisting of an aluminum pot and rack. She does not can beans because she does not have a pressure cooker to do it without fear of botulism.

Is it possible to can jars of starter wort in this manner or do I need to have a pressure cooker.
 
A pressure cooker is the way to roll.

Wort isn't sufficiently acidic to use water-bath canning methods.
 
I can starter wort all the time. And I don't even use a hot water bath.

My Processs:

Prep Yeast Nutrient 30 min:
  1. Harvest the trub from the bottom of secondary (primary often still contains hop bits, refrigerate your trub in a sanitized jar if you are not going to proceed with the remaining steps at this time).
  2. Clean all mason jars. Rinse off with hot water.
  3. Pour boiling water over the lids and let sit while doing the rest of the steps.
  4. Boil trub for 10-15 minutes with a crushed Once a Day multivitamin.
  5. Pour the boiling slurry into warm mason jars. (Mason jars won't crack when you pour boiling liquid in them.)
  6. Place lids on immediately and tighten.

The lids should autoclave by morning (I usually do this in the evening).

Once the jars are cool, if the lid pops when you press on it, it did not autoclave. If you are using new lids with nice rubber seals and the liquid was boiling when you poured it in, and you tightened it down nice and tight it will autoclave. I have never had one not autoclave.

You now have bottled yeast nutrient. If you have enough slurry you should be able to boil and bottle 1 gallon or 8 pints in about 30 min.

(This yeast nutrient is good for cooking as well as using in starter wort. It has a flavor similar to Maramite, and contributes the Umami flavor the MSG is used for, with out the MSG.)

Make starter wort: This is the easiest way...
  1. Wake up and make yourself a nice cup of tea. Boil the water in an electric water kettle. (easy)
  2. While the water is heating up wash your bottles and get them ready. My tea kettle holds about 1.5 qts. so I usually prepare 2 pint bottles, or 1 quart bottle.
  3. Place your lids in a shallow bowl.
  4. Open up a bottle of yeast nutrient (shaken), and fill 1/4 cup nutrient per pint.
  5. Add your sugar. LME, DME, Rice Syrup. Using the yeast nutrient, I have good results using 1/2 cup plain white/or brown cane sugar per pint. (easy) (If you don't use the yeast nutrient cane sugar does not have all the food yeast need, you will get under productive yeast if it even works at all. I think it is always best to use yeast nutrient when making starter.)
  6. If you want you can put one or two hop pellets in the jar too.
  7. While your tea is steeping and the water is still boiling hot pour some of the hot water over the lids in your shallow bowl. (I know that tea is best steeped below boiling, but for my extra black, extra strong, extra cheap morning brew it works for me. For my finer teas I use the correct steeping temperature.)
  8. Fill your mason jar(s) leaving 1/4 to 1/2 inch at the top.
  9. Take the lids out of the hot water, use a fork if you don't want to burn your fingers.
  10. Put the lids on and screw the rings down really tight.
  11. Shake vigorously to mix up the sugar and yeast nutrient.

By the time you are done with the wort your tea will be ready to drink.

Congratulations you have just canned your starter wort, and made your morning cup of tea!

By evening the lids should be autoclaved. (If they don't autoclave you don't have sterile wort, and you will need to boil it up on the stove and try again.)

Using the wort:
The nutrients the yeast need are soluble, so when the wort cools the sediment at the bottom of the jar is not needed. I usually decant off the clear wort for my starter, but have not had problems or weird flavors by putting the sediment in, so if some of the sediment gets in don't worry.

Using the above process I am able to work the canning of sterile wort into my morning routine without using up any more time than I otherwise would have by stirring my tea bags while they steep.

I have not had any of my canned wort get crazy and start growing weird things in it, but if it does, dump out that bottle and get a good one.
 
Slouch, you are no slouch. Impressive 5th post. I am assuming I can replace the tea with a breakfast stout, right? :mug:

I'll likely be doing something similar to this once I am at a more permanent residence and not moving ever 4 months or so.
 
Hmmm, so all I have to do is pour the boiling wort into the jars (sterilize lids first) and let them cool? I will probably just add my yeast nutrient crystals to the boil with a little hops. I'd like to use grain instead of extract, so I'm planning to do 20 quart jars at once.

Also, I would prefer to be able to just crack a jar, empty it into my sanitized flask, and pitch the yeast without boiling. I assume this is still possible.

Yup, that sounds like you have it!
 
Hmmm, so all I have to do is pour the boiling wort into the jars (sterilize lids first) and let them cool? I will probably just add my yeast nutrient crystals to the boil with a little hops. I'd like to use grain instead of extract, so I'm planning to do 20 quart jars at once.

Also, I would prefer to be able to just crack a jar, empty it into my sanitized flask, and pitch the yeast without boiling. I assume this is still possible.

Yes I would say so.

There are a lot of posts on this subject, and many people like to use a pressure cooker. I am not saying you shouldn't, but I just like to do things the easy way.

With the above technique, I have had wonderful results.

Other posters talk about the need to pressure cook to avoid botulism... I am not doing five gallons at a time and letting it sit for a year. Nor, am I making slants with it. I keep a mother yeast culture around in a glass gallon jug, which I feed once a week or so to keep it active. Then I make a starter from the mother. I can have a quart ready by the next day. No pressure cooker, no microwave. Just my morning cup of tea (morning stout ok too).

I keep 5 or 6 strains active using this method. The wort I add is sterile, and there is always alcohol present in the mother when I add more food, so I have never had a bacterial infection. I have kept wild yeast out by working in a clean, sanitized environment with no drafts when working with the mother.

If the mother ever did get contaminated for some reason, I could start up from a slant, or pick up another vial of original strain from the brew shop.

Also, as I mentioned in post above, if you want to increase the acid level just to be extra safe so you can store the wort for longer periods of time, just put a few hop pellets in the jar with the sugar and yeast nutrient.

Here are some threads to do further reading.

https://www.homebrewtalk.com/f13/canning-starter-wort-110835/
https://www.homebrewtalk.com/f39/canning-wort-133640/
https://www.homebrewtalk.com/f14/pressure-canning-wort-right-123695/
https://www.homebrewtalk.com/f11/pressure-canning-wort-49561/
https://www.homebrewtalk.com/f13/pressure-canning-starter-wort-75748/

(And remember... If the lid is bloated, or pops when you press it dump it out. This method has very little time investment, and if you use cane or beat sugar, is very cheap. Dumping a suspicious bottle should not be stressful. Just add it to the garden.)
 
Well, I ran out before the Packer Game and picked up a 16 quart pressure canner for $60 at Walmart. It can hold 7 quart jars, same as the 23 quart which is just taller, and without spending a lot more money that's about as much capacity as you can get.

I will probably be making a year's worth of starters today so I might as well be safe about it.

Now I gather from other posts that a preboiling the wort is not necessary if you don't mind a little hot break in your jars when they are done pressure cooking.
 
Starter Wort.jpg

Ok, here are the step by step instructions I followed for anyone else who may find this link.

  • Make 5 gallons of wort - I used 10 lbs of grain (you could probably get away with 8)
  • Wash mason jars; fill w/ warm water
  • Pour out water; add 1/4 tsp of yeast nutrient, fill to neck with wort (1 inch head space)
  • Wipe brim of jars with a damp cloth
  • Fingertip tighten the lids
  • Place jars in pressure cooker
  • Add 3 qts of boiling water (you can add 2 tbsp of vinegar if you want to avoid water stains)
  • Close cooker; heat on high until steam starts to vent
  • Steam moderately for 10 minutes
  • PLace the weighted regulator on the steam vent stem set for 15 psi (for my cooker that is fully weighted)
  • Heat on high to medium high until regulator begins to rock
  • Pressure cook for 15 minutes adjusting the flame so that the regulator rocks moderately. On my stove's largest burner, that's just below medium-low
  • Remove cooker from burner and place on hot pad to cool. Do not use a wet towel to hasten the cooling. This could lead to boil overs in the jars inside as the pressure would change too quickly.
  • After the pressure lid lock drops (about 45-50 min), remove the regulator and allow to stand for 10 more minutes
  • Remove jars and fully tighten lids; allow to cool on a towel on countertop.

The water remaining in the pressure cooker was still crystal clear even though there was a moderate wort smell, therefore I think I avoided any serious leakage from the jars. As you can tell, the wort carmelized a bit from the extreme heat. The jar on the far left is the before picture.
 
slouch, you have intrigued at least a few of us with your techniques. can you elaborate on your experiences using table sugar and homemade yeast nutrient in order to make a starter? some say that your method might condition the yeast to prefer simple sugars instead of maltose, possibly resulting in stuck fermentations. do you ever encounter this?

also, regarding your mother culture: its a gallon jug--do you cover it with an airlock/blowoff or can it be as simple as a piece of foil? when you feed it, are you using the table sugar/yeast nutrient mixture?

thanks much
 
I have never had a problem with yeast sticking up their noses at maltose simply because the had sucrose for their last meal. With the cost comparison of sucrose to maltose or other sugars, I would be really surprised if the yeast suppliers were raising their yeast on maltose.

I have only had stuck fermentation a couple of times. Adding more yeast has always solved the problem.

For the Mother I do keep it under air lock since it is a long term storage, and sometimes I am not around to feed it again before the activity dies down. I think the foil method would be fine for the starters made from the mother.

I use the white/brown table sugar and yeast nutrient almost exclusively to feed the mother and the starters. It's cheap. It let's me recycle my trub and produces lots of yeast. I never have to feel stingy with my pitch rates.

I brew only once or twice a month, and with six mothers active at any one time a single mother could have been growing for 3 months before I use it to make a starter.

With this technique the starter is not used to grow more yeast, simply to make it active. You you put the full amount of yeast you want to pitch into the starter along with a pint of new food. You can do this the night before, or if you mash you can start it up before you mash and let it activate while you mash, boil, and cool.

Feed the mother at the same time you make a start and you are on your way to more yeast.
 
It was brew day yesterday, and I took some photos of my yeast mother, the start I made, and the fermenting wort 12-18 hours later.

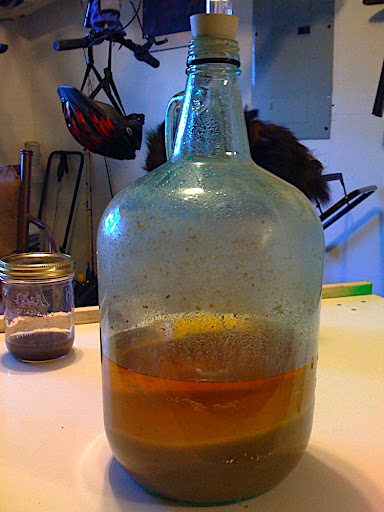
Yeast Mother that has settled and cleared for several days after feeding.
IMG_0592.JPG


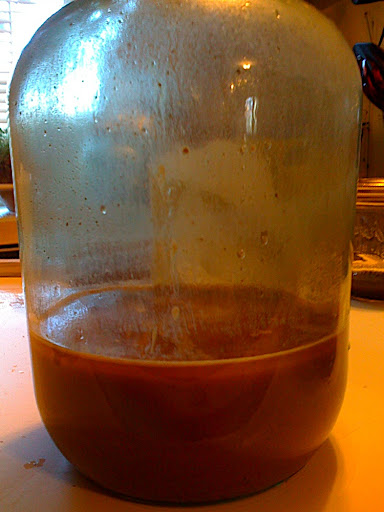
Yeast Mother that has been swirled up ready to make a starter, and receive a feeding.
IMG_0593.JPG


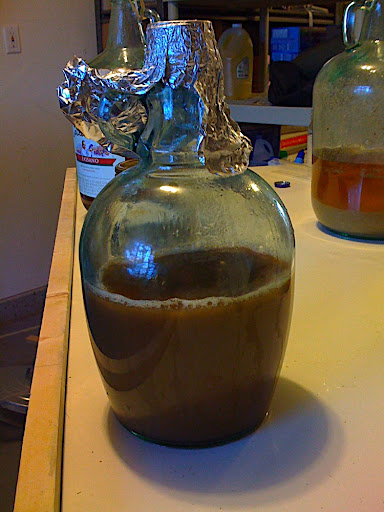
Yeast starter: In a sanitized bottle, added 1 pint of sterile wort, and about 1-2 pints of yeast from the mother. The aluminum foil on top has been sanitized as well. I use Star San for my sanitizing rinses.
IMG_0595.JPG


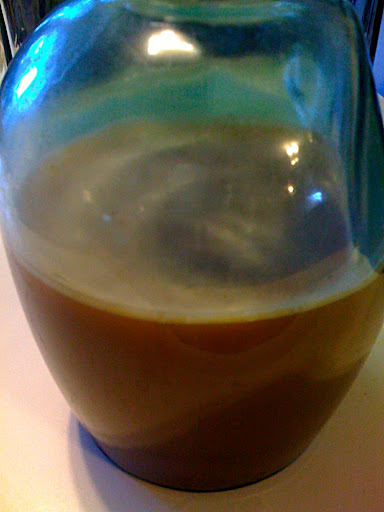
Kreusen on the starter after several hours. I began the starter around the same time as the mash, and this photo was take toward the end of the boil.
IMG_0596.JPG


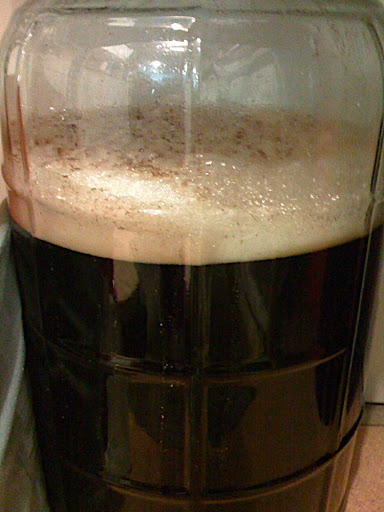
This is half of a 10 gallon batch of stout. I poured half the starter in here, and half in the other carboy. I pitched the yeast in the evening around 8:00 pm, and this is the next day around noon.
IMG_0599.JPG


Here is the link to the full gallery.
 
slouch, you have intrigued at least a few of us with your techniques. can you elaborate on your experiences using table sugar and homemade yeast nutrient in order to make a starter? some say that your method might condition the yeast to prefer simple sugars instead of maltose, possibly resulting in stuck fermentations. do you ever encounter this?
thanks much

That's the part I would question also. Am I to assume everything I have read previously in the many books and articles on using sugar to make starters with is wrong?
 
That's the part I would question also. Am I to assume everything I have read previously in the many books and articles on using sugar to make starters with is wrong?

Well, I am not sure what you have read, and so I am not going to say it is wrong. I am only saying what I am doing, and the pictures show the results of healthy fermentation. (any one know why they are only links and not full size pics?)

My understanding is that yeast will pretty much eat any kind of sugar they can wrap their little bodies around. I have never heard or read that feeding them one type will make them not like another type.

What I have heard/read/experienced, is that simple sugars do not have all the nutrients yeast need to live. This is why mead needs yeast nutrients; honey is also too simple of a sugar for the yeast to grow healthily.

Dead yeast contain most if not all the nutrients live yeast need to live. This is the reason I make my cast off yeast into nutrient. (you can also use it to cook with) By adding all the nutrients, vitamins, minerals, proteins, etc to the sugar (table sugar, honey, rice sugar, malt, corn sugar, whatever you have on hand) you are providing the fuel, as well as the building blocks the yeast need to grow.

I am only relating my own experiences here. If you have a process in place and it works keep using it. If you want to try the techniques I am using – make up a mother, feed it, make a start and try it in a batch of beer, or split a batch if you don't want to commit a full batch.

I love to read about yeast ranching and brewing, baking, etc, but at the end of the day I am a pretty experiential learner. So all I can say is try it. If it works for you great. If not... well... it is working for me, so I am going to keep doing it.
 
slouch, thanks for the updates. I very rarely secondary now (thanks to this forum of course) but I will surely harvest that trub next time.

the brewer I was six months ago would be put to shame by the brewer I am now, all because i discovered this forum last month.

cheers to learning somethin new everyday, all in the pursuit of making good beer!
 
It was brew day yesterday, and I took some photos of my yeast mother, the start I made, and the fermenting wort 12-18 hours later.

Yeast Mother that has settled and cleared for several days after feeding.
IMG_0592.JPG


Yeast Mother that has been swirled up ready to make a starter, and receive a feeding.
IMG_0593.JPG


Yeast starter: In a sanitized bottle, added 1 pint of sterile wort, and about 1-2 pints of yeast from the mother. The aluminum foil on top has been sanitized as well. I use Star San for my sanitizing rinses.
IMG_0595.JPG


Kreusen on the starter after several hours. I began the starter around the same time as the mash, and this photo was take toward the end of the boil.
IMG_0596.JPG


This is half of a 10 gallon batch of stout. I poured half the starter in here, and half in the other carboy. I pitched the yeast in the evening around 8:00 pm, and this is the next day around noon.
IMG_0599.JPG


Here is the link to the full gallery.

Quoted to get the pictures to show up (give it a few weeks and a few more posts, and your pics will show up without my help).

A brew buddy of mine always cans about 8 big jars of his wort. It amounts to at least a gallon so that he can make a big lager starter for his next batch (he ONLY brews big batches of German-style lagers). IIRC, he just puts hot wort into Mason jars, lids them up, and stores them in the fridge.
 
Back
Top