
Over the past few months I have been building up my equipment. Now with a keggle and HLT with SS valves, a cooler-MLT. All with QD hoses. Working towards more automation.
I now find myself at the stage of wanting to brew indoors. Where I live it can easily get down to -40°C in mid-January. So, I am looking to e-brewing.
I currently brew 5 gallons or less and don't really foresee 10 gallon batches. I just can't drink that much beer!!
In general, I know I have to choose between 240v and 120v. I am choosing 120v.
Please correct me or add to anything in the following:
1. The circuits in my new panel all have 15A circuits; thus, I will call the electrician in to add a couple of 110v 20A circuits. It will be a small job since the room where I will brew has the electrical panel in it.
2. Since the circuits will be new, I will have the electrician install GFCI sockets. Are they sized somehow?
3. In theory, using these two circuits, I should be able to use two 120v 2.4kW threaded elements for the BK (120v x 20A x 2 circuits). In practice, likely two 2kW elements to bring it to a boil and one to maintain the boil. It seems I should use low-density elements to prevent overheating wort. I will use a third element in the HLT, though not at the same time as the other two unless I have a third 20A circuit.
4. Installing the elements into the BK (SS keg) and HLT (aluminum turkey fryer). I don't have the elements yet, but it seems they are 1" threads, come with a gasket but no SS nut. Would HD carry such a nut? Or Fastenal? Do I also need a silicone o-ring on the inside of the pots?
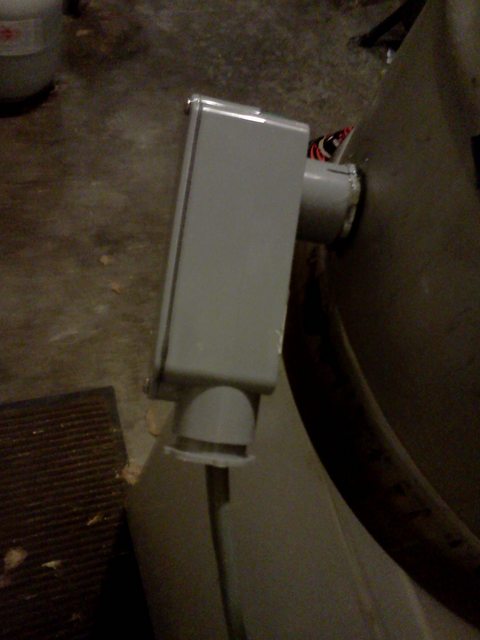
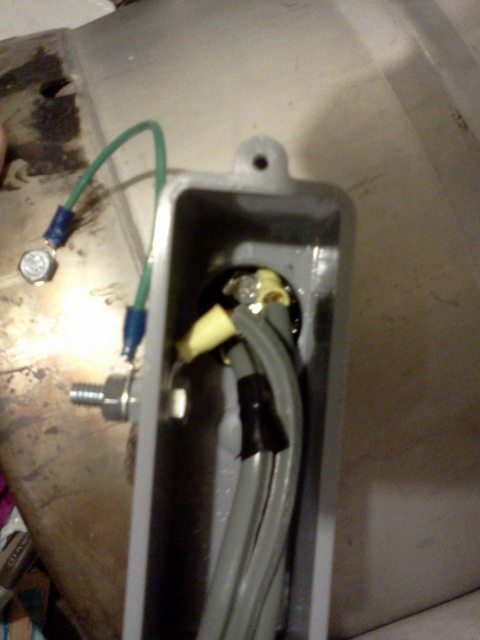
5. Wiring the elements. Since I will have the GFCI sockets where I'll plug in the cords for the elements, am I good to simply wire the elements to the proper gauge cable, attach an outdoor box around the leads to prevent water leakage to the wires, and attach the ground in the cable to the outdoor box? And to ground the keggle/HLT do I make sure the outdoor box is metal and touches the SS or aluminum to make sure the ground is continuous? Is that covering all grounding issues?
6. At the moment I want to be able to control the elements by either plugging/unplugging or with an appropriate in-line switch. Does that mean what people call PID or SSR are not yet needed?
The combination of electricity and "just enough knowledge to hurt myself" make me want to cover all of the bases. I have been reading threads on HBT and all over the net, but I don't seem to be able to find a thread of what I would like to do.
Please advise.
Thanks.
B
I now find myself at the stage of wanting to brew indoors. Where I live it can easily get down to -40°C in mid-January. So, I am looking to e-brewing.
I currently brew 5 gallons or less and don't really foresee 10 gallon batches. I just can't drink that much beer!!
In general, I know I have to choose between 240v and 120v. I am choosing 120v.
Please correct me or add to anything in the following:
1. The circuits in my new panel all have 15A circuits; thus, I will call the electrician in to add a couple of 110v 20A circuits. It will be a small job since the room where I will brew has the electrical panel in it.
2. Since the circuits will be new, I will have the electrician install GFCI sockets. Are they sized somehow?
3. In theory, using these two circuits, I should be able to use two 120v 2.4kW threaded elements for the BK (120v x 20A x 2 circuits). In practice, likely two 2kW elements to bring it to a boil and one to maintain the boil. It seems I should use low-density elements to prevent overheating wort. I will use a third element in the HLT, though not at the same time as the other two unless I have a third 20A circuit.
4. Installing the elements into the BK (SS keg) and HLT (aluminum turkey fryer). I don't have the elements yet, but it seems they are 1" threads, come with a gasket but no SS nut. Would HD carry such a nut? Or Fastenal? Do I also need a silicone o-ring on the inside of the pots?
5. Wiring the elements. Since I will have the GFCI sockets where I'll plug in the cords for the elements, am I good to simply wire the elements to the proper gauge cable, attach an outdoor box around the leads to prevent water leakage to the wires, and attach the ground in the cable to the outdoor box? And to ground the keggle/HLT do I make sure the outdoor box is metal and touches the SS or aluminum to make sure the ground is continuous? Is that covering all grounding issues?
6. At the moment I want to be able to control the elements by either plugging/unplugging or with an appropriate in-line switch. Does that mean what people call PID or SSR are not yet needed?
The combination of electricity and "just enough knowledge to hurt myself" make me want to cover all of the bases. I have been reading threads on HBT and all over the net, but I don't seem to be able to find a thread of what I would like to do.
Please advise.
Thanks.
B

 What can silicone do to any metal?