Advice needed on brewstand design

Homebrew Talk - Beer, Wine, Mead, & Cider Brewing Discussion Forum

Help Support Homebrew Talk - Beer, Wine, Mead, & Cider Brewing Discussion Forum:

This site may earn a commission from merchant affiliate links, including eBay, Amazon, and others.

jangevaa

Well-Known Member
Joined
Nov 22, 2010
Messages
251
Reaction score
74
Location
Guelph
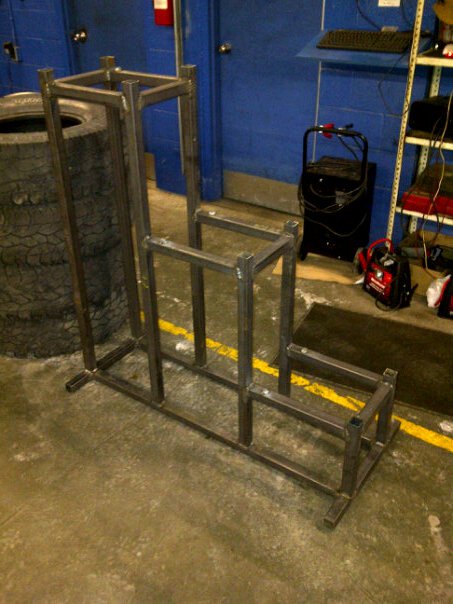
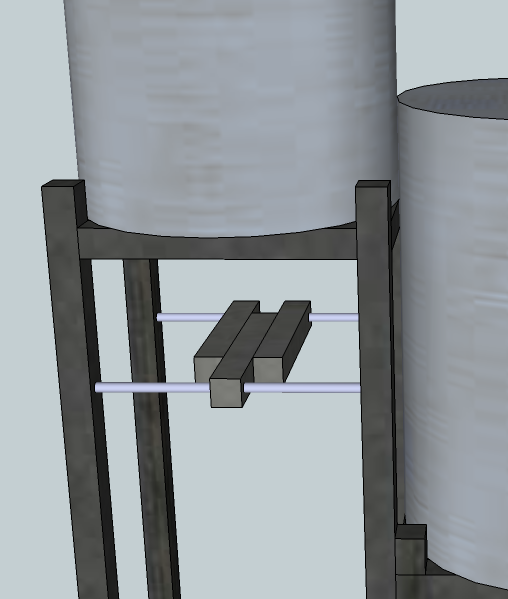
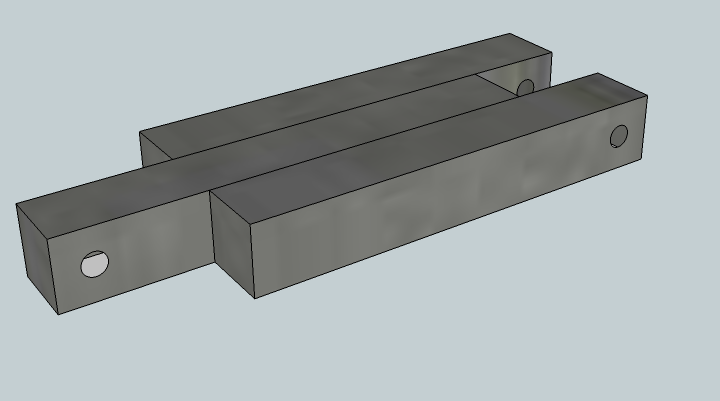
Hello hello. I will start to build a brew stand in the next 2 weeks or so, and have came up with the following design:


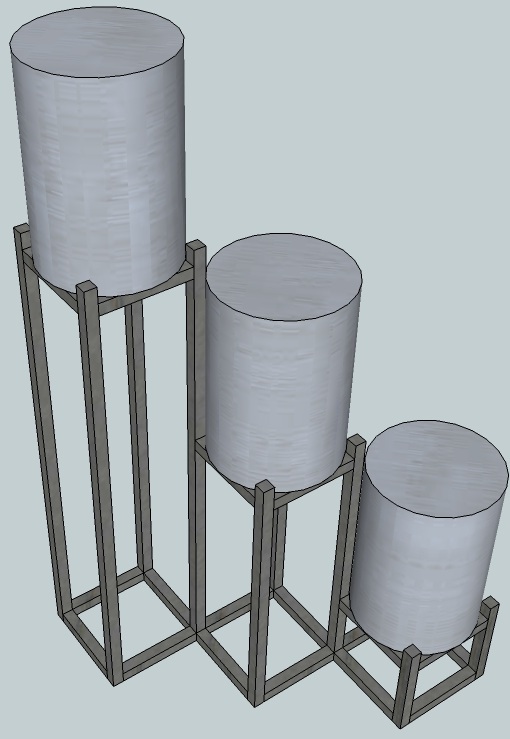
I have never seen any designs which are aligned 'diagonally' like this. I wanted to come up with a design where I could fit my keggles in between 4 corner posts such that they would be somewhat secure.

My questions:

Does this design look unstable or weak? I figure I could build it, and easily add reinforcement if it were. I am also considering adding a basic platform which would allow me to step up to manage my HLT, which could increase stability if necessary. This design uses 1.5" square steel. What gauge do you think I could get away with?

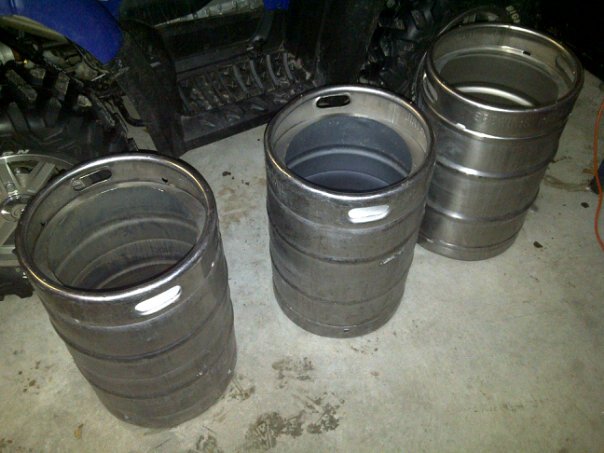
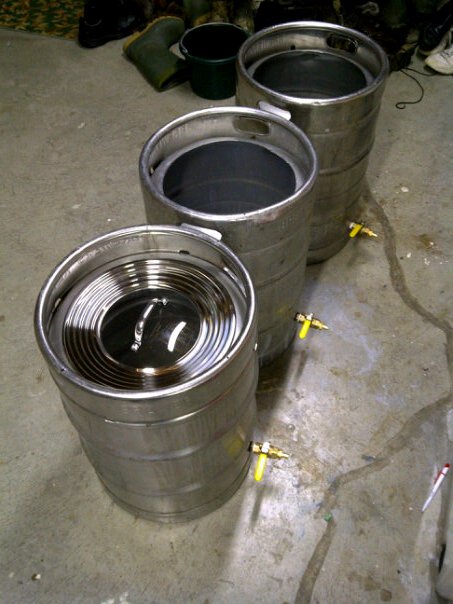
Secondly, if the height, thus materials could be reduced, that would be nice. This also would increase stability. I am wondering how much height is required between tiers to produce adequate siphon action/flow rates. This system will be used to do 10 gallon batches. I should've went out to the garage to measure my kegs, but I just figured they were 16 1/8th" in diameter and 23 3/8" in height as I found somewhere on the web, for the purpose of drawing out my idea.

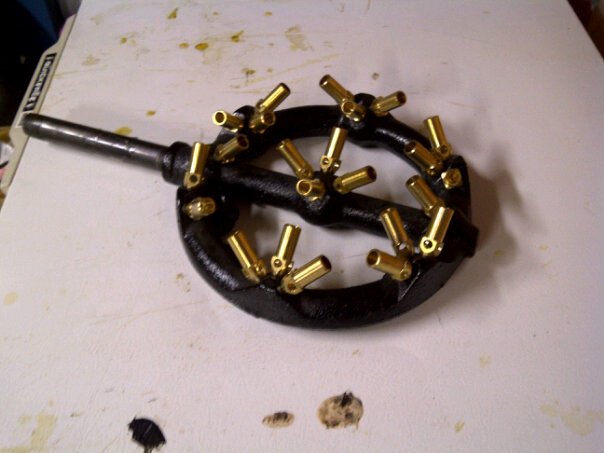
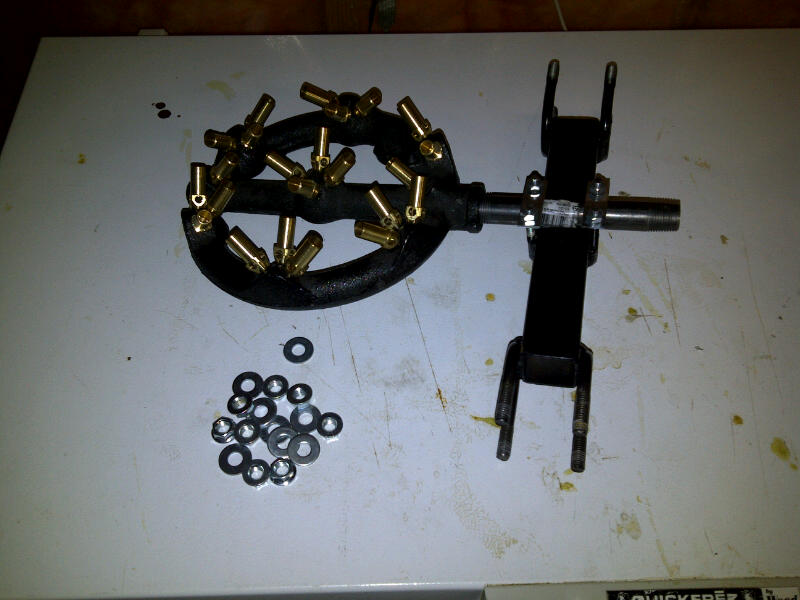
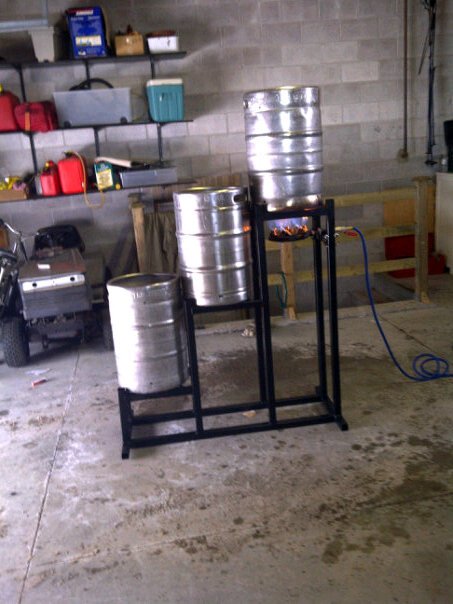
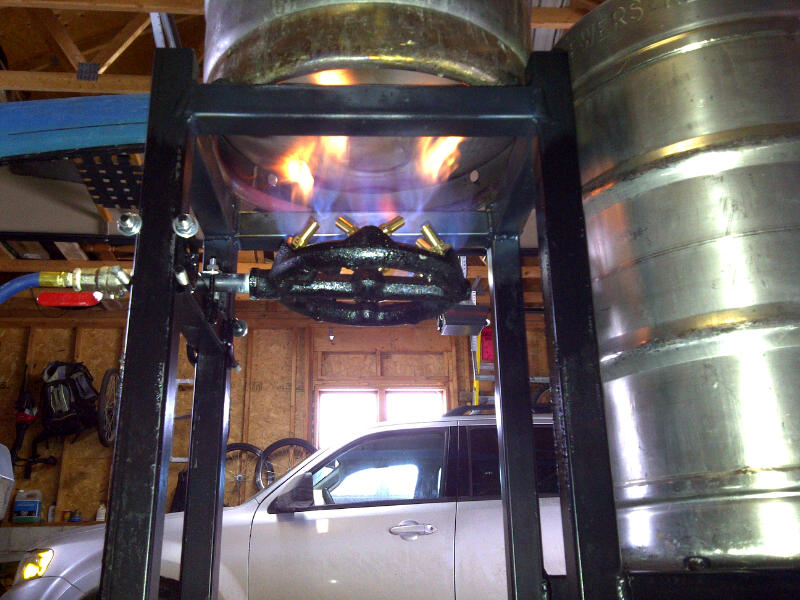
I also plan to reduce the entire overall height when my burner arrives and I can see better what I am working with/how much clearance from the ground I can get away with on the lowest tier. I am going to try to use just one burner, which is movable between the tiers. It'll be connected (after a length of pipe) to a flexible hose. I was having trouble finding a natural gas burner in Ontario for a reasonable price, and combined shipping rates for ordering multiple burners from the states were not good enough for me to go out and buy 2 or 3 at the same time (and I am trying to keep costs down!)

Anyways! I appreciate any of your advice. I am sort of head in the clouds type and come up with these ideas which are not always the greatest, lol. At least I tend to structure my ideas such that they are flexible!
:mug:
 
Nice work on the model. The diagonal layout is rather odd which means you do well thinking outside of the box (inside the diamond? haha!). You can surely have the four posts to secure your kettles with a traditional rectangular design. To do this, keep the HLT tier the same and only two posts protruding for the MLT and BK. The uprights will keep the kettle from falling towards the higher level.

As far as your elevation is concerned, consider what most don't. Your HLT should drain completely empty if the hose is routed to a level at least below the bottom of the kettle. That said, you can lower the bottom of the HLT to the lowest liquid level in the MLT! For me the highest 'lowest level' in my MLT would be about 3/4 full. So, the HLT can be positioned about 3/4 up from the bottom of the MLT.

The MLT is the same in relation to the BK. I always have at least 3 gallons (on a ten gallon batch) of liquid left over in the MLT. Including the spent grain, the liquid level in the MLT after the sparge is about 1/4 full AT LEAST. That said, it would be best to position the bottom of the MLT 3/4 up from the bottom of the BK.

With this method, you can get at least 1/2 a kettle in height savings. You coulld save a little more by lowering your MLT a few more inches below the 3/4 BK height, but its hard to say what your pre boil levels will be depending on a lot of things.
 
IMO the design looks good. I would think that it will be pretty stable on its own but you may need to add some diagonal braces in the HLT tier for lateral stability. You'll know better once it's all welded together. The layout should work just fine. As far as overall height is concerned, my system is all gravity with the HLT completly above the MLT which is completely above the BK. This way I'm always assured of completely draining one vessle into the next.

Good luck with the build.

Beach
 
Nice work on the model. The diagonal layout is rather odd which means you do well thinking outside of the box (inside the diamond? haha!). You can surely have the four posts to secure your kettles with a traditional rectangular design. To do this, keep the HLT tier the same and only two posts protruding for the MLT and BK. The uprights will keep the kettle from falling towards the higher level.

As far as your elevation is concerned, consider what most don't. Your HLT should drain completely empty if the hose is routed to a level at least below the bottom of the kettle. That said, you can lower the bottom of the HLT to the lowest liquid level in the MLT! For me the highest 'lowest level' in my MLT would be about 3/4 full. So, the HLT can be positioned about 3/4 up from the bottom of the MLT.

The MLT is the same in relation to the BK. I always have at least 3 gallons (on a ten gallon batch) of liquid left over in the MLT. Including the spent grain, the liquid level in the MLT after the sparge is about 1/4 full AT LEAST. That said, it would be best to position the bottom of the MLT 3/4 up from the bottom of the BK.

With this method, you can get at least 1/2 a kettle in height savings. You coulld save a little more by lowering your MLT a few more inches below the 3/4 BK height, but its hard to say what your pre boil levels will be depending on a lot of things.

Thank you for the advice! I have decreased the height difference between tiers by 6 inches, lowering the total stand by 1 foot! great.
 
is buying a pump out of the question?

my first batch will likely be some gravity type setup, but I do plan on using a pump. and if I were going to fabricate out of metal I'd like it lower and level like the Brutus style stands.

if a pump is out of the question then your stand should work just fine.


-=Jason=-
 
is buying a pump out of the question?

my first batch will likely be some gravity type setup, but I do plan on using a pump. and if I were going to fabricate out of metal I'd like it lower and level like the Brutus style stands.
..
if a pump is out of the question then your stand should work just fine.


-=Jason=-

For the time being, yes. I haven't been able to find an affordable source in Ontario for one of those March pumps. (like, under $200...)

I am going to try and build this from 16ga mild steel, 1.5" square tubing. But I also have alternative plans to build from wood if I can't find a good enough price. I have access to a welder, and perhaps some misc. steel. I need to investigate all of this a bit further...

If this goes well, definitely would like to upgrade to a single tier in the future though!

Buy a pump, say a Chugger (about $100 US) have it sent to someones house here in the states..and drive over and get it... your 5 hours from my part of NY but I would think that you could find someone local in either Niagara Falls or Buffalo area that can help you out.... just an idea...we see many Canadian's shopping over here on a daily basis!
 
I created a new design, abandoning the diagonal-style plans. The initial design (with 18" height differences between tiers) used 51' 2" of steel. The redesign uses 44' 9.5". I got a price on some 1/8" thick 1.5" square tubing... $40 for 24', which is better than I expected. So I will be going with 1/8th instead of 14 or 16ga as I had originally planned.

Here's the design

20hstxd.png


If anybody wants the dimensions/materials list let me know!

And I left the bottom tier fairly close to the ground... the keggle will be 11.5" off the ground. Once the keggle is drained enough into the carboys such that siphoning doesn't work anymore, it should be light enough to easily move to the 2nd tier and complete the process.

I will start building next week. Let me know if you think I left out anything. Thanks for all the advice again!
 
did you leave out casters on purpose? or hadn't you gotten that far? i love my 4 double locking casters.... they added like 4" or so to my stand height but make it much easier to move.

as for the way the stand is engineered, i would think that butting the joints at the top the same way you butted them at the bottom would be stronger. the way you have your welds is easier to build but the weld is holding the weight instead of the "top" of a tube.

======
||
======

instead of

||======
||
=======
 
Well... here is the progress made with the brew scuplture. About $90 in steel including delivery. 14ga 1.5" square tubing. Still need to clean up the welds and paint... possibly add casters or some legs. It's not that heavy for me.

Design was altered a bit to i) increase front-back stability by extending the base ii) only create support on 3 out 4 sides of the rectangular keggle base on two tiers... as we deemed them unnecessary - this thing is a tank! took about 4 hours to cut and weld all of this together. One 'problem' we ran into is that in my design I based the stand on our kegs having a 16 1/8" diameter, when really the base diameter was more like 15 1/2" or so. The widest point of the keg is 16 1/8" I am guessing. I am not sure if you can see in the picture, but we welded large nuts to keep the kegs snug based on their actual base size.


Now... I am seeking intuitive ideas to attach a burner which is movable between the tiers. We only have one burner. Bonus if if the height can be adjusted as well. There is a couple feet of steel left over which could be used... I haven't decided if we will direct fire the mash tun or just insulate it as much as possible and hope for the best. Here is the burner:


And finally, just because I can... here is the progress on the keggles. Tops are off (and quite cleanly) using an angle grinder and a very simple jig (we screwed through the angle grinder's plastic handle, and attached it to a square chunk of wood that fit snugly in the keg's opening. It took 2 discs. I have used a grinder, and a file by hand to clean up the edges. I will still do a bit more with sanding attachment for a drill.


So... please let me know if you have any ideas or projects for me to check out with movable burners. The burner is natural gas... thanks!
 
i would maybe weld a pipe vertically from the front horizontal of each tier. then attach a quick release mtn bike seat post clamp to the burner. the burner would slide up n down on the pipe (infinitely adjustable) and then slide off the bottom to move to the next position it's needed.

another idea would be to build a mount for the burner and connect it to the stand with earth magnets to the sides. (also infinitely adjustable)

:ban::tank::D:mug:

1.jpg


2.jpg
 
Rare earth magnets... that's a new one! The burner is pretty heavy. I think I would like to support it from two sides. Though using some sort of clamp has certainly crossed my mind. Not a bad idea to have some metal hanging down like that.

My most recent thought is to come up with a way of just using some threaded rod which can be slid into some holes in the frame, and through some simple support structure for the burner. This would be simplier, except I have 3 pieces of metal left... 2 9.5" and 1 10.25"... And the distance between the posts for the highest tier is less than the distance for the two lower tiers...

While writing this message I came up with this: Though... it's a lot of hole drilling... bound to destroy a couple drill bits... I don't even know what is the optimal distance from the keggles this burner should be yet.


you want to make sure whatever you design is going to be easy to move when hot and easy to adjust the height, but easily reproducible.
 
A good point... Maybe I could weld some more bolts up the side of the stand, and load the burner support structure on much like adjusting an oven rack.... Hmm!

Oh... also got my keggles fitted up today. This is a fairly budget build so no sight-glass or built in thermometer (maybe future upgrades). For now I will use an electronic thermometer and a measuring stick.

 
oven rack style would be cool. maybe even make a single shelf rail set on the stand, and build a "shelf" with adjustable height bolts to raise/lower the burner. or put the "rails" on some all-thread so they go up/down and build the shelf with the burner stationary on it.

personally, i went through a couple iterations in my head for my build, then sucked it up and spent the extra $10 for another burner from agri :) each burner is plumbed to flexible hose, then to a needle valve, then tied together and out to the regulator/propane.
 
More progress..!

Stand painted (with high temperature paint)


Keggles completely complete! And I found a nice lid I can use on my HLT and MLT


And here is a prototype for burner adjustment...


I was a little unhappy to see how quickly it scratched up my nice paint job... Also, it doesn't really fit on the lowest tier, as you need to get it into place by fitting it in between the supports diagonally... if that makes sense. Not really a deal breaker because the burner could just sit on a brick or something for the lowest tier. Also, I think there is enough support if it is only attached on one side. Maybe I will modify it so that it only uses one side. So it would look more like an 'L' and less like a 'T'.

Still searching for better ideas...

Everytime I look at one of these projects, I hate myself for not being able to weld or having access to the supplies to do so.
 
are you going to move that burner for every brew? nuts n bolts seem problematic. i'd try to come up with something like a clamp to make it easier to move.

an L should be plenty, nothing will be moving the burner.
 
I am thinking peg board... rig some type of hook and latch system so the burner will just go in at an angle and lock into place.

peg pointing up and a straight peg pointing out
insert upper peg first and swing burner into place allowing lower peg to drop into place.


-=Jason=-
 
I am thinking peg board... rig some type of hook and latch system so the burner will just go in at an angle and lock into place.

peg pointing up and a straight peg pointing out
insert upper peg first and swing burner into place allowing lower peg to drop into place.


-=Jason=-

This idea is great. Here's another, just to keep the brainstorming going:

Quick release pins like on jack stands. There needs to be a U shape at each end in place of the bolts, and then a single hole for a 3/8 - 1/2 QRP (quick release pin). At each tier, a set of holes would be drilled for the pins
 
Got the natural gas all hooked up tonight. The burner as expected has little dynamic range... though I did first light up on a windy deck. The jets would go out quite easily if not receiving enough gas. This would be improved slightly when brewing in the garage. Essentially the project is complete though. Just waiting for my 25' of 1/2" ID silicone to arrive, and to source my actual brewing supplies! I still haven't figured out anything for a chiller. But it's pretty cold here for the time being... like 10F, or colder. So ambient cooling will suffice until I can figure something else out. (I think...)

I will do a run with just water to test and sterilize everything first, and we'll see if this burner support structure will work at least temporally. I am not too optimistic about it. It'll function, but it'll be a major PITA. Some possible easy improvements to it would be cutting it off so it is more of an 'L' as discussed earlier. Also, I will try to come up with a plate with 4 holes into it to replace the 4 separate washers so there's less stuff to fiddle around with. If I could combine that with that with quick release pins I'd be laughing!

Really, I wouldn't expect the structure to get *that* hot, as the heat is going up. Time will tell. All of this considered. I hope to do my first batch next week, after xmas. I was thinking perhaps 'EdWort's Haus Pale Ale' recipe.

This project moved much faster than I could have expected. I am a university student who came back home for winter break with half of the supplies. My father really got on board with my ideas and lent his welding and various technical expertise to the project. I think he's just as excited as me for the first batch.

The total cost for the project... this will be the first time I am adding it up (I try not to think about it) $550
$90 - Steel for stand
$150 - 3 kegs
$70 - 25' Silicone hose
$70 - Keggle fittings
$50 - Burner with shipping/duty :(
$100 - 50' flexible gas hose + all of the gas valves/fittings
$20 - Paint, cutting discs, steel cutting blades for saw, etc.

I'll let you guys know how the first brew day goes! Thanks for all of the advice.
 
Did a systems test today... I would've brewed too except my silicone hose hasn't been delivered yet. I just used a garden hose to transfer water around and test out the siphons.

Took about 30-40 mins to bring the water to a boil when the keggles were filled right up (it was really cold out too). I think I actually had the burner too high at one point and it was more than what our gas line liked. I am impressed with how much flame adjustment I was able to get when using the burner out of the wind though. I expected very little from what I have read on this forum. With the ball valve 60% or so open we got a nice controlled flame - which my father is seen inspecting in the below image.

BrEYx.jpg


So... the boiling water was a good final clean for the system. The burner support worked just fine except for a few lost nuts/washers and it taking some of the paint off of the brewstand. It didn't get so hot that the nuts were difficult to remove either.
 
I should mention the problem I had with my burner in a bit more detail. Basically, we use a 50' length of 1/2" ID air hose rated for 300psi to connect to a quick disconnect which we use for our NG bbq. When running at full, after about 20-30 mins the flame was getting a bit dirty. We were totally perplexed by this. Initially we thought it was because the burner itself was getting hot from reflected heat from the keggle and the NG was expanding and changing it's characteristics as time went on. The problem was not fixed If we only turned the burner off for 30 seconds or so. When we finally turned the burner off on the HLT, spent some time moving the water tand burner to the MLT... maybe 10 mins went by. When we lit up the burner again it was burning cleanly.

I spoke to my buddy who does HVAC stuff and he affirmed my second suspicion - that it was probably too long of length of piping/hose from the meter to run at full pressure sustainably. He had mentioned this being an issue when I was planning the set up. I figured by just turning off all of our NG appliances that maybe I wouldn't have any pressure issues. And I probably wouldn't have if I were just 5' away from the quick connect at the bbq even with them running. A large oversight on my part.

The soot that was produced when the burner was not running great came off easily with a damp rag. I think I will move down to a 25' length of air hose Or maybe try getting a hookup closer to the meter. I didn't realize that the friction in these NG lines were so great that it contributed greatly to the actual available gas. I am fine and even prefer not having the burner fully opened but I would like to remedy this issue.

Here is a picture of when the burner wasn't running great. I should really emphasize since the use of these burners is somewhat controversial that this is not a problem with the burner, but with how the gas is supplied to them. Note how the ball valve is wide open in this picture... and had been for probably 25 mins at this point.

I should also mention that I feel like a lot of problems people have with these burners are probably from issues similar to this when running natural gas. This thread: https://www.homebrewtalk.com/f11/23-tip-jet-burner-problems-102701 had some useful general info with running these burners with NG. i.e. have the shortest possible run from your meter!

You can see in one of the above pictures that the flame probably has a bunch of orange in it from the reflection the the near keggle and on the burner tips. I didn't have my phone handy to take a picture of the flame when it was running clean at full blast near the beginning of the test (nor did I expect the flame to change by when I got my phone). I will try to replicate this when I brew tomorrow or the next day.

W6rqY.jpg
 
that burner mount worked better than i expected. i'd look for some wing nuts in that size and maybe weld some nice big fender washers to them, so there is less to lose...

wrapping the burner side mounting with a bicycle innertube would probably reduce scratching.

sorry to hear about your gas issues, but it sounds like you have a solution. give it a test with the shorter line, and then let's see this thing make some beer! :D
 

Latest posts

Back
Top