RIMS for Dummies

Homebrew Talk - Beer, Wine, Mead, & Cider Brewing Discussion Forum

Help Support Homebrew Talk - Beer, Wine, Mead, & Cider Brewing Discussion Forum:

This site may earn a commission from merchant affiliate links, including eBay, Amazon, and others.
Noob question alert.
For some unanswerable reason I have suddenly become very interested in HERMS / RIMS and am still struggling to wrap my head around the pros/cons of each method.
I am wondering what temperature the wort reaches as it passes the element. I know the average temperature downstream is measured by the thermocouple, but I am wondering about the wort that passes closest to the actual element.
Here is where I might blow some basic brewing facts. The enzymes that are responsible for Saccharification denature at higher temperature (beta ~152, alpha higher). Is the heating element raising the immediate temperature high enough that is denaturing these proteins? If so ( I can't seem to recall off the top of my head,) will these proteins reform as the temperature falls back below their denaturation point?
Is this an actual concern or only theoretical masturbation?
I am really sorry if this is a sore point or has already been hashed out for a hundred times. Please feel free to ignore or ***** slap as warrented.
jason
 
Is this an actual concern or only theoretical masturbation?

Mostly the latter.

However, with RIMS at least, this is why most people use a LWD (low watt density) element to avoid scorching.

The enzymes are not instantaneously denatured, if I understand the science, anyway.
 
jwright,
That's a very good question regarding scorching the wort with a RIMS system.
Curious what others will say.
I know with HERMS it would be safer in that respect....but a much more involved setup.
 
jwright,
That's a very good question regarding scorching the wort with a RIMS system.
Curious what others will say.
I know with HERMS it would be safer in that respect....but a much more involves setup.

Not true, if you use the proper element in your RIMS tube. If you use a high density, element you are almost guarantied to scortch the Mash. If you use a low density or extra low density element you are very safe. I have never scortched the Mash with a low density element.
 
Used my Sawdust RIMS pipe bomb for the first time 2+ weeks ago. It worked very well even though I had some other issues with the pickup tube creating a stuck flow of wort. Fortunately a neighbor helped me out and we quickly transferred the mash to the BK (nice to have a false bottom in both keggles!) and got back to a clean flowing recirculation. All in all I think I mashed a bit longer than planned at a total lower temperature due to the problem.

The end result however is an excellent clone of Rogues Brutal Bitter and even at this young stage it is very drinkable.

Kudos again to Guy for getting me moving on RIMS.

All I have left to do (ha ha) is figure out if I want to control my HLT as a gas or electric vessel.
 
Thanks guys!
That is what I was hoping to hear.
Is it really so simple - I can add a pump and a RIMS unit to my existing cooler mash tun with a bazooka tube and have automated electric mash temperature control?
Great guide.
jason
 
Thanks guys!
That is what I was hoping to hear.
Is it really so simple - I can add a pump and a RIMS unit to my existing cooler mash tun with a bazooka tube and have automated electric mash temperature control?
Great guide.
jason

Yes, it is really that simple. The reason I created this thread was to show fellow brewers that it is not the expensive and complicated setup they think it is. It is not very hard to implement and doesn't cost an arm and a leg.
 
You are my hero. :D

Really, it is great that you were able to present your plan/method in such a straight forward and easy to understand way. By presenting the 'big picture' it makes it much easier to see this as an easy, and more importantly, viable solution. You have removed many of the lingering details that often prevent newer diy-ers from starting a seemingly complex endevor.
Thanks again.
Jason

PS. now where is that HERMS for dummies?
 
Sawdustguy,
I'm kinda afraid to ask this, but regarding #41, 42. Any chance you did have the nipple length correct at 6"? I'm looking at your beautiful pictures, and I can't see how that is a 10" long pipe. Knowing that the tee ports are 2", it just doesn't map out. The 7" long element would fit easily once you add 2 of the 4" long tees. I keep going back to the pictures, and looking at several other threads and have seen several others using the 6" nipples. I hope you could clarify.

FWIW, you have finally swayed me over to the RIMS camp. I really wanted to go HERMS for several reasons. One, I already had extra copper coil, so the cost would have only been a couple of fitting. Second, I was hoping to gain HLT temperature automation as a freebie. Third, intuitively, the indirect heating used in the HERMS seemed more ideal.

After reading what seems like 200 pages of posts and may good natured 'discussions', I can not discount the experience of you and the many supporters of RIMS. With all of those batches under the collective belt, and the years of experience here on HBT --now I believe, I believe! So by spending a little more money to go RIMS, I can untether my MLT from my HLT, simplify the brew day process and have a future project to look forward to (automated HLT).

Thanks again to everyone who keeps helping others,
Jason

You are absolutely right. I started with a 10" nipple to keep the element as far away from the thermocouple as I could but it was rediculously long. I then switched to a 6" nipple. I never got to change the parts list. The 10" will work just fine but is way longer than needed. The RIMS works incredibly well. If you intend to automate the HLT as I did have a look at https://www.homebrewtalk.com/f51/gas-temperature-control-dummies-116632/. The third in the trilogy will be HERMS for Dummies but alas I am not a HERMS Fan. If you need any help just ping me.
 
I bought the parts to make this but do you recirc without vorlouf or will the grains mess up the pump until it starts to run clear? My plan is to run water until I hit mash temps then dough in and recirc until I hit mash temps in my 5 gallon cooler w/false bottom then turn it off and move it to heat my sparge water and do the same thing until I get to mash out temps. Thanks
 
I bought the parts to make this but do you recirc without vorlouf or will the grains mess up the pump until it starts to run clear? My plan is to run water until I hit mash temps then dough in and recirc until I hit mash temps in my 5 gallon cooler w/false bottom then turn it off and move it to heat my sparge water and do the same thing until I get to mash out temps. Thanks

If you use a false bottom in your mash tun there is no problem. I have been doing this for a while with no ill effects to my pump. RIMS systems have been around for a very long time. No need to vorlauf.
 
Wiki PID controllers. A ranco/etc. controler just has a set point and a hysteresis, a PID has second order prediction. The ranco will work fine for controlling a heater on a large amount of water because the thermal capacitance serves to control overshoot/stability/etc. The PID is better suited for fine control where finesse is needed. If your ranco couldn't keep up with your heating element the entire system would be unstable and oscillate; the PID however will enable you to tune your control system to be able to handle a variety of situations.

Hope that helped....
--Tom
 
the ranco is an on/off thermostat and PID control how much power goes to the heater so it will be full blast until it gets to a set point then reduce the power so it doesnt overshoot the temp then it will apply just enough power to keep it at that temp i.e autotune. So a ranco is good for like freezers and frig that has to run as an on/off due to the motor but certain type of heaters doesn't like water heater element so you can use a PID or proportional thermostat which takes reading every x milliseconds and adjusts the output accordingly.
 
the ranco is an on/off thermostat and PID control how much power goes to the heater so it will be full blast until it gets to a set point then reduce the power so it doesnt overshoot the temp then it will apply just enough power to keep it at that temp i.e autotune. So a ranco is good for like freezers and frig that has to run as an on/off due to the motor but certain type of heaters doesn't like water heater element so you can use a PID or proportional thermostat which takes reading every x milliseconds and adjusts the output accordingly.

There are fully analog PID controllers, however they are fairly expensive and are not really used in the home brewing world.

Most process controllers (what you find at auberins.com) are PID devices that control a relay type output, whether it be mechanical or solid state. The PID magic happens in how the duty cycle of the on/off relay is modified.
 
So where do I sign up for the book?
I think that would be a "dummies" book that I would actually buy. :)
 
This is a great thread, I am hoping to build my rims at the beginning of next year or sooner. I just have a question.

Is the heating element, pump and PID run from one 120 volt outlet, also does the wiring diagram allow for the pump to run without the PID being on?

I'm no electrician so i am just trying to figure this out before i start. Once i get the parts i will probably find someone in my club who know more about this to help me out i just want to learn as much as i can before hand.

any comments are greatly appreciated.
 
whats a good flow rate 1 quart/min and should I do a thin mash? thanks

I had a similar question myself. I use both peristaltic pumps and march pumps. I use the march pumps for the mash and the peristaltic pump to recirculate the wort during cooling (easier to keep sanitary).

However, as I discovered with my RIMS (same design as Pol's here) my flow rate with the march pump is pretty low. If you look at the head pressure flow chart for the March 809 if you have 3 feet of head you are barely going to get 0.5 gallons of flow from that pump. Am I reading this wrong?
 
If you look at the head pressure flow chart for the March 809 if you have 3 feet of head you are barely going to get 0.5 gallons of flow from that pump. Am I reading this wrong?

Most US current is 60Hz, so I guess with 3 ft of head, the flow rate would be about 2.5 gallons. I'm guessing that is the maximum, so any other restrictions would lower that.

Of course, I may be reading the chart wrong.
 
Sawdust Guy; I was just reading in another thread here about issues with the Water Heater Elements straight threads not working so well with NPT threads... Is that an issue here? The parts I ordered should arrive today and I was wondering if I am going to have an issue putting my element (I ordered the extra low watt element), into the 2x1" bushing?

Thanks
Ed

You need to use the o-ring that comes with the element, plenty of teflon tape, and screw in the element tight.

Most US current is 60Hz, so I guess with 3 ft of head, the flow rate would be about 2.5 gallons. I'm guessing that is the maximum, so any other restrictions would lower that.

Of course, I may be reading the chart wrong.

There was 60 Hz at 230 and 60Hz as 115... I was referring to the 115. 0.5 gallons flow rate isn't that poor because many of my mashes have a large grain bill and combined with my tall cylindrical mashtun, I don't get a quick runoff anyhow.
 
Sawdust Guy; I was just reading in another thread here about issues with the Water Heater Elements straight threads not working so well with NPT threads... Is that an issue here? The parts I ordered should arrive today and I was wondering if I am going to have an issue putting my element (I ordered the extra low watt element), into the 2x1" bushing?

Thanks
Ed

You need to use the o-ring that comes with the element, plenty of teflon tape, and screw in the element tight.

The advice JVD_X is 100% absolutely and without a doubt, correct! To slightly modify the paraphrase of a Frankie Sinatra classic "I did it that way".;)
 
Thanks guys.

Take a look at this (I think this is Kal's sight, the name, logo and equipment are familiar):
http://www.theelectricbrewery.com/node/9?page=1

I'm leaning toward an electric kettle and really like they way he attached the element.
I'm wondering if some of the things he did could be integrated into your RIMS heater?
For instance, I like the strain relief and the fact the electrical connections are protected but you can still access them (as opposes to being potted in epoxy).

While it may not apply so much to the RIMS heater (but maybe it could) I also like the way he used the silicon o-ring and slightly larger washer to get a seal and still be able to get metal to metal to tighten the components.

Ed
 
For instance, I like the strain relief and the fact the electrical connections are protected but you can still access them (as opposes to being potted in epoxy).

I really like Kal's electrical design too. But, I'm not a fan of his approach to a water-tight connection for the heating elements. Properly applied, epoxy is the most secure, water-tight connection possible.

While it may not apply so much to the RIMS heater (but maybe it could) I also like the way he used the silicon o-ring and slightly larger washer to get a seal and still be able to get metal to metal to tighten the components.

Not sure if you noticed, but he purchased 1" nuts with an o-ring groove but, for some unknown reason, opted not to take advantage of the o-ring on the inside of the kettle. Instead, he chose to seal the back of the heating element with a washer, o-ring, and silicone. While this works, it's not the best approach.

Based on my experience, the best approach is to use a 1" nut (with o-ring groove) with the o-ring installed on the inside of the kettle. Teflon tape is more than adequate to seal the threads. Perfect water-tight seal that seals from the inside-out.

Kal, if you're reading this, I hope you don't take offense. Your setup is very slick.
 
I really like Kal's electrical design too. But, I'm not a fan of his approach to a water-tight connection for the heating elements. Properly applied, epoxy is the most secure, water-tight connection possible.


Not sure if you noticed, but he purchased 1" nuts with an o-ring groove but, for some unknown reason, opted not to take advantage of the o-ring on the inside of the kettle. Instead, he chose to seal the back of the heating element with a washer, o-ring, and silicone. While this works, it's not the best approach.

Based on my experience, the best approach is to use a 1" nut (with o-ring groove) with the o-ring installed on the inside of the kettle. Teflon tape is more than adequate to seal the threads. Perfect water-tight seal that seals from the inside-out.

Kal, if you're reading this, I hope you don't take offense. Your setup is very slick.


The issue I see with the locknuts with the groove is that when you tighten the nut you continue to compress the o-ring and they don't feel solid.

It appears to me that Kal's method uses an o-ring that is thicker than the washer and the OD of the o-ring is smaller than the ID of the washer.

So as you tighten, the o-ring contacts the kettle and the backer plate before the nut gets tight. Then as you continue to tighten, the washer becomes containment to keep the o-ring centered and prevents the o-ring from being over compressed. The washer also allows you to tighten the nut as tight as you want so it would be very solid and there is no wobble.

I haven't used the epoxy method of potting the connections but I'm not 100% comfortable with the idea yet either... It appears to me the insulation on the power cord is going to bend, flex and stretch, and where the epoxy has set will be a sharp edge against the jacket that may be abrasive. I know it would take a long time before this became an issue, but I just like the idea of using a proper strain relief.

To stay on topic here, I'm thinking of using a similar method (mounting the electrical connections of the heating element in a box) for the RIMs heater that Sawdustguy designed. This also allows you to attach a ground to the box.

Thoughts?

Ed
 
To stay on topic here, I'm thinking of using a similar method (mounting the electrical connections of the heating element in a box) for the RIMs heater that Sawdustguy designed. This also allows you to attach a ground to the box.

You will notice that his box is not water tight. The curve of the pot distorted the box cover. I think a better approach would have been to attach the element in the usual fashion and then machine a curve into the open side of the junction metal box then JB Weld the box to the kettle.
 
For those brewers who would like to add a RIMS Heater to their Brewtroller setup, here is a schematic that may prove to be useful to you. It uses most of the parts called out in the https://www.homebrewtalk.com/f51/rims-dummies-114997/ thread with the exception of the Brewtroller and a Relay Card. There are very few, if any, Brewtroller controlled RIMS out there and there is no reason why any RIMS brewery can't be automated with a Brewtroller. I hope this post is an inspiration to those who have a RIMS brewery to cast away your PID's and consider an automated brewery. If it recieves enough attention I will make it into it's own thread.
Brewtroller%20E-RIMS.jpg


Here is the brewtroller. Pictured is the latest version V3. It is available from http://www.brewtroller.com. At present it will set you back only $115.00 (assembled and tested). The BrewTroller 2.4 HomeBrew Version is available as a Kit with a fully assembled and tested board for $75.00. Check it out.

dsc_0001.jpg


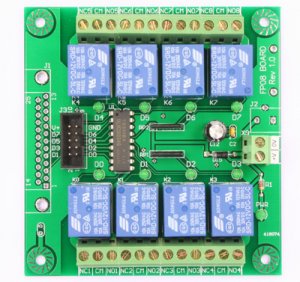
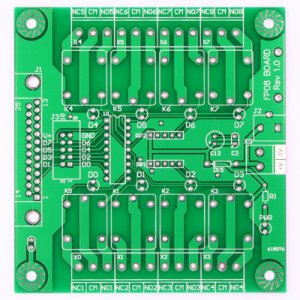
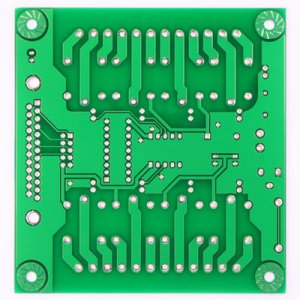
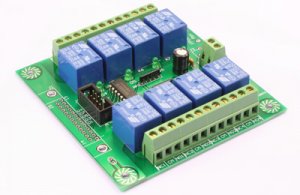
This is a relay board kit I will use in my Brewtroller driven brewery. It has 8 relays and it is really inexpensive. It is $16.99 + $8.99 shipping in the continental US.

http://www.ecrater.com/product.php?pid=3528455#


4a8b2f1e9fce5_87933n.jpg
493b01a7452b2_87933n.jpg
493b01908e266_87933n.jpg


493b01853f381_87933n.jpg
493b015f11ad9_87933n.jpg


Here is the Relay Board Schematic. I am going to purchase an 18 pin DIP Socket (Digikey 18 Pin IC Socket) and 18 pin Header (18 Pin DIP Header) to replace the ULN2803LW (hardwire across the IC using the header) so I can have the Brewtroller drive the relays directly.

I hope this thread help those considering this option to their brewery. I welcome comments and questions.
 
I've been considering a RIMS setup for my christmas/bday present to myself, with the exception that I was going to use a brewtroller. Now that you've updated your thread, it'll just make my life even easier.

Quick question - why did you decide to control the pump via the brewtroller? Just to make things neater, or was there some other consideration? I don't see a float switch or anything else in the diagram.
 
Thanks for the wright up. Question though, How much fluid do you leave in the RIMS heater/pump/piping when you transfer to the kettle?

It's not a significant amount and all you need to do is sparge with a bit more water and what you leave behind is not needed for the kettle.
 
I've been considering a RIMS setup for my christmas/bday present to myself, with the exception that I was going to use a brewtroller. Now that you've updated your thread, it'll just make my life even easier.

Quick question - why did you decide to control the pump via the brewtroller? Just to make things neater, or was there some other consideration? I don't see a float switch or anything else in the diagram.

Automation, my friend. Why should I turn the pump on or off when the brewtroller can do it for me. I fly sparge so I use a Blichman Autosparge with the float set to keep 2" of wort over the grain bed.
 
Back
Top