Found the 'Magic' in 'Magic Chef' - keezer progress, questions

Homebrew Talk - Beer, Wine, Mead, & Cider Brewing Discussion Forum

Help Support Homebrew Talk - Beer, Wine, Mead, & Cider Brewing Discussion Forum:

This site may earn a commission from merchant affiliate links, including eBay, Amazon, and others.
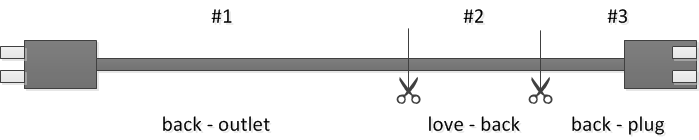
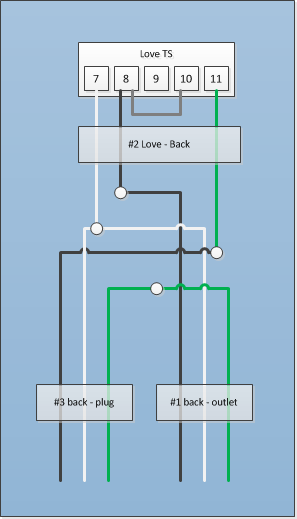
I didn't connect mine to the thermostat. I left the thermostat wired and attached the power from the Love to the power cable for the freezer. It's the easiest way to connect, unless you want to wire a female edison plug (extension cord) to the controller and just plug in your freezer.

B

OK, I think we are talking about the same thing, just different interpretations. This is what I think you did:
1-Removed the freezer's power cable from the wall socket and opened the power cable head to expose the wires.
2-Connected the striped exposed wires from the head of the freezer’s power cable to the love controller "switch on" (the "switch on" is controlled by your temperature settings).
3- Connected the love controller power cable to the wall socket and turned on the system!

If you did that, you are totally connecting your controller to the thermostat through the "switch on" which overrides it! Remember, the freezer's power cable powers the thermostat first!
 
My plan is to do the following:

1. Cut the female end off an extension cord and use it to provide power from the wall outlet to the Love controller.
2. Install a standard wall outlet in the back of the collar of my freezer.
3. Use the controller to provide switched power to the outlet (I may leave one as always-on... haven't yet decided).
4. Plug the freezer's power cord into the switched outlet in the collar.

It's a little roundabout, I realize, but it means I don't have to mess with any of the freezer's original wiring. If I ever remove the collar, the freezer would be completely back to normal.

I don't see anything wrong with that. It's a good idea. In fact, now that I think about it, I'm going to do the same thing. I would leave one of them as always-on, and plug the freezer into that one and the fan into the other.

Robbyg, that's fine, but IMHO, you would be better off with one of those wired ranco or johnson controls because you wouldn't need to do any wiring at all with them, just plug the freezer to the controller and the controller to the wall socket. Those run a little more expensive than the love controller though.

To me, the big advantage of the love controller, besides a slightly lower price, is that it has a nice and small front interface that can be fitted to the collar given a neat and professional look to the kegerator. I don't really see a reason why one would ever want to remove the collar since it makes the freezer bigger inside and the love controller would allow it to work at freezing temperatures too, just like it had always been. If you ever want to sell your finished kegerator, it is much easier to get a better deal in a kegerator compared to just a chest freezer. In fact, the craigslist is full of used chest freezers being offered 60-80% lower than their brand new counterparts in the store.
 
if you already have the Love, you could just cut an extension cord in half and use the male half to power the Love and the Female half as the controlled outlet.

B
 
I don't have the wiring diagram in front of me, but I got a really clean installation doing this --

I got a nice weight black 3 prong cord from home depot. One end of the cord from the wall to the freezer, the other end from the freezer to the plug, and the middle chunk from the controller to the back of the freezer. I ran the middle chunk of the cord from the front (love controller) out the back. Then connected up all the wires using male/female spade connectors. Using a 3 conductor cord gives you the right # of wires for each segment.

The end that went into the wall was the longest, the middle chunk just right to go from controller to back and a small segment hanging off the back for the freezer to plugin. I also put the spade connectors on in such a way that I couldn't hook it up wrong.
 
I haven't seen the Magic Chef in black. But one of the other companies that's selling the freezer under a different name may have it.

B
 
I don't have the wiring diagram in front of me, but I got a really clean installation doing this --

I got a nice weight black 3 prong cord from home depot. One end of the cord from the wall to the freezer, the other end from the freezer to the plug, and the middle chunk from the controller to the back of the freezer. I ran the middle chunk of the cord from the front (love controller) out the back. Then connected up all the wires using male/female spade connectors. Using a 3 conductor cord gives you the right # of wires for each segment.

The end that went into the wall was the longest, the middle chunk just right to go from controller to back and a small segment hanging off the back for the freezer to plugin. I also put the spade connectors on in such a way that I couldn't hook it up wrong.

That sounds like agood idea. Would you be more specific or perhaps provide a diagram? I got confused by what you meant by end of cord and plug or wall, not sure if by end of cord you meant the original freezer cord or the new 3-prong cord and not sure if wall and plug are both referring to the wall outlet.
 
A pretty rudimentary diagram of the cord.

KeezerCord.png


I didn't modify the original cord or wiring in any way -- I just plug the freezer into this just like my previous Ranco controller.

All three of these segments meet at the "back" of the keezer. #1 goes from the wall outlet to the back, #2 go from the love controller to the back (mine was routed inside the keezer) and #3 just dangles down to the original plug.

For my purposes #3 was a little two foot stub, #2 was just long enough to go from front to back after hooking up the controller and #1 was the rest of it (~8' in my case).

I'll see if I can find my wiring diagram -- it's on paper somewhere...

That is actually very helpful, thank you very much. If you can find the wiring diagram, please post it too!
 
A pretty rudimentary diagram of the cord.

KeezerCord.png


I didn't modify the original cord or wiring in any way -- I just plug the freezer into this just like my previous Ranco controller.

All three of these segments meet at the "back" of the keezer. #1 goes from the wall outlet to the back, #2 go from the love controller to the back (mine was routed inside the keezer) and #3 just dangles down to the original plug.

For my purposes #3 was a little two foot stub, #2 was just long enough to go from front to back after hooking up the controller and #1 was the rest of it (~8' in my case).

I'll see if I can find my wiring diagram -- it's on paper somewhere...

Thanks! I hate to ask this but do you happen to have any pics of your wiring?
 
Disclaimer -- you should know what you're doing .. blah blah.


Haven't found my chicken scratchings yet, but this was the resource I used along with the wiring diagram that came with it. This site has a great description I'll reproduce here:

In text, take the black wire from the wall plug to #8, run a short jumper from #8 to #10. Then, connect the black wire from the device plug to #11.
Then run a length of wire from #7 to the white wire from the wall plug, and splice that into the white wire from the device plug.
Then splice the green ground wire between the wall/device plugs together.
This configuration is the typical setup of device is unpowered when switched off. If, for some reason, you wanted to be on when the switch is off (and not used the menu option) you could connect the jumper to #9 instead of #10.

http://blog.flaminio.net/blogs/index.php/beer/gadgets/love-ts-13010-temperature-switch-new-wir-2008

Notice that in either case (new or old controller) there are 3 wires leaving the love controller, 3 wires "to device" and 3 wires from "power plug". I carefully drew everything out and planned out the spade connectors. I left the wires from the love controller alone and put


KeezerWiring.png


My actual wiring (basically looks like above in reality)

photo%20(1).JPG
 
I second that! THANKS BOLTS! This is very helpful. Those insulated spade connectors are great but I have not been able to find them. Do you happen to know the model and where you got them?

Glad this is helpful. The spade connectors and the cord were from home depot.
 
Looks good, except the green to black connection. Any electrician who sees that (without the schematic) will ^&(* bricks. Take a piece of black electrical tape and put a band around the green wire, close to the spade. Then it will make sense!

Indyking, any hardware store will have them. Just ask for "spade lugs" (But I buy them in boxes of 100 from HD.)

B

Glad this is helpful. The spade connectors and the cord were from home depot.

Thanks guys. I actually have one more question. Instead of using the short jumper from #8 to #10, is it OK to just to connect the wire that is comming from the Love output #10 to the spade connector between cord #1 from the outlet and cord # 2 coming from output # 8 in the Love controller? It seems it would make no difference and make that wiring a bit simpler.
 
Two taps and kegs are due to arrive tomorrow.

Collar has been constructed but need to be drilled out and painted.

Its actually been a ton of fun doing the minor woodworking stuff! I forgot how it feeds into my nit-picky ways and usually pays off!
 
So last night was the big night.....after hemming and hawing for a few weeks and thinking over the procedure and getting everything ready I went at it.

It took me longer than I thought it would and I have a few complications. Here's my thoughts:

-The biggest issue I had was that I used a short collar. This resulted in needing to build up the back of the collar to come flush with the hinges that hung down past the collar. If I had to do it again I would just make the collar the height of the hinge.

-Scratch that; if I had to do it again I would make it as tall as the hinge or the CO2 distributor and go with a panel mount model rather than the one I have tethered to the tank right now.

The biggest compliment I got was having my wife come downstairs after delaying doing so for the day because I think she thought it would be an eyesore and declaring that it actually really looks quite nice! At first mention of making a 4 unit kegerator she was a little put off by it. However now that it's in and she sees how it looks she's quite agreeable to it. It's almost enough to quiet the random questions about various fermenters I've got going around the house!
 
so it turns out I picked up a a Freezer from a garage sale for $50 its this exact same freezer, I tested and I can fit 4 cornys on the floor with another 2 on the hump but I'd have a build a collar.

I don' thave my co2 tank yet, but I scored some 3" perlick dual faucet towers so I'll have 4 beers on tap.

I don't really want to cut the lid up so I was planning on just using plywood for my lid.

I am going to use some granite tiles I got for free for the top and sides.

should look come thing like this
marble_tile_countertop.jpg


here is what I have so far.

IMG_20101208_170404.jpg


IMG_20101208_170420.jpg


here is where I am at a pickle.

do I build a 8" tall collar so I can fit cornys on the hump?

do I just build a small 2-4" collar or so that I can use my granite on the face and sides
as my faucets can only handle 4 kegs anyways

my kitchen is natural oak cabinets with dark granite counter tops and black and stainless appliances so this will fit well in there.

I plan on painting it black so it doesn't stick out like a sore thumb in my kitchen, I wish I could get stainless steel floated onto it, that would look titties.

-=Jason=-
 

Latest posts

Back
Top