You guys are not going to believe this...

Homebrew Talk - Beer, Wine, Mead, & Cider Brewing Discussion Forum

Help Support Homebrew Talk - Beer, Wine, Mead, & Cider Brewing Discussion Forum:

This site may earn a commission from merchant affiliate links, including eBay, Amazon, and others.

movet22

Well-Known Member
Joined
Sep 26, 2011
Messages
219
Reaction score
27
Location
Haddon Heights
So before I get into the brief back story, here is the brief-er beck-er story: I have been brewing for almost 5 years, started with extract batches in my college apartment and have just finished my 7th AG batch a few minutes ago. I have, within the past 5 months, gotten engaged, bought a house and moved out of my parents house and in with my fiance.

This is all relevant because, I have moved my MacGuyver-esque propane fueled AG set up to our new house and brewed for the first time with it in the new digs tonight. My fiance was NOT happy that I was using such an intense flame (banjo) on the new front porch (In my defense, it was supposed to rain, I needed the cover). She was so appalled that she demanded that I drastically upgrade before I brew again.

This all brings me to the electric forum. I have just been given full reign over the entire basement (which has a utility sink already) and have been told to go completely electric. Including pumps, a control panel and a fermentation chamber. (The frem chamber is just another thing she wants me to make so that my carboys do not sit in the air conditioned living room.)

Let me start by laying out my current set up, of which I plan to mostly keep: 10 gal aluminum HLT, 10 gal orange rubbermaid cooler MLT and an 8 gal stainless boil kettle. I just got a brand new circuit breaker in the basement so I plan on getting a spa panel installed within the next few days, maybe a week.

My first question is, what should I expect to spend on a generally simple 2 element build? (I am hoping to keep in under $1k.)

I am also going to post a mock up of what I have in mind for a control panel in the morning, hopefully I can get some critique and suggestions.

Feel free to follow me as I build my budget friendly dream set up, and suggest anything you can think of along the way.

Thanks in advance for all the input!
 
heh I'm moving in with my girlfriend and she has told me to stop spending money on brewing. You're a lucky one.
 
movet22,

Wishing you great success.

I've drawn many diagrams for a brew rig such as your planned adventure.

Please let me know if I can help.

P-J
 
I would think you could do it pretty cheep, and it would be a nice setup to.

You could use your existing equipment plus, a simple phase angle controller, 100 bucks. http://www.stilldragon.com/basic-controller.html Two 5500 elements 60 bucks. Two tri clamp feurrels, clamps, and seals, about 30 bucks. Two connectors for the elements, 40 bucks. http://www.hillbillystills.com/Heating_Element_plate_p/hecp.htm

After the parts it should take about an hour at the shop to tig weld the feurrels in, 60 bucks.

All total you will be into it under 300 dollars to have the same set up your currently using converted to electric.

This would be a similar setup to mine except when I did mine I had to build everything from scratch.
 
heh I'm moving in with my girlfriend and she has told me to stop spending money on brewing. You're a lucky one.

Told you? WTF? Is she your parent? Does she have control issues?

You're an adult, she's an adult; If she does not feel that is true, and wants to tell you how to conduct yourself, it may be time for her to come to terms with that idea. I suggest you not move in until that issue is settled.
 
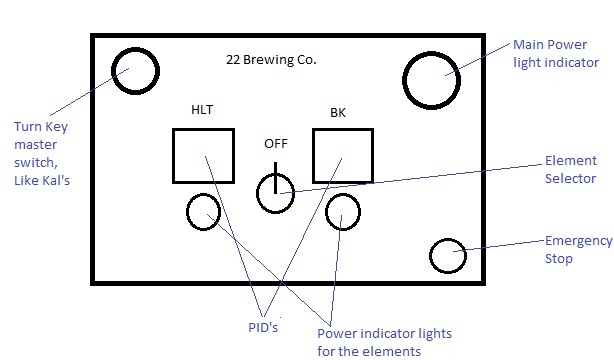
Ok, so here is a picture of the control panel that I would like to build. I am looking to keep it simple (forgive me for the paint-esque drawing), also, I am planning on putting in a switch for the pump in the lower left corner of the box (not shown in the illustration).

Is it completely insane of me to ask what a general parts list would be for something like this? I know of the main things that I will need, obviously the parts listed, but things like a heat sink I would have totally forgotten about.

Also, P-J, I have most of your diagrams saved b/c I have been dreaming of a build like this for a while, but I do not really know which one is best for what, so any help here would be amazing.

Thanks guys!

Control pannel picture.jpg
 
movet22,

Quick question: Why 2 PIDs? With your element selector switch, you can only select one element at a time. One PID could get the job done for you & it would save you some good dollars.

I just finished a diagram for you and put together an Excel parts list.

P-J
 
P-J, I know that diagram and parts list is for movet22, but would you mind posting it publicly for others like me who are interested in going electric eventually?
 
movet22,

Ok. Here is a diagram for your planned build:

As always - Click on the image to see (and save) a full scale diagram that is printable on Tabloid paper (11" x 17")


This link is for the Brewparts_Order.xls spread sheet that list most of the parts needed for your build. Save it to your system. When you click on the URL column items, the specific part referenced will show from the vendor. Use the TAB & Back Tab keys to navigate the sheet.

Near total cost is $480.

I sure hope this helps you in your adventure. If you need anything changed on the diagram, Please let me know.

P-J
 
I just realized that when I edited and changed my last response no one would be notified.

So... This post is to bring it to the top again.
 
question, with the PID, there is only one temp probe on the parts list, does that one go in the HLT to heat strike water only? if so, do I just switch power to the BK element and not worry about exact temps?
 
question, with the PID, there is only one temp probe on the parts list, does that one go in the HLT to heat strike water only? if so, do I just switch power to the BK element and not worry about exact temps?
Exactly. The PID has a manual mode that you would be using for your BK. Manual mode allows you to control the % of power being delivered to the element. The temp probe does need to remain connected to the PID for it to function. A raging boil and a simmer boil are both at a nominal 212°F so manual mode allows you to have control.

I hope this makes sense.
 
Let me start by laying out my current set up, of which I plan to mostly keep: 10 gal aluminum HLT, 10 gal orange rubbermaid cooler MLT and an 8 gal stainless boil kettle. I just got a brand new circuit breaker in the basement so I plan on getting a spa panel installed within the next few days, maybe a week.

My first question is, what should I expect to spend on a generally simple 2 element build? (I am hoping to keep in under $1k.)

I am also going to post a mock up of what I have in mind for a control panel in the morning, hopefully I can get some critique and suggestions.

Feel free to follow me as I build my budget friendly dream set up, and suggest anything you can think of along the way.

Thanks in advance for all the input!

First of all, use the 10g HLT for the BK if it is in fact a pot and not a cooler. Use the 8g BK for the HLT. You'll want more room to boil than 8g, and I know this because I brewed in one for over a half-dozen batches.

This all depends on what you want to do. If you want a controlled brewery like Kal's, you'll spend more. If you just want to be able to brew inside, but still keep the "human" factor of monitoring and manually maintaining temps...you'll spend peanuts.

Throwing an element in the HLT and BK will cost you all of about $75 total. The elements are cheap and you can easily install them yourself. I've done 5 so far.

The electrical for the spa-panel will cost you a little, especially if you have someone else do it.

Once you have elements and power to them, you have a setup that will work. That's what I have, nothing fancy, just electricity and elements in pots.

You can build your own steam hood and get the inline fan for about $150 too. Build your stand out of lumber, also fairly cheap.

It's the blichmans, sight glasses, quick-disconnect valves, silicone hoses, tri-clover fittings, all of that is what costs. That and a controller for the whole rig.

SO really it's up to you.
 
Just as a point of reference, I've got about $500 total in my rig (free 1/2 barrel Sanke). I did all the work myself which saved me a bundle. A pump is soon to be added to the setup for recirculating mashing.
 
movet22,

Ok. Here is a diagram for your planned build:

As always - Click on the image to see (and save) a full scale diagram that is printable on Tabloid paper (11" x 17")


This link is for the Brewparts_Order.xls spread sheet that list most of the parts needed for your build. Save it to your system. When you click on the URL column items, the specific part referenced will show from the vendor. Use the TAB & Back Tab keys to navigate the sheet.

Near total cost is $480.

I sure hope this helps you in your adventure. If you need anything changed on the diagram, Please let me know.

P-J

P-J, can you explain a few things about this diagram? There's a few changes on it as opposed to say Auberin-wiring1-a4-5500w-30a-e-stop.

1) there's an alarm buzzer on the PID; what is that supposed to do given that the 2352 isn't a timer?

2) for the element select switch, it's a "SPDT center-off in this diagram", but on others it's a Grainger GCX3264-12; is that difference significant?

3) There's now a third coil and a key switch; is the 3rd coil the same Auber contactor as the element contactors? I assume the key switch is simply the "master power switch" for the panel, correct?

Also, how much more complicated would a safe-start interlock be?

Thanks!
Dan
 
1. I use an alarm to let me know that is is almost at boiling temperature. That way you can set set the PID for say 212 degrees and the alarm for 205 degrees. At 205 degrees I switch over to manual control to prevent boil-overs.
 
I have a (probably stupid) question: one of my pots (the 10 gal one) is aluminum. Do I need to replace that with a SS one? Will I have any ionic issues brewing with an electric element with SS parts in an aluminum pot?

Thanks guys!
 
P-J, can you explain a few things about this diagram? There's a few changes on it as opposed to say Auberin-wiring1-a4-5500w-30a-e-stop.

1) there's an alarm buzzer on the PID; what is that supposed to do given that the 2352 isn't a timer?

2) for the element select switch, it's a "SPDT center-off in this diagram", but on others it's a Grainger GCX3264-12; is that difference significant?

3) There's now a third coil and a key switch; is the 3rd coil the same Auber contactor as the element contactors? I assume the key switch is simply the "master power switch" for the panel, correct?

Also, how much more complicated would a safe-start interlock be?

Thanks!
Dan
Dan,

1) The Alarm Lite Buzzer is there to alert the user to conditions setup within the pid. For instance: You setup your PID for your wanted strike water temperature in the HLT. When it reaches that set temp, the alarm will sound. There are many other things that can be done with it.

2) The difference is that movet22 wanted seperate indicator lights for display on his panel. He also called out the specific switch that he wanted to use. BTW: The switch you noted above is actually pn: GCX3264-120 from AutomationDirect.com - not Grainger - is also a "SPDT - Center Off" switch (Illuminated), (The info is in the Legend at the bottom of the diagram.)

3) That is correct. The "3rd coil" is actualy the same contactor as used with the elements: 240V - 30A - 120V coil. It is included to provide a Key Lock master power switch that movet22 wanted in his setup.

Regarding the "Safe Start Interlock": I'm sure it is not all that complicated to set up. Take a look at Kal's site for how he set it up if that is something you want to do. For me? I'm not a fan of that technique.

I hope all of this makes sense and helps you.

P-J
 
I have a (probably stupid) question: one of my pots (the 10 gal one) is aluminum. Do I need to replace that with a SS one? Will I have any ionic issues brewing with an electric element with SS parts in an aluminum pot?

Thanks guys!
I believe that you will be A-Ok using that kettle. I do not see problems with that. Consider some of the high end SS cook pots. They have sandwiched triple layer bottoms with an Aluminum core.

P-J
 
P-J said:
movet22,

Ok. Here is a diagram for your planned build:

As always - Click on the image to see (and save) a full scale diagram that is printable on Tabloid paper (11" x 17")

http://www.pjmuth.org/beerstuff/images/Auberin-wiring1-a4-5500w-30a-e-stop-8a.jpg

This link is for the Brewparts_Order.xls spread sheet that list most of the parts needed for your build. Save it to your system. When you click on the URL column items, the specific part referenced will show from the vendor. Use the TAB & Back Tab keys to navigate the sheet.

Near total cost is $480.

I sure hope this helps you in your adventure. If you need anything changed on the diagram, Please let me know.

P-J

P-J

This is almost exactly what I am planning. What would it take to add a Auber timer and the alarm? How do you feel about the switches Kal uses to turn off the alarms?

Thanks, Rich
 
Unless P-J modified that diagram a bit to meet the Ops needs, it looks to be the same as the one he did for me.
I have all of my parts ordered, and I am sitting right around $500 for the entire control panel. This includes the more expensive flanged plugs etc like Kal's build.
For me the 4 most expensive parts were the Enclosure, the PID, the RTD (with deluxe cable) and the Spa Panel. Those alone were almost 50% of the entire cost.
I picked up the 3 Contactors on Amazon for $25 delivered, the LED lights and switches were almost all from ebay/China seller.
If you want all of the seller's info for all my parts let me know.
I will start assembling my panel in the next few weeks after I move.
 
My advice, buy pots to jump to 10 gallon batches. It wont cost much more and you double your production with the same amount of brew day work.
 
Unless P-J modified that diagram a bit to meet the Ops needs, it looks to be the same as the one he did for me.
...
Correct. It is the same diagram I developed for you.

Getting old sucks. I do not know why I changed the date stamp on the bottom right of the diagram.

Hmmmmm.

Senility might be setting in. (Damn.!)

P-J
 
Sorry, no intent to hijack the thread. I was wondering if you hand something drawn up with the same scheme with a timer built in.
 
Sorry, no intent to hijack the thread. I was wondering if you hand something drawn up with the same scheme with a timer built in.
Sorry for the delay but it took me some time to create the new drawing for you.

As always - Click on the image to see a full scale diagram that is printable on Tabloid paper (11" x 17")


I hope this is of some help.
 
Sorry for the delay but it took me some time to create the new drawing for you.

As always - Click on the image to see a full scale diagram that is printable on Tabloid paper (11" x 17")


I hope this is of some help.
P-J I need to hire you to convert all my brewery schematics into your great graphical representation.
Great benefits and top salary.:D
As soon I am in beer heaven my family members will be lost troubleshooting my mess.

Cheers,
ClaudiusB
 
heh I'm moving in with my girlfriend and she has told me to stop spending money on brewing. You're a lucky one.

Tell her NO!

You are moving in with her to add to your life... no subtract from it.

Why would she ask such a thing?

What will you ask her to give up?

Everybody in a relationship should be allowed thier own STUFF... be it hbbies, motorcycles, friends, or what ever... EXAMPLE: It is ok for her to have friends you don't like... just be polite to them... you don't have to love them...

DPB

https://www.homebrewtalk.com/f14/swmbo-vs-homebrew-164813/
 
Hello everyone... again! After many months of life taking over, my lovely better half and I have completely finished a total renovation of our new house. This included needing a new roof- that we did not plan for- which sapped most of my reserve for this build. I must also admit that I have an equally addicting watch hobby, which means that not only the roof, but a beautiful in house Frederique Constant and a vintage c. 1960's Wittnauer Chronograph have kept me from rebuilding my funds for this build.

With all of that said, I sit here, typing to you with real progress being made. I have started by modifying and re-positioning an existing workbench in my basement into a usable table for the brewery. I have polyurethaned the entire piece for ease of cleaning and added some plastic sheets above where I will be brewing (so no crap falls into anything on brew day).

I also have on order lots of sight glasses and fitting from Bobby and a shiny new 15 gal BK. I am still debating on how to work out my control panel, but have been in contact with Ryan from ebrewsupply about that. I have looked long and hard into P-J's diagram, but I am really concerned about may lack of ability to make it look nice and my complete lack of any sort of electrical knowledge.

Also worth noting is that my lovely lady has said that she would be OK with me spending more on the whole set up if I could get pre-made parts in which all of the wiring was done for me. with that in mind, I will probably be pulling the trigger on Kal's pre-assembled 2 element kit shortly after the panel has been bought.

Obviously, the central theme of this thread being a 'budget build' has kind of gone by the way side, but I will still be documenting it nonetheless. I hope everyone enjoys as much as I will, this has been quite a while in the making for me!

Below are some pictures of the workbench as I have it configured and in its final resting place. The window to the left will be where I vent out the BK. I also used the remaining plastic from the ceiling cover to make a nice cover to drape over the rig in between batches to ward off dust and nasties (it is neatly folded on the table)

:)

CameraZOOM-20130101173550282.jpg


CameraZOOM-20130101173608154.jpg


CameraZOOM-20130101173643594.jpg
 
I too had problems with crap falling from the ceiling; since its a hundred year old house that's not surprising. So I got some Zinsser zero VOC primer and low VOC semigloss and painted the ceiling joists and subfloor above my brewing area.. Looks a lot better than plastic and makes the whole area brighter too. Takes maybe a few days including drying time and great results.
 
dcbw- My brother in law is a painter and we were originally going to have him paint the whole basement ceiling in that same style you mentioned, but at the moment he needs to finish the upstairs. From there I don't know how much my basement ceiling is on his radar :( The plastic will have to do for me at this current time.

In build news, I am going to be stopping at Lowe's after work to check out the ventilation solutions and perhaps pull the trigger on something and start to get that set up. Will post pics if I wrangle something in.
 
What you are about to see is disgusting. I am hardly a handy person and this was my first foray into duct work (as noted by the poorly rigged hanging solution), so bare with me.

I know that my stock 6'' inline fan will barely get the job done, but it was cheap. On top of that, having never even been down the ducting isle of home depot before, I didn't want any parts to be expensive b/c I assumed I would butcher them (I was kinda right!)

I am going to take a night off I think tonight, and will hopefully have my kettles and fittings by the weekend. I have also talked to Ryan from ebrewsupply and should be honing in on a decision soon as well. More to come... Cheers! :mug:

CameraZOOM-20130102183413331.jpg


CameraZOOM-20130102201705742.jpg
 
A quick update on the biuld progress: I have installed the water filter and have it set up with my [extremely ugly] stand to be able to fill my HLT. I have an order of parts in to Bobby and hope to be step-bit-drilling soon!

I also received the false bottom and sparge arm MT upgrade that I wanted! I'd say, all in, I am about 70% done. Heating elements should be in the pots relatively soon and my father in law is installing my GFCI 50a 240v outlet within the week (or so I hope).

I will post some pics this evening. This is getting exciting!
 
Back
Top