You are using an out of date browser. It may not display this or other websites correctly.
You should upgrade or use an alternative browser.
You should upgrade or use an alternative browser.
TeensyPi Networked Temperature Controller
- Thread starter jimmayhugh
- Start date

Help Support Homebrew Talk - Beer, Wine, Mead, & Cider Brewing Discussion Forum:
This site may earn a commission from merchant affiliate
links, including eBay, Amazon, and others.
old thread bump!
tried to build one of these for the lols. can't for the life of me even get the bloody web page to load ha!
just sits there loading, in the process of stopping apache the page then loads but of course starting apache again i can no longer load it.
pretty odd! anyway was fun busting out my soldering iron after a long time in the cupboard. will keep at it so i can learn about it all.
Hello:
I'm not the expert here but just to throw in my two cents: When I have that issue I find that it's one of two issues: a) my sensors/switches are wired incorrectly or aren't connect; or b) I need to reflash the Teesny. You do need to have at least one sensor and switch wired to the Teensypi for the web interface to display correctly.
Regards...Jon
hugemc
Member
- Joined
- Jan 21, 2014
- Messages
- 6
- Reaction score
- 0
can't get this to go. probably too many things i'm expected to know i don't!
i know this is a very old project but if anyone is out there that can answer there q's?
When programming the teensy, do i just upload the "OneWire DS18S20, DS18B20, DS1822 Temperature Example" or do i need to upload all the OneWire libraries?
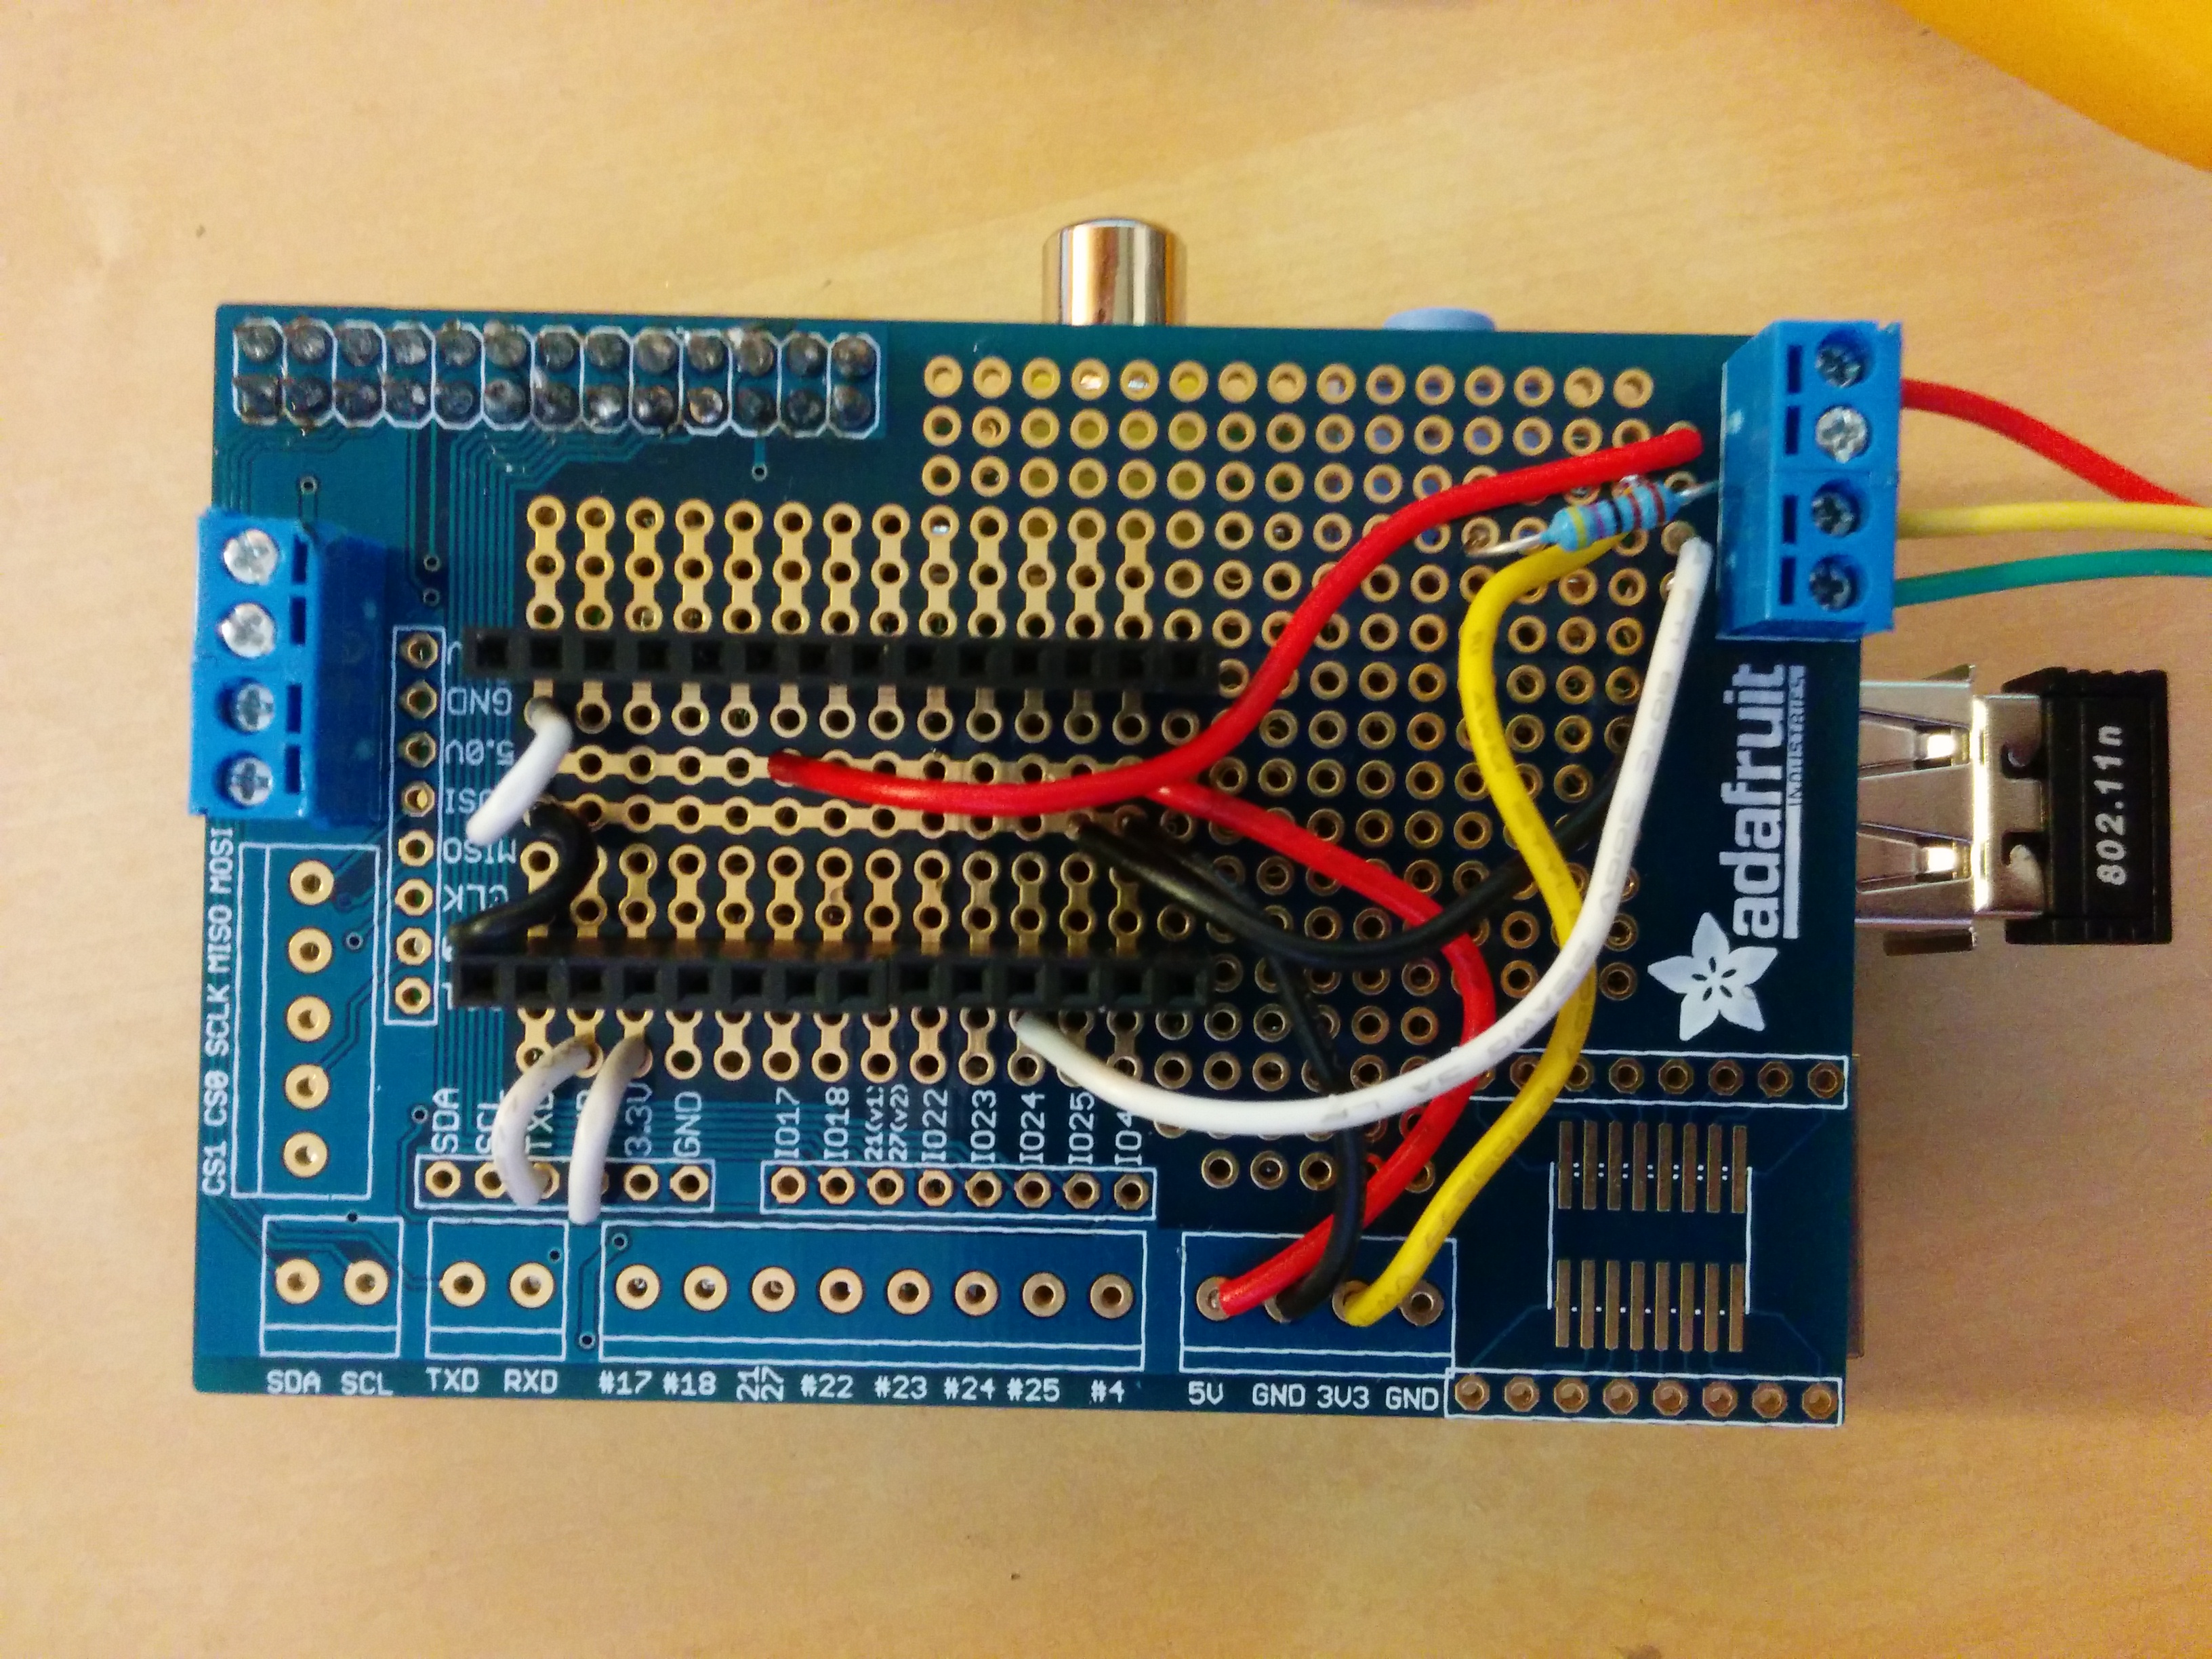
I've wired the board up according to the instructions here They're a tad vague on a few points for the noobs.
Do I have to have a onewire switch attached? Can i just hook up a temp sensor? I assume temp sensors will attach to the screw terminals on the top right of the board (in the image on the hardware setup page). Are the connectors as follows?
Red - VCC
Yellow - DATA
Green - GND
?
Jimmay says the 4k7 needs to be placed between the 3v3 power line and the data line. Is this connected in any way on the back of the board?
Anyway! Just using this as a learning experience. Ultimately i would love to use this as a network of fridge temp monitors in a small business that is dependent on functional fridges. Monitoring like this would be perfect for it.
i know this is a very old project but if anyone is out there that can answer there q's?
When programming the teensy, do i just upload the "OneWire DS18S20, DS18B20, DS1822 Temperature Example" or do i need to upload all the OneWire libraries?
I've wired the board up according to the instructions here They're a tad vague on a few points for the noobs.
Do I have to have a onewire switch attached? Can i just hook up a temp sensor? I assume temp sensors will attach to the screw terminals on the top right of the board (in the image on the hardware setup page). Are the connectors as follows?
Red - VCC
Yellow - DATA
Green - GND
?
Jimmay says the 4k7 needs to be placed between the 3v3 power line and the data line. Is this connected in any way on the back of the board?
Anyway! Just using this as a learning experience. Ultimately i would love to use this as a network of fridge temp monitors in a small business that is dependent on functional fridges. Monitoring like this would be perfect for it.
OP
OP
It's been a while since I looked at this project, so I had to revisit what I did here. 
You need to compile and upload the TeensyPi.ino file that is at my github site. To do that you need, at a minimum, an arduino IDE, modified with the latest version of Teensyduino, and the libraries associated with the ino file.
All you need is at least one DS18B20 or DS2406+.
Not sure what you mean by "the back of the board". The single 4k7 resistor is placed between the VCC (in this case, 3v3) line and the Data line. The resistot should be at one end or the other of the mini-lan.
Hope this helps
When programming the teensy, do i just upload the "OneWire DS18S20, DS18B20, DS1822 Temperature Example" or do i need to upload all the OneWire libraries?
You need to compile and upload the TeensyPi.ino file that is at my github site. To do that you need, at a minimum, an arduino IDE, modified with the latest version of Teensyduino, and the libraries associated with the ino file.
I've wired the board up according to the instructions here They're a tad vague on a few points for the noobs.
Do I have to have a onewire switch attached? Can i just hook up a temp sensor? I assume temp sensors will attach to the screw terminals on the top right of the board (in the image on the hardware setup page). Are the connectors as follows?
Red - VCC
Yellow - DATA
Green - GND
All you need is at least one DS18B20 or DS2406+.
Jimmay says the 4k7 needs to be placed between the 3v3 power line and the data line. Is this connected in any way on the back of the board?
Not sure what you mean by "the back of the board". The single 4k7 resistor is placed between the VCC (in this case, 3v3) line and the Data line. The resistot should be at one end or the other of the mini-lan.
Hope this helps
I'm having trouble with the PID function. I finished my brew system and started testing. Everything seems to load correctly and I was able to start an action and bring the kettle to a boil without issue. When I tried to test the PID, it let's me access the PID setup page but when I push the "Modify" button the browser immediately hangs and the browser is unresponsive until I reboot. Doesn't matter if I make changes to the setup variables (second debug message stream below) or just push modify with the default variables (first example below). I've tried everything I can think of but haven't been able to resolve. Looking for inputs on what else to try.
I'm running the lastest version of the RPI image and teensypi.ino (version 0.0.12tc). System includes teensypi board v5 with a Teensy 3.1, an action board (4 switches and LEDs) and sensor. All the devices work for actions, graphing, etc.
I've had the PID working previously so I've tried reverting to .ino version .7 and my original Adafruit piplate version/different RPI setup with an action board and relay that I used for the successful rice cooker test I mentioned in a previous thread and I'm getting the same browser hang. Also tried substituting a Teensy 3.0 with the latest .ino into the rice cooker setup with no change. Accessing browser through iPad, iPhone, Windows 8.1 (Explorer and Chrome) with no change.
Checked the debug messages through the minicom and got the attached. Monitoring all debug streams shows this:
You can see that the PID messages stop in the middle of sending the switch address but the Action and chip buffer messages continue.
Running just the Serial debug messages shows this (ignore the action messages; that was from a different attempt):

I'm running the lastest version of the RPI image and teensypi.ino (version 0.0.12tc). System includes teensypi board v5 with a Teensy 3.1, an action board (4 switches and LEDs) and sensor. All the devices work for actions, graphing, etc.
I've had the PID working previously so I've tried reverting to .ino version .7 and my original Adafruit piplate version/different RPI setup with an action board and relay that I used for the successful rice cooker test I mentioned in a previous thread and I'm getting the same browser hang. Also tried substituting a Teensy 3.0 with the latest .ino into the rice cooker setup with no change. Accessing browser through iPad, iPhone, Windows 8.1 (Explorer and Chrome) with no change.
Checked the debug messages through the minicom and got the attached. Monitoring all debug streams shows this:
updating Action: 6 - not enabled
updating Action: 7 - not enabled
updating Action: 8 - not enabled
updating Action: 9 - not enabled
updating Action: 10 - not enabled
updating Action: 11 - not enabled
updating Action: 0 - not enabled
updateMX enter
updateMX exit - 0 milliseconds
chipBuffer = 0XAA, 0X00, 0X00, 0XFF, 0XFF, 0XFF, 0XFF, 0XFF, 0X00, 0X00, 0X7E, C
M 0 0 0x00,0x00,0x00,0x00,0x00,0x00,0x00,0x00 70.00 0x00,0x00,0updating Action:d
chipBuffer = 0XAA, 0X00, 0X00, 0XFF, 0XFF, 0XFF, 0XFF, 0XFF, 0X00, 0X00, 0X7F, D
updating Action: 2 - not enabled
chipBuffer = 0XAA, 0X00, 0X00, 0XFF, 0XFF, 0XFF, 0XFF, 0XFF, 0X00, 0X00, 0X61, D
updating Action: 3 - not enabled
chipBuffer = 0XAA, 0X00, 0X00, 0XFF, 0XFF, 0XFF, 0XFF, 0XFF, 0X00, 0X00, 0X7F, D
updating Action: 4 - not enabled
updating Action: 5 - not enabled
updating Action: 6 - not enabled
updating Action: 7 - not enabled
updating Action: 8 - not enabled
You can see that the PID messages stop in the middle of sending the switch address but the Action and chip buffer messages continue.
Running just the Serial debug messages shows this (ignore the action messages; that was from a different attempt):
OP
OP
I'll have to dig out my dismantled test rig and fire everything back up, and see what's going on.
I'll try to duplicate your setup as closely as possible.
Which Raspberry Pi model are you using?
I'll try to duplicate your setup as closely as possible.
Which Raspberry Pi model are you using?
I'm using the model B (https://www.adafruit.com/product/998). I have the B+ but haven't used it due to the issues you saw with the Teensynet; may use it with my Teensynet setup and the B+ specific RPI image if I can't get it up on the Galileo (which isn't going well so far...)
The PID issue has echoes of the issue from message #221. Same symptoms anyway.
Thanks!...Jon
The PID issue has echoes of the issue from message #221. Same symptoms anyway.
Thanks!...Jon
OP
OP
When you reloaded the .ino code, did you first clear the EEPROM? I seem to recall some issues with EEPROM data locations not lining up properly between .ino changes, causing hangups.
Just a shot in the dark.
Just a shot in the dark.
No, I've never done that. Would I use this method: http://www.arduino.cc/en/Tutorial/EEPROMClear or is there an easier way?
OP
OP
No, I've never done that. Would I use this method: http://www.arduino.cc/en/Tutorial/EEPROMClear or is there an easier way?
That should work. The program is probably located in the "examples" section of the IDE under "EEPROM".
I haven't used the on-board EEPROM in my TeensyNet project, so I haven't made a EEPROM clear function similar to what I have on the TeensyNet.
...on the other hand, it does say this on the PJRC site:
https://www.pjrc.com/teensy/td_libs_EEPROM.html
Will still give it a try.
Thanks!...Jon
On Teensy 3.0, the EEPROM data is erased when you upload a new program.
https://www.pjrc.com/teensy/td_libs_EEPROM.html
Will still give it a try.
Thanks!...Jon
OP
OP
Thought you had a Teensy3.1
Correct. I'm using the 3.1. The PRJC page for the EEPROM doesn't mention the 3.1 but I assumed that the 3.1 would act the same in that case.
Anyway, I tried the EEPROM Clear on both my brew system and the test setup and no change. Browser still hangs when pushing the "Modify" button from the PID Setup page. The Teensy LED continues to flash happily but no response from the browser.
Anyway, I tried the EEPROM Clear on both my brew system and the test setup and no change. Browser still hangs when pushing the "Modify" button from the PID Setup page. The Teensy LED continues to flash happily but no response from the browser.
purdman10
Well-Known Member
jsbird I was not able to use teensypi.ino on my setup, but if you try teensydebug.ino that may work for you.
purdman10
Well-Known Member
I quoted from memory - it is teensypiPidDebug.ino.
I have an email out to Jim but I thought I'd post here to see if anyone else knows of the solution to this issue.
I just booted up my new box with 10x switches and 1x temp probe connected. At first nothing was recognized and I was at a bit of a loss. After some troubleshooting I have everything being recognized, but ONLY if there is no connections to pin 3 of the switches. As soon as I make a connection to pin3 of any of the switches, or even try and measure the resistance between pin1/pin3 on any of the switches, the Teensypi stops responding (light stops blinking on the Teensy, web interface stops responding). Immediately after I remove the connection/multimeter the Teensy responds again as normal. I've tested for shorts between pin 3 of all the switches with the GND and Data lines and everything seems good.
I'm kind of at a loss and don't know how to proceed or what the issue may be. If anyone has any suggestions I'm all ears!
Sounds like the sensors are only operating in parasitic mode? My first impression is it has to be something in the connections. There should be one and only one resistor between the "Data" and V+ line for the entire chain. Another thing that Jim has emphasized is that the sensors should be configured as a daisy chain versus a star configuration. I think that has more to do with noise but thought is was worth mentioning.
Sorry, just re-read your post and realized you were referring to the switches, not the temp sensors. May I ask what you have connected to line 3? That pin is essentially the output of the switch and should be connected to whatever you are trying to turn on (typically a relay). If so, what is the other pin of the relay connected to (should be V+)?
purdman10
Well-Known Member
After much time and effort in trying to build either a teensypi or teensynet, and given my less than stellar soldering skills, I have finally been able to have a fully functional teensypi with a teensy 3.1 to put into a control panel. I am using a three burner propane gas system. There is a lot of information using PID controllers with gas, but much less about arduino-based controllers such as the teensy. My question - for the control of the 2 Honeywell VR8300A3500 valves I will be using, can I connect another action board to 2 SSRs to control the gas valves, just as the pumps are controlled with an action board and SSRs?
OP
OP
After much time and effort in trying to build either a teensypi or teensynet, and given my less than stellar soldering skills, I have finally been able to have a fully functional teensypi with a teensy 3.1 to put into a control panel. I am using a three burner propane gas system. There is a lot of information using PID controllers with gas, but much less about arduino-based controllers such as the teensy. My question - for the control of the 2 Honeywell VR8300A3500 valves I will be using, can I connect another action board to 2 SSRs to control the gas valves, just as the pumps are controlled with an action board and SSRs?
Looks like it should work.
Bigdaddyale
Well-Known Member
bookmarked
OP
OP
bookmarked
This is a very old thread, and I am not currently doing any new upgrades to the TeensyPi.
The TeensyNet is a more recent project, and one I am more likely to maintain.
OP
OP
The TeensyPi website will be going away by the end of the year (2016), as I am no longer developing nor supporting the device.
Similar threads
- Replies
- 9
- Views
- 3K
- Replies
- 13
- Views
- 2K
