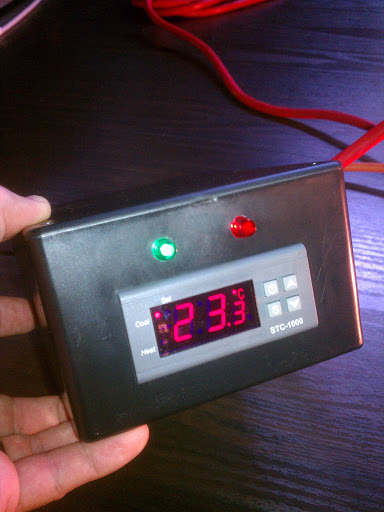
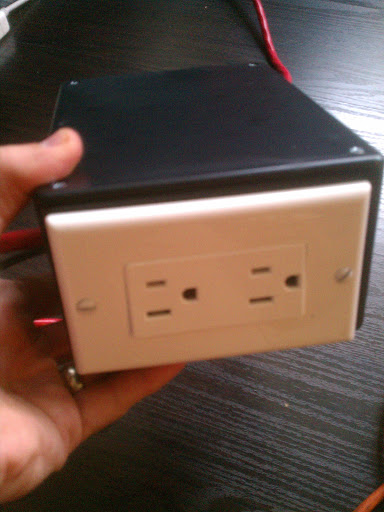
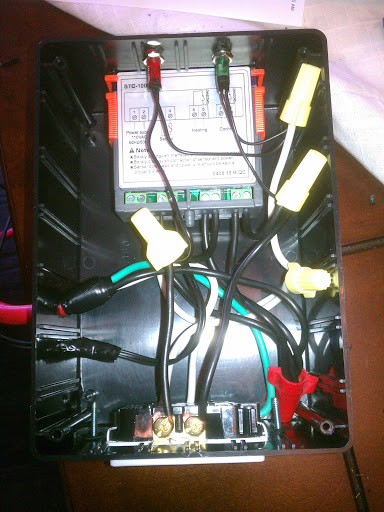
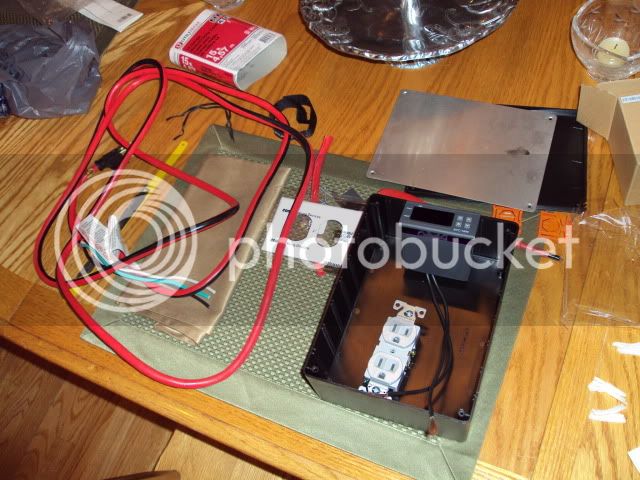
ebay aquarium temp controller build

Homebrew Talk - Beer, Wine, Mead, & Cider Brewing Discussion Forum

Help Support Homebrew Talk - Beer, Wine, Mead, & Cider Brewing Discussion Forum:

This site may earn a commission from merchant affiliate links, including eBay, Amazon, and others.
I notice that it cools to SP, then shuts off the compressor, which then lets the temp rise to SP+offset, then kicks on the compressor.

So with a 20* SP and 0.5* offset, you average at 20.25* in the chamber.

If you really want to hold at 20*, you need to set your temp to 19.75 with an offset of 0.5. Or to 19.7 with an offset of 0.6, or 19.8 with an offset of 0.4. You get the idea.:mug:
I think he mentioned that he is heating currently, so that is why he is setting it higher.

If you are really going to get that anal about it, it isn't a simple avg even with steady ambient temps. It will be some kind of logarithmic or exponential decay/increase waveform. It really just isn't that critical with proper probe placement that allows a .5C diff. Maybe a bit of compensation could be justified in winter and summer when it is purely heating or cooling, but there are meds that can help with that.
 
hot damn! just built two of these in about 4 hours. The multimeter says they both work. Tomorrow I'll plug them into the chest freezer and heat tape to see how they stand up in the brewery.

Thanks for the awesome idea! I'll be spending the cash I saved on more carboys to fit in the giant fermentation chambers.
 
So, quick question:

Wired mine like the OP, and wasn't getting anything from the outlet. Checked the computer out, wasn't getting voltage.

Firstly, Does the compressor delay trigger first before the heating/cooling turns on?

If not, wtf?
 
I thought the same thing. And I actually emailed the seller about it. The compressor delay kicks in as soon as the unit turns on. Be patient. It will kick on after your compressor delay time (i.e. 10 mins is what mine is set to) ends.

The cooling light came on and blinked, and did not kick on the compressor. Then after the delay, the light stayed on continuously and then it was working appropriately. Otherwise, it could be a faulty controller, but I doubt it.

Let us know what happens.

Ryan M.
 
So, quick question:

Wired mine like the OP, and wasn't getting anything from the outlet. Checked the computer out, wasn't getting voltage.

Firstly, Does the compressor delay trigger first before the heating/cooling turns on?

If not, wtf?

If your wiring is correct, and you've waited till the light stops blinking (that's the delay), then you've either ordered a 220v model or recieved one by mistake. On your controller, where the graphics that show the numbers and what wires go into them, is it 110V or 220V? If it's 220 it's not going to work and you'll need to replace the model.
 
Nope, mine is a 110 (though if it was a 220, i'd just go wire for that, i have it available)

Something is wrong in it, causing the relays not to change from open to closed, thus not sending power down the line.

Bah.
 
Nope, mine is a 110 (though if it was a 220, i'd just go wire for that, i have it available)

Something is wrong in it, causing the relays not to change from open to closed, thus not sending power down the line.

Bah.

Did you completely break off the tab on the right side of the outlet? The one that connects the top and bottom? Use a needlenose and clamp on then rock back and forth until it snaps off and the two parts are completely separated.
 
And a note to others, I have ordered 3 110V and I still got one that was 220V. I spent 3 hours on it before I checked the sticker to see it was a 220. The ebay item, the box, and the instruction manual were all 110V, but the unit was 220v. I'm not saying you do, but just because people buy a 110V doesn't mean they always get one. The sellers are known to make mistakes.
 
Something is wrong in it, causing the relays not to change from open to closed, thus not sending power down the line.

Bah.
While this is possible, if true, you would have the first 110V unit on HBT to either not work properly, or quit working.

You might try double checking your wiring, and/or checking for continuity on the switched terminals when they are active. Is the cool or heat light flashing or solid ever? You mention you "checked the computer", but it wasn't getting voltage. Not sure what that meant.

RE: breaking tabs on the outlet. That may be necessary, but will not make it appear to not work. It can make it appear to activate both heat and cool simultaneously.

Have you tried hooking it up to your 220v system? All signs pointing to this being a 220, possibly with the wrong sticker on it.
 
Alright: I removed the case from the computer.

The LCD, temp sensor, works.

Heat light comes on, doesn't flash.

Relays are JQC-3FF

Connect power, split between Heating side and Power supply, multimeter attached to a pigtail wire nutted on the white wire, and the hot out on the switch side(thus completing a circuit)

Waited 10mins, just to be damn sure the compressor delay wasn't a factor. Checked the contacts, 120v leads in to the relay, and 0v out.
 
Relays are JQC-3FF
By "computer", I assume you are talking about the controller case.
There is no delay for heat. If the heat/cool light is solid, the relay is closed (or is supposed to be).

The relays are the same for both 110VAC and 220VAC controllers. What is different is the transformer. There should be markings on it that will tell you whether it is a 220VAC or 110VAC transformer. There are pics in this thread of the transformers for the 110VAC and 220VAC that show the differences.

Alternately you could check voltage on the leads going to the relays. The input/activation DC voltage should be printed on the relay. If you have a 220VAC transformer, you will only have 1/2 of the required activation voltage.
 
I guess you don't "have to" but its much safer if you do. Less chance of a wire getting snagged or pulled out.
 
fixitoscar said:
I guess you don't "have to" but its much safer if you do. Less chance of a wire getting snagged or pulled out.

So the ground has nothing to do with the controller then. I'm mounting the controller on top of the freezer so all the wires will be in the back.
 
Thank you thank you for this thread!!! Got this controller put together and working perfectly. It's going to be nice to finally be able to controller my fermenting temps without using a cooler and ice.
 
Thank you thank you for this thread!!! Got this controller put together and working perfectly. It's going to be nice to finally be able to controller my fermenting temps without using a cooler and ice.

I put mine together about a month ago. I now Have my 1st Brew in my freezer using the STC 1000. What a pleasure it is to know the temp is spot on, AND you don't have to do anything. :rockin:

It's kinda like "RON Po PEEL " SET IT and FORGET IT ! yea

But like you said, without this thread, I for one would never have attempted to get it, let alone wire it!

I agree, Thanks to ALL who shared this information !

:mug:
 
Okay, I purchased the 1, 2 loading; 3, 4 power supply; 5, 6 function control; 7, 8 temp probe controller. After wiring up I plugged it in, the LCD lit up and I turned it off. I plugged it back in again and nothing. I checked all connections but still nothing. I have come to the conclusion that my wiring is horribly wrong or I fried the controller.

I used an old extrention cord (with a ground) but was not sure which wire was which (black or white) besides the ground. So I assumed that they are the same as long as they are not mixed up during the wiring. So I assigned one wire red (no white wire) and the other black, plus the ground (green). Also I am using 18 guage wire.

Here is my wiring set up.

From extention cord:

Green to ground on socket
Red (white) to wire connector connecting two other red wires (one going to the socket (ground side), the other going to 3.
Black wire going to connector connecting two other black wires (one going 1 the other going to 2)

From the Controller
1: black wire to extension cord (connector)
2: black wire to socket (opposite of ground side)
3: black wire to extension cord (connector)
4: red wire to extrension cord (connector)
5: red wire red wire to socket (ground side)
6: black wire to socket (opposite of ground side)

Sorry I am horrible with electronics....any wiring diagrams would help a lot. Thanks.

This thread: https://www.homebrewtalk.com/f51/ebay-fish-tank-controller-build-using-wal-mart-parts-261506/ has awesome pictures and diagrams.
 
From the Controller
1: black wire to extension cord (connector)
2: black wire to socket (opposite of ground side)
3: black wire to extension cord (connector)
4: red wire to extrension cord (connector)
5: red wire red wire to socket (ground side)
6: black wire to socket (opposite of ground side)

Sorry I am horrible with electronics....any wiring diagrams would help a lot. Thanks.

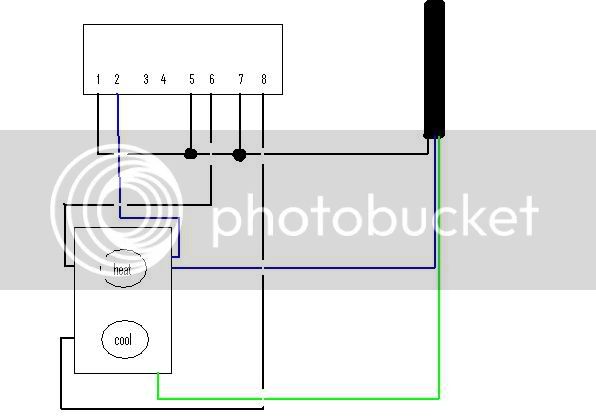
Post #1 in this thread has a wiring diagram.

I just built one earlier this week so it's still pretty fresh in my mind. I recommend using the correct color coded wires so that everything is clear and consistent. I'd also recommend using 14 gauge wire.

Assuming you're using the STC-1000, you need to have three hot wires coming off the black (hot) wire of your extension cord. You can do this with a terminal block or with something as simple as a wire nut to join the wires. These hot wires will always be hot when the controller is plugged in and connect to #1, #5, and #7 on the controller.

The neutral wire (this is usually a white wire but it sounds like yours is red) may need two or three connections depending on how many outlets you use...if you use one outlet you should only need two connections; I went with two switched outlets (so I have two switched cooling plugs and two switched heating plugs) so I have three connections. Same thing, you can use a terminal block or something as simple as a wire nut to join the wires. One of the white wires goes to #2 on the controller and the other(s) goes to the neutral side(s) of your outlet you're switching.

#3 and #4 are used for connecting the temp probe. If you applied 120V to these, I'm guessing you probably fried your controller.

#6 and #8 should have a black wires running to the hot side of the outlet(s). These are controlled by the controller so they'll only be hot when the controller has switched the applicable circuit on.

The green wire from your extension cord needs to be connected to the green ground wire connection(s) on your outlet(s).

if mklojay's description is right, he didn't buy the stc-1000 he says
mklojay said:
... 7, 8 temp probe controller ...
which would be a different controller than post one of this thread.
 
if mklojay's description is right, he didn't buy the stc-1000 he says

which would be a different controller than post one of this thread.

Correct, it's probably the single stage unit, for which I have posted wiring diagrams in this thread several times.

5712-single-stage-wiring.jpg
 
So if I wanted to do this without a project box, and as a single stage (heating only) regulator I could (correct me if I'm wrong)...

Cut a 12 AWG extension cord in half.
Connect the grounds together.
Connect the hot from the plug end to both pins 1 and 5 (wire nut).
Connect the neutral from the plug end to pin 2 and receptacle end (wire nut).
Connect the hot from the receptacle end to pin 6.

I don't have a chest freezer yet, so I don't have use for both heating and cooling, but I'm trying to figure out a way to make my crock pot not run so hot and figured a temp controller would fix it, then I realized I could make a sous-vide machine also, same idea. It's funny because I was planning on building this as a two stage at some point, and now this is just an excuse to get started on it now.

Looking for a quick and dirty way to get it up and running, and then later spend a bit more time and energy to properly "package" it.

Sounds like this should work, right?
 
Got around to putting mine together today. It looks like after first test that it works as designed! Cool! :mug:
I didn't have a black receptacle. I just used one I had laying around in the garage.

IMG_20111203_132217.jpg

IMG_20111203_132308.jpg

IMG_20111203_131140.jpg
 
Built mine and its working, But:

I am fermenting 2 glass carboys in a chest freezer. 1 carboy has a thermowell with the probe inside (also filled with stansan). My settings are F1=17, F2=0.5, F3=10, F4=0. I am using a blow dryer for the heating.

My problem is that when the hair dryer kicks on at 16.5 and then the temp increases to 17.0, the hair dryer shuts off but then the temp still (in about 4 minutes) increases to 17.5, triggering the freezer to cool back to 17.0. Then the beer still cools and gets to 16.5, triggering the cycle over again, with the limit of the 10 min compressor delay.

I have tried a F2=1.0 but it seems to make the problem worse.

Any suggestions? I was thinking it might be a bad idea using the hair dryer. Thanks
 
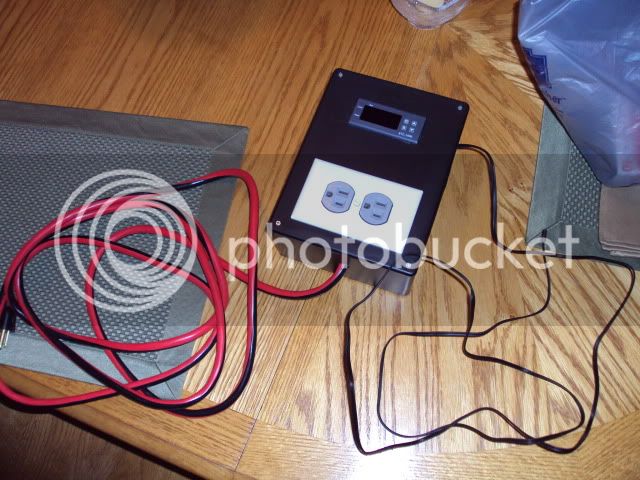
i was excited about the prospect of this temp controller, so i got one from ebay and put the whole thing in a project box from radio shack. one plug is switched for heating and the other for cooling. i have yet to build up my fermentation chamber that i'll use this on, but preliminary tests confirmed that the unit worked great. there is a 0.3 deg C differential on this thing, so it is pretty accurate and easy to set. i used a 14 gauge extension cord for all the wires. it does read in celcius, but that's OK by me.

all of the parts:
DSC00889.jpg


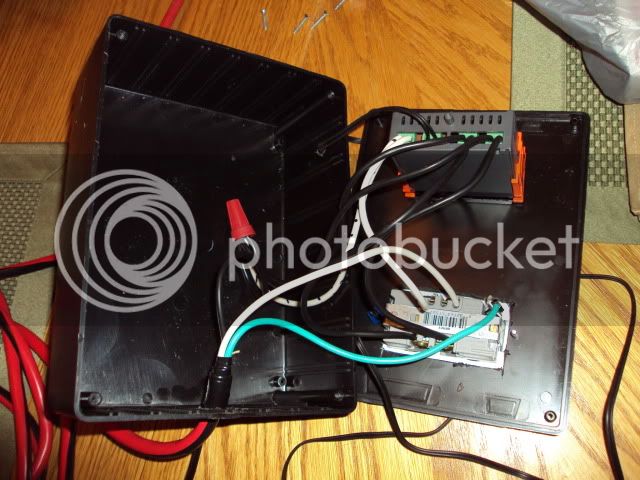
did some sloppy cut outs and wired it up:
DSC00899.jpg

power cord and sensor gives plenty of slack:
DSC00892.jpg


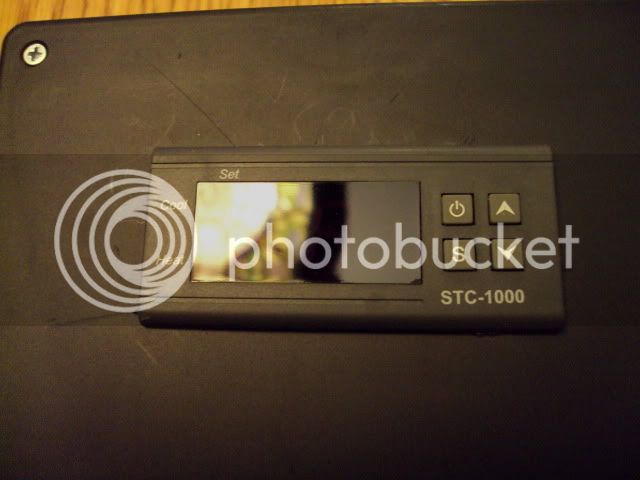
close up of the temp controller:
DSC00896.jpg


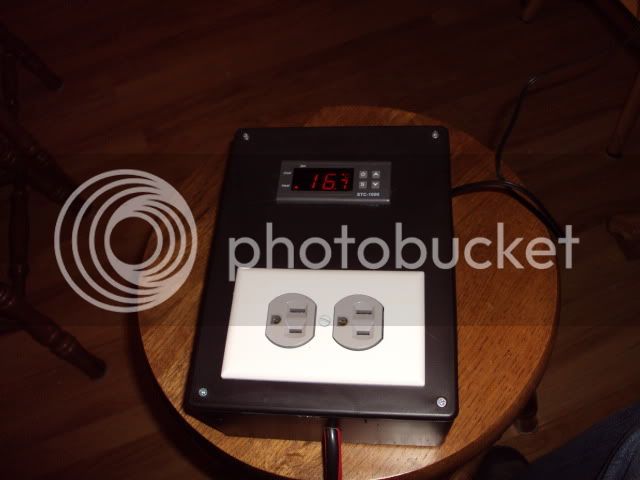
powered up:
DSC00890.jpg


my wiring diagram (sloppy also). i only used one wire nut to join the hot wires as you can see in one of the pics above. also, very important to break off the jumper tab on the hot side so you can control each outlet independently.
possibleschematic.jpg
Can you dumb this down and tell me how to wire this without the fancy box? I'm only using this for my freezer.
 
nutsok said:
Can you dumb this down and tell me how to wire this without the fancy box? I'm only using this for my freezer.

Wiring without a box is the same as with a box just don't put the unit in a box
 
WinnerWeiner said:
Built mine and its working, But:

I am fermenting 2 glass carboys in a chest freezer. 1 carboy has a thermowell with the probe inside (also filled with stansan). My settings are F1=17, F2=0.5, F3=10, F4=0. I am using a blow dryer for the heating.

My problem is that when the hair dryer kicks on at 16.5 and then the temp increases to 17.0, the hair dryer shuts off but then the temp still (in about 4 minutes) increases to 17.5, triggering the freezer to cool back to 17.0. Then the beer still cools and gets to 16.5, triggering the cycle over again, with the limit of the 10 min compressor delay.

I have tried a F2=1.0 but it seems to make the problem worse.

Any suggestions? I was thinking it might be a bad idea using the hair dryer. Thanks

So what is the problem? Sounds like it's working as u have it programed?
 
Built mine and its working, But:

I am fermenting 2 glass carboys in a chest freezer. 1 carboy has a thermowell with the probe inside (also filled with stansan). My settings are F1=17, F2=0.5, F3=10, F4=0. I am using a blow dryer for the heating.

My problem is that when the hair dryer kicks on at 16.5 and then the temp increases to 17.0, the hair dryer shuts off but then the temp still (in about 4 minutes) increases to 17.5, triggering the freezer to cool back to 17.0. Then the beer still cools and gets to 16.5, triggering the cycle over again, with the limit of the 10 min compressor delay.

I have tried a F2=1.0 but it seems to make the problem worse.

Any suggestions? I was thinking it might be a bad idea using the hair dryer. Thanks

Another option is to only use the function that you need at the time (heat in the winter and cooling in the summer. Or, it sounds like you have too much heating power quite frankly. Have you tried a reptile heater or 60W/100W incandescent light bulb in a can as a heat source? You might also have better luck moving the sensor to the surface of the carboy which will prevent the surface of the carboy from being over heated or over cooled while the remainder of the wort is being warmed/cooled. The skin temperature of the carboy should be very close to the wort temperature and should also keep the alternating cycles from happening.
 
Another option is to only use the function that you need at the time (heat in the winter and cooling in the summer. Or, it sounds like you have too much heating power quite frankly. Have you tried a reptile heater or 60W/100W incandescent light bulb in a can as a heat source? You might also have better luck moving the sensor to the surface of the carboy which will prevent the surface of the carboy from being over heated or over cooled while the remainder of the wort is being warmed/cooled. The skin temperature of the carboy should be very close to the wort temperature and should also keep the alternating cycles from happening.

I had this same problem for a while so I just plugged in the freezer so that it could cool the carboy. when it cooled it wouldnt turn the heater on because the heater wasnt plugged in. I let the carboy get into the temp range before I plugged the heater in.

it also sounds like you could use a bit more thermal mass in the chamber if you can fit it. I found that after I added all my little batches of meads and cellared beers to my chamber that sucker doesn't move for anything.
 
Amazing

-=Jason=-
Sent from my HTC using Home Brew Talk

I love this thing, cheap and works perfect for the size fermentation the majority of us on the forums use. I got lucky and found it before I invested a lot more money is other heating products.

As someone pointed out though, stock up on these bulbs because they're being slowly removed from the shelves in favor of LEDs. They usually go on sale in bulk at HD or Lowes every other week.
 
Back
Top