Natural gas brew stand - 23 tip burner to 10 tip conversion build.

Homebrew Talk - Beer, Wine, Mead, & Cider Brewing Discussion Forum

Help Support Homebrew Talk - Beer, Wine, Mead, & Cider Brewing Discussion Forum:

This site may earn a commission from merchant affiliate links, including eBay, Amazon, and others.

mykayel

Well-Known Member
Joined
Feb 26, 2007
Messages
203
Reaction score
3
This is my version of a natural gas burner that I made. The main reason I went this route is the ease and convenience of using the unlimited supply of natural gas. In the long run it will be cheaper also as the cost of propone vs natural gas is factored in, but that will have to be a long term price recovery.

There was a decent amount of information out there from what others have done but at the same time, every time I came across a thread it seemed there was incomplete information so this is the documentation of what I did.

From what others had said, all I would need is the 10 tip burner and even that would be overkill for a 10 gallon boil. I wanted to go the most economical route so as others have done, I bought the 23 tip nozzle burner or wok burner for $23, it was like $30 after shipping, instead of buying the actual 10 tip burner which is around $60 from morebeer.com. I took out some of the jets and plugged them with 8mm x 1.0 bolts as I found in this thread. Plugging with the bolts using plenty of Teflon tape worked very well to seal them.

The first configuration I tried was very similar to what was shown in the previous referenced thread, I took out the middle four burners and then left only the ones in the outer ring that were pointing in one direction and a four that were pointing inward (sorry no picture). My thought was that this would give the most even heat without any big hot spots. But this does not work very well. I had to light each and every tip; they would not light each other. And when this happened, I understood what others were saying about these burners being temperamental with individual nozzles self extinguishing, especially when they were not at full blast. This also confirmed what others had said about these types of burners only being an on/off without really any heat control even though there were some that said they could control it just using a ball valve as a regulator (and I didn’t understand why some could get it to work but others couldn’t).

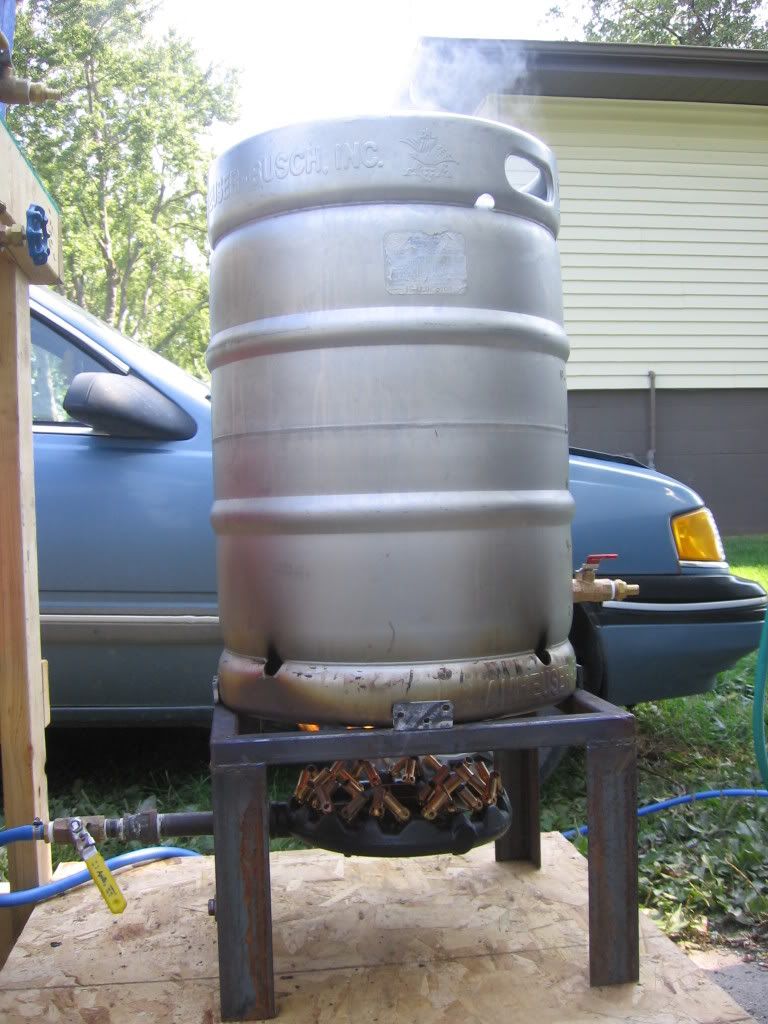
After this failed attempt, it occurred to me that these burners (whether it be the 10, 23, or 32 tip) with all of the tips in place, the tips are pointing at each other and with all of the tips in they would light each other with no problem. So that’s how I cam up with my configuration, I still decided to try only using 10 tips but have them all together where they would be pointing at each other so they could light each other so if one would self extinguish it wouldn’t matter as it would just get re-lit instantaneously by another tip. I tried the configuration below with just 10 tips all in one area and this works perfectly. The tips will light each other and it is very controllable just using the ball valve.

01-burneroff.jpg


01-5-burner-close-up.jpg
 
I used 1”x1”x1/4” angles (my dad had some of this laying around so it was free) that I cut to 12” long and welded them together (I used a cheep wire feed welder so anyone that has any welder will work). I also used the 1”x1”x1/4” cut to 12” for the legs and welded them to the inside of the box. The cross member that supports the burner and the four tabs to keep my keggle from falling off are all made from 1”x1/4” bar stock. Originally I just clamped the burner support to the frame so that I could adjust it to the flame height that I thought would work well, I ended up with the top of the tips 4 1/2” away from top of the stand. I used an 8” piece of 1/2" black iron pipe out to the ball valve. To clamp the burner to the cross member and to one leg, I actually made my own U-clamps but they could be bought.
02-stand-top-view.jpg


03-burner1.jpg


04-stand-side-view.jpg
 
My main gas line was 3/4" black pipe, there was already a “T” that was capped where the line turned to go to my furnace and water heater, so I uncapped that and added another 10’ piece of pipe before I reduced it to 1/2" and added a ball valve and a 1/2” x 1/2” adapter to attach the hose to. I wanted to keep the larger diameter pipe as far as possible to prevent any possible supply issues if the furnace and or water heater would kick on during a brew session. The black iron pipe runs approximately 30’ within my basement and then I have 25’ of the 1/2" I.D. “utility hose” that I bought from Lowes before it connects to the burner.
05-gas-connection-to-main-line.jpg


This is the view from the inside of the hose running from my basement to the outside.
06-hole-inside.jpg


From the outside I bought an exterior electrical outlet cover and just drilled a hole through the bottom spot for the hole to go through, this makes for a clean appearance on the outside of the house.
07-hole-outside-hose.jpg

08-hole-outside-closed.jpg
 
Flame test before I added my wind screen, this is about as low as I would comfortably go without worrying of the flames going out (they will definitely go lower though). There was no wind on this day. This is the reason I also added a wind screen (see below) so that I could adjust the flow low without any worries after I have the boil going.
09-burern-flame-low.jpg


This is the flame full blast.(only 10 tips).
10-burner-flame-high.jpg
 
Burner on low with keggle on top.
11-burner-flame-stand-low.jpg


Burner on medium with keggle on top.
12-burner-flame-stand-med.jpg


Burner on high with keggle on top.
13-burner-flame-stand-high.jpg
 
I did a wind shield out of some sheet metal I found at Lowes and just cut it to fit (it is 8” tall and I left about 1/2” gap at the top) and bolted it in place with 1/4” bolts. I added a tee and another ball valve to supply a 1/4” I.D. copper tubing that would act as a pilot light so that I could turn the burner off and not have to re-light it (not that relighting it is any issue, it was more so that I saw someone else that had done so and it sounded like a good idea.)
14-pilot.jpg

15-stand-side-wind-gard.jpg


Parts list and estimated costs:
23 tip burner: $23 +$10 shipping
13- 8mm x 1.0 bolts $10
Plumbing pieces:
1/2"x 8” black iron pipe $3
2- 1/2" ball valves, 2x $6.93 = $13.86
2- 1/2"x 1/2” MIP Nipple, $5
25’- 1/2" I.D. utility hose, 25x $1.17 = $29.25

Steel:
8 - Angle 1”x 1” x 1/4" – 12” long (free for me), approx $30 if bought from Lowes, probably about $10 if bought form a welder or other steel supply.
1- 1”x 1/4" bar stock – 15” long (free for me), approx $10 if bought from Lowes, $3 if bought from others

Sheet metal:
16”x 36” flat sheet metal, I cut to 8” tall, $5

Optional pilot light:
1- 1/2" ball valve $6.93
1- 1/2" pipe “T”, $1.43
2- 1/2" x 2 1/2" black iron pipe, 2 x $0.78 = $1.56
1- 1/2" MIP to 1/4" O.D. compression fitting, $4.12
1- 1/4" O.D. x 5’ soft copper pipe - $5

Side note:
After the fact, I’ve saved the extra tips that I took out and thought about making a second burner, even though I haven’t, I thought I’d share my thoughts. Basically out of 1/2” pipe just make two parallel pieces as shown below, and with a 8mm x 1.0 tap place the burners at 45 deg angles so that each side is pointing at each other, and if you offset each side slightly, then one tip would light two on the other side. I wouldn’t place them two far apart as I stated above, they need to be pointing at each other so that they will light each other and not self extinguish.
16-burner-option.jpg
 
I haven't actually brewed with this yet but I don't forsee any problems. Any questions or comments?
 
So you blasphem my design by Xing out my picture. I can live with that.
The pro to my plug pattern is a more even flame across the entire vessel but the con is that you have to light the tips in a few places and cannot use a pilot.

I also thought about making up additional burners with the spare tips because that's really the part that would be more difficult to make. I just haven't gotten around to it because I didn't want to buy such an odd tap size just for that purpose.
 
Looks VERY nice. I hve been thinking about switching to natural gas but have to move all my brewstuff from the garage to the porch where the natural gas line is.
 
If gas was my only option for heating it would be natural gas vs propane one hundred to one hands down. Besides I have a capped off natural gas line in my open patio area. Congrats on working with it until you got the results you wanted without spending big bucks on LHBS burner unit. There is a reason why they are in business and doing good especially in my area. Many people with money and not a clue how to build a thing drop coin in a heartbeat, i've seen it a couple times. I can't believe Bobby_M that a 8mm tap is above your available pocket money. A electricians EMT bender up one size you can bend your pipe to your needs, drill and tap and make a burner cheaper than what the LHBS sell 'em for last time I checked. Having the spare nozzles was the clincher. Just need a reducer with mounting bracket, jet and valve then a scratch built burner can be made. Air control jetting just a testing process.
Great stand it will hold up anything you want to boil on it.
 
The pro to my plug pattern is a more even flame across the entire vessel but the con is that you have to light the tips in a few places and cannot use a pilot.
Yeah, I orginally followed your lead trying to get a more "even" heat across the bottom, but I don't really think that is an issue at all with the burner on full blast the flames are spread across the entire bottom of the keggle. Would the heat be a little more even with your patter, probably but IMHO, its insignificant, especially considering the pro of not having to light every jet and being able to use a pilot light. But to each their own.
 
Looks VERY nice. I hve been thinking about switching to natural gas but have to move all my brewstuff from the garage to the porch where the natural gas line is.

I don't know if this helps you at all or not, but I have a good 30' from of pipe from my meter + 25' of hose to the burner. If you keep as large a diameter of pipe/hose as possible in route to your garage, you shouldn't have any supply issues.
 
Yeah, I orginally followed your lead trying to get a more "even" heat across the bottom, but I don't really think that is an issue at all with the burner on full blast the flames are spread across the entire bottom of the keggle. Would the heat be a little more even with your patter, probably but IMHO, its insignificant, especially considering the pro of not having to light every jet and being able to use a pilot light. But to each their own.

I notice that your burners sit a little lower than mine too. I occassionaly still get some orange flame from what I'd call "CO pillowing" under the keg skirt. Let me know if you have any problems with that due to the enclosed wind shielding after like 10 minutes of boiling.
 
I'm hoping that I won't have any issues like that. That's part of the reason I left a 1/2" gap at the top of the wind shield to allow good flow of air (flames) from the bottom up but just protecting it from the wind.
 
I ended up using Bobby_M's design but with 17 jets, blocking the center four and two others. I have no problems with using a pilot light and not having all jets light as long as my kettle in on the stand when the jets light off. Take it off and not all jets light up.

I also fought orange sooty flames by trying various heights of the burner. Nothing worked until I put a couple of angle irons on top of the stand and set the kettle on them. I have wider kettles (Megapot) and I believe they block enough of the side area that the CO2 cushion Bobby_M talks about develops very quickly underneath the kettle. Raising the kettle an inch or so provided enough vent area that everything works fine.

My NG supply is half inch and I have a regulator dropping the pressure to 3.5 pounds. I also have a ball valve downstream of the control solenoid.

Picture2.jpg
 
Here is my 32 tip setup. I use it often. Me and my dad ( who is a welder/fabricator) built the stand. Have about 17' of 3/8" hose off of my 1" gas meter. You have to run it low, makes it a little sooty, but works great!
021.jpg

010.jpg
 
Nice thread OP, i am currently thinking about changing over my 10gal sculpture over to NG. The convenience of never having to change the LP tank out is my main motivation. I have two concerns. 1. Can NG burners bring 10gal to a boil as fast as high pressure LP? What kind of BTUs do they put out? 2. IS there a problem with black soot? Where did you pick up those burners?
 
Nice thread OP, i am currently thinking about changing over my 10gal sculpture over to NG. The convenience of never having to change the LP tank out is my main motivation. I have two concerns. 1. Can NG burners bring 10gal to a boil as fast as high pressure LP? What kind of BTUs do they put out? 2. IS there a problem with black soot? Where did you pick up those burners?

I have not yet brewed with mine (I've been busy lately) but I will update you once I have, but from my reasearch people have said that a 10 tip burner is on the overkill side for a 10 gallon boil, that's the reason I took out half of the tips (I figured I could always add tips back in). And from the little testing that I did, I beileve this 10 tip set up will be just right, more than enough heat to get it to a boil quickly while easily adjustable to back off the flame to keep a steady boil without overding it. I cannot comment on the soot just yet but my guess is that so long as you don't have the flame to close to the bottom of your brew pot so that you get complete combustion, it won't be an issue.

As in my original post, I got my burner from 23 Tip Round Nozzle Jet Burner (natural gas) - CHINESE WOK RANGES - RANGES - EQUIPMENT www.morebeer.com also sells a variety of naturl gas burners but they are a bit more expensive when they appear to be the same exact thing.


Maybe some of the other posters can chime in on how well their setup works, how far they have the top of the tips to the top of their stand. How many tips they are using and how fast it brings it to a boil. That was my whole point of showing what I did so that others could get a good idea of how to do this.
 
I ended up using Bobby_M's design but with 17 jets, blocking the center four and two others. I have no problems with using a pilot light and not having all jets light as long as my kettle in on the stand when the jets light off. Take it off and not all jets light up.

I also fought orange sooty flames by trying various heights of the burner. Nothing worked until I put a couple of angle irons on top of the stand and set the kettle on them. I have wider kettles (Megapot) and I believe they block enough of the side area that the CO2 cushion Bobby_M talks about develops very quickly underneath the kettle. Raising the kettle an inch or so provided enough vent area that everything works fine.

My NG supply is half inch and I have a regulator dropping the pressure to 3.5 pounds. I also have a ball valve downstream of the control solenoid.


What are you using for your pilot? I just smashed the end of the 1/4 copper tubing, it works but its not the best.

Also, I thought house hold natural gas pressure is around 0.5 psi to start.
 
I used the following:

Drillspot.com:
Honeywell Q314A6094 Pilot Burner $23.32
White Rodgers 764-742 Gas Pilot Safety Valve $68.45
Honeywell Q340A1066 Thermocouple $6.62

Fremont Industrial Supply:
STC 2 way normally closed solenoid valve, 1/2" npt 120/60 volts AC
STC 1/2: NPT $46.20

Maxitrol regulator:
BURNERPARTS.COM -Buy Parts Online! - 1/2" NPT GAS PRESSURE REGULATOR,

Here's a picture in the Brutus 10 thread:
https://www.homebrewtalk.com/909663-post429.html

Oops on the pressure - that was 3.5 inches, not pounds.
 
Low pressure NG is .5 psi and high pressure is 2 psi. If the piping that comes off of your meter is small chances are you have high pressure and there is a .5 psi regulator in the house. WTF does "contractory" mean?
 
I think orange flame sootiness is contractory to "works great" though. That's why you need to plug like 15 of those tips... so you can run the pressure higher so the tips that are left pull a good flame.
I've been making some improvements to my rig, one of the things left to do is plug some tips. My other projects have been Bobby_M sight glasses and thermometers on HLT and Keggle, and a CF Chiller.
 
I occassionaly still get some orange flame from what I'd call "CO pillowing" under the keg skirt. Let me know if you have any problems with that due to the enclosed wind shielding after like 10 minutes of boiling.

I had that very problem, it was a real fine art finding the balance between blocking the wind and not oxygen-starving the burner. I invariably lost that battle, and ended up with a sooty kettle every time.

I'm so happy to have moved on past those jet burners, and I should look into finding a new home for them. My new hurricane is ferociously hot, and burns squeaky clean!

Love the OP's burner stand though...I've got some angle iron, and a cheap wire-welder. It's enough to get a guy thinking.
 
Well I did my first brew with it today. I didn't have any issues with soot or the "CO Pillowing" as far as I could tell. I think with having the burner far enough down that it gets rid of these issues. Today was also a rather windy day and the wind screen worked fine. Another point about the wind screen, I think that leaving the 1/2" gap at the top allows the flow of the air from the bottom up releaving the "CO Pillowing" effect. My pilot didn't work very well, while heating my mash water, if I had it turned down rather low, the wind would be enought to blow it out, and if I turned it up, it worked fine but it did produce soot. I'll have to find a real pilot or go back to one of my original ideas of using a push button spark type of ignitor (I had bought a generic replacement part at lowes but it didn't end up working for how I wanted to use it). So I just use my little push button butane stick light as I normally would have done with propane.

My original boil volume was right at 13.0 gallons and it took 33 minutes to bring it up to boil from the 165ish that it was from the sparge (air temp at 38F with steady 10mph winds). Not the most impressive but it definately works for me. I never timed what it took with propane, but just subjectively it seemed very similar. It was very easy to adjust down to get a steady boil. I thought about it halfway through the boil, so I'll have to do it next time, but I want to check how much natural gas I acturally used.
 
Low pressure NG is .5 psi and high pressure is 2 psi. If the piping that comes off of your meter is small chances are you have high pressure and there is a .5 psi regulator in the house. WTF does "contractory" mean?

Contractory is a horribly mispelled version of contradictory. Sounds like a cool word though.
 
I am having some issues with my Natural Gas setup. And hope one of you can help. I can't even boil a gallon of water. Highest temp I have been able to reach is 190 deg.

I have 2 32 tip burners and 1 23 tip burner. I have narrowed my testing to have only the 23 tip burner on. The flames from all the burners even when run individually is very week. The 23 tip has the strongest flame.

There is 3/4 pipe running till the last drop the the stand. Then it is 1/2 all the way. Except for the two 32 tip burners have 3/4 pipe for the last 6 inches.

I am probably going to replace the 32 tips with 23 tips as I seem to get better flame out of them.

But I need help trying to figure out why I cannot bring 1 gallon of water to a boil with a 23 tip burner. I know this works, I just need to get it to work for me.

Here is a link to pictures of the stand and gas components.

The New Brewery :: Image0002

Thank you anyone for your help.
 
There's a chance you got burners rated for propane which would have smaller orifices in the tips. The flames look really weak but I'm surprised how clean and blue they are for being so low. I can't turn mine down that low. Have you tested the burners directly off the gas line with no solenoid valves upstream?
 
Seems Bobby_m was right about the solenoid. Mine are rated for 4-224 PSI not 0 and up. After a bit more reading I have come to the conclusion of getting new solenoids. So I have new solenoids coming STC 2W160 - 1/2. My old ones will work for water (not wort) transfer. As long as they can stand 174 deg water. Hopefully I have it right this time.
 
Does anyone have pics of how they tee'd off for the NG? I have a NG hot water heater in my garage with a gas line comming out of the wall to it. Before the hose leading to the hot water heater there is a ball valve. Could I just close the valve, put a tee in with another ball valve leading to my burner? I would prefer to use NG vs propane, especially witht he prices of that stuff around where I am. Main concern: blowing up the hose :D
 
My NG pipe to the furnace had a "crap trap" that I removed and replaced with a gas ball valve. The street elbow in the second picture has been replaced with a gas quick-disconnect since this was taken.

I used teflon tape rated for NG.

Check for leaks with soapy water.

I found a ball valve that allows you to take out the screw for the handle, take off and turn the handle 180 deg, and replace in a locked position. Gives a bit of piece of mind that it will not be turned on accidentally.

furnacegb9.jpg

valveyc3.jpg
 
Does anyone have pics of how they tee'd off for the NG? I have a NG hot water heater in my garage with a gas line comming out of the wall to it. Before the hose leading to the hot water heater there is a ball valve. Could I just close the valve, put a tee in with another ball valve leading to my burner? I would prefer to use NG vs propane, especially witht he prices of that stuff around where I am. Main concern: blowing up the hose :D

Yes you can do exactly as you describe. If there is another place closer to where you will be brewing, I would "T" as close as possible so that you have the shortest path. You can close the valve that is on your gas meter that supplies your whole house, that's what I did.

And I do exactly as above, I put a cap in place when its not in use just as a piece of mind in case the valve were to leak.
 
For the above connection you should use a "T" instead of an elbow, and put another "drip leg" in. The plumber that helped me run my gas lines for my brewery and dryer told me that anytime you have a vertical run like that you should have a "Drip Leg' or "crap trap"
 
Yes you can do exactly as you describe. If there is another place closer to where you will be brewing, I would "T" as close as possible so that you have the shortest path. You can close the valve that is on your gas meter that supplies your whole house, that's what I did.

And I do exactly as above, I put a cap in place when its not in use just as a piece of mind in case the valve were to leak.

Now... what kind of burner should I get? Will a boyou classic work with NG without any modifications?
 
Back
Top