The 'Keezer' Project

Homebrew Talk - Beer, Wine, Mead, & Cider Brewing Discussion Forum

Help Support Homebrew Talk - Beer, Wine, Mead, & Cider Brewing Discussion Forum:

This site may earn a commission from merchant affiliate links, including eBay, Amazon, and others.
Nooooooooooooooo!!! You can't sell it!! It's a HBT icon.

(with that said)

If you are looking for a new place make sure it has a sweet basement so you can build a basement bar like you have wanted. :)
 
Quick Question:

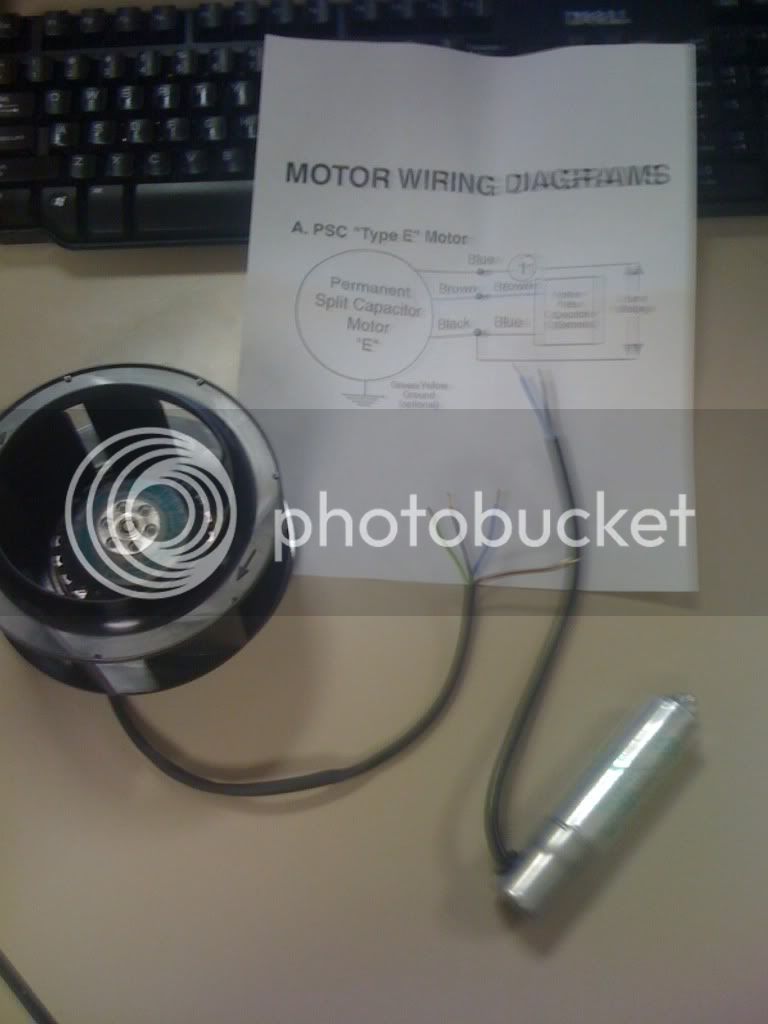
I got my fan in from McMaster for underneath the keezer, However it came with an extra part...

photo8.jpg


photo9.jpg


Jester - Did yours come with the 'Motor Run Capacitor' as well?

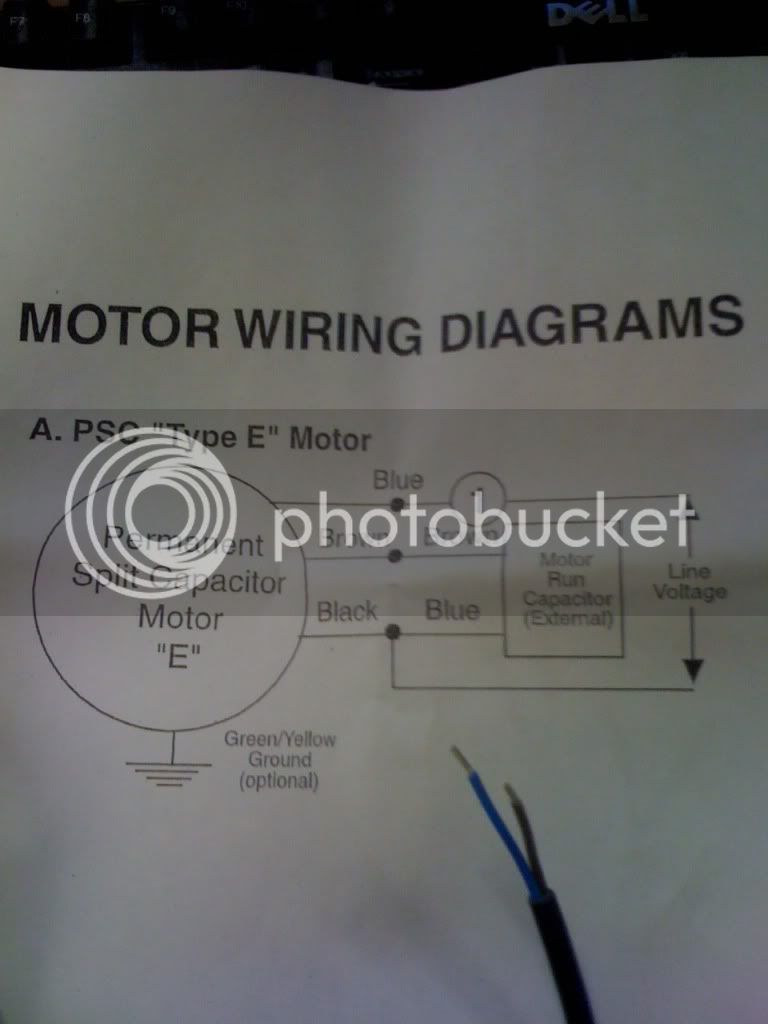
What do you guys think? I'm assuming that the Blue is the hot line, and the black is the neutral. I consider myself a rookie at electrical work though so any input would be great.

And in the diagram, why do you suppose the black line from the motor goes to the Blue line on the capacitor instead of keeping it simple and having the Blue line from the motor go to the Blue line of the capacitor?? Seems kind of dumb unless I'm missing something. :cross:
 
That would be awesome. I can definitely see why you would want it though, I'm almost finished with mine and the top is very heavy! I think I might put some gas shocks on mine.
 
Well, since it's not going to get done - or at least no time in the near future...

cruelkix had it right - motorized top!

How were you gonna do it? I'm very curious, cuz mine is mega heavy. Like I squat and lift it with both arms and legs. My wife has a hard time holding it up at all.
 
Jester,

Very sad to hear that you may have to sell the keezer. I just wanted to thank you for the inspiration for building mine, link in sig. Cheers.
 
What do you guys think? I'm assuming that the Blue is the hot line, and the black is the neutral. I consider myself a rookie at electrical work though so any input would be great.

And in the diagram, why do you suppose the black line from the motor goes to the Blue line on the capacitor instead of keeping it simple and having the Blue line from the motor go to the Blue line of the capacitor?? Seems kind of dumb unless I'm missing something. :cross:

I don't think it really matters whether you tie the neutral to the blue or the black. Just guessing, it looks to me like there is probably a motor winding between the blue and black wires and another winding between the blue and the brown, with the blue motor wire being common to both windings. The capacitor in series creates a phase shift in the blue to brown winding with respect to the blue to black winding, which has no capacitor, thus creating a rotating magnetic field. If that's the way the motor is wired, then wiring blue to blue and brown to brown would leave the capacitor in parallel with the second winding instead of in series, and no power going to the second winding. As for the wire colors, it may simply be that the motor manufacturer buys the capacitors pre-assembled and they just happen to come with blue and brown wires, or maybe the vendor buys both the motors and capacitors from different sources.
 
Thanks for the replies.

Man I would have sure liked to see the motorized top completed. Such a bitchin' idea. I was thinking of putting some cheap trunk shocks on mine.
 
This may have been asked before but is the first pull of the tap warmer since its not actually in the freezer, even though it might be insulated?
 
This may have been asked before but is the first pull of the tap warmer since its not actually in the freezer, even though it might be insulated?

if you use the glycol cooling copper method or the computer fan with insulation it should not be. if you don't then it very well will be
 
This may have been asked before but is the first pull of the tap warmer since its not actually in the freezer, even though it might be insulated?

Yes, it does warm up in the line. In general I have found that if I am drawing a full pint, it isn't noticeable - there is only an ounce or so of warm beer in the line - but if I'm pulling samples for someone, it's a problem. If I ever get it back up and running in the house again I am going to go back to my original plan of using a fan to circulate air through the coffin.

:mug:
 
I can not thank Jester enough for sending me the Sketchup files. Here's my interpretation of his Keezer. I'm working on the front surround now, but as you can see, the wife has allowed the kezzer inside the house, and a lot of beer was drank from it this last weekend.

I couldn't have done it without the Sketchup files, so thank you, from the bottom of my heart :D

312664062.jpg
 
Jester- Great job, an inspiration for many.

For an alternate solution to cooling the beer line(s) in the coffin, have you considered just running a 1/2 OD soft copper line that extends into freezer to be cooled over the beer line? Here is an example below. Not ideal like glycol, but for very little $ you may be able to solve the warm initial beer sitting in the coffin area of line.

https://www.homebrewtalk.com/f51/pvc-tower-cooling-solution-43072/

Hard to beat the price of a free muffin fan. Also, with the way the coffin is set up, it can get great air flow. With a closed tower, the alternative above is almost certainly more effective due to restricted air flow, but with the coffin I think it's probably more trouble than it's worth.

:mug:
 
Hard to beat the price of a free muffin fan. Also, with the way the coffin is set up, it can get great air flow. With a closed tower, the alternative above is almost certainly more effective due to restricted air flow, but with the coffin I think it's probably more trouble than it's worth.

:mug:

I agree with Jester, I have a fan mounted to the lid that draws cold air from the bottom of the keezer through a hose and pumps it into the tower. I plugged it in so it only runs when the freezer is on and it stays within a degree or two of the freezer temp.
 
Okay...as with many who have posted here, my swmbo gave me the green light to pull off this build.

I read through the entire thread at 1:00am this morning. I read a few different opinions about the ventilation and whether or not the compressor will overheat if the cabinet is right up against the freezer walls...any final word on this?

Also, I plan on using something a bit smaller (7-8cf) and want to have a modest 3 tapped with one ready to tap. My plan is to build a collar around the top and then build a sort of stand at the bottom at a level height of the hump...this should 1) give me a level surface along the bottom, 2) keep my equipment dry as any condensation would gather at the bottom under the stand.

I have read in other threads that adding a collar causes the compressor to run more often as its now trying to cool the additional room. Could I fill the under side of my shelf with bottles of water and install a couple fans in it to compensate?...thoughts?

I am going shopping for a freezer this weekend
 
Hey Agentaaron.....check out my thread for information about using a smaller freezer. (Sorry to butt in on your thread Erik) ;) I used a 7 cu.ft. GE and have a 4 keg/3 tap system.....sounds like what you are going for. It's a collarless coffin keezer like Jester's....just doesn't have the capacity of his. My thread is pretty long, but it is basically a step by step process of my build, including venting, the temperature controller I went with, how I'm cooling the coffin, insulating the coffin, the system set up, blah, blah, blah..... Let me know if I can help and good luck.
 
As many here, I'm insprired by Jester's build. I thought about doing a smaller 7cuft keezer, then it got bumped to 9cuft, and now I'm thinking about going whole hog and finding a used 14cuft freezer. I feel like this will allow me to expand my build in the future and still use the extra space for cold crashing.

Now I just need to find a truck/van to haul my potential new keezer.
 
mtbiker278 said:
As many here, I'm insprired by Jester's build. I thought about doing a smaller 7cuft keezer, then it got bumped to 9cuft, and now I'm thinking about going whole hog and finding a used 14cuft freezer. I feel like this will allow me to expand my build in the future and still use the extra space for cold crashing.

Now I just need to find a truck/van to haul my potential new keezer.

I would not mind a bigger freezer, my issue is that I don't want to buy anything used that is either going to break down or be as loud as the current kegerator that I have now...so I have to go new and try and keep the cost down
 
Scored a 14.8cuft Kenmore for $150. It's only a year or two old, and still kept stuff frozen when I checked it out. Should be a similar build to Jester's, I just hope it doesn't take the year it took him.

Build thread to follow.
 
Yeah, yeah, so it took me a while to get it done. Can't rush these things. Well, maybe they can be rushed. :D

Obviously good work comes with patience and time, as the photos show. I'm just looking forward to a new show-piece.

I like how you had the Ranco mounted to the back of the lid. I think I might do something similar with whatever controller I go with. One difference I might do is plug the output of the temp controller into a power strip and have the various fans and lights plugged into the power strip. The whole thing could be hidden away by the back panel. I figure the minimal additional current draw from such things shouldn't be a big deal for the temp controller to handle. Looking at either an Ranco or a digital Johnson controller.

Anyone else do something similar?
 
Hey Jester I have a couple of questions for you after looking through the thread with more detail.

- Is the bottom dolly made from a sheet of plywood with 2x6"s bracing the area the freezer sits on, but also acting as an attachment points for the casters?
- How much bigger did you make the dolly than the freezer to allow for the skirt to fit? I'm guessing an inch or two.
- I looked on McMaster for a bottom blower fan but the only two similar ones. Is this the fan you used? Labeled as "low-profile enclosure cooling fan".
- Are most of the face pieces glued on to the exterior? I didn't see any nail or screw heads on the outer surfaces. Maybe finishing nails?

Thanks for the help!
 
Is the bottom dolly made from a sheet of plywood with 2x6"s bracing the area the freezer sits on, but also acting as an attachment points for the casters?
- How much bigger did you make the dolly than the freezer to allow for the skirt to fit? I'm guessing an inch or two.
- I looked on McMaster for a bottom blower fan but the only two similar ones. Is this the fan you used? Labeled as "low-profile enclosure cooling fan".
- Are most of the face pieces glued on to the exterior? I didn't see any nail or screw heads on the outer surfaces. Maybe finishing nails?

1 - Yes, the dolly is a 2x6 frame, with a 1/2" ply top. There are also 4 metal brackets at the joints of the 2x6 for additional support. Check back around post #94.

2 - I believe I went with a 1" overhang

3 - Yup, that's the beast. It's pretty expensive for what it is, but I did it anyway, since I couldn't find anything else that fit my needs.

4 - The face frames were assembled with pocket screws, so nothing showing on the exterior - no nails used anywhere in the project. The inset panels are rabbited into the back of the face frames and held in with tabs glued to the back of the face frame. If you look really closely in post #127, you can see how I made vertical corner blocks in the two front corners that allowed me to screw the sides and front panels together.

Hope that answers your questions! :mug:
 
Awesome! Thanks for the info. I think I'm going to go for a giant computer case fan (like 25cm). I'm hoping it'll be both low power and quite but still move a bunch of air. heck I could probably put in two. I'd just need to avoid the lighted fans unless I wanted to go for the Fast and the Furious underbelly glow look.

Thanks again!
 
I'm planning on wrapping my keezer with 4" tongue and groove pine. was thinking of building mini stud walls around it out of 1 by 1s. this would provide a little airspace between the freezer and the paneling. think this would eliminate the need for a fan?
 
wncbrewer said:
I'm planning on wrapping my keezer with 4" tongue and groove pine. was thinking of building mini stud walls around it out of 1 by 1s. this would provide a little airspace between the freezer and the paneling. think this would eliminate the need for a fan?

Actually, the general consensus seems to be that if you are not going to actively exhaust the heat, you are better off putting the wood directly against the freezer. Still air makes a great insulator - something you don't want.
 
that makes since, I have to have something to brad the paneling to, maybe i'll try using some construction adhesive to glue some nailers directly to the freezer skin. thanks for the response...truly an inspirational thread. hope you don't have to sell yours
 
Hi everyone,

First time caller, long time listener.

Anyway, I'm attaching a few pictures of my recently completed keezer. Not as cool as all of the ones I've seen here, but it is my first attempt at building anything remotely like furniture. I learned a lot. If only I could build a second one . . .

keezer1.jpg

keezer2.jpg

keezer3.jpg
 
Hi everyone,

First time caller, long time listener.

Anyway, I'm attaching a few pictures of my recently completed keezer. Not as cool as all of the ones I've seen here, but it is my first attempt at building anything remotely like furniture. I learned a lot. If only I could build a second one . . .

Whew, that's one first post. Looks good!
 
Hey Jester,

I really just want to thank you for your detailed thread on your build. It really helped me get an idea of what I wanted to start building.

Here is my thread: "Keezer 5ive"

I would appreciate any words of advice as im still in the process of building!
 
Since I just about finished my keezer I thought I would post some pics as well.

inside12.jpg


outside3.jpg
 
@Cap1: Did you happen to keep track of your costs? Some of these are so elaborate that it's easy to see how they can go north of $1k in a hurry, but your's is so nice and simple that it's almost like an 'every-man's keezer'. I know the Perlicks add up, but if you dont mind my asking: Start to finish, what did your setup cost?
 
I am not Cap1, but since I am in the middle of my keezer build I can give you a rough idea of the costs. Assuming you are starting from scratch but have general tools and a way to cut some wood (I am borrowing the use of my GFs brothers miter saw and table saw)..

Freezer: $100-300 (depending on if you buy used or new and even more if you want a huge one)
Lumber: Collar method - $10.. Fully encased freezer with coffin ~$150-500 (this really is dependent on what you want, I am using oak for my build so it is closer to the upper end of that)
Foam: Collar method - $15 (full 4x8 sheet of 3/4".. plenty left over) Coffin method - $50 (sheet of 2" and sheet of 3/4")
Tile: $75-150 (again dependent on what you want and if you have any kind of tools to do this with.. does not account for a tile saw.. Lowes will do that for you though)
Stain: $60 (this is stain, polyurethane, good brush or two, etc)
Misc: I would account for at least $100 worth of little stuff you just dont think about.. screws, hole saws, liquid nails, etc.

This does not include the cost of kegging equipment.. but if you have even thought about doing a keezer I am going to assume you already have that stuff or know the cost of it. You will need to account for buying extra beer line.. I am going to be using 12-15' per line. And if you do stainless perlick taps those run $30-40 each.

Hopefully that will help.. for the most part the cost can be mitigated through proper planning. I have pages and pages of sketches, measurements and ideas (btw.. if you have not done woodworking before make sure you look up ACTUAL size of lumber when doing planning).
 
yeah, I have all of the tools/misc materials that I would need, so I guess besides the cost of the freezer itself and the kegging equipment, the only expense for a basic collar is just the lumber and insulation...

I might have to make the switch. I hate bottling...
 
This is kind of a noob question, but is it necessary to do a collar, if you plan on using a draft tower?
 
yeah, I have all of the tools/misc materials that I would need, so I guess besides the cost of the freezer itself and the kegging equipment, the only expense for a basic collar is just the lumber and insulation...

I might have to make the switch. I hate bottling...

Keep in mind you can do stages to help spread the cost over time. I started by buying my kegging stuff with the plastic party taps and a temp controller. Then I had my kegs in my freezer with temp control and just used the party taps for a while. Then if you wanted (I didnt go this route, but thought about it) to go the collar route you could spread the cost of some nice Perlick taps, shanks, etc by adding 1 when you can, drilling the hole and going until you have enough for all your kegs. After that you can still build a coffin style keezer and the final stage. The only thing that is really throw away in all that are the party taps at the beginning.. and they are cheap enough. You would need to seal off the holes you drilled in the collar, but some foam and foam spray makes that easy enough.
 
Back
Top