Yeast ranch - Is this all I need

Homebrew Talk - Beer, Wine, Mead, & Cider Brewing Discussion Forum

Help Support Homebrew Talk - Beer, Wine, Mead, & Cider Brewing Discussion Forum:

This site may earn a commission from merchant affiliate links, including eBay, Amazon, and others.

Boerderij_Kabouter

Well-Known Member
Joined
Dec 21, 2007
Messages
7,763
Reaction score
178
Location
Oconomowoc, Wisconsin
So with my brewery cobbled together enough to be functional again (and much improved within
the last couple months :)) I am using my budget to stream line my brewery. I have started
buying hops in bulk (hopsdirect.com) and my next step is to start a frozen yeast bank.

I have read flyguy's tutorial about a million times and have an idea of what I want to do. PLease
look though my list and read about my setup and tell me if I am forgetting anything or if you
would do things differently...

thanks

...................................

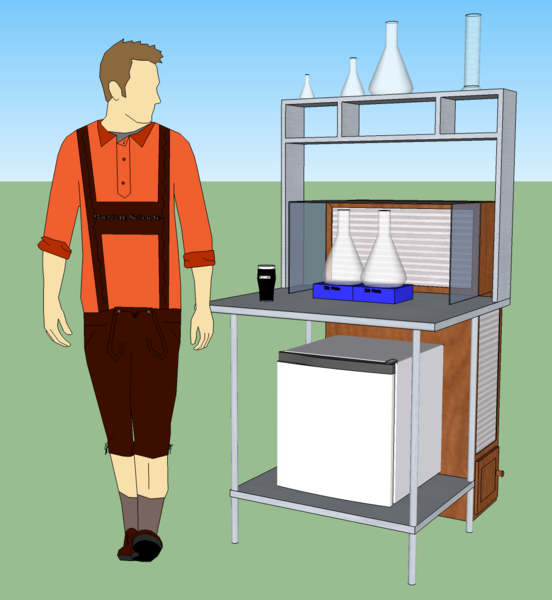
Here is my basic design for my yeast ranch:

Yeast_Ranch.png


My brewery is in the basement and I have not redone the room it is in, so dirt and dust are a
concern. The whole ranch will be within a plexi-glass "clean room" that will be completely sealed,
and vented with a sanitary air filter (the little plastic ones). Housed within the ranch will be a
fridge converted to a freezer with a LOVE controller, two stir plates, a hot plate, a cold water
bath, and my testing equipment and assorted glassware.

The reason for two stir plates is that I do yeast experiments with every batch I brew using at
least two yeast strains.

Here is my equipment list:

Ranch_parts_list.bmp


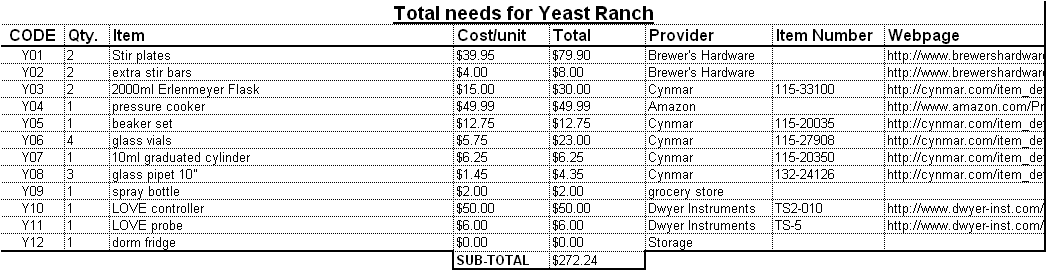
...........................................

I think this should be all the stuff I need.

My procedure will be to use the pressure cooker for sterilization, the hotplate for heating starter
wort, stir plates for propagation, and the vials with glycerine for freezing yeast samples.

1. Does this look like a good plan?

2. Will the plexi-glass housing be enough protection against floating nasties?

3. Would you include or do anything different?


Thanks a million! :mug:
 
Looks good. My only recommendation is that you will want more than 4 vials. I have 4 strains in my yeast bank and I have try to harvest 4 vials from each flask. So have a a total of 8 vials of each strain. When I begin a started, I put two vials in each flask.

Not saying its the right way, just that it works for me and creates good healthy starters.
 
I would say more vials as well. Also probably needs the sportcoat for the best effect. You will also want someway to keep condensation on the stirplates in check.
 
No Laminar flow-hood?

I'm disappointed in you, Justin. :D

I'm using 8 dram vials for my slants, believe I got a gross for around $70.
 
Oh yeah, the vials come in packs of 12, so I figured I would have enough for 4-5 strains to start with and order more later to keep initial cost at bay.

Sport coat is a definite need.

You will also want someway to keep condensation on the stirplates in check.

What do you mean by this? While they are propagating or during cooling? I haven't used a stir plate for this kind of thing before, I am a complete yeast ranching noob.
 
well the plexi-glass will work kinda like a glove box. but if you want to beable to working there you need to add a laminar flow hood, there are lots of plans to build them on line
the home mushroom growers build them. but basicly all you need is a hepa filter and fan blowing air in to your box, but it needs to be centered and free of turbulance, so no shrouds or cover on the filter, the eddys in the curent can mix in contams.

as for slants i use these

http://cgi.ebay.com/20-Vacutainer-4...0?hash=item53dacf1421&_trksid=p3286.m20.l1116

i also got some autoclavable plastic caps for mason jars and added red port from a VACUTAINER, that way i just take a suringe and put yeast from the VACUTAINER and in to the mason jar that has autoclaved wort in side totaly steral transfer in to steral wort.
i will take some pics of the lids tonight.
 
I'd strongly consider adding Parafilm to your list of supplies, particularly if you are planning on testing viability of your frozen samples by streaking to an agar plate.

Don't buy agar media from a supply company, the price is ridiculous. It's easily found at health food stores (vegetarian gelatin substitute).

yeah +1 Parafilm

get you a few glass petry dished too , thay are costly but the plastic ones
cant be autoclaved and you will waste some many becase thay come in sleaves of 20 and you wont need but maybe four to isolate and clean up the dirtyest ones from bottle beer you like that has yeast in it.

here is some good pricing on agar agar
Bulkfoods.com Agar Powder 5 pounds Fast Online ordering with $5 Shipping on $75+ order.
 
What is this parafilm you speak of?

And for the agar plates, do you streak them when you pitch the starter yeast and check under a microscope to double check you have the sacc. yeast you wanted? Like I said, this is all new to me.

Thanks for the help guys!!!
 
OK I looked up the parafilm. Can this be used as an air lock of sorts or are you just using it for sealing things up?

Looks like a laminar flow hood could be added in the future for around $300 all told. Not bad, maybe next year or something...
 
I know you said it will be vented, but I would watch out because that fridge/freezer is going to create some major heat in there unless you have the compressor running on the outside of the Plexiglas...
 
Neat, but where is your workspace? Inside? If the laminar flow-hood isn't in your future then a burner would suffice. Maybe a fold up counter where you could work with your burner and then fold it down when you are done.
 
Thats how we perform aseptic technique without a hood. Upward flow of air won't allow anything to fall into your work area and you can use the burner to sterilize your loop and flame the vials. I don't know if it would be safe to put the burner inside that space though.
 
Are you saying just turn a burner on and let it rip to get a more clean environment? That seems doable.
All you'd need to do is work over a simple bunsen burner or alcohol lamp; the heat rising will create an updraft, keep wayward spores from settling on your plates. Sterility is important with yeast banking because you are working with such a low cell count.
 
Before you go and get your freezer setup and everything you should look into distilled water storage. I've switched from slants over to it and have had great results. Just need a bunch of vials, some plates, and an innoculation loop. An alcohol lamp is a nice addition.

http://blogs.homebrewtalk.com/frate...t_culture_storage_in_distilled_sterile_water/

Edit: I see you have a pressure cooker listed for $50. You should really look into a pressure canner which is bigger and will hold a number of quart jars (nice for canned starter wort). I think new they are about $75-150, but I bought mine from someone on craigslist for $50 and it came with about 100-200 jars of various sizes

I think the distilled water storage is a great idea, especially if you are into streaking and making sure you have a pure culture.
Frozen yeast banks are also great. They allow for making starters without any plate streaking and tiny step ups.
It really just depends on how in depth you are willing to get with your yeast. Hell, some people won't even make starters because it is time consuming.
 
All you'd need to do is work over a simple bunsen burner or alcohol lamp; the heat rising will create an updraft, keep wayward spores from settling on your plates. Sterility is important with yeast banking because you are working with such a low cell count.

+1 This the way I did it for quite a while actually.

Personally, I don't think the plexiglass case probably is going to really help all that much. You will want a work area with no air movement (i.e. no fans, kids/dogs/cats running around). I'm not sure if those little dorm fridges have fans on them when they are running? You'll also need to have a workspace that you can sanitize. I used a large cookie sheet that was covered with a piece of tinfoil that was flamed / sprayed with alcohol. After that, all the work was done over the burner flame.

Yeast ranching is a lot of work. Building up a strain from a few cells -> pitchable amount adds a week or more to the brewing cycle, depending on your batch size. I tried it out for a while and in the end, the extra effort involved didn't seem worth it. YMMV.
 
wow.

First, the dorm fridge definitely has enough cooling capacity to get into the frozen range.

Second, I am glad I posted this thread... this is starting to sound more complicated than I had hoped. From Flyguy's tutorial this all seemed pretty easy. Freeze some yeast, warm it up, pitch into a one cup starter, then pitch that into a full size starter.

I am not interested in getting into a full fledged yeast science lab here. I just want to save some cash and have high quality yeast.

Perhaps this is a bit more than I need and I should just try using washed yeast first???
 
I don't think it has to be all that fancy for yeast farming. It's nice to have a clean environment though and eventually I'll build myself a corner where I can work with reduced contaminants.

But I have sucessufully been working off slants an plates w/o a clean room. Just follow a few rules:
- pressure can the first two stages of propagation (10 and 60 ml in my case)
- keep exposure of a culture to air ar a minimum. This means working quickly. Vials for slants, if you go that route, are nice b/c they have a small opening
- seal vials and plates with masking tape or parafilm. Masking tape is cheaper and can be found at the HW store
- taste every stage of propagation and have a back-up in case you caught an infection. At least in the beginning.
- tin foil over flasks and beakers will keep the culture clean even in basements and kitchens.

Kai
 
Second, I am glad I posted this thread... this is starting to sound more complicated than I had hoped. From Flyguy's tutorial this all seemed pretty easy. Freeze some yeast, warm it up, pitch into a one cup starter, then pitch that into a full size starter.

I am not interested in getting into a full fledged yeast science lab here. I just want to save some cash and have high quality yeast.

From your reaction, it sounds like you would like to keep things simple. Therefore, I would ditch the clean box and just get yourself a sanitized countertop and an alcohol burner along with the materials you listed on page 1. Foil or foam stoppers over the flasks will keep stuff out while allowing some gas exchange.

Don't get discouraged, freezing yeast really is as simple as you want to make it. You will save cash and have any type of yeast on hand.

By the way, I do use the cynmar 24ml vials and I like them. 15ml of yeast and 3-4ml glycerin works just fine for me.
 
O.K. cool.

The clean box was really just because I like to keep my brewery stuff in the brewery and out of the main house. But my brewery is in my basement that I have not finished so it is a bit dusty...

The box as I envision it would just be a basic box that would be easy to completely spray down in star-san before doing anything. I could then put a oil burner in there for working above.

This has been great feedback. Thanks everyone!!!
 
- seal vials and plates with masking tape or parafilm. Masking tape is cheaper and can be found at the HW store

I'm not sure who gave me this tip, but the 3m nexcare paper tape you can get at a pharmacy is way better than masking tape. Not as good as parafilm but its a lot cheaper.

You can get it in various widths and the smaller widths come on little dispensers.

Doesn't leave a sticky residue when you pull it off
 
Woo Hoo! Christmas time!

So I already received some Christmas stuff: LOVE controller with probe and two stir plates with extra bars! Taking the advice here I have changed my plans a bit.

I will start with a burner (burns isopro fuel, 80% isobutane and 20% propane) for keeping my workspace low in contaminants. I will also have an alcohol lamp. I am getting a pressure cooker (23 quart) for sterilizing equipment and canning starter wort. And I think I should be getting a bunch of glassware for Christmas.

Here is my new plan for my yeast ranch area:
Table.png


That is a stainless prep table (36" wide by 30" deep) with a lower shelf. My fridge will go on the shelf for yeast storage. I will probably build some shelves for holding equipment above the table top.

Then, in the future, I plan to build a laminar flow hood with the directions here:
http://www.fungifun.org/English/Flowhood

I think I should be able to make the flow hood for about $350 and hope to do it with some money I am saving on the side. Maybe I will be able to build that next summer.

I am really excited about this project! The more I read about yeast stuff, the more interested I am in it!
 
Last edited by a moderator:
Awesome, I'm glad this plan didn't die. I just ordered a bunch more of the autoclavable 24ml glass vials from cynmar to step up my bank to 7 strains.

With good sterile lab technique I think you might find the laminar hood to be unnecessary. Needless to say, I like the design change. Keep us posted.
 
Thanks dfohio. I will be doing yeast work without the hood for some time at least. So I will find out how well it works :D

mordantly- Yes I have seen that page. It and others are what inspired my ideas and desired to have a yeast bank.
 
Hmmm.... so I was just looking at laminar flow DIY stuff (again...) and just realized that one of the sites I have browsed often looking up laminar flow hoods is a magic mushroom site... probably not the best site for my at work breaks. lol. I am an idiot, but they do have good info. The shroomery.com for those interested.
 
So I sold my brewery and am rebuilding. Part of that rebuild will be a full yeast lab. Below is my updated list. I have some things already and some I may not buy right away. Bu the bulk should be coming soon!!!

:rockin:

Seeing how I have no experience with yeast propagation other than high school and college labs, I don't really know what I am doing. Any pointers or things I have left out would be great to know about!

My plan is to freeze yeast cultures, and to use the plates to isolate strains I want or to reculture every couple of generations. I want the microscope to check strain purity, maybe vitality, and just to look at stuff.

One of my goals is to isolate a good brewing yeast from my yard.

.............................

Total needs for Yeast Ranch
CODE : Qty. : Item : Cost/unit : Total : Provider : Item Number : Webpage

Y01 2 Stir plates $39.95 $79.90 Brewer's Hardware link
Y02 2 extra stir bars $4.00 $8.00 Brewer's Hardware link
Y03 1 2000ml Erlenmeyer Flask $15.00 $15.00 Cynmar 115-33100 link
Y04 1 KIMAX ERLENMEYER FLASK STARTER SET, 5/PK $34.00 $34.00 Cynmar 115-33118 link
Y05 1 pressure cooker/canner $83.64 $83.64 Amazon link
Y06 1 beaker set $12.75 $12.75 Cynmar 115-20035 link
Y07 3 glass 24ml vials $7.75 $23.25 Cynmar 115-27910 link
Y08 1 10ml graduated cylinder $6.25 $6.25 Cynmar 115-20350 link
Y09 3 glass pipet 10" $1.45 $4.35 Cynmar 132-24126 link
Y10 1 spray bottle $2.00 $2.00 grocery store
Y11 1 LOVE controller $50.00 $50.00 Dwyer Instruments TS2-010 link
Y12 1 LOVE probe $6.00 $6.00 Dwyer Instruments TS-5 link
Y13 1 dorm fridge $100.00 $100.00 Home Depot
Y14 1 microscope $105.00 $105.00 Cynmar CSH-08124 link
Y15 1 BASIC SLIDE MOUNTING KIT w/INSTRUCTIONS $28.00 $28.00 Cynmar 130-21302 link
Y16 1 Glass petri dish 10-pack $7.25 $7.25 Cynmar 132-20697 link
Y17 1 fermentation tube 25 ml $10.50 $10.50 Cynmar 115-20887 link
Y18 4 Inoculating loop $1.50 $6.00 Cynmar 132-25101 link
Y19 1 GLASS ALCOHOL LAMP w/CAP, 4oz $3.40 $3.40 Cynmar 120-30895 link
Y20 1 replacement wicks for alcohol lamp $1.95 $1.95 Cynmar 120-30896 link
Y21 1 Bottling Hydrometer $14.90 $14.90 Williams Brewing
Y22 1 Hydrometer stand $12.90 $12.90 Williams Brewing
Y23 1 0-230 glass thermometer $5.90 $5.90 Williams Brewing
Y24 1 glass hydrometer jar $9.90 $9.90 Williams Brewing
Y25 1 wall shelf $48.00 $48.00 eBay
Y26 1 Stainless Table $110.00 $110.00 eBay
TOTAL $788.84
 
Last edited by a moderator:
So, what is the temp target you're trying to reach with your dorm freezer?

Love your idea here and consolidating some of the common supply lists.


Also, what are you expecting to check for in the scope? It may be difficult to differentiate the desired yeast from wild yeast strains, but you can certainly get an idea of bacterial infection or yeast viability itself.
 
I assume the fridge is just for storage and not for culturing. If you aren't prepping the yeast samples for freezing (sucrose or glycerol added), then 4C would be probably be the best storage temperature. If you hit freezing the distilled water might begin to form ice crystals and shear your yeasties. Probably not a big deal, but it's something you might want to watch out for. Our lab fridges used to store plated cells are maintained at 4C.

Is the area where you will be working temp controlled? Just curious if your starters and cultures will be warm enough to grow effectively.
 
I am planning on freezing yeast samples for storage and possibly distilled water for backup storage and reculturing purposes when my frozen samples run out.

I just did a bit of reading and it looks like I want the frozen samples to be COLD. A house hold fridge temp (~-10ºF) should be fine and I think I can get that in my dorm fridge pretty easy, but no way will I make it to a commercial -80ºF kind of temp.

The brewery room is about 55-60 year round. I do have a small heater I could use to warm the area a bit, but I think those temps should be sufficient.
 
You will want to get it as cold as possible and you should try to keep the temp variation minimized. As you mentioned, not likely to get anywhere near -80. The insulation and seals on those dorm fridges can't handle that and the compressors are not likely to get anywhere close either.

I would be curious if you could hook up a chest freezer compressor to something smaller what kind of temps you could reach, LOL.

When you do this let us know what kind of temps you can achieve. I plan on keeping 2 copies of each yeast sample (banking in small quantities as I indicated in flyguy's thread) with one of them at home and one in the -80 C freezer at my SWMBO's lab.
 
Not sure why distilled water is used (sorry, didn't read that other thread) by my understanding is that using the glycerin is to prevent the yeast cells from rupturing. How can distilled water prevent this? Definitely not a technique SWMBO recognizes.

Dense slurry combined with 50% glycerin solution in a 50-50 combination. Shake it up and freeze it like that. Should keep indefinitely in a -80C freezer. Not sure longevity in a freezer in the normal -20 C range you're probably going to achieve.

I guess I don't fundamentally understand how the distilled water method helps the cell rupture issue.
 
Back
Top