Roxton Garage/Brewery build

Homebrew Talk - Beer, Wine, Mead, & Cider Brewing Discussion Forum

Help Support Homebrew Talk - Beer, Wine, Mead, & Cider Brewing Discussion Forum:

This site may earn a commission from merchant affiliate links, including eBay, Amazon, and others.

RoxtonBrewing

Well-Known Member
Joined
Feb 4, 2011
Messages
60
Reaction score
4
Location
Owensboro
I figure that if you are gunna build a brewery in your garage, you should start with providing a way to quench the thirst that we will surely create while working.

This is Phase 1 of the garage revamp.

The Kegerator.

2776-img-6488aaaa.jpg


2777-img-6489aaa.jpg


2778-img-6490aaaa.jpg


2779-img-6491aaaa.jpg


2780-img-6492aaaaa.jpg


2781-img-6495aaaaaaaaaa.jpg


Tomorrow........Phase 2........Cabinets/Storage
 
OK, so it is not tomorrow yet.
Here is Phase 2.......Cabinets/Storage.

Have to make room for the beer machine and future fermenting chamber.
2782-img-6499aaaa.jpg


The space where the brew rig will be stored.
2783-img-6501aaaa.jpg


Everything being painted blue.
2784-img-6502aaa.jpg


2785-img-6503aaa.jpg


Dad was putting up new cabinets in his house and found a couple doors had scuff marks. The rep sent him a complete replacement set.
All I had to do was design the cabinet sizes around the doors I had.
2786-img-6506aaaa.jpg


It was almost a shame to paint them.....almost.
2787-img-6505aaaa.jpg
 
Brew stand.
Decided since I am going electric and using stainless, it would look good to use a stainless table.
Got it at a great price from a friend that owns a restaurant supply company.

I think I will cut the legs down to lower it and enclose it somewhat to blend with the cabinets while not in use.

2788-img-6519aaaaa.jpg
 
Built a cutting rig that worked great. (thanks to all the people that posted pics of their rigs)
2789-img-6508aaa.jpg


Took all the rough edges and ground them smooth, so there would not be any cut wrists.
2790-img-6507aaa.jpg


Then proceeded to polish the 3 keggles.
2791-img-6510aaaa.jpg


2792-img-6260aaaa.jpg


I followed instructions that were posted on a previous thread.
Used angle grinder with Gator Grip pads/polishing compounds.
It wasn't too bad, except that 1 of them had been painted and covered with stickers. That one took a little longer to prep.
 
Not sure what the issue might be. I can see them when I view the thread.

Might have to look into this............

Are none of them showing?

I even logged out to see if I was the only one to see them because I was logged in, but I was still seeing them.
 
Must be a premium member thing. I'm posting the direct link to a photo to make sure it's not a HBT issue.
IMG_6494.jpg
 
Started out with a somewhat satisfied result from polishing.
I may return to try and shine it up more later.

2846-img-8083aaaa.jpg


For now..............

Started cutting holes for the hardware. I decided to go with a hole punch, but thought it was silly to pay $40 for 1 single punch(Greenlee 13/16"), so I went to the local Harbor Freight and bought a kit with 4 punches for $20. It even came with the punch I needed for the heating element.

So I began with the holes.......

2847-img-6483aaaa.jpg


THEN THE FLAW IN MY CHEAPNESS SHOWED ITSELF.....

2848-img-6481aaaa.jpg


Trip to Lowes and a bolt later, I was back in business. Or so I thought.
Finished up all 4 holes needed that size in the HLT and the bolt stripped and couldn't get it back out.

2849-img-6482aaaa.jpg


2850-img-8084aaaa.jpg


I decided to order a Greenlee and stop being a cheap ass. I am after all going to be paying the extra price to use as much stainless as possible. Why would I go cheap on tools for a simple $20?
 
Is the keg pictured with the holes punched the HLT?

I am assuming the 2 vertically aligned holes on the left are the HEX and the outlet is the bottom middle and the upper right is the return?

Just curious.
 
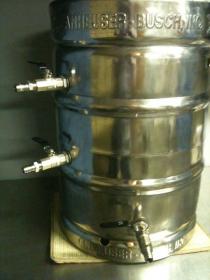
Here is the hardware for the HLT, or HMT(Hot Mizu Tank) as my dad likes to call it.

2851-img-8086aaaa.jpg


Output.......

2852-img-8088aaaa.jpg


Outside.......

2854-img-8093aaaa.jpg


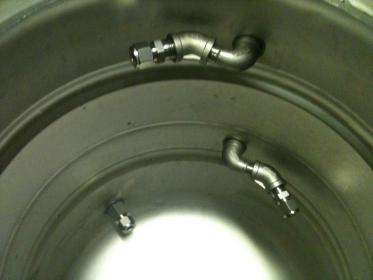
The inside hardware. The connections for the coil look kinda weird, but this way makes it to where I do not have to put any crazy bends to meet up with the connectors.

2855-img-8096aaaa.jpg
 
OK.....the coil was a workout. I bought .020 thick 1/2" tubing.
It came in a coil about 2 foot diameter and I needed it to fit in the keggle.

2856-img-6209aaaa.jpg


I tried to reduce the diameter of the coil by hand as a few people told me I should be able to do. That turned out very bad.

2857-img-6338aaaa.jpg


As I am sure everyone knows, that is some pretty rigid tubing.
Filled it with water, sealed both ends and secured one end to the handle of a 1/4 bbl keg.

2858-img-6471aaaa.jpg


2859-img-6470aaaa.jpg


Lucky I have a few that I use for bar stools and have a swivel seat on them. That made it a little easier to spin & coil.

2860-img-6473aaaa.jpg


After about a half hour, having to stop after each revolution, I had a very professional looking coil that fit in my keggle.

2861-img-8101aaaa.jpg
 
I realy like everything you've shown so far, and those keg bar stools are freakin sweet.
 
Saw that the bolt broke on the radio punch. Overall how well did the harbor freight punches work out. Looking at the same kit for my electric brew kettle when i get going.

Also what size nipples do you have for your plumbing going through the keggle wall. all i can find is brass locally?
Looks great keep it up


Rock Chalk

Chris
 
The Harbor Freight hole punches just don't stay sharp. They are not made from high temp steel. The problem that I ran into was that after I cut a hole, the edge of the punch would get distorted and need to be ground down each time.

2901-img-6482bbbb.jpg


If not, then it would eventually get so bad that the punch would not fit in the opposing piece.
Result would be.......SNAP.

I don't know how many holes you would need to punch, but I think if you are not doing more than 10, it may be worth trying the set.

If you are going electric, then you will need a large hole for the element. The kit comes with that punch as well. I only needed 2 of those holes, so it was worth it not to buy the $70+ 1 1/4" punch from Greenlee.

I spent $40 on the Greenlee 13/16" punch from Amazon and you can definitely tell the difference.

All of my fittings are 1/2NPT. I decided to go all stainless. Found that it was a lot more dificult finding fittings locally, but I live in a city of around 65,000. I had to order about 50% of them.
 
I got a greenlee 3/4 radio punch at a garage sale for $2 the radio punch are oversized and it cuts a 7/8 hole perfect for valves. May get the harbor freight punch set or try to pick one up on ebay. Where did you order your stainless from i have a good site but shipping is sometimes high.

Rock Chalk

Chris
 
The best thing to do is not order here & there. Make out a complete list of what you need, check everywhere locally and then order only what you have to.
I ordered from Adventures in Homebrewing, McMaster Carr and NorCal. Tried to get everything in one order. Try calling them to see if they will give you a discount on shipping if you buy numerous items from them.
A lot of places were on backorder and it was easier to get it from another, even if they may have been a dollar or two more.
 
Well, the Greenlee punch came in and it really helps when you have high quality equipment.
Finished up all the holes and they went smooth.

2930-img-8127aaaa.jpg


Finished up the element enclosures......stole the idea from Kal. His build rocks of course. Figured why try to re-invent the wheel when his design is great.
I will probably steal a few more before the build is done.
Hope he doesn't patent any of his designs.

2929-img-8130aaaa.jpg


2928-img-8132aaaa.jpg
 
Any updates on the keg conversions? Pics? I'd love to see the coil fully mounted, as I am in the process of doing this as well...thanks!
 
I will try to post some more tonight, but I have Beer School at the local watering hole. Might not be until tomorrow.
I have it mounted and tested. Looks good if I say so myself.
 
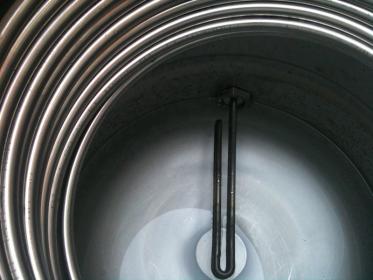
Found these photos on my phone of the heat-X mounted in the HLT.
Filled with water and tested for any leaks.

More to come.

image-2836981792.jpg


image-4079463600.jpg


image-3028179877.jpg


image-697247164.jpg


image-488200871.jpg
 
Nice! Thanks!

Why did you mount it so far from the bottom of the keg? It seems like you'd have to have a completely full (or nearly completely full) HLT? I was thinking of mounting mine so that the bottom port is at the top of the lower 1/3 of the keg... Just curious...
 
Back
Top