Finally getting started

Homebrew Talk - Beer, Wine, Mead, & Cider Brewing Discussion Forum

Help Support Homebrew Talk - Beer, Wine, Mead, & Cider Brewing Discussion Forum:

This site may earn a commission from merchant affiliate links, including eBay, Amazon, and others.

Codfishhead

Well-Known Member
Joined
Mar 3, 2014
Messages
176
Reaction score
19
Was going to have my friends do a lot of the build for me but decided it was my job. Grabbed a 170amp mig welder from harbor freight, watched some videos, started flux core welding everything in site. Not pretty as pro welds but rock solid. I encourage anyone thinking of starting to have at it. I'm having a blast.

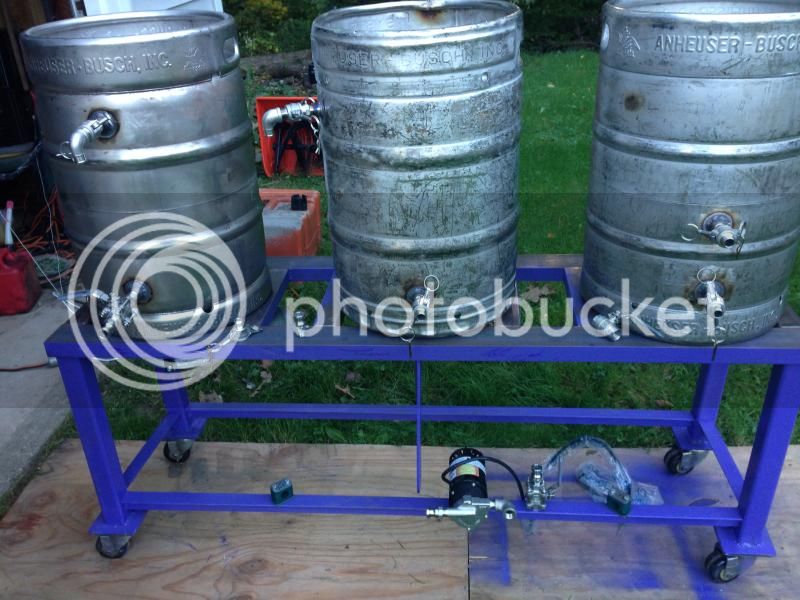
With a 4.5" cutting tool and a welder I went at it. started cutting n welding away. Went much slower than expected. Just removing all the rust, cutting n prepping took all day. Once I got going it went pretty smooth.


I have most if not all the hardware needed. I'll be laying it all out this week. Hope to get the kegs ss welded next week as well. I'm not takin that on. I played welding the tops of the kegs I cut off. Very easy to burn through without using gas.

Paint is just n undercoat to stop it from rusting. Not sure what color it will end up. But the wife likes the purple.

ImageUploadedByHome Brew1408233508.323973.jpg

ImageUploadedByHome Brew1408233612.601482.jpg

ImageUploadedByHome Brew1408233649.053036.jpg

ImageUploadedByHome Brew1408233670.184961.jpg
 

Attachments

  • ImageUploadedByHome Brew1408233684.709418.jpg
    ImageUploadedByHome Brew1408233684.709418.jpg
    657.7 KB · Views: 542
I have one pump and quick disconnects for my hoses.

Is the only reason for 2 pumps so you don't have to switch lines?
 
I think the reason for 2 pumps on a single tier system is for sparging. You can probably get away with one pump if you want to keep switching lines during sparge. Hlt -> mlt (switch) mlt -> bk.
 
I am running one pump and it works fine. No need to drop another $100 bucks on a pump when you only switch the lines a couple times.
 
As for the 1 pump, I was planning on making a heat/cooling exchanger out of a copper coil. Drop it in the hot water pot to recirculate n run cold water through it chill down the wort. Same reason I didn't use 3 burners. I don't see a need with the heat/cold exchanger.

Searching up what everyone has for gas lines now. I see many that mount the pipes or hoses as well as tank right under or very close to the burners. Not sure why all gas lines aren't as far from the burners as possible. As in better safe than sorry.

Also have a very cool brass site glass I acquired. Thinking of cutting the SS tubes I pulled from the kegs to use as protectors for the site glasses. Still designing and fabricating as I go so not positive yet.

Been in Cape Cod drinking, fishing, and eating all the shellfish in the cape this week. Can't wait to get back to work on this.


Anyone suggest where to buy lids for the kegs and what installing is used to wrap the mash tun.
 
Looking good.
I did a gass pipe manifold and the gas lines off the that I used the yellow flex lines from big box store.
Used tees before the solenoid valves and the othe port a 1/4" line for pilot lights along with needle valves to adjust.
 
I'd think that a couple of three-way valves could eliminate the need for a second pump &/or switching hoses around during the brew session...unless one wants to fly sparge on a single tier.
 
Did you use the same cheap-o HF flux welder (was my first welder, too!) on the SS? If so, you're going to have problems down the line...
 
No that was done with a very expensive setup by a very experienced welder.

I wish I could weld that thin SS and make it look like that.
 
almost ready to cook on this bad boy. Making a few other things now for dry hoping and such. Need a few flexable gas lines to come off the black pipe. but it's getting there.

F87AB37B-18F4-4022-815D-AAC9D548EA4C_zps3jadmz5g.jpg
 
First flame test worked fine. 4" from burner to keg bottom. I have some sheilds I need to install. Man the heat from these burners is killer. Boiled a gal of water faster than a microwave.

048E8590-0538-4F5E-8890-1E02D19B0A80_zpssztfr0md.jpg
 
That pic the gas is not on full and the keg is on there in that pic. This next pic was double the amount of gas with the keg on and still looks good.
I’ll need to see what happens when I add the shield. Worst case I won’t add it if it restricts too much air cutting down the flame.

I can blow the flame out by cranking it up. I have a 30lb reg on this. I’ve been playing with the gas and air mixture. Really puts out some power. I think it should be fine. So much so I’m using the same burner for another project I’m doing. Had a couple extra kegs so project number 2 getting done at the same time. Should be done in another week. All other parts (condensers, plates, boko set up, infuser) already made. Going to be a 3 in one still. LM, VM, and straight run. Making the column in sections to swap out parts not needed for certain runs.


As for the shield on the keg burner, on my old setup I had a cone shield half way up the pot. Directs the heat escaping back towards the keg. After some testing I may go back to that type setup with this new setup. I’ll figure that out after cooking on it a few times.

43528E75-FEC2-4AFF-94BB-EB57291EB6E6_zpskvlz3pg8.jpg


Project #2
8' x 2.5" cutting into 4' and two 2' sections.
B84075D9-4705-46AC-A70F-4BCAF7174E4A_zpspwme5hzc.jpg
 
Back
Top