MalFet's bottle washer for lazy homebrewers

Homebrew Talk - Beer, Wine, Mead, & Cider Brewing Discussion Forum

Help Support Homebrew Talk - Beer, Wine, Mead, & Cider Brewing Discussion Forum:

This site may earn a commission from merchant affiliate links, including eBay, Amazon, and others.
awesome work! and awesome thread. Im gonna work on my 24 bottle washer once the next paycheck comes in.

I want to get the outside of the bottles washed as well so it will be in an enclosed bin with 2 extra spayers that just shout sanitizer everywhere
 
Where is everyone getting the cross cpvc fitting?? I can find the pvc cross fitting all day no problem, but not cpvc.
 
Where is everyone getting the cross cpvc fitting?? I can find the pvc cross fitting all day no problem, but not cpvc.

I've had a few people ask me this, so I think you're not alone. Unfortunately, I don't have a lot of insight to offer. I got all my parts at a very small neighborhood hardware store in upper-Manhattan.

(Speaking only for myself, if I could find all the other parts in CPVC, I'd probably just go ahead and use a PVC cross-tee if necessary. I know there's some concern about leaching, but (a) we're talking about a very small area of contact, (b) after a hot wash I always do a long rinse with cold starsan and then drain completely, and (3) ...I can't remember what 3 was because polymer toxins have rotted my brain.)
 
I've had a few people ask me this, so I think you're not alone. Unfortunately, I don't have a lot of insight to offer. I got all my parts at a very small neighborhood hardware store in upper-Manhattan.

I was able to find a few via Fire Suppression type businesses. These are usually a different color as they're used specifically for fire suppression, but it should be same/same as far as I know as they follow the schedule 40/80 dimensions.

Here's a couple examples out there:

http://www.plumbingandfire.com/cpvc-plastic-fittings/cpvc-cross.html

http://www.platinumfiresupply.com/products/CPVC/CPVCSLIPFTG/CPVCCROSS.aspx

I'd also be inclined to agree that one single non-CPVC part probably isn't going to ruin anything, unless you're using really hot water. You'll be rinsing things out anyway, usually.
 
Yeah but I'm planning on not only using this as a washer, and I want the corrosion resistance of the cpvc, which can be used with chemicals. I ended up getting a stainless cross, which is just about the same price it looks like.

The main reason I don't bottle much anymore is it takes a while and is a pain. I'm wanting to take more homebrew to the lake in bottles now. To that end I recently made a pneumatic foot actuated single bottle caper, that I may double to 2 bottles. Being able to wash and sanitize 25 bottles (for me) at a time is great, but I'm making mine stainless so I can use it as a bottle filler too. I plan to get one worked out and then make another so I can bottle, and cap
5 gallons in 10-15 minutes.
 
Good to know. Before I made my recommendation, I verified that the fire suppresion CPVC followed Sch. 40/80 dimensions. Interesting to find out that it doesn't...or maybe it's because it's Sch. 80 and we're typically using Sch. 40. Hope you didn't have to spend money on that!

A worst case option, you could use two T's to create a funky cross (really just two T's, but you could cement them in opposite directions like a cross). Essentially you'd have one T on top of the other for your keg line feeds and the mainline going up into the keg to wash the main part. A bit kludgy, but it would probably get the job done. Something like this, just line up the vertical posts.

-|
|-


As long as there were sufficient back pressure on the main riser, you should get good feeds out of the two T's.
 
I have a disk sander and I'm sanding down the tips and then using a stainless cross as a die and threading them in, and then backing them out. A little primer and cpvc glue and presto.
 
So, you use hot water with PBW to wash and then cold water with starsan to sanitize, right? I'm looking forward in building this using PVC only. But the maximum temperature it can take is about 120F...
 
I have ordered pieces for building my manifold all in stainless steel. I already have the pump and the bucket.

Here's my part list:

1/2" stainless fittings :

3 x tee 9$
6 x 75mm nipple 12$
1 stainless cross 6$
4 elbow 90 degrees 10$
8 female coupler 8$
12 x 150mm nipple 42$

Risers:

24 x 3/8 stainless straight tube 7" length ( around 50$, waiting for the quote)

JB weld marine 10$

24 x #6 countersunk 3$


I will apply jb weld in the inside of the countersunk and "weld" it to the riser. Then i will drill the manifold and try to jbweld the risers. If it isnt strong enough, i think i might ask my neighbor if he can weld my 24 risers :S

Total price around 150$! I will edit the post when ill get the manifold built.

Here's the link for the countersunk.

http://www.ebay.com/itm/Stainless-S...141?pt=LH_DefaultDomain_2&hash=item27d26d93b5
 
I have a pump but it is only rated to 300 gpm which is suffiently lower then the OP's. Now, would this still work if instead of turning the bottles upside down, I flipped the cleaner chassis upside down so the stems drop straight down into the bottles. From reading through this thread the cleaning method doesn't come from the force of water but rather the water flow. I would just leave it so that causing the bottles would consistently overflow. The only problem I forsee is that some of the debris would sink if it was heavy enough. But it should still be dislodged from the bottle. Any thoughts?
 
I have a pump but it is only rated to 300 gpm which is suffiently lower then the OP's. Now, would this still work if instead of turning the bottles upside down, I flipped the cleaner chassis upside down so the stems drop straight down into the bottles. From reading through this thread the cleaning method doesn't come from the force of water but rather the water flow. I would just leave it so that causing the bottles would consistently overflow. The only problem I forsee is that some of the debris would sink if it was heavy enough. But it should still be dislodged from the bottle. Any thoughts?

Unfortunately, my hunch is that it wouldn't work, at least not very well. Though it's not pressure per se that cleans the bottles, you do need significant turbulence to wear down deposits. If you're just piping water into a full bottle, I doubt you'll get that.

If you try, though, let us know how it goes!

Ok, I think I will try it mainly because the parts list is the same whether is upward or downward. I would have liked to avoid buying another pump but its not worth having a plethora of dirty bottles around. Almost all of my bottles don't have noticeable chunks of debris so it might be difficult to tell how successful it would be.
 
I built one of these (similar anyway) over the weekend.. I only built 3 rails, but I didn't solvent-weld the rails to each other, so I can add/remove rails as needed, depending on the number of bottles I have to do. it's got 20 bottle risers on it now, and I bet I could easily double that with this pump. works fantastically.

See it in action:

https://youtu.be/sRW3Q0lceZo

https://youtu.be/Fpp8FzmwcUk

IMG_20150621_214913095.jpg


IMG_20150621_230419636.jpg


IMG_20150621_221041177.jpg
 
Last edited:
This is a great idea! I've been toying with it for a few days and have come up with a couple of suggestions.

If you're in any way concerned with getting the most bang for the buck, the supply line must be significantly larger than 1/2". It works (obviously), but you get unnecessary flow restrictions. Depending on how many 1/4" tubes you have used, the flow rate is double or higher from the nozzles; this represents a pretty significant loss of pressure. Per my calculations, if you use a pump similar to the one initially suggested with a 1 1/4" output, an initial reduction to 1" will still have acceptable flow rates with minimal head pressure losses.

I intend to use the FastRack system so I designed it to handle 24 bottles at a time. That being said, a 1" main supply should connect to 3/4" cross lines and 1/2" branch lines. The gradual reduction is probably overkill as the head losses of such a small system are likely to be negligible, but I'm a perfectionist like that.

Six 1/4" vertical lines exceeds the volume of the 1/2" branch lines by about 50% so it is necessary to reduce the final output (which I see most people have done). I plan on capping the line and drilling one 3/32" hole on top and eight 1/16" holes on the sides. This will be large enough to have high flow, but small enough to have a decent dynamic pressure increase. The cross line on the back side is technically unnecessary, but it might help with stability.

I'm including a very rough sketch for those who prefer visuals.

Bottle Washer.png
 
Just found this thread - I realise it's been a while, so hoping people are still around. Has anyone run their pump regularly at higher temps (60-80C / 140-180F)? How did it cope? I'm tempted to run this with PBW / Oxyclean at appx 140F for better cleaning action.

Also - has the silicone grommet idea stood the test of time? Looks like the easiest and most efficient solution to me.
 
I have used a superior 91250 1/4 HP pump for 2 years in a sink filled directly from the hot water tank and have had no problems with hot temperatures.

However I have replaced my homemade copy of MalFet's bottle washer with a MoreWine Bottle Rinsing Base and Bottle Rinsing Rack:

https://morewinepro.com/products/bottle-rinsing-purging-base.html

https://morewinepro.com/products/bottle-rinsing-purging-rack.html

They work perfectly for bottle washing and I think are worth the price instead of constructing a homemade one. I did drill out the tips to allow more flow and works great.

I still use the superior 91250 pump, one in hot PBW and one in cool Starsan.

I would send photos if I knew how.
 
Thanks Jim, his hit is the water you are using do you think?

Do you think the commercial model works better than your homemade one? Or just not worth the time and $ to make it given the price?
 
The water is about 130 degrees.

The commercial model has more pressure and less flow. I don't think the commercial one is necessarily better but it sure is easier. While I like to improvise and make things from scratch, the cost and convenience of the Morewine set up makes it not worth the time and trouble to build my own. But this is just my opinion.

When this thread was started, I didn't know about the commercial washer. If I had, I wouldn't have made my own.
 
Thanks Jim, I appreciate the honest and pragmatic approach. I'm in Aus, so will prob make one as I haven't seen that product out here. I'll post pics when it is complete.
 
I finally added a chugger pump to my brewing equipment so I have been looking for things to use it on. A bottle washer has been on the "to-do" list since my first batch so I thought I'd take a crack at it.

There seems to be regular questions about "how much pressure do I need". The diameter of the jets makes a big difference, but with these 1/4 couplings (1/8" ID) I would say 15 jets is the limit for a chugger pump.

I am at just under $15 in this thing, and it actually cost me closer to $10 since I already had the 1/4 nozzles. Everything is press-fit, no glue, the fittings themselves have plenty of friction for this level of pressure. Considering the whole thing took me well under an hour including planning I feel pretty good about it. Tonight I am going to brainstorm a frame or plate to hold the bottles upright on the tubes.

rR7wQm7.jpg


Tools:
Drill
-1/8" Bit for Pilot Holes
-3/8" Bit for Tube Holes
-3/4" Bit for Tub Drain
Saw

Parts:
5' Section of 3/4" PVC - $2.23
5' Section of 1/4" PEX - $1.84 (x2 $3.68)
3/4" Slip PVC 90s - $0.48 (x3 $1.44)
3/4" Slip Tee - $0.31 (x2 $0.62)
3/4" by 1/2" Side Outlet 90 - $1.68
1/2" Plastic Male Adapter - $0.25 (x2 $0.50)
1/4" Drip Irrigation Coupling - $4 for 25 (can probably get cheaper)


The Picture Gallery:

Cut Tubing and Parts Layout

Drilling Tubing

Assembling Uprights

Testing Head Pressure at 5 Tubes

Jet Height with 15 Tubes

Video

Project Gallery
 
OK, built the bottle washer! :) Seriously amazing to put 20 bottles on and rinse with little more effort than turning the hot water tap on... Haven't built the keg washer yet or gotten a pump. That's next.

The bottle washer was designed with the riser spacing to go through the holes in the bottom of the Hacker Pschoor crates. The aim is to slide a full crate over the top of the washer, hit go, pull the crate off and presto - washed and dried in the crate. Of course... the risers aren't that rigid and I didn't drill the holes all that straight, so it is virtually impossible to get all 20 risers through all 20 holes for the moment. Next Steps: find some small gauge stainless tube and drill the cross members in the drill press. Hopefully then the 'in-crate' washing magic will work....

https://www.homebrewtalk.com/attachment.php?attachmentid=300203&stc=1&d=1441025328

The larger ring around the outside equalises the pressure so all risers get the same amount of flow/pressure. The outside ring is 3/4"/20mm, the inside cross-members are 1/2"/15mm. The risers are rigid irrigation risers. Everything is press-fit together; no glue. No leaks when using mains pressure so it is likely to stay that way. Without bottles on the washer the hot water tap will give about 15cm of 'fountain'. On cold water on the garden tap, around 2M-3M of height, completely even. At low pressure some of the risers are slightly uneven lower - I think I might have pushed them in slightly further.

https://www.homebrewtalk.com/attachment.php?attachmentid=300204&stc=1&d=1441025328

The washer is running here, though it is hard to tell from the photo. The water flows over the cross member and straight into the sink. No mess, no fuss. :)

https://www.homebrewtalk.com/attachment.php?attachmentid=300205&stc=1&d=1441025328

The T pieces are 3/4"/20mm, with a push-in reducing bush for the 15mm cross-members.

https://www.homebrewtalk.com/attachment.php?attachmentid=300206&stc=1&d=1441025328

The risers are 20cm poly irrigation risers. 7.2mm OD appx / 2.5mm ID appx. I couldn't get a neat hole drilling into the PVC using the 7mm drill on the test piece (the drill bit kept wandering off the pipe into my fingers), so drilled pilot holes with a dremel on high speed @ 3mm. Worked a treat. The 7mm hole was then easy. The pressure fit works brilliantly.


Parts List:
Masters was cheaper by around 50c / $1 on each pressure pipe fitting, which adds up quick.

10x 1.49 https://www.masters....ts-pvc-tee-20mm

10x 0.80 https://www.masters....nnector-20x15mm

4x 1.05 https://www.masters....-degrees-x-20mm

2x 2.10 https://www.masters....re-pipe-15mm-1m

1x 2.40 https://www.masters....re-pipe-20mmx1m

1 x 1.65 https://www.masters....et-tee-pvc-20mm

1x 1.65 https://www.masters....ly-bush-20x15mm

20x 0.50 - rigid riser 200mm. I got mine from an irrigation store - so you will need to measure what you get. You can see the brand above. The OD was 7.2mm appx - hole was 7mm. Worked really well.
https://www.masters....gid-riser-200mm if you want to get it all from the same store.

1x 1/2" stainless barb - from brew kit.
1x 1/2" silicon hose - from brew kit.

Total: $37.10

Of course... I spent more on other parts because I was thinking of building more than one (one to fit a 25 bottle batch of 330ml bottles in a milk crate... slide into the 5x5 grid of bottles, invert the crate, wash. I'm not convinced this is as good as you will still need to rack to the bottle tree to dry). I'll see if I can get this one to work with the Hacker Pschoor crates before I do that, but I will say - 20x 330ml bottles worked a treat on the current one which is making another unlikely (more likely to build another the same... run one for recirculating washing fluid, another for rinsing from tap).

Worth the money? - absolutely! If you are bottling... just build one. So easy and so satisfying.

Spacings if you are interested in the layout I used:
- 19mm Joiners between T pieces - 43mm (and between elbows) x12
- 19mm end cross member - 300mm x1
- 19mm end cross member to faucet T - 135mm from memory ( (300-30)/2 ) x2
- 15mm cross members - just under 300mm - I cut these so they 'just' fit the bottom lip of a Hacker Pschoor crate between the insides of the T pieces. x 5

Total time building... 3hrs? I lost my plans with measurements I had drawn up, so included a lot of messing around. I cut all the pieces with a stainless cut-off disc on the angle grinder which worked really well, but I didn't cut straight most of the time. As long as the largest width of each piece is the same length (mostly 43mm), that isn't really an issue. I had to re-do two of the spacers between T's because the spacings didn't match the crates the first time. Otherwise it is super simple to put together.

BottleWasher01.jpg


BottleWasher02.jpg


BottleWasher03.jpg


BottleWasher04.jpg
 
I was asked by Beek in the Scrubmaster 3000 thread to post about my Malfet-style bottle washer so here we go!

I'm brand new here and to brewing in general. I've done a single brew with a friend and am doing my first solo brew on my own equipment tomorrow. But while lurking here, researching, and planning my equipment I saw a recurring theme that bottle washing was a huge hassle and I wanted to eliminate it before I ever started. So I found this thread, read all 20 pages at the time, decided I wanted a FastRack-compatible design, and went to work. I didn't do a detailed parts list during the build but I did take photos.

Mine is built with 3/4" PVC. I didn't bother with CPVC because of previously posted issues getting a cross piece and we're talking about hot tap water at low pressure here. If I were doing it over, I'd probably use 1/2". I thought 3/4" would help with the flow but I really don't think it matters much. The main issue is that the bottle pattern on a FastRack is a 2.5" grid and 3/4" fittings don't let you get the pipes that close together (see below) so I had to take the fittings to the belt sander to slim them down.

I used 1/4" PEX for my risers because it's really cheap and also easy to just press-fit into drilled holes. The PEX moves around a good amount and it is nearly impossible to place a rack full of bottles down onto the risers. Maybe with a second pair of hands. In actual use I had to load an empty rack and then put on the bottles. Kind of a pain. Also, 24 1/4" ID risers was too much volume of water and I wasn't getting much height of water. I "fixed" it by smashing the ends of the risers hard with a pair of pliers to make a sort of crimped nozzle.

I'm considering making a new frame with 1/2" PVC and those irrigation risers like @lael did above. I believe that will help with both rigidity and pressure. If I do this I will probably also add a ball valve so that I don't have to unplug and plug the pump from power with wet hands when changing racks.

Parts:
* 1/4 horsepower sump pump (same as the original post)
* 10ft 3/4" PVC
* 15ft 1/4" ID PEX (3 lenghts of 5ft cut into 7" risers)
* 4 x 3/4" elbow
* 3 x 3/4" tee
* 3/4" cross
* 3/4" slip to threaded adapter
* Brass thread to female hose adapter (attaches to hose adapter that comes with the pump)
* 2 x 3/4" male threaded hose barb
* 4ft 3/4" ID tubing
* Plastic bin bought to size after taking measurements

The connectors. Left to right: 3/4" hose barb, slip to threaded adapter, short length of PVC, 3/4" hose barb, brass thread to female hose adapter, 1 1/4" to hose thread adapter that came with the pump.

q2GeXyzh.jpg


3/4" fittings wouldn't let me get the 2.5" spacing I needed between pipes so I sanded the fittings down until the spacing worked.

Q8h5oveh.jpg


Assembly, used a FastRack as a template to mark hole locations, drilled with a 3/8" bit to press-fit the 7" risers.

t8yifhoh.jpg


Test fit into Sterilite brand tub I bought based on my measurements and a FastRack in place.

SQLAu22h.jpg


Test run after crimping the riser ends. Height works for 12 and 22oz bottles but I'd like more pressure.

108eiOCh.jpg


Current setup, including cross members to keep the frame from twisting and falling into the tub.

E0XmNnPh.jpg


It works! Man, does it make the Star San foam!

IQrzO4Ih.jpg
 
I read many of these posts before building my own bottle washer. I wanted something compact that didn't require dedicating a sink, and that I could leave running for a while if needed without worrying about water splashing out of the tub.

I built something that completely fits inside a storage tote, without anything hanging over the sides. So, the goal was to maximize the use of space and try to have washing posts on all 4 sides of the rig.

What I came up with is in the pictures. This version can clean 20 bottles at a time. With some modification (or a bigger tub), you could probably increase that. As you can see, the pump fits UNDER the tub, so that saves on the footprint as well. I also hard-piped the pump to the rig, so you can use the handle on the pump to left the entire rig out of the tub as one unit.

I also wanted something that was somewhat powerful, and was willing to spend a little more to get it. I get about 10' of water height without any bottles on the rig with a pump I got from harbor freight for $50.

I can post a parts lists if there's interest. I also took pictures of the construction, if anyone wants those.

I'm considering building another one so that I can have one rig that's cleaning and another that's sanitizing simultaneously.

The only downside so far is that the risers are a bit wide, and on some bottles the cleaning solution doesn't drain as fast as it enters. Some of the bottles will have several inches of liquid in them waiting to drain while the pump is running. This seems to reach equilibrium, however, and since I made the posts tall enough, there's a good stream of water that hits the bottom of the bottles, even if liquid is backing up a bit.

If anyone has any suggestions for improvement, let me know.

20151010_154948.jpg


20151010_155105.jpg


20151010_155457.jpg
 
Holy balls! Are you trying to clean them, or send them into low Earth orbit?
 
What's inside the PEX "sleeves"?

If you took a piece of 1/4" copper and somehow were able to hook it through the sleeve up to the top of the pex it would vent the bottles better allowing them to drain MUCH faster.
 
What's inside the PEX "sleeves"?

If you took a piece of 1/4" copper and somehow were able to hook it through the sleeve up to the top of the pex it would vent the bottles better allowing them to drain MUCH faster.

Hm. I'm having trouble picturing this. Are you referring to an air vent of some sort? A second small line going from inside the bottle to outside air, allowing air to come in via the vent so that water can exit the bottle without the "glug glug" of air coming in? Or something else?

I can certainly see how allowing air in would help get the water out faster, but I'm not picturing how I could mount this, short of gluing it to the plex. Also, the plex just barely fits in my grolsch bottles as it is. I'm not sure how much more width that I could add to the risers before the mouth of the bottle wouldn't fit around them.

In my first test of this build, I found that bottles made too good of a seal between the mouth of the bottle and the fitting where the plex goes into the PVC. Water would spray everywhere. To help alleviate this I built "stand offs", which are just PVC with a 45 degree cut, to allow water to drain out of the bottle in a slightly more controlled/directed fashion. The attached picture gives a better look at these. The stand-offs are in the lower-right, and go on the fittings in the upper-left, with the flex tubing going through the middle of the stand-offs. This is one of the two things I dislike about the build. I currently don't have the stand-offs anchored, and they rotate, sending the water outside the tub instead of towards the middle. Also sometimes the mouth of the bottle sticks to the stand-off, and comes with it when I pull the bottle off of the rig and I have to pull them apart and put the stand-off back on the rig.

(The second thing I don't like is that the bottles don't have anything to make them stand straight upright. I've seen others in this post make a template that's just a plate with holes in it that the bottles fit upside down into, like a fast rack. I use quite a bit of flip-top bottles, and I'm not sure how I'd do this with the different sizes of bottles that I want to use. Plus, the different heights of the rig make this more difficult to construct, since the template couldn't be flat.)

Thanks for the advice. If you have any more specific suggestions as to how to better accomplish this, I'd certainly like to hear them. I may try flattening out a piece of copper tubing and put it on one of the stanchions as a test to see if the mouth of the bottle will fit, and how much it helps the draining.

20151010_153740.jpg
 
Holy balls! Are you trying to clean them, or send them into low Earth orbit?

Heh heh. Yes to both?

I wonder what would happen if I ran the entire output of the pump into one nozzle. That might be interesting to try at some point. While I definitely don't have enough pressure with 20 nozzles to launch a bottle, perhaps something more pressure-washer like could manage to launch something a distance. : )

Mainly, I wanted something with a bit of pressure to dislodge dried gunk at the bottom of the bottles, which I certainly got and I'm pleased with. The only down-side to this is that if I miss putting a bottle on one of the risers, I get a huge fountain in my basement until I can unplug the pump.
 
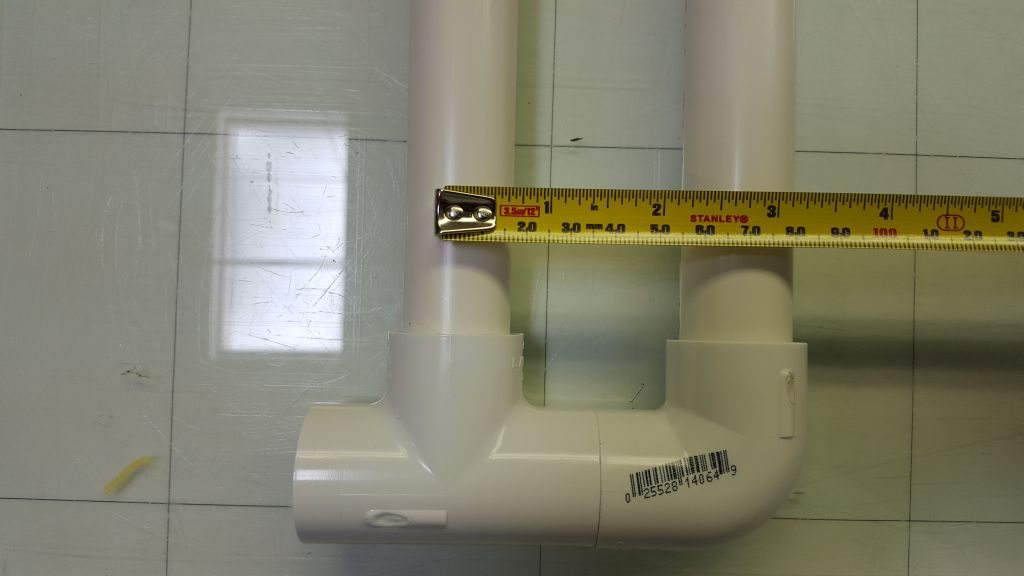
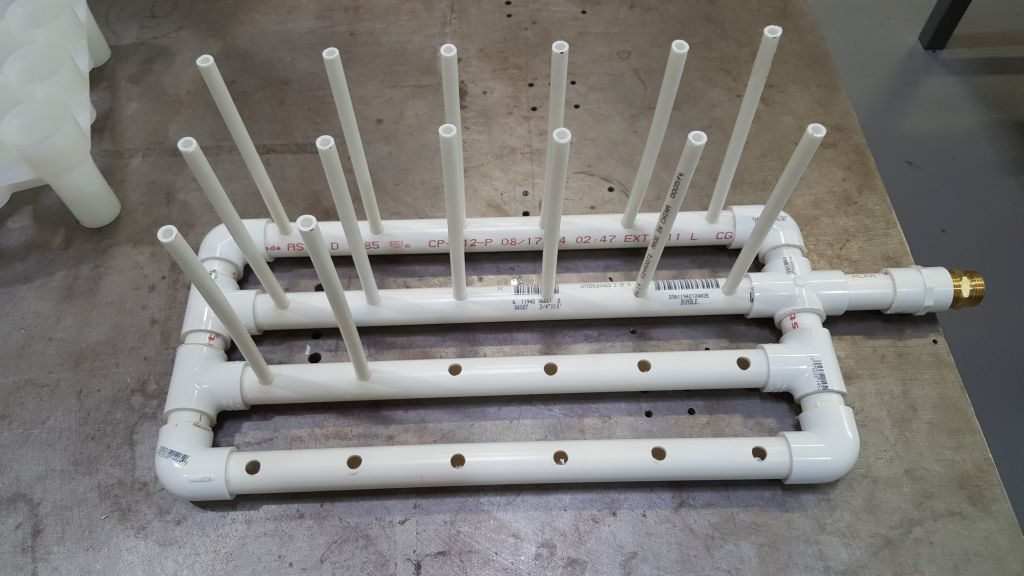
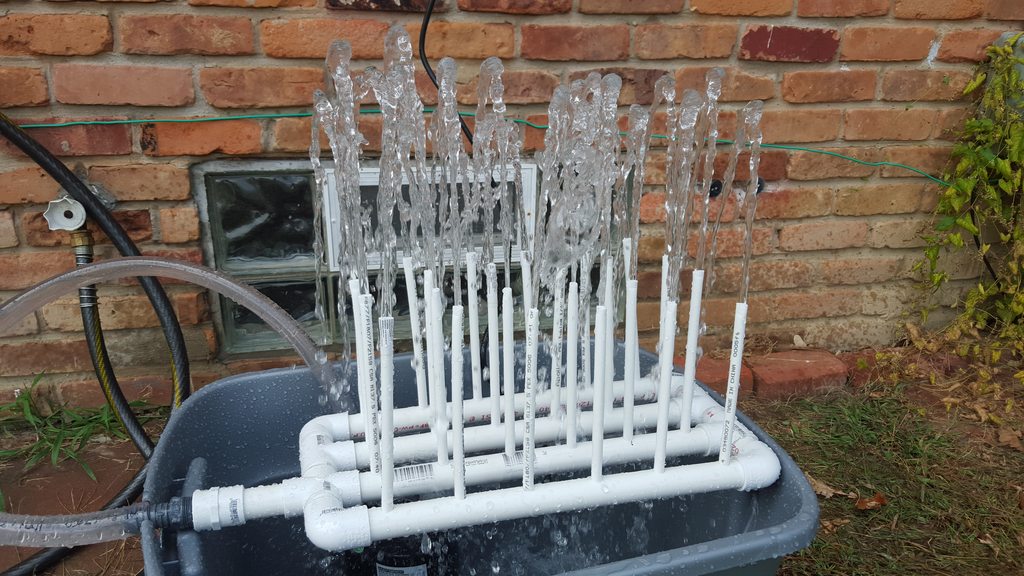
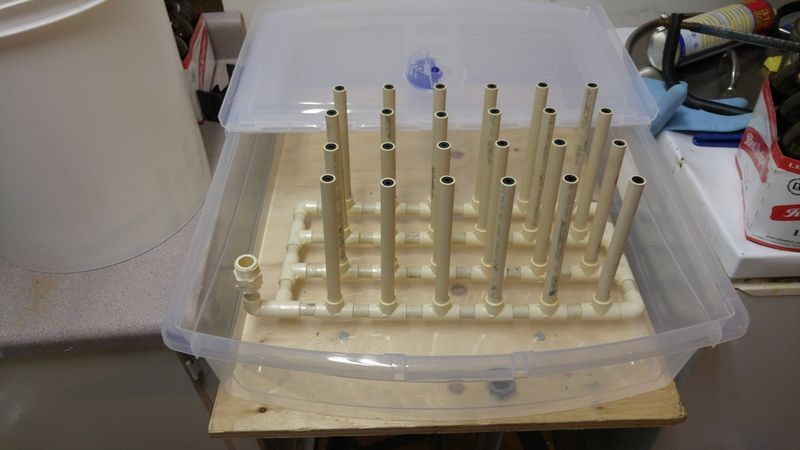
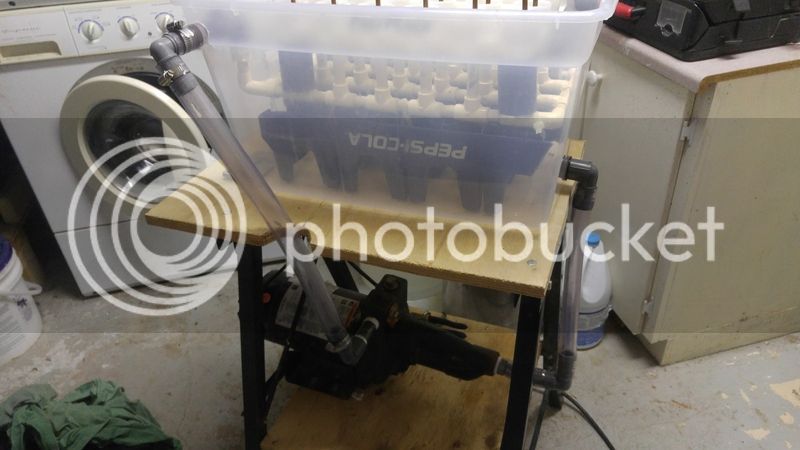
I've finally (mostly) finished my own build and thought I'd share it here. Here is the completed manifold:

20151001_063634_zps21gjus7r.jpg


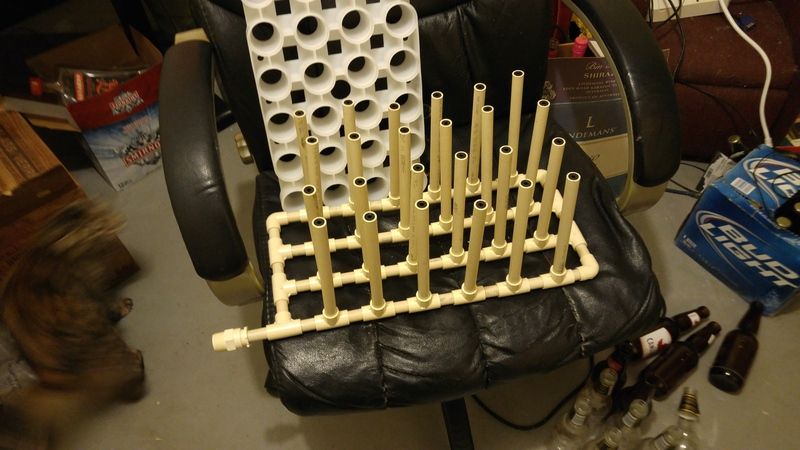
It was modeled after a mix of ideas, from Malfet's and also this video (https://youtu.be/jSXpPCrLt7A), but changed to 4x6 to accommodate the use of the FastRack system.

After completion I tested it out, but found three problems:


  • Because I chose to place the threaded input at the END instead of to the side of the manifold, it was just ever-so-slightly too long to fit in your average Rubbermaid container.

  • The sump pump I had laying around turned out to not have the power to handle 24 risers, resulting in less than 2 inches of spray, not enough to reliably cover the inside of the bottles or dislodge dirt

  • The 1/2" PEX didn't leave much room for air to escape and on some of my older non-standard stubby bottles, it actually formed a seal so it wouldn't work at all.

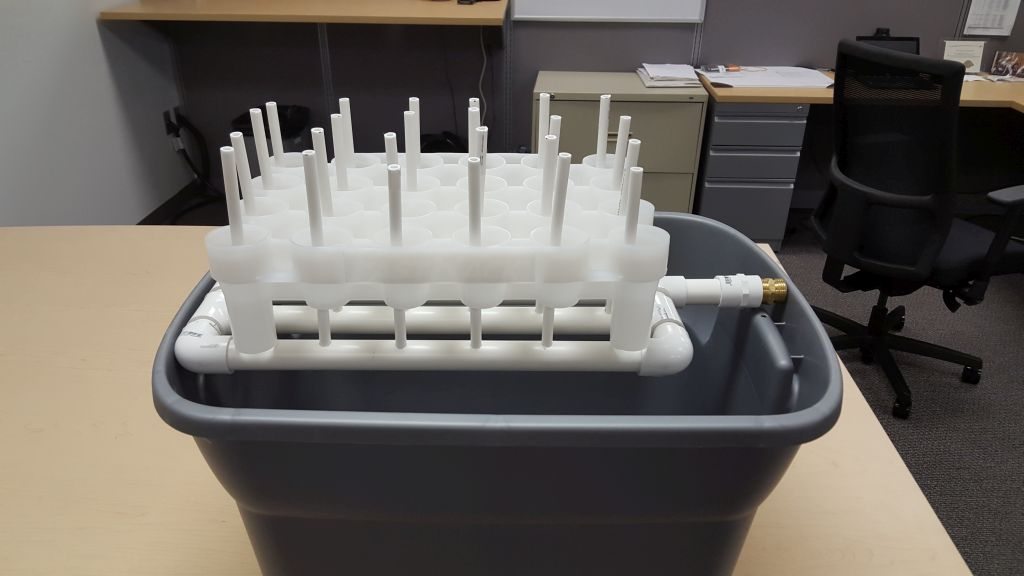
First fix was to find a container big enough for the manifold. Unfortunately the only one I could find was MUCH wider than I needed, but I made do:

20151022_205543_zps50wqay1e.jpg


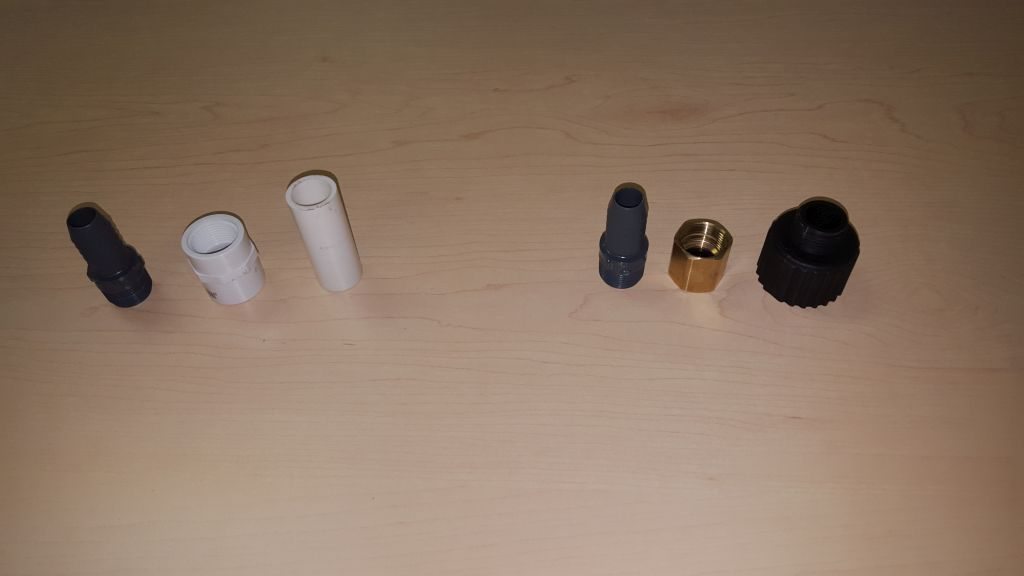
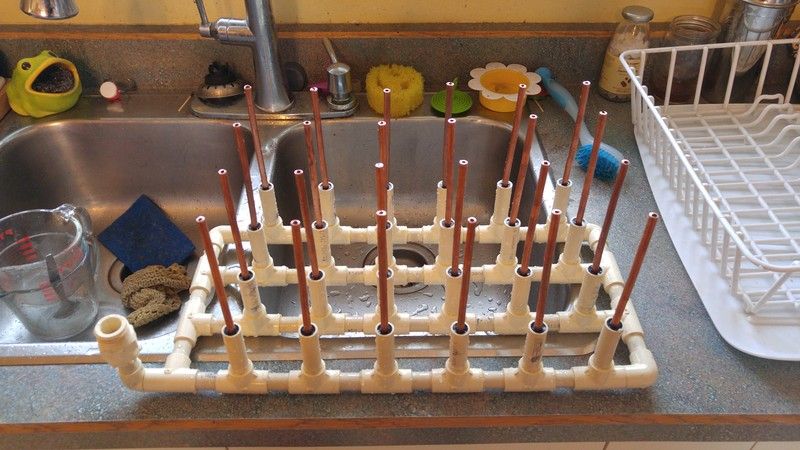
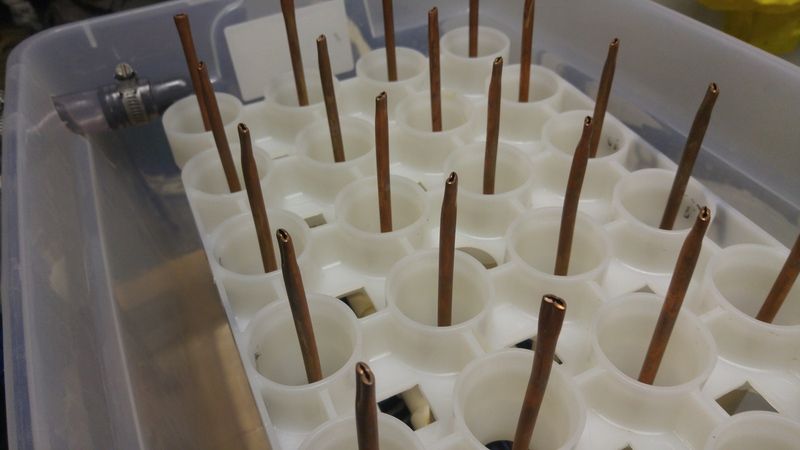
Unfortunately I wasn't able to find 1/4" PEX anywhere for sale in Winnipeg, most hardware guys told me there wasn't enough demand so no one stocks it. Picked up some 1/4" copper and cut my risers, reused the 00 beveled washers to hold the new copper risers. To get this to work I had to sand the washers down a bit and also took the dremel to the inside of the remaining PEX riser to widen the ID just a hair, then heated the holy hell out of the washer to press fit it, I ended up with this:

20151025_150512_zpsnqk5z1li.jpg


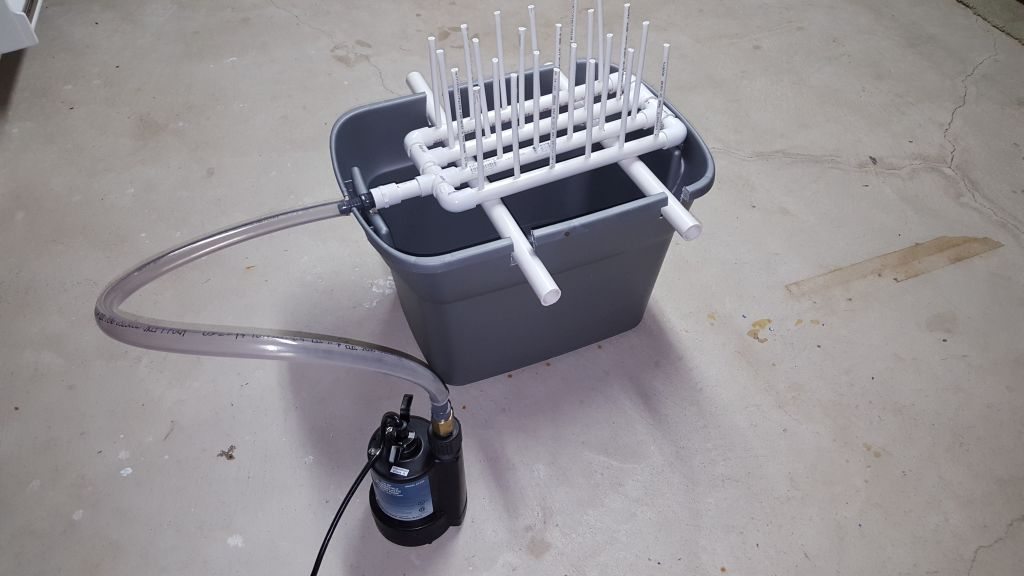
This fixed the airflow issue with narrow-necked bottles, but did nothing for my lack of power. Around here, PEX ain't cheap, so with $70+ already invested in the PEX I didn't want to buy a new pump too, but luckily I had my old household water jet-style pump kicking around, which would have the power needed, but called for a redesign of the rest of my setup.

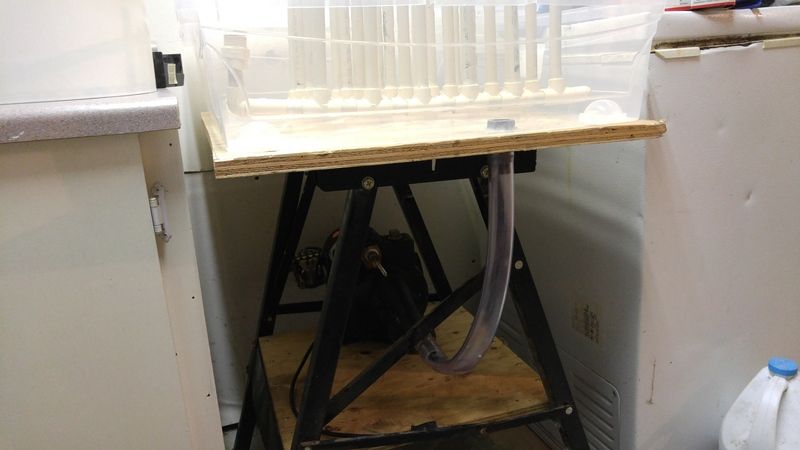
So I grabbed some scrap plywood and an old sawhorse I had kicking around and came up with this:

20151022_205552_zpsr6gibkjl.jpg


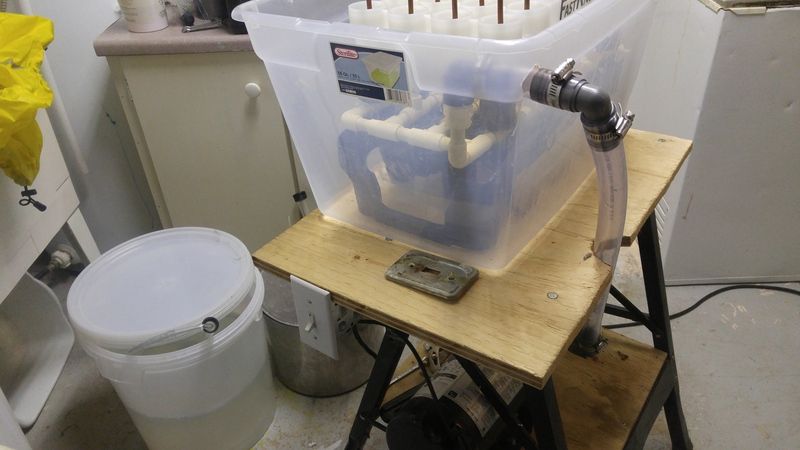
The return water hose isn't attached in that image, but exits the left of the pump and loops up and over the side to the threaded connector visible through the plastic container. I had this setup using a washing machine's water hose and here was the initial test:


This test left me with another problem, as well as a hint to its cause: in the last few seconds of the video, if you look closely you can see the 3rd riser from the left has less than 1" of water coming out of it. There were one or two other risers with the same problem as well. If I covered and uncovered them quickly they would sometimes prime and then flow normally, sometimes not.

The hint was that the water being gravity fed to the pump kept developing a cyclone and sucking air into the pump, led me to believe this was causing the loss of pressure and I figured it was due to the feed line being 1" ID vinyl tubing while the return line to the manifold was a washing machine line which was MAYBE 3/8" ID at best. So back to the design table!

I still wasn't happy with the extra wide container, especially since the drain wouldn't completely seal even with silicone, moving the container at all would cause a leak, so i tackled both problems at once.

While my manifold WAS slightly too large to fit the average container, this was only true of the BOTTOM of the container, because of the sloped sides, the manifold fit fine until the final 2-3" at the bottom. So I decided to switch containers and just rest the manifold on something. This had the added benefit of me being able to add more water/cleaner to the basin without getting too close to the draining bottles on the manifold. I also switched the drain from a bottom drain to a side drain, making it much easier to seal.

1451522673980_zpsrhkmueiz.jpg


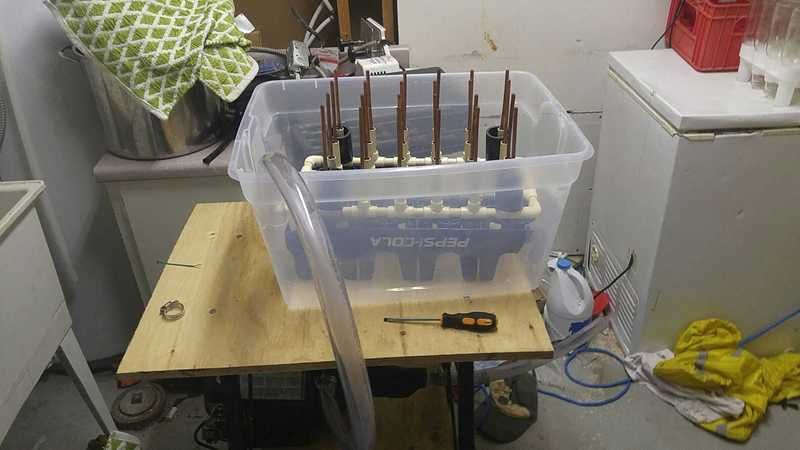
As you can see, I just used a plastic Pepsi bottle tray I had kicking around (after I trimmed one end to have it fit) and zip-tied the manifold to it. The black ABS on the 4 corners are removable risers I put in when I'm cleaning full size bottles to keep the neck of the bottle further away from the PEX riser (not needed with stubbies).

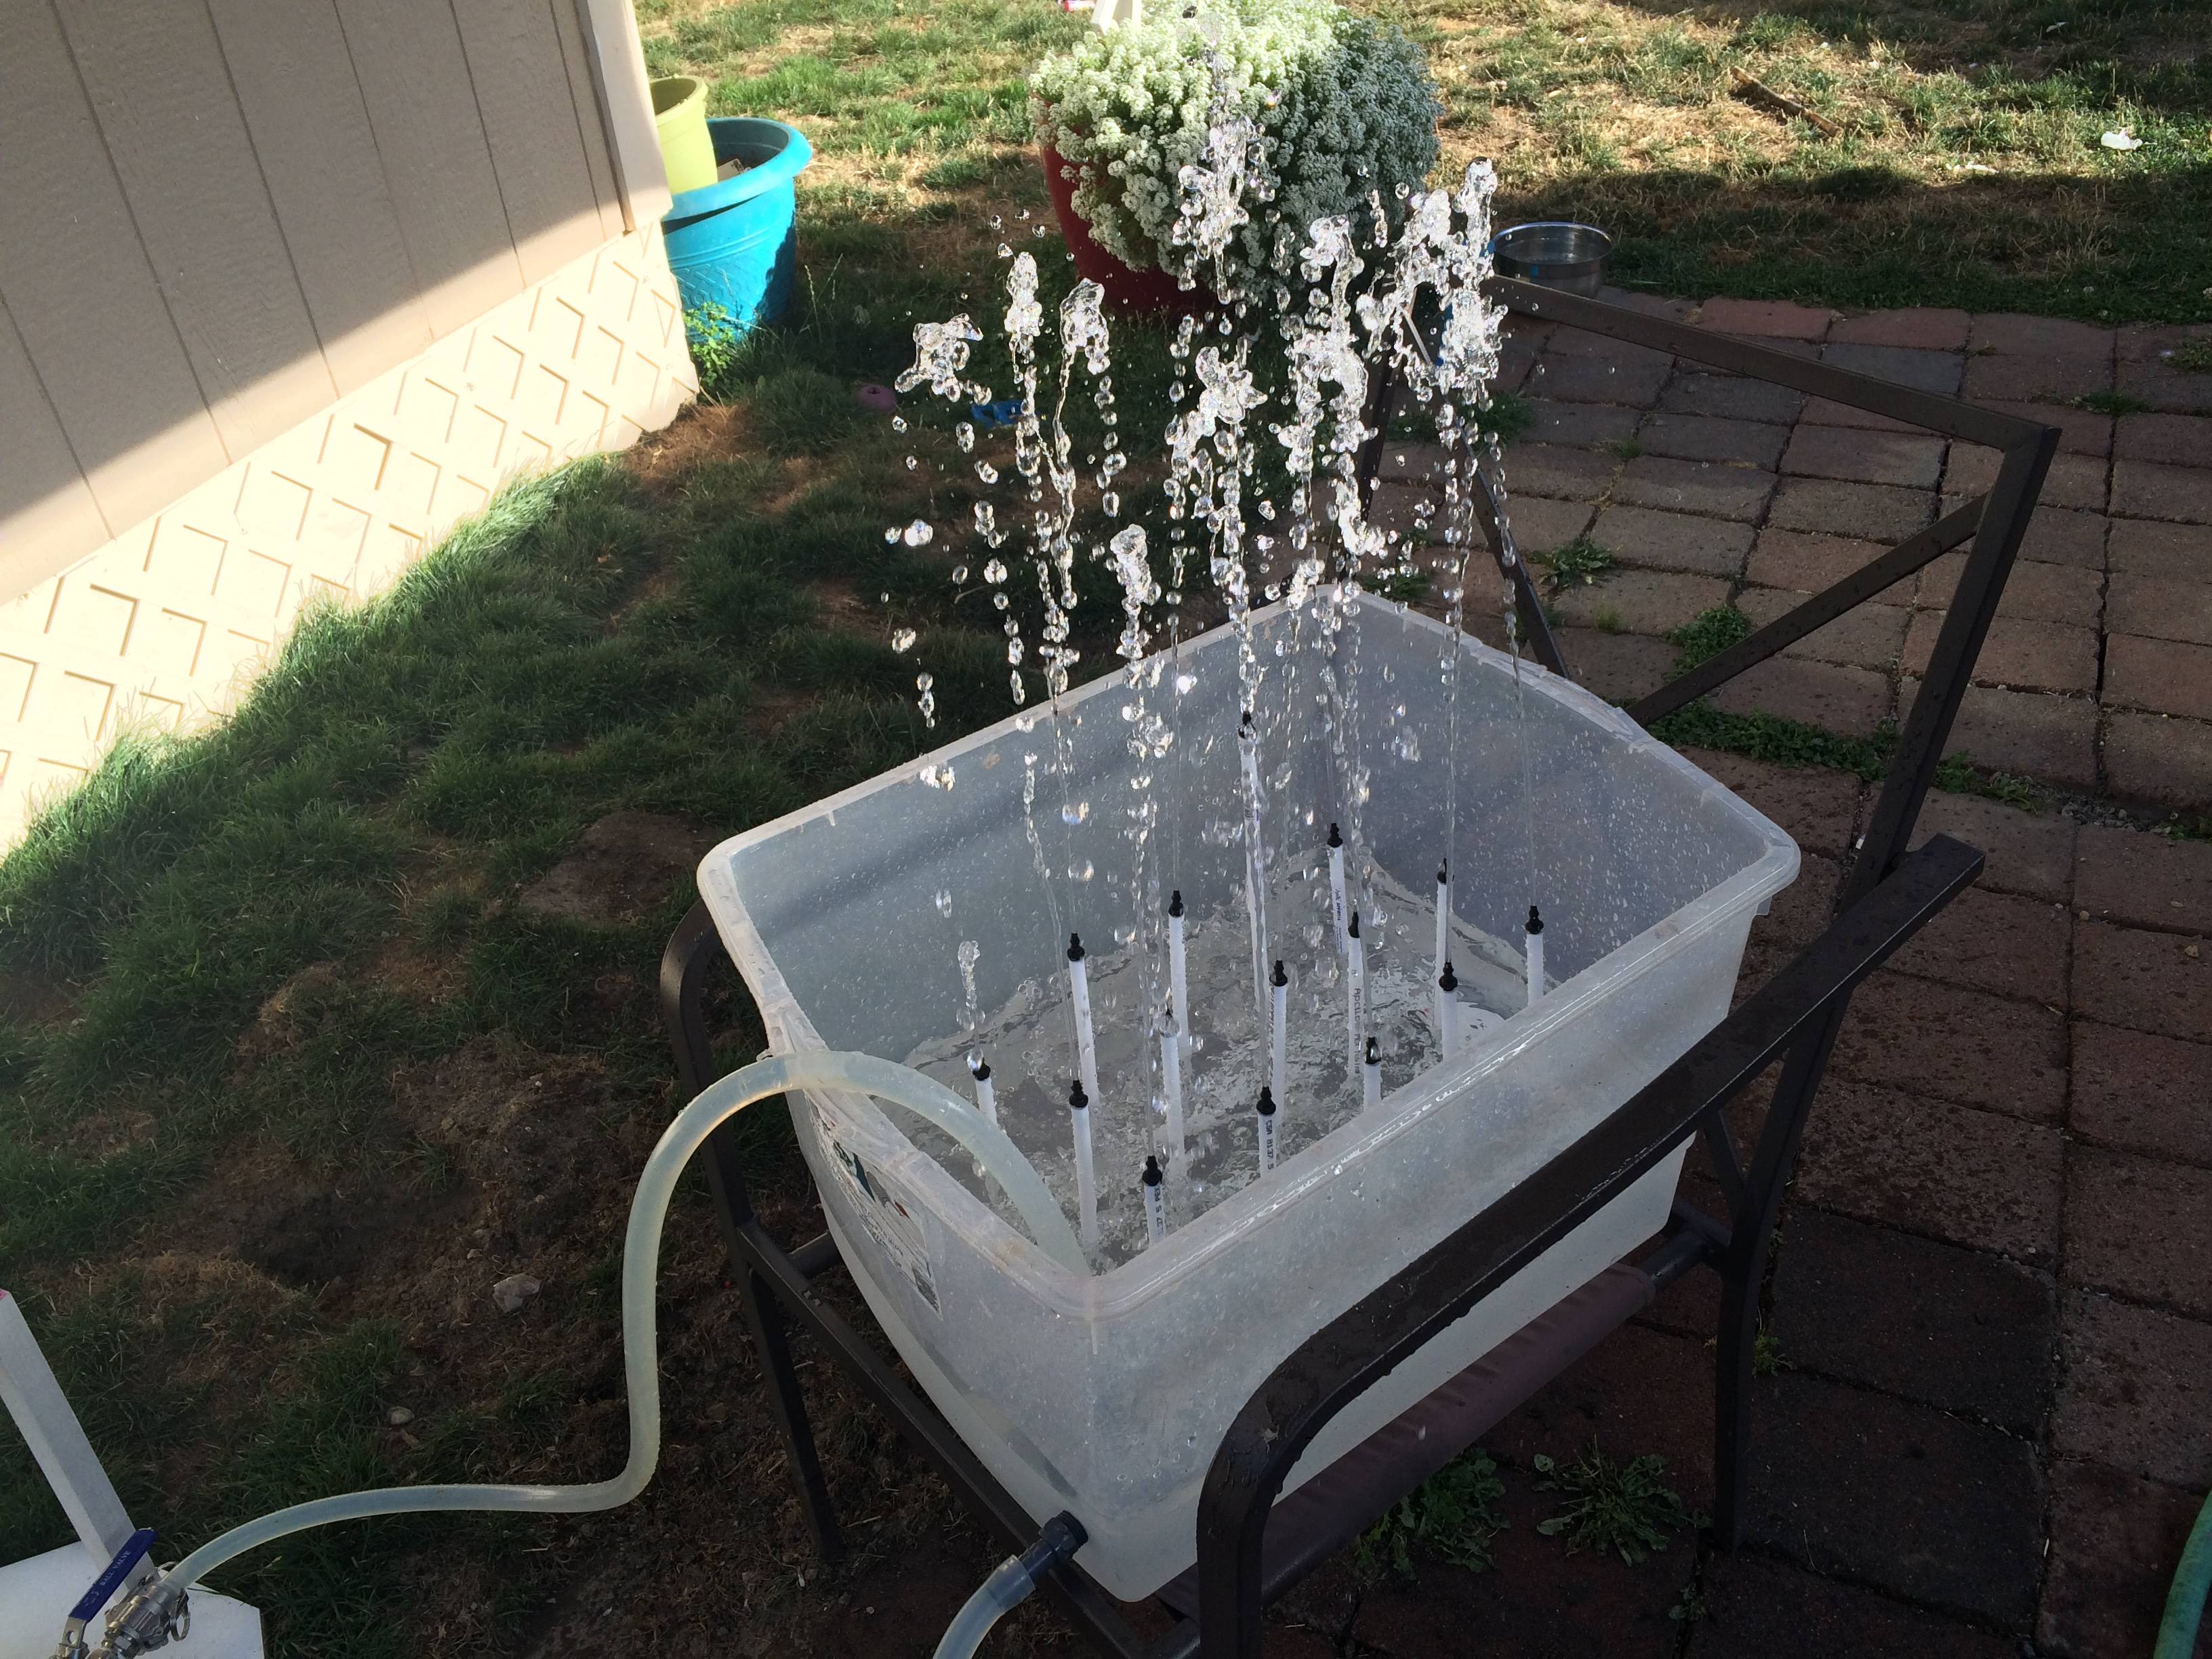
I ran a test with this setup and it worked BEAUTIFULLY! But I wasn't happy with the way the vinyl line kinked on both the feed and return lines due to the looping needed, so I picked up some elbows and also trimmed down the (now oversize) plywood top to come up with this:

20160103_225552_zpsldmh5usk.jpg


For the last touches, added a switch (was previously just a straight plug-in setup)

20160103_225624_zpsmiaddct3.jpg


and crimped the top of the copper risers

20160103_225609_zpsilpe9w1v.jpg


All that really remains to do now is just to add a 3-way diverter valve near the pump.

Since this setup is gravity fed to a jet pump, I can't fully empty the pump after use, which can lead to rust or dirt staying in the pump itself and contaminating whatever cleaner I run through the next batch of bottles after the pump has been sitting for awhile. With a diverter valve in place I'll be able to simply fill the tub with water, divert the flow and flush to pump out before use!

Starting 2 new batches of beer this week, can't wait to put this bad boy to use!

EDIT: Got home a short time ago and recorded the new setup operating. Unfortunately I can't drag it outside to show how high the spray goes now since it's winter here and damn cold.

But I *DID* take one bottle off in the video and it's impressive compared the the first attempt video above!


Last edited by a moderator:
i copied the design but am not happy with the pressure. all equipment has the same power, same tubes, same risers. it's very clever so i'm going to fix it.

i think the issue is the goZouta connector i used from the pump might be too small inner diameter (ID). and the ID of the goZinta to the manifold is also too small. i think it is 1/4 and i need 1/2 ID or better to permit more throughput. i'll advise after i change it.
 
I tried the design with risers made of copper but wasn't really happy with the pressure, I used this design instead and it works perfectly.
The whole thing is made out of cpvc with tiny holes, I'm not exactly sure but I think the drill bit was 1/8''.

Thank you all for the ideas.

20160627_190548.jpg
 
I mean the 4 risers you have holding the Fastrack up off the nozzle assembly. Are the caps screwed on or "glued " ?
 
I mean the 4 risers you have holding the Fastrack up off the nozzle assembly. Are the caps screwed on or "glued " ?

I just needed around 1'' - 1.5'' of space, so it's really simple. The risers are simple PVC couplers with a PVC piece of tube to keep in place. They are not screwed or glued (nothing is, in fact, everything is held in place by pressure), the weight of the fast rack + bottles is more than enough to keep it in place. I'll post some pictures tomorrow.
 
I just needed around 1'' - 1.5'' of space, so it's really simple. The risers are simple PVC couplers with a PVC piece of tube to keep in place. They are not screwed or glued (nothing is, in fact, everything is held in place by pressure), the weight of the fast rack + bottles is more than enough to keep it in place. I'll post some pictures tomorrow.

More pictures would be great, I am still trying to figure out how exactly this is setup. I would like to do something similar to your setup, but I am still not sure how exactly it is built or works.
 
I was asked by Beek in the Scrubmaster 3000 thread to post about my Malfet-style bottle washer so here we go!

I'm brand new here and to brewing in general. I've done a single brew with a friend and am doing my first solo brew on my own equipment tomorrow. But while lurking here, researching, and planning my equipment I saw a recurring theme that bottle washing was a huge hassle and I wanted to eliminate it before I ever started. So I found this thread, read all 20 pages at the time, decided I wanted a FastRack-compatible design, and went to work. I didn't do a detailed parts list during the build but I did take photos.

Mine is built with 3/4" PVC. I didn't bother with CPVC because of previously posted issues getting a cross piece and we're talking about hot tap water at low pressure here. If I were doing it over, I'd probably use 1/2". I thought 3/4" would help with the flow but I really don't think it matters much. The main issue is that the bottle pattern on a FastRack is a 2.5" grid and 3/4" fittings don't let you get the pipes that close together (see below) so I had to take the fittings to the belt sander to slim them down.

I used 1/4" PEX for my risers because it's really cheap and also easy to just press-fit into drilled holes. The PEX moves around a good amount and it is nearly impossible to place a rack full of bottles down onto the risers. Maybe with a second pair of hands. In actual use I had to load an empty rack and then put on the bottles. Kind of a pain. Also, 24 1/4" ID risers was too much volume of water and I wasn't getting much height of water. I "fixed" it by smashing the ends of the risers hard with a pair of pliers to make a sort of crimped nozzle.

I'm considering making a new frame with 1/2" PVC and those irrigation risers like @lael did above. I believe that will help with both rigidity and pressure. If I do this I will probably also add a ball valve so that I don't have to unplug and plug the pump from power with wet hands when changing racks.

Parts:
* 1/4 horsepower sump pump (same as the original post)
* 10ft 3/4" PVC
* 15ft 1/4" ID PEX (3 lenghts of 5ft cut into 7" risers)
* 4 x 3/4" elbow
* 3 x 3/4" tee
* 3/4" cross
* 3/4" slip to threaded adapter
* Brass thread to female hose adapter (attaches to hose adapter that comes with the pump)
* 2 x 3/4" male threaded hose barb
* 4ft 3/4" ID tubing
* Plastic bin bought to size after taking measurements

The connectors. Left to right: 3/4" hose barb, slip to threaded adapter, short length of PVC, 3/4" hose barb, brass thread to female hose adapter, 1 1/4" to hose thread adapter that came with the pump.

q2GeXyzh.jpg


3/4" fittings wouldn't let me get the 2.5" spacing I needed between pipes so I sanded the fittings down until the spacing worked.

Q8h5oveh.jpg


Assembly, used a FastRack as a template to mark hole locations, drilled with a 3/8" bit to press-fit the 7" risers.

t8yifhoh.jpg


Test fit into Sterilite brand tub I bought based on my measurements and a FastRack in place.

SQLAu22h.jpg


Test run after crimping the riser ends. Height works for 12 and 22oz bottles but I'd like more pressure.

108eiOCh.jpg


Current setup, including cross members to keep the frame from twisting and falling into the tub.

E0XmNnPh.jpg


It works! Man, does it make the Star San foam!

IQrzO4Ih.jpg


Thanks for this idea!

I used the 1/2 pipe and fittings and the thing came out to the perfect dimensions of the fast rack!

Works like a charm!
 

Latest posts

Back
Top