Kegerator Conversion - DANBY 440BL

Homebrew Talk - Beer, Wine, Mead, & Cider Brewing Discussion Forum

Help Support Homebrew Talk - Beer, Wine, Mead, & Cider Brewing Discussion Forum:

This site may earn a commission from merchant affiliate links, including eBay, Amazon, and others.

hvrtaxi

Member
Joined
Jan 13, 2012
Messages
13
Reaction score
5
Location
Alexandria
I have reached the beer dispensing stage with my DANBY 440BL conversion and wanted to provide a supplement to the various threads and websites out there. I'm not a welder, electrician, or really even that smart so take this for what it's worth!

1. I chose the Danby because it was cheap ($180ish at Wally's) and acceptable to my wife. I had limited space and had to match some existing furniture. I would have preferred a keezer but I only have 49% of the vote when it comes to appliances! Also, if highly recommend you read the refrigerator manual section on how long to let the thing sit prior to plugging it in. Returning a unit that fails to work because of compressor oil or refrigerant issue because it hasn't sat long enough after handling = sucks. Not that I know, but I have a friend that...

2. I heavily relied on the kegkits website: Danby Homebrew Kegerator . Great info there.
Lessons:
-I tried to use a wood hole saw to cut the tower beer line hole. It was more trouble than it was worth. I would take the time to buy a metal holesaw. Right tool and all that, I know. I admire the patience of those that drilled and used shears.
-Ensure you are careful measuring the baseplate line up prior to drilling. In my fridge there was very little room for error between the cooling plate, the light fixture, and where the mounting bolts need to go. I also dorked up my alignment (45 degress off) but the tower baseplate covered my mistake.

3. I decided to keep my CO2 outside. There's lot of discussion on using grommets or silicone in the bulkhead hole. For unexplained reasons I opted to go rogue. I ran dual CO2 lines through the 'hump' in the back of the 'fridge. Here's what I ended up with.
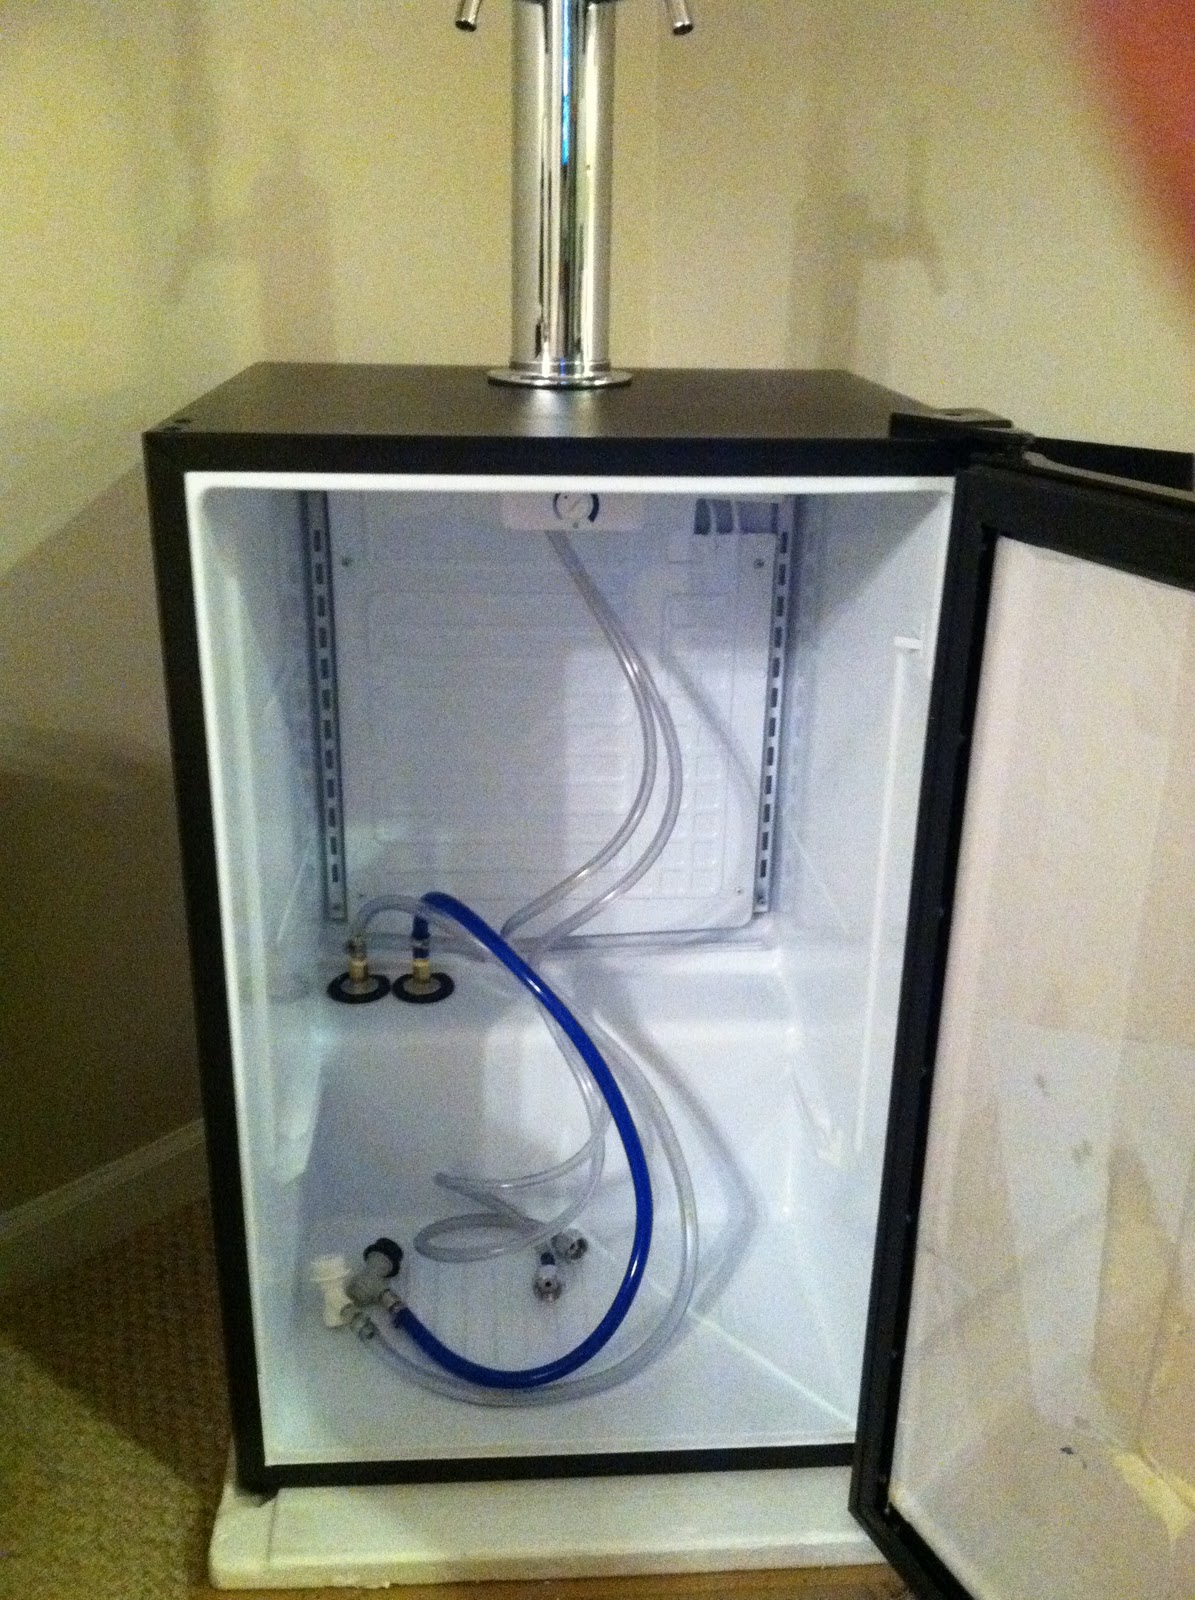
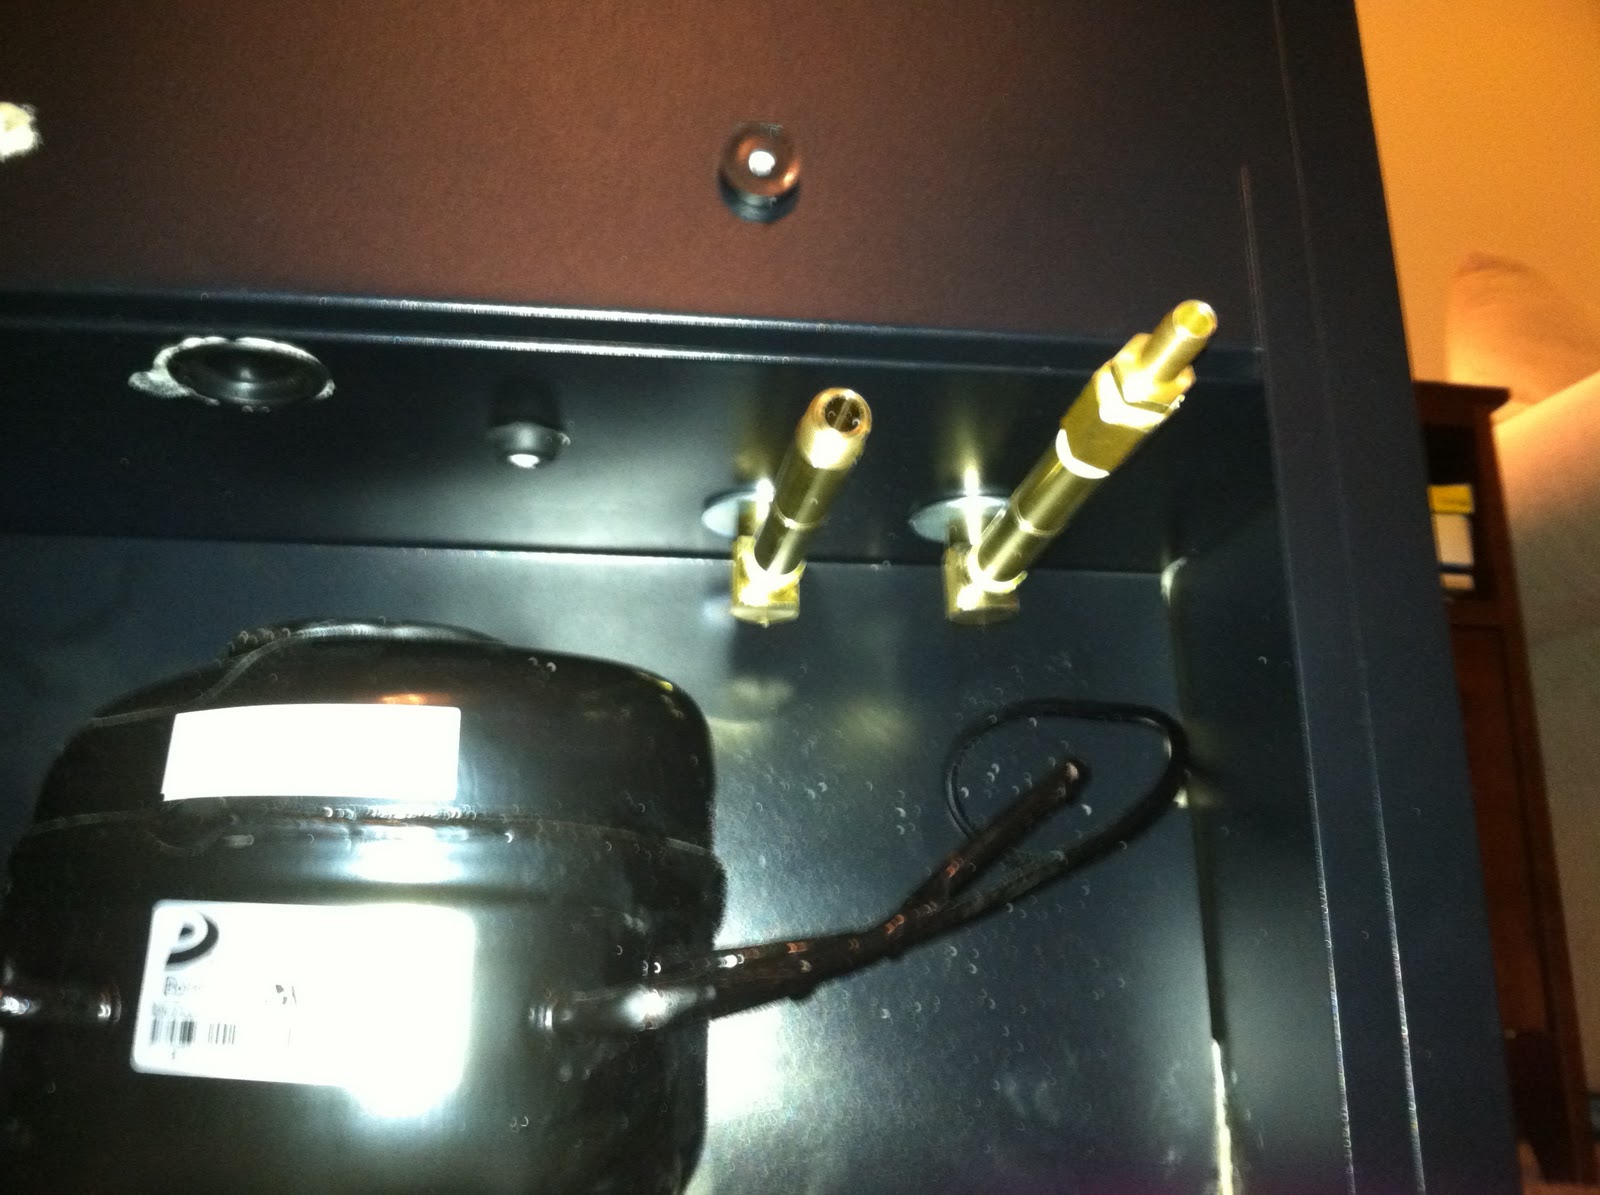
IMG_0056.JPG


IMG_0048.JPG


Parts: Each CO2 bulkhead fitting starting at the 'hump', procured at a big box home improvement store:
- 5/16" barb-1/4"MIP
- 1/4"FIP coupler
- 1/2" steel washer
- 1/2" rubber washer (specialty drawer in hardware)
- 3" 1/4" pipe nipple
- 1/2" steel washer
- 1/4" Female-Female elbow
- 4" 1/4" pipe nipple
- 1/4" FIP coupler
- 5/16" barb-1/4"MIP

*Lessons
-After measuring the thickness of the 'hump' bulkhead I still didn't get the bulhead nipple pipe length right (I originally bought a 2-1/2" pipe). The 3" nipple was perfect.
-I chose to put both fittings near each other so the CO2 would be close to both exits. Give yourself enough room to attach the fittings (I had to trim my rubber washers a bit) but also note the location of the drain pan over the compressor. I had to angle one fitting slightly to avoid the pan.

I plan to install a tower cooler but for now I'm enjoying my first kegerator. I especially enjoy pulling beer from my sweet tap handle. I look forward to many kegerator induced Beast Mode rampages in my basement!

Cheers!
 
Have you tried putting to corny kegs in this, yet? For the life of me, I can't get mine in there without really putting some arse behind it and wedging them in there. Thoughts?
 
Are you using ball locks? Mine fit fine.

I am! I'm not really sure what's going on. I'll have to see if I can snap a picture of it when I get home. I'm assuming most people are able to just slide their kegs in? Mine have to be jammed into the fridge if I want them to sit side-by-side.
 
Nice Clean build. I have considered moving CO2 outside fridge... If I ever do, thanks in advance for the parts list. I use the Stainless Steel model but same fridge and I can fit 2 ball lock kegs no problem they don't fit exactly side by side, one slightly forward but the fit comfortably and the door closes perfectly.

I made a little wedge to keep light off inside fridge out of a part of the plastic rails to hold sodas works great. when I need night inside I remove the wedge from the on off switch normally triggered by door.
 
Have you tried putting to corny kegs in this, yet? For the life of me, I can't get mine in there without really putting some arse behind it and wedging them in there. Thoughts?

Two pin locks will fit inside this fridge but they will be staggered and you won't be able to pull out the one you put in first without pulling out the second one you put in first. Two ball locks (not converted pin locks) will sit side by side.
 
Two pin locks will fit inside this fridge but they will be staggered and you won't be able to pull out the one you put in first without pulling out the second one you put in first. Two ball locks (not converted pin locks) will sit side by side.

Now that i think about it, mine might be pin locks, converted to ball locks. I'm heading to my LHBS today to sell back my CO2 tank. This kegerator is cursed, for me. Tower came with the wrong connectors, was sold a 7.5 cu ft. tank and told it would fit. I just want my beer!

Thanks for the tips.
 
Lessons:
-I tried to use a wood hole saw to cut the tower beer line hole. It was more trouble than it was worth. I would take the time to buy a metal holesaw. Right tool and all that, I know. I admire the patience of those that drilled and used shears.

Nice work on your Danby project. It looks great. I am working on a similar project, and have been deliberating the faucet tower hole in the fridge top. Like you said a hole saw is much faster than using the method described on the website. What size holesaw is it for the hole? Did you use a carbide-tipped one? Is that a Perlick that you attached? Thanks for your help.
 
Like you said a hole saw is much faster than using the method described on the website. What size holesaw is it for the hole? Did you use a carbide-tipped one?

The holesaw I ended up using was pretty darn small, smaller than the 2.5"-3" recommended. I think it was 1-5/8" but I can't locate the darn thing to confirm for you. [It was the largest hole saw in one of those super drill accessory kits]. As I mentioned using a wood hole saw was less than optimal... and I'm fairly certain it was not carbide tipped. Why I was too lazy to run to the hardware store and get a bimetal hole saw is beyond me! Don't follow my example, go buy a bimetal hole saw. However, the smaller radius working fine, even with my spare-part tower cooling system (I'll add a new post for that).

Is that a Perlick that you attached?

Yes on the Perlicks. I bought the stainless tower and two Perlick creamer taps from Midwest. I just checked the website and no longer see the deal. I think it was $180-ish.
 
Thanks for the positive responses. I'll add a few more tidbits to this because I have pretty much finished my build. Additionally, I have an answer to one question that I could not locate on any forum.

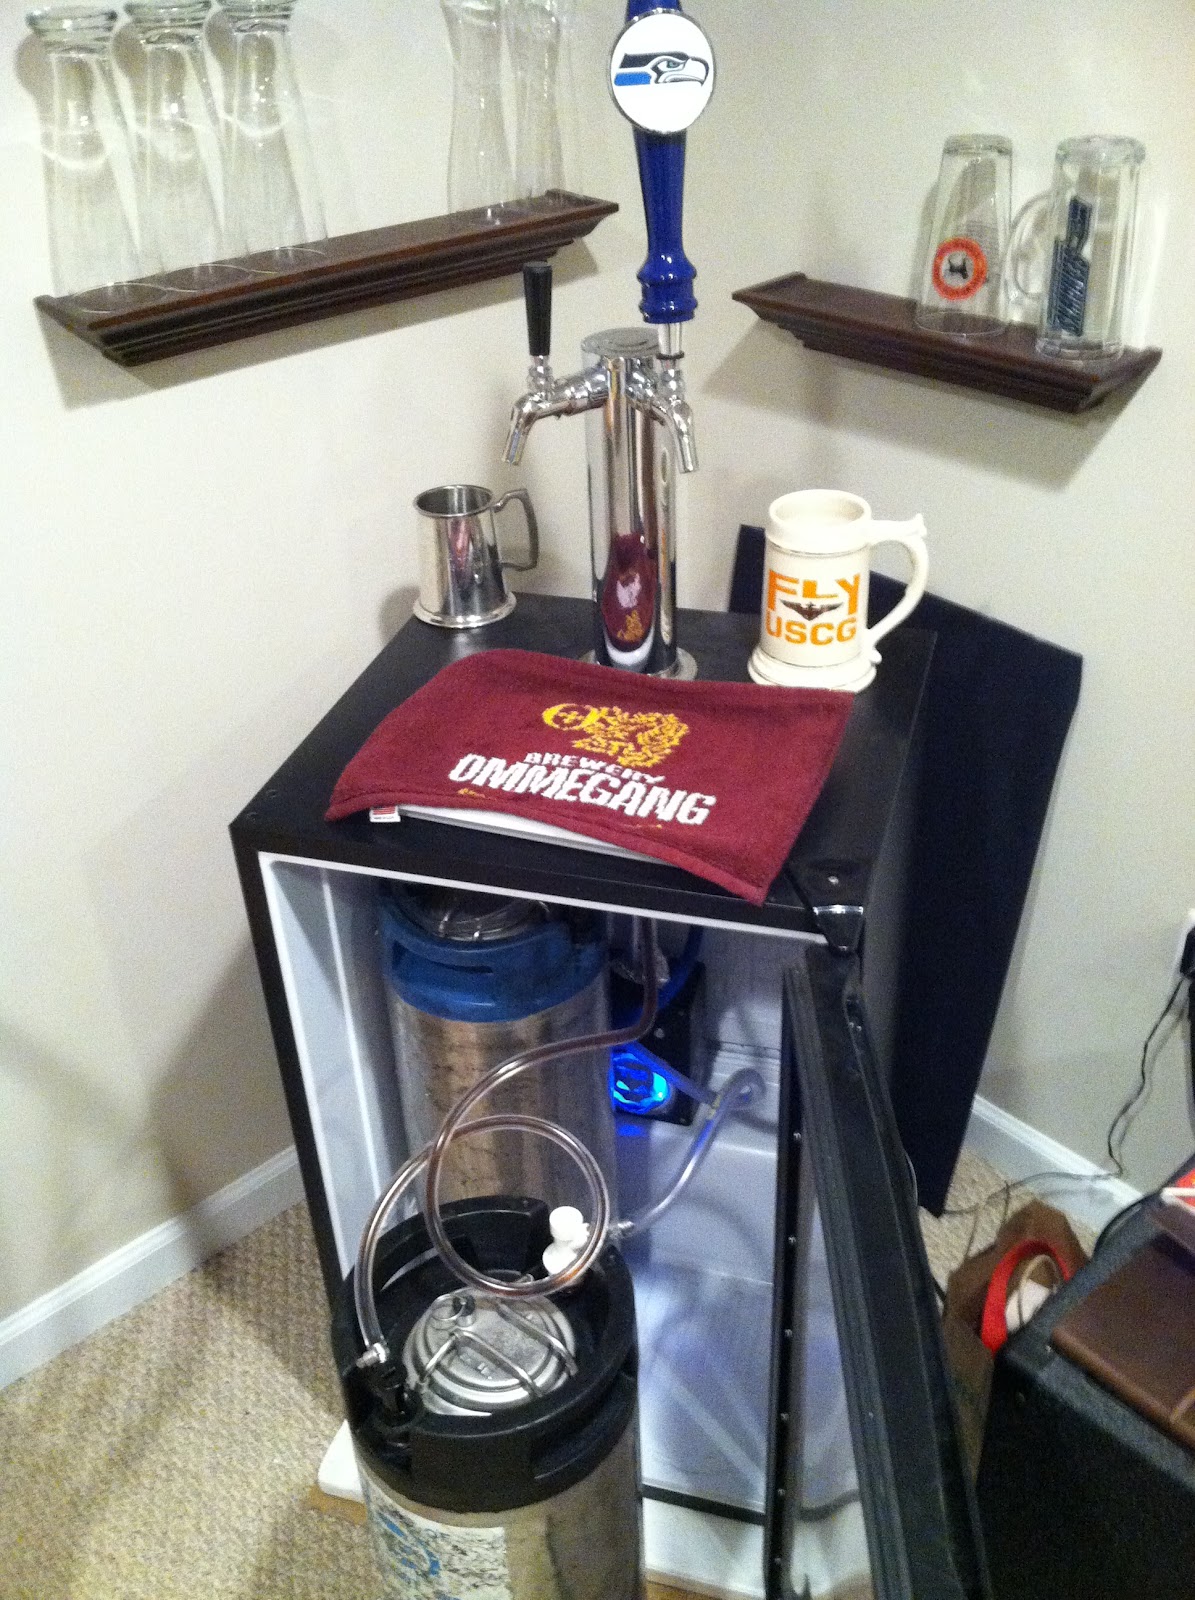
First things first, here's the finished build (Apfelwein and NB Oatmeal Stout on tap!):
IMG_0120.JPG


My final mod to this build was the tower cooler. Blame it on the duality of DIY Homebrew projects, but after getting a pricey tower/faucet setup I went cheap for a tower cooler by using spare sparts (with two exceptions) from around my house.

I used the common method of piping cooler air to the top of the tower from a project enclosure at the bottom. Here is my parts list:
-Radio Shack project enclosure
-Radio Shack push button switch w/ rubber cover
-80mmcase fan from my dying desktop
-Rheostat from an extra variable control CPU fan system
-12V AC/DC adapter (200mA) from a handheld radio w/dead battery*
-1/2"PVC Pipe (measure to fit, ~6')
-metallic ducting tape
-lightweight two-prong electrical quick disconnect fittings (from Mtn. Bike light project)

*I originally tried a cell phone charger (<12V) but this did not give me enough juice.

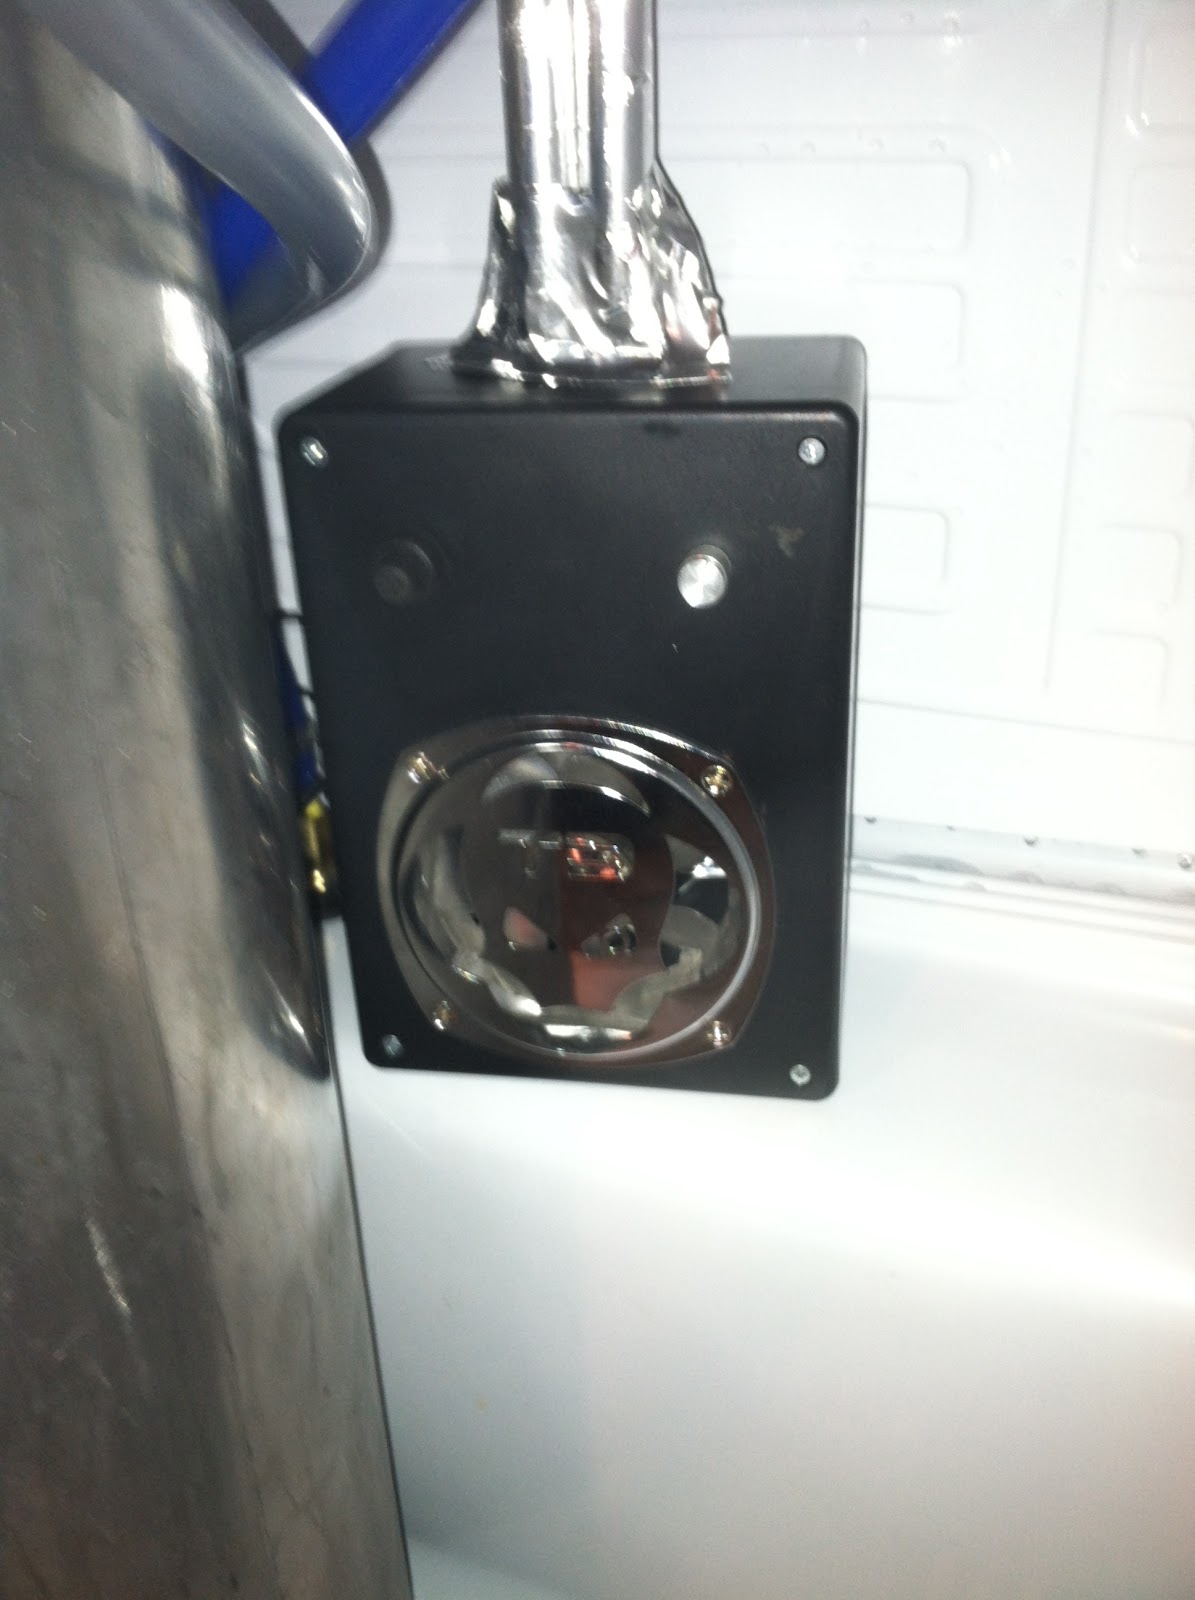
The project enclosure was a bit of an experiment even though lots of folks build them. The fan and fan grate were simple to add to the enclosure box. The CPU rheostat took a few seconds of thinking because the thing was designed for an expansion slot on the back of a computer. I was able to disassemble the original rheostat housing and make it work on the project box. The push buttom was a straight forward install. I ran the bitter end of the AC/DC power supply through 'hump' drain fitting and soldered the quick disconnect plug. I soldered the button, rheostat, and other end of the disconnect to the project enclosure to complete the wiring. So, the box has a push button to turn on and a rheostat to control speed.

To push air up the tower I originally tried to use an old fermenter blowoff tube but it would not fit up the tower. I then went MacGyver with some extra 1/2" PVC pipe and some mettalic ducting tape. I ran two pipes from the box up the tower. Before installing I wrapped each pipe in mettalic duct tape, hoping (?) that it might conduct some coolness up the tower. I then attached the whole contraption to the project box with metallic tape.

When turned on it definitely pumps cooler air up there but I haven't yet measured any temperature differential. Maybe because it doesn't seem at that important because I always give the first glass to my guests...as a good host of course! Also, it really doesn't seem to matter after a few glasses of Apfelwein and thinking about it the next morning just exacerbates the headache.

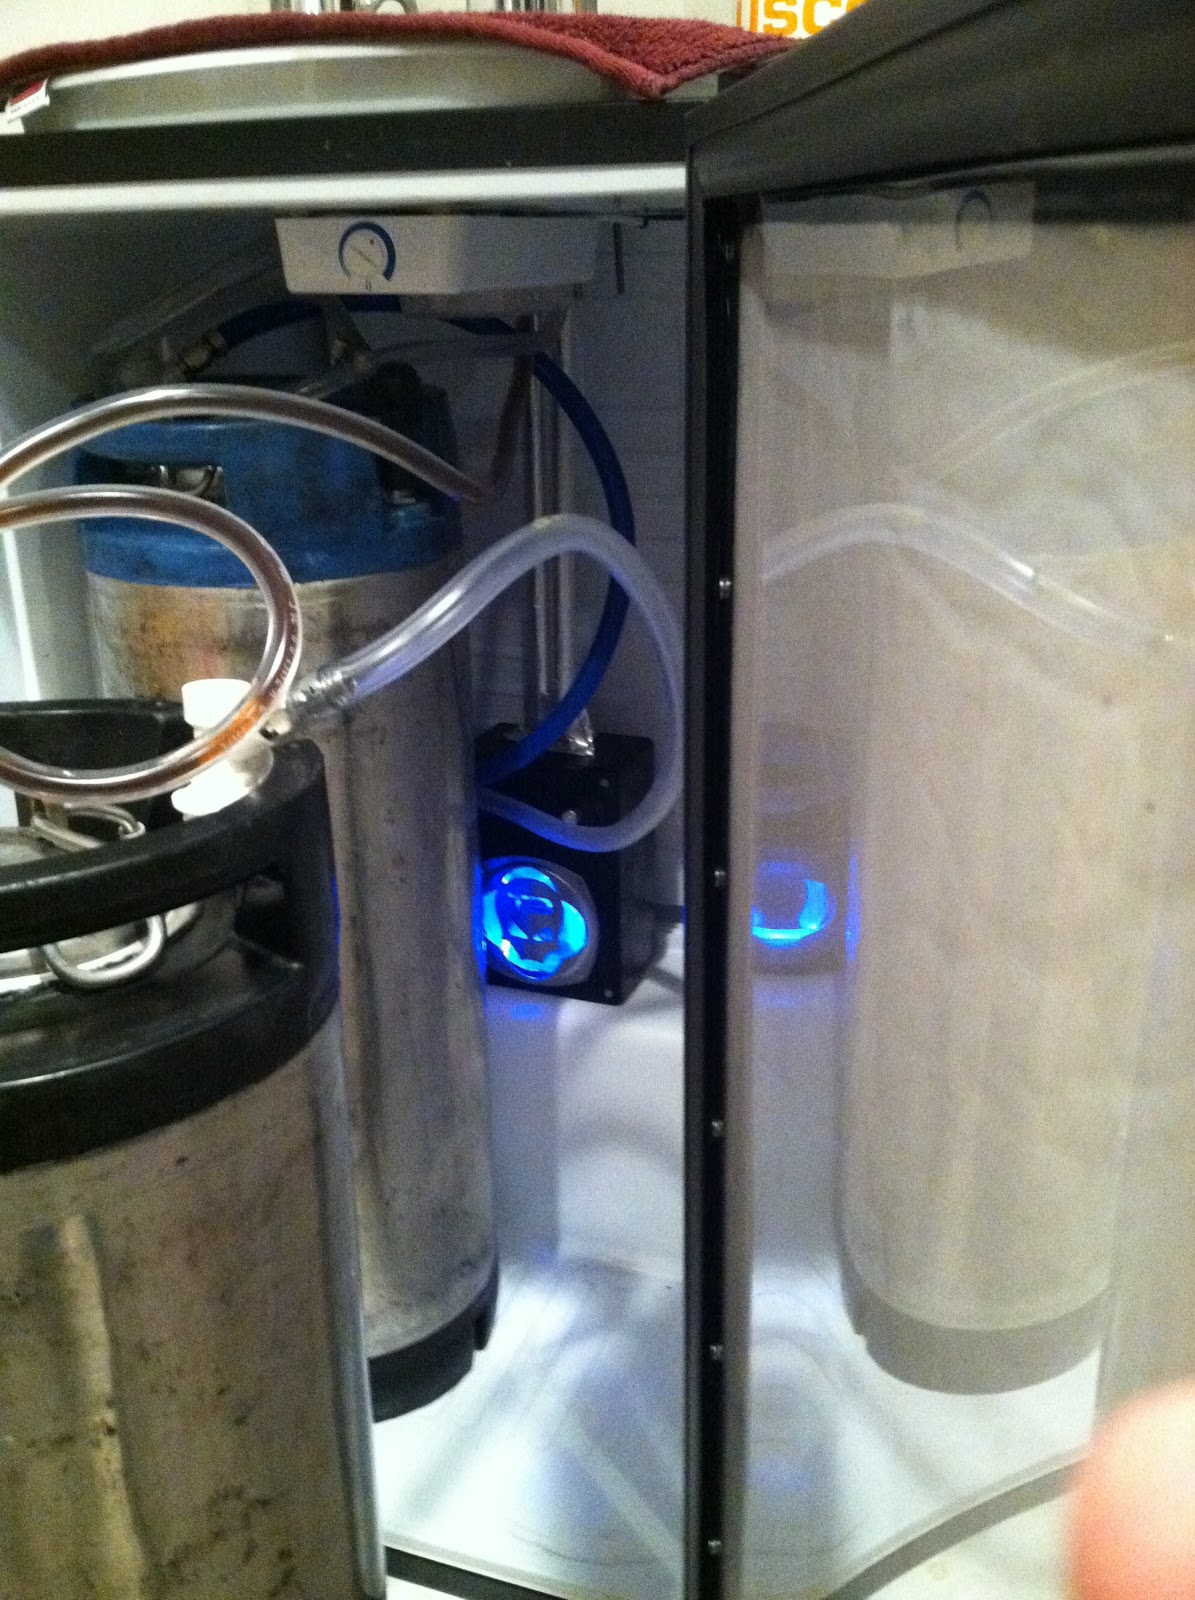
Here's the cooler:

Note my "Twin Pipe" cooling ;)

IMG_0117.JPG


Push button is more visible with the cheesy neon light off!
IMG_0122.JPG


LAST COMMENT:
I've seen a number of posts regarding the Danby's ability to fit a 1/6th Keg. It will fit! More importantly, I was able to fit a 1/6" keg AND a standard ball lock corny inside at the same time. It required a little oomph and pressure but I was able to get the door closed and sealed.
:mug:
 
I have a single tap tower for sale just like the one used here if anybody needs one. Not perlick faucet standard style faucet. Make me an offer.
 
LAST COMMENT:
I've seen a number of posts regarding the Danby's ability to fit a 1/6th Keg. It will fit! More importantly, I was able to fit a 1/6" keg AND a standard ball lock corny inside at the same time. It required a little oomph and pressure but I was able to get the door closed and sealed.
:mug:

Thanks for that much sought after info. I've got the same fridge converted and only used with corney's so far. One thing I'm still wondering, what type of tap did you use when taping the 1/6 barrel keg? I can't imagine a standard commercial tap would fit (due to the height).
I'd like to get setup so that I can have one commercial (1/6) and one corny tapped at the same time. Any tips for converting my current ball lock connection?

Thanks in advance.
 
This answer may be a buzzkill, sorry!

When I used the 1/6th keg I borrowed a sankey tap coupler from my neighbor. He bought the coupler from the local homebrew store (and i think it was a standard coupler). Because I had still not cut off one of the standard beer line fittings that came with my tower/faucet kit (standard female fitting) and had not attached gas/liquid disconnnects, all I had to do was attach the beer/gas line to the standard sankey fitting ports. Specifically, the tower/faucet package came with female fittings that went directly on the sankey coupler. On the gas side, the sankey fitting came with a gas line nipple attached, so I attached my bare gas line directly to it with a hose clamp.

Now that I've gone to all disconnects with my system, I think I have to solve the same problem you have in order to use a 1/6 keg. Off the top of my head I could simply remove my liquid/gas disconnects, leaving the bare hoses, and then connect to the sankey coupler. Since the sankey comes with a gas nipple attached I would only have to buy a 1/4" tail piece nipple (and a nut) to adapt the sankey beer port for a beer hose end.

I'm not a fan of installing/uninstalling hose clamps so a better solution (that everyone else probably already knows) exists if your beer and gas lines are connected to the liquid/gas disconnects with MFL fittings. I did a quick search of a popular online beer supplier and they sell a 1/4" MFL tailpiece that looks like it can be attached to the gas and liquid ports of the sankey tap (each tailpiece requires a nut to lock it down) just like the nipple tailpieces. Now I know finally understand why many forum posts recommend using MFL fittings and disconnects instead of barbs! For one side of my 2-keg system I opted to trust the forums and used MFL fittings. So using the MFL tailpiece just mentioned (times two) and a sankey coupler is how I would plan to set myself up for future 1/6 kegs. It should simply be a matter of unscrewing each 1/4" MFL fitting from both disconnects and attaching them to the 1/4" MFL fittings on the sankey coupler. I'm not sure what this will add for height though... it is possible the adapted sanky coupler gets too tall. It was a tight fit the other way. There are different types of couplers so this issue bears some more scrutiny. When/if I do this I will follow up with a post. If you do it please send me a PM so I can copy what you do.

If your lines connect to disconnects with barbs I think you are stuck with removing hose clamps and reinstalling onto a barb-adapted sankey coupler. Unless, that is, you are already running MFL fittings or you will upgrade your disconnects and line fittings to MFL.

I apologize if my explanations are overly detailed or if they end up being incorrect. I'll defer to the readers to correct my errors. This post seems to make sense to me to me at the moment but I haven't pulled any drinks from the keg yet. I will probably drink some liquid intelligence and realize how wrong I was... I always get smarter after a few frothy glasses of goodness!
 
I just did the keg conversion on this fridge today and thought I would give an update cause there have been some changes to this model which make it slightly more laborious.

First thing is, I believe they have moved the light and thermostat control back a little cause when I cut my hole there is less room than what I have seen in pictures. While there is less room it is still possible to make the hole. you will have to finagle some washers and nuts if you want to put some on the underside to hold the tower firmly. I just screwed down my tower and it seems sturdy enough that I am going to leave it for the time being.

Second thing, and by far the most important thing to note is that the inside door panel is no longer held on with screws. The inside door panel will need to be cut out flush with a saw to make room for two corny kegs. This is a very messy job with lots of foam insulation going everywhere.

Overall this keg conversion is great and I am happy with my results. I only show one keg in this picture but you can fit two as long as you cut out the door panel. If you want to leave in the door panel you can only fit one corny.

20130106_122634.jpg
 
Just picked one up off craigslist today for $60! The door was already cut down as well. Just need to clean it out. I already have a two tap frigidaire that I built but this was too good a deal to pass up.
 
Hi all - slightly old post, but I'm about to get my hands on one of these Danby's (Black ones are on sale for $187 @ WallyWorld) but I'm going to be putting my taps through the door because I'm dealing with some height restrictions.

Two questions:

1) Any idea how thick the doors are to gauge what length of shanks to use?

2) Do you think there will be clearance behind the shanks for the beer lines or are they going to bump right into the kegs?
 
Back
Top