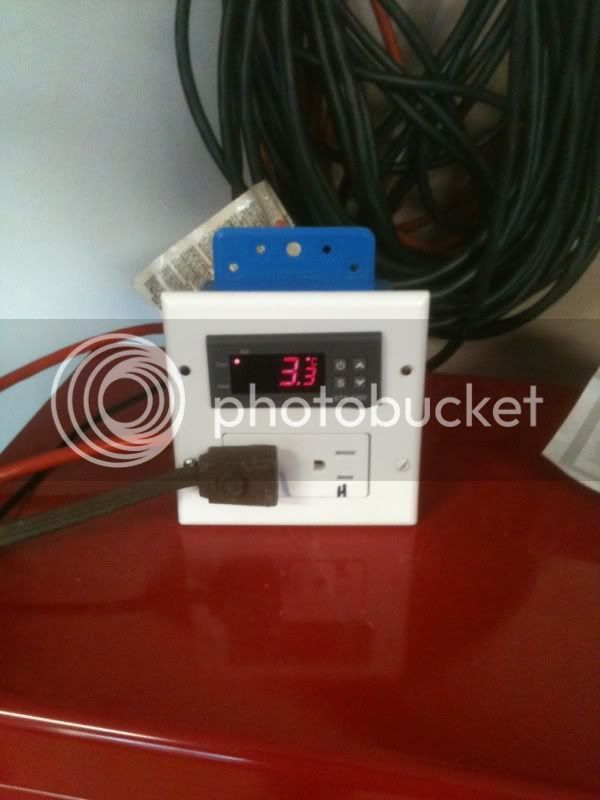
EBay fish tank controller build using Wal-mart parts

Homebrew Talk - Beer, Wine, Mead, & Cider Brewing Discussion Forum

Help Support Homebrew Talk - Beer, Wine, Mead, & Cider Brewing Discussion Forum:

This site may earn a commission from merchant affiliate links, including eBay, Amazon, and others.
I'm not great with electricity but I have worked on car stereos. Whenever I did wiring I would solder and then put shrink wrap over that. Could I do that instead of wire nuts?

Also, is there a difference between the round cord you bought and the flat cord you can buy? As long as it is a good length, 3 prong and at least 13A it should all be the same, no?

There's nothing wrong with heat shrink as long as it completely covers the wire. I've use the flat wires too, but I find them on the bulky side when using wire nuts. That's why I went with the extension cord.

brewyourown4life said:
whats the length of the temp probe wiring? really interested in this build

I'm estimating it's about 6 feet. Some people (in another thread) have made it longer, and some have used a jack to make the sensor removable. Works fine too, but may need to be recalibrated.
M_C
 
No need for a switch box or anything? You can just out the outlet right into the plastic project box?
 
Ordered up my controller couple days ago and it's on its way. I'm excited.
 
I noticed in this picture
r8z9z5.jpg


and this picture
dgh47o.jpg


that the wires going into post 1 and 2 on the controller are different. Does it matter?

Also I have noticed in many of the other wiring diagrams there are three wires coming from the left side rather than two from these pictures.
 
I noticed in this picture
r8z9z5.jpg


and this picture
dgh47o.jpg


that the wires going into post 1 and 2 on the controller are different. Does it matter?

Also I have noticed in many of the other wiring diagrams there are three wires coming from the left side rather than two from these pictures.

Reversing 1 and 2 doesn't matter - it's AC, not DC.

The "left" side has a copper "jumper/leg" for the 2 left legs to be energized at all times. The "right" side has this jumper/leg intentionally broken for the up and down legs to be energized interdependently.

M_C
 
Reversing 1 and 2 doesn't matter - it's AC, not DC.

The "left" side has a copper "jumper/leg" for the 2 left legs to be energized at all times. The "right" side has this jumper/leg intentionally broken for the up and down legs to be energized interdependently.

M_C

Thank you! Just got the controller in the mail this morning. Going home after work to wire it up and test it out.
 
Hmmm... did I get to gleeful at the price and think I had found a nice Fahrenheit reading controller? I've seen comments that they are single stage. Guess I didn't read well enough and see that some are single stage. I still am hopeful this is dual stage, and was assuming Work and Set were the Heat and Cool sides.

1
http://www.ebay.com/itm/320778369051?ssPageName=STRK:MEWNX:IT&_trksid=p3984.m1497.l2649

Guess I can still use a single stage here and there and will have to make another dual stage after this, and at least I did catch the 220v versions and avoided that problem.


The STC-1000 is the one you want. Dual stage.

M_C
 
Hmmm... did I get to gleeful at the price and think I had found a nice Fahrenheit reading controller? I've seen comments that they are single stage. Guess I didn't read well enough and see that some are single stage. I still am hopeful this is dual stage, and was assuming Work and Set were the Heat and Cool sides.

1
http://www.ebay.com/itm/320778369051?ssPageName=STRK:MEWNX:IT&_trksid=p3984.m1497.l2649

Guess I can still use a single stage here and there and will have to make another dual stage after this, and at least I did catch the 220v versions and avoided that problem.

I have one of those in my keezer, and two in my HERMS control panel. They are indeed single stage, but they have nice SS temp probes and more programming options than the STC-1000. The "set" light just indicates that you're in the programming menu.
 
Thanks for the tutorial, Misplaced Canuck. Being an electical idiot, I was glad to see your build and most importantly for me, the pictures.

I finished mine and plugged it in today.

Success!

photo-7-1.jpg
 
Thanks for the tutorial, Misplaced Canuck. Being an electical idiot, I was glad to see your build and most importantly for me, the pictures.

I finished mine and plugged it in today.

Success!

Good job! I built another one over the turkey day weekend, took me about 1 hour. :mug: [My neighbor is holding one hostage!]

M_C
 
I have one of those in my keezer, and two in my HERMS control panel. They are indeed single stage, but they have nice SS temp probes and more programming options than the STC-1000. The "set" light just indicates that you're in the programming menu.
TY much for the clarification. Looks like I'll have a single stage and just do the dual later. I do have a dual stage Ranco already and can still use the single in most cases.
 
Just wanted to say thanks. Followed the instructions a few weeks ago, and works like a champ! Also, my wife would like to thank you for putting up clear instructions I could understand so I didn't burn the house down. She appreciates it.
 
i'm still new to homebrewing only been doing it for just a year.. but am in the process of aquiring a small freezer and plan on making it into a "keezer". if i where to build one of these i can use this to control the temp of the keezer is that right?.
 
i'm still new to homebrewing only been doing it for just a year.. but am in the process of aquiring a small freezer and plan on making it into a "keezer". if i where to build one of these i can use this to control the temp of the keezer is that right?.
Yeup. There are some threads around here where people wire them up to their freezers mounted instead of freefloating as well. Oh, and check out this video I ran into the other day. It should be helpful for ya [ame=http://www.youtube.com/watch?v=z6PjiilVBXY&feature=related]Temp Controller STC-1000 - YouTube[/ame]
 
where did you purchase yours? there are two sellers that i found on ebay. one seller is in hong kong and the other one is in canada. or did you purchase your from someone in the states?
 
where did you purchase yours? there are two sellers that i found on ebay. one seller is in hong kong and the other one is in canada. or did you purchase your from someone in the states?
I am betting the Canadian's are made in China, so no matter - I would take whatever is cheapest. Make sure you get STC-1000 and 110v (or 220v depending on your location).

I caught the diff between the 110v and 220v units luckily, but I was dumb enough to think I found a great deal and pulled the trigger on a single stage when I was wanting a dual stage controller(ST-1000). Now, I'll have both once I get done, so I guess that's good :) My Kegerator really should have its own and a single stage will be fine on it.
 
Well, can't get my controller to power heat or cool side. I have attempted to reverse wiring for heat and cool with no change (white/blk) vs (blk/white)
I have the controller programmed, heat light and both cool light turn on as programmed, but no power sent to designated cord. I do realize there is a compressor delay when cool light flashes.
Going to hook up and program back up controller. Will report back.

did you remember to break the jumper cable?
 
Not, sure. Are you telling me that I can't just wire the power cord b/w directly into the cool connections, and heater cord b/w directly into the heat connections?
 
Not, sure. Are you telling me that I can't just wire the power cord b/w directly into the cool connections, and heater cord b/w directly into the heat connections?

correct. There are jumpers that make it so that if power is provided to one of the outlets both of the outlets have power. In order to make the outlets operate separately you need to break the jumper tab as pictured in post #3 the 3rd picture you can see that the jumper on the side without the ground post has been broken so that the controller can power the outlets separately.
 
I realized what I was thinking after my post, just competed the wiring and all works great. Thanks!
 
I just happened to skim through this thread not really knowing anything about it except that I have seen the thread title before. That being said, I thought it would be cool to get into lagering. Obviously, I will need to control my temp. I don't tinker much with electronics or temperature controllers so, I want to make sure I have my head wrapped around how this thing works...

Let's say I just put one of these controllers together. Could I... Buy a small stand alone freezer, bore a hole into the side, mount a fan where the hole is, plug the fan into the 'hot' side of this controller, plug the freezer into the 'cold' side, set my temp, drop my probe into my wort and go?

I suppose that would work. However, boring holes into fridges might not be the best idea since the coolant lines may be ruptured and then the fridge would be useless. also I dont know if the fridge would be efficient to control lagering temps with a large hole in the side.

there are cheaper models that are single stage though. If the sole purpose of this chamber is to lager in your house a single stage may be a better option than the dual stage. Since lagering temps are far below room temp you would most likely not need to heat it just cool it.
 
I just happened to skim through this thread not really knowing anything about it except that I have seen the thread title before. That being said, I thought it would be cool to get into lagering. Obviously, I will need to control my temp. I don't tinker much with electronics or temperature controllers so, I want to make sure I have my head wrapped around how this thing works...

Let's say I just put one of these controllers together. Could I... Buy a small stand alone freezer, bore a hole into the side, mount a fan where the hole is, plug the fan into the 'hot' side of this controller, plug the freezer into the 'cold' side, set my temp, drop my probe into my wort and go?

NO not at all. DO not do this. In a freezer the coolant lines are all around the entire box of the freezer. The lid is the only safe area to drill. Easiest way is just get the small chest freezer and use an external controller. The probe for the controller drops down inside the freezer and turns power on and off for the freezer as needed. Very very easy to wire up one of these controllers and they cost about 50 bucks to add on.
 
I suppose that would work. However, boring holes into fridges might not be the best idea since the coolant lines may be ruptured and then the fridge would be useless. also I dont know if the fridge would be efficient to control lagering temps with a large hole in the side.

there are cheaper models that are single stage though. If the sole purpose of this chamber is to lager in your house a single stage may be a better option than the dual stage. Since lagering temps are far below room temp you would most likely not need to heat it just cool it.

Sweet... That's more or less the answer I needed. I just wanted to make sure I had an understanding of how the controller works. I really don't have any plans on running out and buying a freezer that I could do this with... yet anyway... :)

Thanks!
 
NO not at all. DO not do this. In a freezer the coolant lines are all around the entire box of the freezer. The lid is the only safe area to drill. Easiest way is just get the small chest freezer and use an external controller. The probe for the controller drops down inside the freezer and turns power on and off for the freezer as needed. Very very easy to wire up one of these controllers and they cost about 50 bucks to add on.

Actually, I have a really small refrigerator (just big enough for a couple of 12 pak's), that isn't being used for anything. I'm thinking I can find a way to work the guts of it into a working fermentation chamber. I'll have to see if I can dig the guts out of it.
 
Actually, I have a really small refrigerator (just big enough for a couple of 12 pak's), that isn't being used for anything. I'm thinking I can find a way to work the guts of it into a working fermentation chamber. I'll have to see if I can dig the guts out of it.

Sure you can, search here and you should find a couple of threads where this was done.
 
Could I some how wire in a extra socket for a fan off of the same extension chord? Having four outlets instead of just two. Two being for the controller and two at constant power? If so could you guys give me help on wiring it in??
Thanks
 
Could I some how wire in a extra socket for a fan off of the same extension chord? Having four outlets instead of just two. Two being for the controller and two at constant power? If so could you guys give me help on wiring it in??
Thanks

You could use a 3-gang outlet and simply jump from one outlet to the next.

MC
 
At 110vac 16ga should handle right around 13A. This project is fused at 10A. 14ga gives you a little extra insurance at 17A for about the same money. 12ga should carry 23A at 110vac. That is a little overkill for this. My controller is on the way. I will likely use 14ga.
 
I don't. 16 ga has been fine.

I used a 16 gauge wire in one version, and I hooked up a small space heater on the lowest setting. The supply wire got hot enough that I decided to switch to 14ga. While 16 gauge may be enough for the low-running draw of a fridge, it would not consider it to be safe for a small space heater.

I would NOT recommend 16 gauge wire.

MC
 
Back
Top