I think I'm going to want a 20gallon one when you get it all set up. I'm going to need an extra two 1/2 coupler for the the HEX. What do you charge per extra coupling?
You are using an out of date browser. It may not display this or other websites correctly.
You should upgrade or use an alternative browser.
You should upgrade or use an alternative browser.
Interested in an Electric Kettle Set Up? Come on in....
- Thread starter SpikeBrewing
- Start date

Help Support Homebrew Talk - Beer, Wine, Mead, & Cider Brewing Discussion Forum:
This site may earn a commission from merchant affiliate
links, including eBay, Amazon, and others.
OP
OP
***UPDATE***
Our welder will be welding the finished 1" couplers into a few kettles this weekend. Once those are done I will do some testing on them. We should be ready to take orders by next week
The standard 20gal comes with (2) 1/2" couplers. Each additional coupler after that would be $20.
Our welder will be welding the finished 1" couplers into a few kettles this weekend. Once those are done I will do some testing on them. We should be ready to take orders by next week
I think I'm going to want a 20gallon one when you get it all set up. I'm going to need an extra two 1/2 coupler for the the HEX. What do you charge per extra coupling?
The standard 20gal comes with (2) 1/2" couplers. Each additional coupler after that would be $20.
Marchborne
Well-Known Member
The closer it is to plug and play the more interested I am. Electricity is an area where I get nervous with diy
THIS. I would also be interested in as plug-n-play a system as y'all could create. Although I'm guessing I brew on a smaller scale (still on 5 gallon batches) than most.
BTW: The 6-gal aluminum kettle arrived, and the partial-mash saison from it;'s first brew is happily churning away in the basement. Many thanks, the kettle looks like it'll work great for smaller batches on my glass stovetop.

OP
OP
THIS. I would also be interested in as plug-n-play a system as y'all could create. Although I'm guessing I brew on a smaller scale (still on 5 gallon batches) than most.
BTW: The 6-gal aluminum kettle arrived, and the partial-mash saison from it;'s first brew is happily churning away in the basement. Many thanks, the kettle looks like it'll work great for smaller batches on my glass stovetop.
A plug and play is something we want to do BUT there is a lot of liability there. In the mean time we will be recommending that any element wiring be done by an electrician. 240V is nothing to mess around with!
***UPDATE***
Our test elements (one 110V and one 240V) will be in this week. I will be picking up the test units today with the 1" couplers installed with the ground lead welded to that. Hopefully I'll have some pics tonight...... :rockin:
everty2007
Well-Known Member
Sweet cant wait to see the final product and results.
OP
OP
***BIG Update***
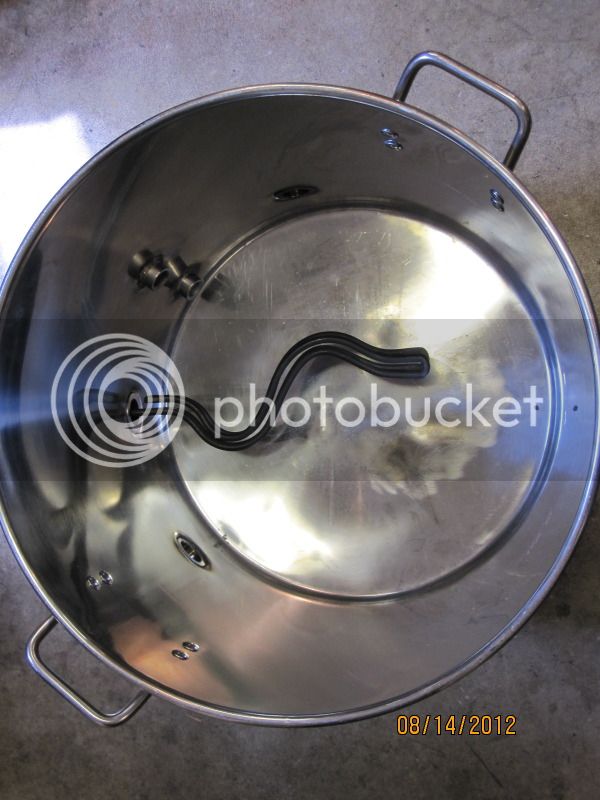
So we're almost there! Thanks for all the patience up until this point! The 'frankenkettle' is back with a bunch of 1" couplers welded into it. Below are the pics of the final product. You'll see that a 1" water heater element will screw all the way into the coupler. We have also welded on a 1/4-20 nut for use as a ground.
Many people have been asking for a 'plug and play' system. We will initially only offering the 1" coupler, ground lead and welding. We want to bring in an electrician to help develop a system since the liability is higher.
Enjoy...
1" coupler with ground lead
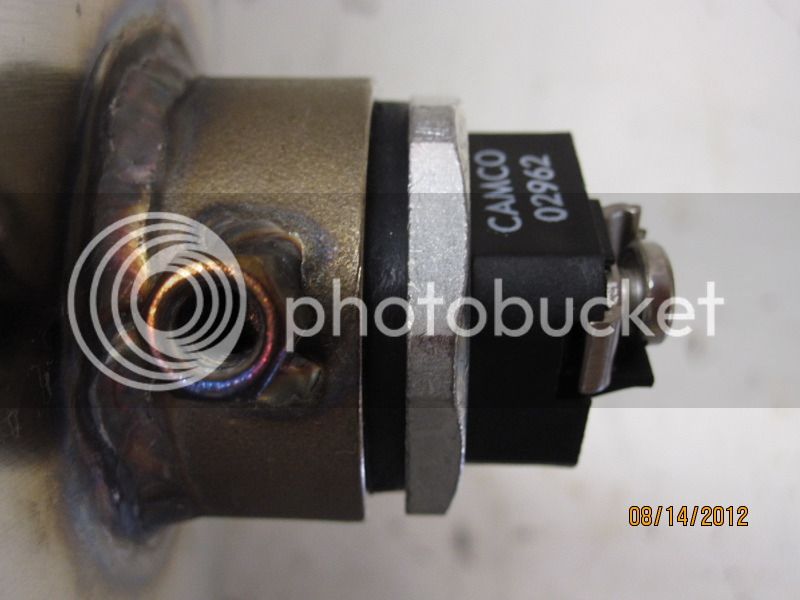
Camco 02963 5500W 240V water heater element installed
Heater element screwed in all the way without gasket

Heater element screwed in with gasket
So we're almost there! Thanks for all the patience up until this point! The 'frankenkettle' is back with a bunch of 1" couplers welded into it. Below are the pics of the final product. You'll see that a 1" water heater element will screw all the way into the coupler. We have also welded on a 1/4-20 nut for use as a ground.
Many people have been asking for a 'plug and play' system. We will initially only offering the 1" coupler, ground lead and welding. We want to bring in an electrician to help develop a system since the liability is higher.
Enjoy...
1" coupler with ground lead
Camco 02963 5500W 240V water heater element installed
Heater element screwed in all the way without gasket
Heater element screwed in with gasket
If you could come up with a nice housing for the element to shield the wires/connections from liquid that would be "plug n play" enough for 99% of people. Let them simply connect 3 wires to a H/D extension cord and just about anyone can do that. Something that easily affixes to cover the element base yet is 99.9% water-tight. Perhaps if the coupler were also threaded on the outside then a PVC cap with a cord-grip could thread right on, voila.
lotbfan
Well-Known Member
Even if you didn't want to make it completely assembled, a "kit" that had the parts all included and suggested assembly directions would make me bite, then if it isn't wired right and I burn my house down it would be on me i am assuming. Alternately a suggested addon list with items that are also available separately from your site that I could add in for the same shipment, and said directions would work for me. I just hate going through 5 different vendors, hoping that when I can't find the right piece that my guess at a like part will still work, and I usually give up, especially on electrical things. This is the main reason I never made a brutus 10 (no interest in trying to make the control panel and nobody sells reasonable priced models) and haven't done electric brewing yet (getting the parts for the element are too dicey for me).
If you could come up with a nice housing for the element to shield the wires/connections from liquid that would be "plug n play" enough for 99% of people. Let them simply connect 3 wires to a H/D extension cord and just about anyone can do that. Something that easily affixes to cover the element base yet is 99.9% water-tight. Perhaps if the coupler were also threaded on the outside then a PVC cap with a cord-grip could thread right on, voila.
There are many easy ways to cover the connection from JB Weld and a PVC coupling to more elaborate electrical boxes to simple heat shrink tubing.
Getting the 1" coupler on there is the biggest obstacle for most people and the grounding lug is really nice too.
Good job Spike
There are many easy ways to cover the connection from JB Weld and a PVC coupling to more elaborate electrical boxes to simple heat shrink tubing.
I know, I have 4 elements installed.
I was giving suggestions for making this less intimidating for someone who isn't a DIY person and doesn't want to do any of that. The term "plug-n-play" was used. My suggestion was to make it more "plug-n-play" for those people.
Something that I think many people don't understand is that having electric elements doesn't REQUIRE a sophisticated controller, etc. Mine are simply elements with glorified extension cords running to the wall outlets. Yeah, I don't have precision control, but I'm using them for HLT and BK...why do I need control there again? I've brewed a dozen batches with this setup and the selling point for me was that I could do it in the basement, which I can't do with propane and no stove is gonna heat 10g of wort.
It's not as intimidating as it seems, is all I'm saying.
It's not as intimidating as it seems, is all I'm saying.
uberg33k
Well-Known Member
I'd definitely agree that the BK just needs to be on/off and powerful enough to get a rolling boil going. That can be really simple. However, I'd think you'd want your HLT to have a bit more sophistication since strike temperature matters. If you're recirculating, that kind of control becomes even more important.Something that I think many people don't understand is that having electric elements doesn't REQUIRE a sophisticated controller, etc. Mine are simply elements with glorified extension cords running to the wall outlets. Yeah, I don't have precision control, but I'm using them for HLT and BK...why do I need control there again? I've brewed a dozen batches with this setup and the selling point for me was that I could do it in the basement, which I can't do with propane and no stove is gonna heat 10g of wort.
It's not as intimidating as it seems, is all I'm saying.
I'd definitely agree that the BK just needs to be on/off and powerful enough to get a rolling boil going. That can be really simple. However, I'd think you'd want your HLT to have a bit more sophistication since strike temperature matters. If you're recirculating, that kind of control becomes even more important.
Right, IF you're recirculating.
Look at it like this: When you use propane to heat strike water you just crank it up and watch the thermometer. When it get's where you want it, you turn off the heat and move the water to the MLT.
It's the same exact principle with a basic eHLT setup. Fire up element(s), watch thermometer, turn off when at temp.
I'm saying as a means to brew indoors with electricity, it can be incredibly simple. If you want more automation and sophistication, yes, you need temp control and such.
OP
OP
Even if you didn't want to make it completely assembled, a "kit" that had the parts all included and suggested assembly directions would make me bite, then if it isn't wired right and I burn my house down it would be on me i am assuming. Alternately a suggested addon list with items that are also available separately from your site that I could add in for the same shipment, and said directions would work for me. I just hate going through 5 different vendors, hoping that when I can't find the right piece that my guess at a like part will still work, and I usually give up, especially on electrical things. This is the main reason I never made a brutus 10 (no interest in trying to make the control panel and nobody sells reasonable priced models) and haven't done electric brewing yet (getting the parts for the element are too dicey for me).
A plug and play is in the works but we want the system to be fully tested.
I view giving an un-experienced person a 'kit' to giving someone a gun, magazine and bullets hoping they know how to use it. Everyone is so sue happy now-a-days that even good intentions get people in trouble. In the mean time we'll be offering just the 1" coupler and ground for the DIY's. The kit will be to follow.
OP
OP
Sorry to muddy-up your thread, Spike. Kudos on the coupler though. I had to drill another hole in my HLT for the ground wire...something I wasn't happy about.
Feel free to muddy. The open forum is a great place for customers to voice their opinions and vendors to design products based off those.
Idiot question on that electric coupler.
Can that be welded on from the outside only?
I've built my own RIMS, I'm super handy, but I'm not a welder. I've been thinking of converting an uncut keg into a still. I was wondering if I popped a hole in a keg with our taking the top off, if that coupler could be welded in place. I know nothing about welding so the answer might be no. If its yes, I could build a sweet electric still.
Any advice is appreciated.
Idiot question on that electric coupler.
Can that be welded on from the outside only?
I've built my own RIMS, I'm super handy, but I'm not a welder. I've been thinking of converting an uncut keg into a still. I was wondering if I popped a hole in a keg with our taking the top off, if that coupler could be welded in place. I know nothing about welding so the answer might be no. If its yes, I could build a sweet electric still.
Any advice is appreciated.
Judging from the pictures, I'd say it WAS welded from the outside.
OP
OP
Idiot question on that electric coupler.
Can that be welded on from the outside only?
I've built my own RIMS, I'm super handy, but I'm not a welder. I've been thinking of converting an uncut keg into a still. I was wondering if I popped a hole in a keg with our taking the top off, if that coupler could be welded in place. I know nothing about welding so the answer might be no. If its yes, I could build a sweet electric still.
Any advice is appreciated.
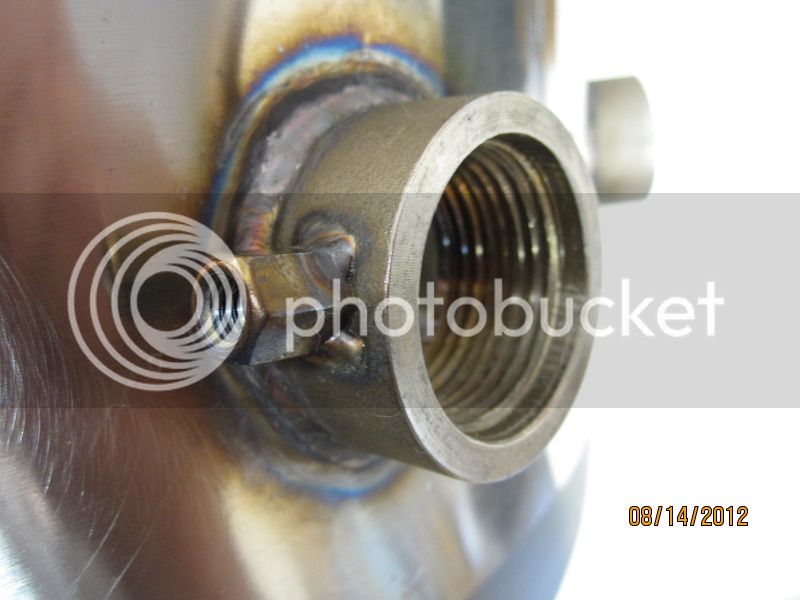
The coupler was welded from the outside. It's not as easy as popping a hole in welding. We special drills, punches and tooling to get the coupler into place. If that's not done you'll have a terrible looking backside weld. You can also back purge with argon but that costs $$. Welding stainless is not easy (although everyone thinks it is). So many times people will bring their stuff into a welder that has "welded stainless 1000's of times" but their end product ends up like this:

We could have it welded up if you sent it to us but shipping is going to be $$$
If you could come up with a nice housing for the element to shield the wires/connections from liquid that would be "plug n play" enough for 99% of people. Let them simply connect 3 wires to a H/D extension cord and just about anyone can do that. Something that easily affixes to cover the element base yet is 99.9% water-tight. Perhaps if the coupler were also threaded on the outside then a PVC cap with a cord-grip could thread right on, voila.
They exist:
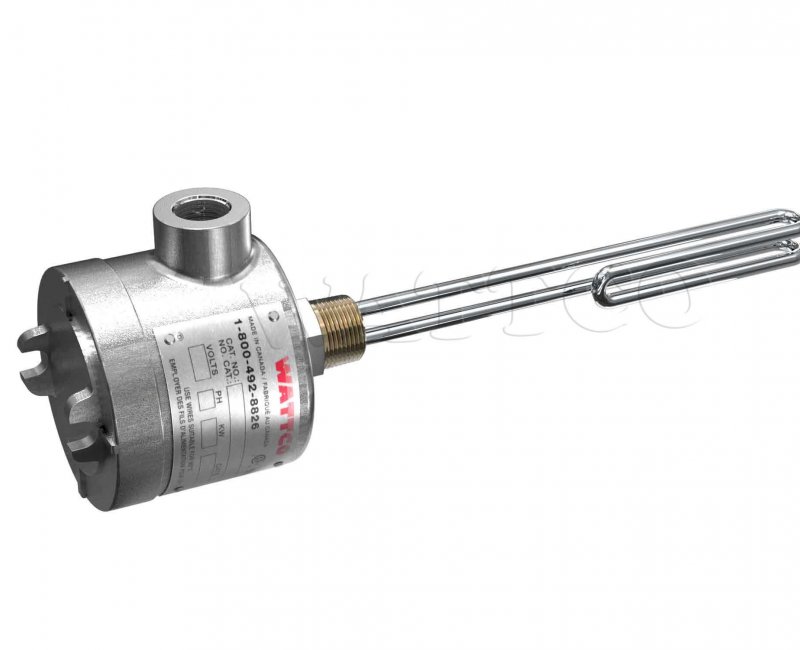
Wattco or Chromalox makes them and they only cost $200-$400 and up
") These are of course commercial/industrial products. It sure would be nice if Camco or some other manufacturer would make something like this more affordable but I'm sure the electric brewer market is not large enough to make it worthwile.
These are of course commercial/industrial products. It sure would be nice if Camco or some other manufacturer would make something like this more affordable but I'm sure the electric brewer market is not large enough to make it worthwile.The coupler threaded on the outside is a good idea but any leaks would end up inside the electrical box.
kzimmer0817
Well-Known Member
Regarding the following 2 photos from Spikebrewing:
Would it not be quite easy to install a Kal-like electrical box to this? Perhaps like that of the DIYers who use a single gang box instead of the double. Would placing the metal plate of the enclosure between the gasket and the element (or between gasket and kettle) provide for a water tight enclosure?
Another question: Since I am interested in the 10 gallon kettle: Ben mentioned that he was considering making the 10 gallon kettle the 110/120V and using 220V in the 15+ gallon kettles. From what I've read on these forums, I have been under the impression that it's difficult to bring 6-7 gallons (pre-boil volumes for 5g BIAB batches) to a boil using the elements available at 120V. True, some guys are doing this with 2 elements connected to separate circuits, but I only want the simplicity of a single element/circuit.
Thanks,
Keith
***BIG Update***
Camco 02963 5500W 240V water heater element installed
Heater element screwed in with gasket
Would it not be quite easy to install a Kal-like electrical box to this? Perhaps like that of the DIYers who use a single gang box instead of the double. Would placing the metal plate of the enclosure between the gasket and the element (or between gasket and kettle) provide for a water tight enclosure?
Another question: Since I am interested in the 10 gallon kettle: Ben mentioned that he was considering making the 10 gallon kettle the 110/120V and using 220V in the 15+ gallon kettles. From what I've read on these forums, I have been under the impression that it's difficult to bring 6-7 gallons (pre-boil volumes for 5g BIAB batches) to a boil using the elements available at 120V. True, some guys are doing this with 2 elements connected to separate circuits, but I only want the simplicity of a single element/circuit.
Thanks,
Keith
You will have a hard time boiling a 5g. batch (~6.5g boil) with a single 120v element, yes. I can attest to this. A 2000w LWD element would be your best bet, but it still would take 26 minutes from 160* to get to a boil...guess that's not horrible, but that's also at 95% efficiency which means you better insulate the kettle well, too.
Now, as a HLT, no problem. You're probably crushing grain and doing other things while heating strike-water anyways.
Now, as a HLT, no problem. You're probably crushing grain and doing other things while heating strike-water anyways.
- Joined
- Nov 6, 2007
- Messages
- 62,016
- Reaction score
- 6,922
Couplers look good. Looking forward to a complete plug in play. I've got time to wait
kzimmer0817
Well-Known Member
I hate to keep beating the horse, but I'd like to restate the question that I asked three postings up. I'm hoping that knowledgeable folks who have built e-kettles will offer answers.
[Looking at the photo of the element installed into the fitting on the new Spikebrewing e-kettle] Would it not be quite easy to install a Kal-like electrical box to this? Perhaps like that of the DIYers who use a single gang box instead of the double. Would placing the metal plate of the enclosure between the gasket and the element (or between gasket and kettle) provide for a water tight enclosure?
I am about to either (1) build an e-kettle out of the keg I just cut or (2) purchase one of these from Spike Brewing. At first glance, and after reading thru Kal's description of his build, I don't see why it wouldn't work to place the metal cover plate between the element and the gasket in this above photo.
Impatiently, but respectfully,
Keith
Would be better to place the element connections on the inside of the box and let the element face make the seal. Attach the back of the element to the box. That way if there is a leak it won't be inside the box with the connections
https://www.homebrewtalk.com/f170/show-us-your-element-housings-pots-how-did-you-do-212079/index2.html#post2506114
Hole needs to be 1" conduit punch or 1 & 3/8" wide I believe
Also, take a look at BoobyM's welding spuds and the silver soldering thread for the element connections to the kettle.
Good luck
kzimmer0817
Well-Known Member
Would be better to place the element connections on the inside of the box and let the element face make the seal. Attach the back of the element to the box. That way if there is a leak it won't be inside the box with the connections
1. Exactly how do you attach the back of the element to the box?
2. If the element is screwed into a fitting as Spikebrewing will be doing, I would think that the attachment of the box to the element must be movable. What position will the box be in when the element has been tightened.
3. Element position isn't as important if the element is slid thru an opening in the kettle with the o-ring and nut being on the inside of the kettle.
Thanks,
Keith
kzimmer0817
Well-Known Member
I may have answered my own question. Scroll down to postings #6 and #7 of the following thread:
https://www.homebrewtalk.com/f170/show-us-your-element-housings-pots-how-did-you-do-212079/
If I'm looking at these correctly, this is exactly what I asked in my previous messages. The photo by hatfieldenator in message #6 of the above thread shows an element being screwed into a coupling just like what Spikebrewing will be doing. Same thing by trigger in #7 except that he used a single box.
Cut a hole in the metal box just large enough to slip over the element mount. pass the element thru the hole in the box, put the gasket onto the element, then screw the element into the threaded coupling.
I'd appreciate any comments,
Keith
BlackNotch
Well-Known Member
Nice! Will there be an option on the coupling placement?
OP
OP
Well guys it's not looking good for the welded electric coupler. After discussing it with a lawyer friend they advised against it because of the high risk. So it looks like the months of machining, our planning and your planning might be in vein. We would love to see this happen but UL ratings, insurance, etc make this project very unappealing. It only takes one person to get hurt and we're hurting.
Sorry guys....
Sorry guys....
What if I only want a 1"coupler welded on, I have a really big pump.
kzimmer0817
Well-Known Member
Well guys it's not looking good for the welded electric coupler. After discussing it with a lawyer friend they advised against it because of the high risk. So it looks like the months of machining, our planning and your planning might be in vein. We would love to see this happen but UL ratings, insurance, etc make this project very unappealing. It only takes one person to get hurt and we're hurting.
Sorry guys....
This is certainly bad news. So you can't simply offer the option of having a threaded coupler (that happens to have a little threaded screw hole in the side) welded to the side or back of the kettle for the brewer to use as s/he wishes?!?
What about an option of including a welded ferrule for the tri-clamp adapters.
Kal is somehow able to sell the element and mounting box in kit form as well as ready-made. It's rather obvious what this is intended for: installation thru the wall of a kettle full of liquid.
http://www.theelectricbrewery.com/heating-element-kits
Thanks for trying so hard.
Keith
OP
OP
What if I only want a 1"coupler welded on, I have a really big pump.
(wink wink) This is usually how I operate but it seems the risk is really high for something like this.
This is certainly bad news. So you can't simply offer the option of having a threaded coupler (that happens to have a little threaded screw hole in the side) welded to the side or back of the kettle for the brewer to use as s/he wishes?!?
What about an option of including a welded ferrule for the tri-clamp adapters.
Kal is somehow able to sell the element and mounting box in kit form as well as ready-made. It's rather obvious what this is intended for: installation thru the wall of a kettle full of liquid.
http://www.theelectricbrewery.com/heating-element-kits
Thanks for trying so hard.
Keith
It's something we'll have to look into more. In this day and age you need to cover your ass so much when it comes to legal things like this. I'm just as disappointed! We've spent a lot of time and money into this project. We won't give up until all options are explored though.
lotbfan
Well-Known Member
can you do a kettle with just an extra hole in it, i may then choose to add any sort of innocent weldless fitting into it that i wish (i just dont have the tools to make my own hole)?
BlackNotch
Well-Known Member
That sucks for your business. What about putting the coupling on there, and not specifying what it's intended to be used for?
OP
OP
can you do a kettle with just an extra hole in it, i may then choose to add any sort of innocent weldless fitting into it that i wish (i just dont have the tools to make my own hole)?
We could do this for you.
That sucks for your business. What about putting the coupling on there, and not specifying what it's intended to be used for?
I would love to do the wink wink routine but the risk is too high.
Yeah, maybe have the options for the 1" coupling but take the grounding lug off there....I think the grounding lug would be kind of hard to talk around....
Like I said before we're going to try and figure something out so we can offer this to you guys!
uberg33k
Well-Known Member
Well guys it's not looking good for the welded electric coupler. After discussing it with a lawyer friend they advised against it because of the high risk. So it looks like the months of machining, our planning and your planning might be in vein. We would love to see this happen but UL ratings, insurance, etc make this project very unappealing. It only takes one person to get hurt and we're hurting.
Sorry guys....
How much would the UL certification cost? Maybe a Kickstarter would be in order?
Would it be possible to shift the cost to the supplier of your kettles? Basically, give them the specs for the heating coupler and then have them produce it? I would think that would shift the liability to them, since no one (sane) sues Home Depot if they buy a faulty electrical outlet from them.
If all that doesn't work out, would you consider open sourcing your plan for the coupling?
HighGravity is a much bigger operation overall than Spike is. And an e-kettle is a niche of a niche business, can't expect him to go overboard on this.
Seriously guys, it's really not that hard to mount an element. Weldless, dimple tool, weld a coupling, weld/solder a welding spud - lots of ways to do it that really aren't difficult. You just have to read up on them and this forum is a great place to do so.
Seriously guys, it's really not that hard to mount an element. Weldless, dimple tool, weld a coupling, weld/solder a welding spud - lots of ways to do it that really aren't difficult. You just have to read up on them and this forum is a great place to do so.
Similar threads
- Replies
- 1
- Views
- 363
- Replies
- 0
- Views
- 710
- Replies
- 3
- Views
- 745
- Replies
- 4
- Views
- 689
North Carolina
20g Electric Colorado Brewing System (10g final)
- Replies
- 2
- Views
- 1K
