Dogface Brewing Co. Keezer Build...Lots of Pics

Homebrew Talk - Beer, Wine, Mead, & Cider Brewing Discussion Forum

Help Support Homebrew Talk - Beer, Wine, Mead, & Cider Brewing Discussion Forum:

This site may earn a commission from merchant affiliate links, including eBay, Amazon, and others.

DogFace_Brewing

Well-Known Member
Joined
Jan 23, 2011
Messages
247
Reaction score
9
Location
Huntley
Well I am already of sick of doing bottles, so I am starting my keezer build :rockin:

I am starting off slow but wanted to document my little project for myself, so no place better then here!!

I bought a 5 CF GE Chest Freezer from Sams Club for $168 shipped to start. It gets dropped off on Thursday (3/17/2011) and I can't wait!!! After that purchase I went over to Midwest Supplies website and picked up their Brew Logic Dual Tap Kit which will arrive on Tuesday(3/15/2011) I went with Ball Lock Kegs after ready up on the 2 different styles on HBT. I also picked up a Analog Thermostat control to regulate the temp from Midwest. I based this purchase on budget and also the great reviews it got. Most likely when I have more money I will put in a digital display, but that is not in the budget just yet.

Since I wont get my orders for a couple days I start messing around on Google Sketch Up and came up with the design I am shooting for.
There are 2 keezers in the picture, but I am only building one....the 2 show with casters on and also with side door open to get a all around idea of the final product. I DID DECIDE to put a trim around the bottom to cover the casters and put interior hinges on them so you cant see them but you will be able to lift the trim up to get access to the locks on the casters...pretty nifty :O)
bothkeezersideview.jpg

closeuptop.jpg


I am still debating on doing frosted glass in the front with some rope lighting from under, but I have not 100% convinced I want that yet, so that will have to come later.

I am also debating on making the side door a chilled area or not buy just extending the casing and top and insulating the interior and putting a small foam door wrapped in wood to cover it.....still working on it. I love having the idea of the side door to keep red wine bottles, and some beer bottles while they warm condition so I think keeping it rom temp will be best. Plus it is a great area for beer glasses as I hate chilled glasses. :mug:

03/13/2011 Progress
Got aroudn to building the collar for the keezer today so I can get a extra keg on the hump in the future. Went with pine, since I wont see this part anyways since it will be covered with a "sleeze" wrapping the whole keezer after it is finished.

IMG_0009.jpg

Since I done have clamps, I decided to get a little help holding the boards straight from doubled sided tape that is used for insulating also...worked out great!!
IMG_0011.jpg

Installing the brackets
IMG_0010.jpg

Then did some foam insulation...first time using it and I got a little crazy but I can trim off all the extra once it's dry
IMG_0015.jpg

Found out after readin the can :drunk: that once you start using foam insulation, you have to use it all...welll not to waste it I insulated all the boards which I will sand down and make smooth so I can wrap in water resistant wrapping
IMG_0017.jpg


And that's it for now. The foam is drying and I and excited to move on to the next step!! Time for a home brew and to relax with the SWMBO who made this keezer build possible by getting a job that pays ALOT more then she used to make WOOOHOOOO!!! More updates to come!!
 
Like it, I plan on making a keezer here soon too, once i get a job that pays more that unemployment. I have an old chest freezer that has a temp control that goes up to a temp of 35degrees ice cold beer. If my measurements are correct i should be able to store up to 7corny kegs. I want to have three taps on it. Im gonna build a nice wood frame around it with a marble top. Lets just hope i get a job soon so i can start buying the stuff i need.
 
Like it, I plan on making a keezer here soon too, once i get a job that pays more that unemployment. I have an old chest freezer that has a temp control that goes up to a temp of 35degrees ice cold beer. If my measurements are correct i should be able to store up to 7corny kegs. I want to have three taps on it. Im gonna build a nice wood frame around it with a marble top. Lets just hope i get a job soon so i can start buying the stuff i need.

I would say get another thermostat when you do it...since not all beer taste great at 35 degrees. I like having the option of raising the temp a bit to 45-50 so I can enjoy the flavors more of my stouts...but to each his own right :O) Good luck on your build!!
 
I think it would have been way easier to just buy 1" Foam board. It's 10 bucks a sheet and cuts all to easy. You could have lined your boards with it and saved a whole lot of troubles. Not much more cost than your can of spray foam. Just my $.02
 
I agree on the 1" Foam board, but it looks like you are on your way to a great built. Keep us up-dated with the pictures.
 
The horizontal piece with your brewery name on it does look great, however, you're building the collar so that you can have 3 kegs inside, but you're tower is only going to allow you to pour 2 at a time.

I can see the benefit of having the space for carbing a 3rd keg, but why not add a 3rd tap to that middle section that has your name on it? OR make the whole tower more of a T shape, so that the horizontal part has the brewery name and the vertical part can be wide enough to house 3 taps.

This is all getting pretty petty since 99% of us would kill to ahve what you have sketched up, but it's just my $.02
 
Looks like a fun build!

Suggestion/comment: you'll want to find a way to extend the taps out a little bit more from the body of the tower, or else all of you drips will be pretty close to the base. Some people build a small overhang in (and run lights underneath). I chose to take advantage of the longer shanks that I had purchased and put a couple of rosette moldings (http://www.homedepot.com/Building-Materials-Moulding-Millwork-Moulding/h_d1/N-5yc1vZara1Z1z14084/R-202081922/h_d2/ProductDisplay?langId=-1&storeId=10051&catalogId=10053) and drilled a hold for the shank. It allowed me to not have to use the crappy black plastic shank guard that comes with the shanks.
 
I think it would have been way easier to just buy 1" Foam board. It's 10 bucks a sheet and cuts all to easy. You could have lined your boards with it and saved a whole lot of troubles. Not much more cost than your can of spray foam. Just my $.02

No you are correct...just wanted to use the can since once you use it you have to use all of it...plus it gives me something else to do while i am waiting on the freezer to be dropped off. It was pretty easy to smooth out thought...just a knife and some sand paper.
 
I like that horizontal piece with your brewery name engraved on it. What are you planning on using for it?

I went shopping around today for that...thinking of going with stainless steel and getting it custom laser cut....then blackening it. Still pricing out the cutting part before I made my mind up 100%
 
The horizontal piece with your brewery name on it does look great, however, you're building the collar so that you can have 3 kegs inside, but you're tower is only going to allow you to pour 2 at a time.

I can see the benefit of having the space for carbing a 3rd keg, but why not add a 3rd tap to that middle section that has your name on it? OR make the whole tower more of a T shape, so that the horizontal part has the brewery name and the vertical part can be wide enough to house 3 taps.

This is all getting pretty petty since 99% of us would kill to ahve what you have sketched up, but it's just my $.02

I am thinking down the road I can take off the name plate and add a Nitro tap for my stouts, but since that is very pricey I am sticking with just 2 taps for now and having the collar will allow cold fermenting or laggering 3 kegs while I am on vacation and the other taps are dry :mug:
 
Looks like a fun build!

Suggestion/comment: you'll want to find a way to extend the taps out a little bit more from the body of the tower, or else all of you drips will be pretty close to the base. .

I actually measured it out and the drips will be caught in the try no problem, the sketch up might not show it all that well, but the 2 taps are actually set forth on the post and the sign is set back. The posts will only be 1/4" from the drip tray cutout, so with a drain installed it should not be a issue, but thank you for the suggestion!!! :mug:
 
Only a small update:
Still waiting on the freezer but had some time to run and get the base and the casters.

Went with 1/2" MDF 24" x 36" for the base. This will allow a open back design and 3" on each side of the freezer for air circulation.

Also went with 2" casters rated at 125lb each since I figure total weight with 3 full corny keg, gas tank, all the wood when finished, freezer, etc. will be just under 375lb plus taking into the fact that people might lean on it while hanging out drinking my AWESOME BEER!!!. I figure better safe then sorry!

IMG_0023.jpg
 
YAAAAHHH BABY!!! Came home from work to see a box of new toys!! Everyday we are getting closer and closer to the final product! Kegs were not in to bad shape either. Some little dings and dents. Just a quick wash in Oxy Clean inside and out, and now they are filled with hot water and Star San sitting overnight. I will be picking up some tools to polish these babies up also....can't have a sexy Keezer and junk sitting inside!!

Had to have a glass of Oatmeal Stout to celebrate!! :ban:

IMG_0025.jpg
 
Well the fridge was dropped off and the collar and thermostat were installed.

81528890.jpg

4021df6f.jpg

af334216.jpg


Also kegged a Liberty Cream Ale and a Autumn Amber both from Midwest last night. A great way to celebrate ST Paddy day! Kegs are now carbing and chilling and I will be starting the wood wrap and top for the Keezer this weekend.
 
Lookin' good, I've been going back and forth over doing a collar on mine. Whats the height on that bad boy? and after the finished top?
 
If this thing turns out 1/2 as good as your google sketch mock up, it is going to be KICK A$$! The brewery name plate spanning between the two towers is cool as hell. Nice work so far! :mug:
 
40Below said:
Lookin' good, I've been going back and forth over doing a collar on mine. Whats the height on that bad boy? and after the finished top?

The collar is 6" pine. The keezer sits on 1/2" mdf with 2" casters. When I get off work I will post full height dimensions.


UPDATED:
Keezer is 43.5" tall from floor to top of the freezer top now. This is NOT including the wood that will be placed on the freezer top once we have the wood casing built.
 
No you are correct...just wanted to use the can since once you use it you have to use all of it...plus it gives me something else to do while i am waiting on the freezer to be dropped off. It was pretty easy to smooth out thought...just a knife and some sand paper.

I think half the fun we have is building the new toy! I'm glad your having fun! The build looks great so far. :mug: SWMBO hate when I take on these types of projects. The consume all my free time.
 
Is the back panel of the enclosure open or vented in some way? These things can run pretty hot when the compressor is on.
 
Just couldn't wait.

I took the money I was suppose to use to build the wood casing for the Keezer and spent it on PERLICKS :rockin::rockin::rockin: instead LOL....I just had to have them!!! I will build a temp Faucet holder until I have the money to get the wood casing done....I just had to have them now!!

I think this has to do with pulling out a beer line from the Keezer late last night redy to poor another beer, it had a picnic tap on it, and you guessed it, the picnic tap got caught on another beer line and opened WIDE UP!!!! Beer all inside the freezer! I pulled the beer lines off and said screw it...I am holding off on the wood trim around the Keezer and buying Perlicks!!!

2-Perlick PERL 525SS Keg Beer Faucet - Stainless Steel-$55.70
2-SHANK3 - 3" Long Shank with Nipple Assembly - 3/16" I.D. Bore-$27.80
2-Black Plastic Beer Faucet Knob-$4.64
1-Heavy Duty Faucet Wrench - Red Handle-$4.18
2-Worm Drive Clamps for 3/16 or 5/16 Inch ID Tubing-$2.32

Subtotal $94.64 :ban:
Shipping - FedEx Ground-$10.24 :mad:
Total Price $104.88

Best price I found shipping to Chicago. Bought everything from BeverageFactory.com:mug:
 
Well we have made some really good progress. Perlicks were dropped off and the coffin boxes have been built. Picked up some rope lighting and also went shopping for tiles for the top. Tomorrow I will be finally attaching the top to the freezer lid and both taps will be functioning!! I will be getting around to tiling the top and building the wood around the keezer over the next month as money pops up, but for now I will just have to deal with a half way keezer. Here are some pics!!

Perlicks!!
IMAG0143.jpg


Coffin box all ready for taps
IMAG0144.jpg

IMAG0145.jpg


Single tap installed in one box
IMAG0147.jpg


The boxes were built for easy access when needed. They will be covered in the back with wood on a hinge so it can be lifted up to change the shanks or plumbing if needed:
IMAG0148.jpg

Perfect Height for a tall boy!!
IMAG0150.jpg
 
Test fitting both taps:
IMAG0152.jpg

IMAG0153.jpg


And with the bridge installed
IMAG0155.jpg


Drilled 1" holes for rope lighting
IMAG0156.jpg


House lights on with rope lighting
IMAG0159.jpg


House lights off with rope lighting
IMAG0158.jpg
 
Waiting on tile to be picked up for the top and also for the drip tray to come in. So this is what we have so far.

IMAG0162.jpg

IMAG0163.jpg


It might not be pretty right now, but it pours smooth creamy beer so it's all good!!! :ban:
 
I'm new to keezer builds, so I have a question.

Do you just drill holes in the lid/cover of the freezer for the hosing, etc to reach the taps?


Looks great, can't wait to see it finished.
 
That is correct sir. For mine I used bimetal hole saws. It's also very beneficial to cool the coffin as well to keep the beer lines close to serving temp. Prevents CO2 from coming out of solution creating foaming issues.

Hey Dogface....what is your plan for cooling the towers?

BTW....I love the dual tower design!!!


I'm new to keezer builds, so I have a question.

Do you just drill holes in the lid/cover of the freezer for the hosing, etc to reach the taps?


Looks great, can't wait to see it finished.
 
That is correct sir. For mine I used bimetal hole saws. It's also very beneficial to cool the coffin as well to keep the beer lines close to serving temp. Prevents CO2 from coming out of solution creating foaming issues.

Hey Dogface....what is your plan for cooling the towers?

BTW....I love the dual tower design!!!

Thanks for the love!! I have the lines just running through the towers and they are wrapped in black insulation. Like this:

IMAG0184.jpg


I have not had any foaming issues yet that I can't control so I might not be installing fans. I did however buy thise from Amazon just in case I need them since it was only $5 shipped. It has 3 fans on it which was cheaper then buying the fans alone at $4 each, I will just disassemble it and use only the fans that have these cool little blue LEDS on them...but not sure if I am going to use them to cool the towers yet or maybe just install the whole cooling pad inside the keezer so they will circulate the air and when I open the Keezer I will have some light :mug:
IMAG0185.jpg

More info to come.....
 
I'm new to keezer builds, so I have a question.

Do you just drill holes in the lid/cover of the freezer for the hosing, etc to reach the taps?


Looks great, can't wait to see it finished.

Thanks for the love....here is how my lines look in the inside

IMAG0186.jpg


I used the same 1" hollow drill bit to drill throught the freezer top that I used to cut my 1" holes through the MDF to feed the lines through the top of the Keezer. I didn't think it would work on the Keezer lid since it is aluminum but it did and saved me a bunch since I did not have to buy a step bit which are expensive ($40 by me). The 1" drill bit was only $5.79 and worked wonders.

The lines are feed through the freezer lid and then the top of the keezer, they are then wrapped in black insulation (see previous picture) and the black insulation is tucked into the top of the MDF board around the lines so it does not let any air escape from the freezer....works well for me :mug:
 
Havent gotten around to buying the tile or wood for the walls yet.....BUT....the all important drip tray came in today!!! Now I just need to drill a hole in it and add the drain....she is coming together slowly but Shirley....hmmm...maybe I will call her Shirley! :mug:

driptray.jpg
 
FINALLY got around to buying the tile for the top. Not my first choice but SWMBO likes it. This is a pictures of the dry fit thats why some pieces are not laying flat yet...just threw it on there to take a picture. Now it's time to glue it and grout it. Wood sides coming up later in the week as I am finally taking some time off work to relax!!

IMG_0067.jpg
 
Nice build!
I used that same tile on a radiator cover a couple months ago and have the same great drip tray...;^)
 
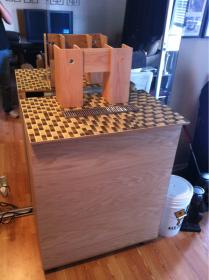
Ok...wood sides are on...just gotta stain it and put the trim on. Went a little different from my original design but whatever..things change :)

image-2446367054.jpg
 

Latest posts

Back
Top